Hadoop组件部署

Hadoop组件部署

Hadoop部署 - 严千屹 (qianyios.top)本笔记建立在Hadoop伪分布机子上,可以前往查看安装机子

Zookeeper

名称 ip
zk01 192.168.48.11
zk02 192.168.48.12
zk03 192.168.48.13

设置hosts

1
2
3
4
5
6
[root@localhost ~]# cat /etc/hosts
127.0.0.1 localhost localhost.localdomain localhost4 localhost4.localdomain4
::1 localhost localhost.localdomain localhost6 localhost6.localdomain6
192.168.48.11 zk01
192.168.48.12 zk02
192.168.48.13 zk03

更改主机名

1
hostnamectl set-hostname zk01 && bash

检查java版本

1
2
3
4
[root@zk01 ~]# java -version
java version "1.8.0_162"
Java(TM) SE Runtime Environment (build 1.8.0_162-b12)
Java HotSpot(TM) 64-Bit Server VM (build 25.162-b12, mixed mode)

检查hadoop版本

1
2
3
4
5
6
7
[root@zk01 ~]# hadoop version
Hadoop 3.1.3
Source code repository https://gitbox.apache.org/repos/asf/hadoop.git -r ba631c436b806728f8ec2f54ab1e289526c90579
Compiled by ztang on 2019-09-12T02:47Z
Compiled with protoc 2.5.0
From source with checksum ec785077c385118ac91aadde5ec9799
This command was run using /usr/local/hadoop/share/hadoop/common/hadoop-common-3.1.3.jar

安装zookeeper

1
2
3
4
5
6
7
8
9
10
11
12
13
14
15
16
17
18
19
20
21
tar -xf apache-zookeeper-3.8.0-bin.tar.gz -C /opt
echo "export ZOOKEEPER_HOME=/opt/apache-zookeeper-3.8.0-bin" >> /etc/profile
echo "export PATH=\$ZOOKEEPER_HOME/bin:\$PATH" >> /etc/profile
source /etc/profile
cd /opt/apache-zookeeper-3.8.0-bin/
cp conf/zoo_sample.cfg conf/zoo.cfg

vi conf/zoo.cfg
tickTime=2000
dataDir=/opt/apache-zookeeper-3.8.0-bin/data
clientPort=2181
initLimit=10
syncLimit=5
maxClientCnxns=60
server.1=zk01:2888:3888
server.2=zk02:2888:3888
server.3=zk03:2888:3888

mkdir /opt/apache-zookeeper-3.8.0-bin/data
echo 1 > /opt/apache-zookeeper-3.8.0-bin/data/myid
cat /opt/apache-zookeeper-3.8.0-bin/data/myid

关机克隆出两台机 zk02 zk03

zk02 192.168.48.12

1
2
vi /opt/apache-zookeeper-3.8.0-bin/data/myid
2

zk03 192.168.48.13

1
2
vi /opt/apache-zookeeper-3.8.0-bin/data/myid
3

互相ping测试连通性

1
2
3
ping zk01
ping zk02
ping zk03

能互通说明成功

开启zookeeper服务

需开启两台才能看见Mode: follower

1
2
3
zkServer.sh start
zkServer.sh status
zkServer.sh stop

HBase安装

安装hbase

1
2
3
4
5
6
7
8
9
10
11
12
13
14
15
16
17
18
19
20
21
22
23
24
25
[root@hadoop ~]# ll
-rw-r--r-- 1 root root 232190985 317 19:37 hbase-2.2.2-bin.tar.gz

tar -xf hbase-2.2.2-bin.tar.gz -C /usr/local/
mv /usr/local/hbase-2.2.2 /usr/local/hbase
echo "export HBASE_HOME=/usr/local/hbase" >> /etc/profile
echo "export PATH=\$PATH:\$HBASE_HOME/bin" >> /etc/profile
source /etc/profile

------------------------------------------------------------------------
[root@hadoop ~]# vi /usr/local/hbase/bin/hbase
CLASSPATH=${CLASSPATH}:$JAVA_HOME/lib/tools.jar:/usr/local/hbase/lib/*

[root@hadoop ~]# sed -i "s/CLASSPATH=\${CLASSPATH}:\$JAVA_HOME\/lib\/tools.jar/CLASSPATH=\${CLASSPATH}:\$JAVA_HOME\/lib\/tools.jar:\/usr\/local\/hbase\/lib\/*/g" /usr/local/hbase/bin/hbase
------------------------------------------------------------------------

[root@hadoop ~]# hbase version SLF4J: Class path contains multiple SLF4J bindings.
SLF4J: Found binding in [jar:file:/usr/local/hadoop/share/hadoop/common/lib/slf4j-log4j12-1.7.25.jar!/org/slf4j/impl/StaticLoggerBinder.class]
SLF4J: Found binding in [jar:file:/usr/local/hbase/lib/client-facing-thirdparty/slf4j-log4j12-1.7.25.jar!/org/slf4j/impl/StaticLoggerBinder.class]
SLF4J: See http://www.slf4j.org/codes.html#multiple_bindings for an explanation.
SLF4J: Actual binding is of type [org.slf4j.impl.Log4jLoggerFactory]
HBase 2.2.2
Source code repository git://6ad68c41b902/opt/hbase-rm/output/hbase revision=e6513a76c91cceda95dad7af246ac81d46fa2589
Compiled by hbase-rm on Sat Oct 19 10:10:12 UTC 2019
From source with checksum 4d23f97701e395c5d34db1882ac5021b

HBase配置

1
2
3
4
5
6
7
8
9
10
11
12
13
14
15
16
17
18
19
echo "export JAVA_HOME=/usr/lib/jvm/jdk1.8.0_162" >> $HBASE_HOME/conf/hbase-env.sh
echo "export HBASE_CLASSPATH=/usr/local/hbase/conf" >> $HBASE_HOME/conf/hbase-env.sh
echo "export HBASE_MANAGES_ZK=true" >> $HBASE_HOME/conf/hbase-env.sh

vi $HBASE_HOME/conf/hbase-site.xml
<configuration>
<property>
<name>hbase.rootdir</name>
<value>hdfs://yjx48:9000/hbase</value>
</property>
<property>
<name>hbase.cluster.distributed</name>
<value>true</value>
</property>
<property>
<name>hbase.unsafe.stream.capability.enforce</name>
<value>false</value>
</property>
</configuration>

HBase启动

1
2
3
4
5
6
7
8
9
10
11
12
13
14
15
16
17
18
19
start-all.sh 
start-hbase.sh
[root@hadoop hbase]# jps
16532 ResourceManager
22502 HMaster-----------
15799 NameNode
16697 NodeManager
23097 Jps
15962 DataNode
22666 HRegionServer-----------
16223 SecondaryNameNode
22431 HQuorumPeer
[root@hadoop ~]# hbase shell
hbase(main):001:0> list
TABLE
0 row(s)
Took 0.3118 seconds
=> []
hbase(main):002:0> exit

访问网页

ip:16010

HBase管理

学号(S_No) 姓名(S_Name) 性别(S_Sex) 年龄(S_Age)
2015001 zhangsan male 23
2015002 Mary female 22
2015003 Lisi male 24

创建学生表

1
2
3
4
5
6
7
8
9
10
11
12
13
14
15
16
17
hbase(main):004:0> create 'student','no','name','sex','age'
Created table student
Took 1.3125 seconds
=> Hbase::Table - student
hbase(main):005:0> list
TABLE
student
1 row(s)
Took 0.0074 seconds
=> ["student"]
#查看表结构
hbase(main):001:0> describe 'student'
Table student is ENABLED
student
COLUMN FAMILIES DESCRIPTION
{NAME => 'age', VERSIONS => '1', EVICT_BLOCKS_ON_CLOSE => 'false'
.......

添加数据

s001为行键

1
2
3
4
5
6
7
8
9
10
11
12
13
14
hbase(main):001:0> scan 'student'
ROW COLUMN+CELL
0 row(s)
Took 0.2712 seconds
hbase(main):002:0> put 'student','s001','no','2015001'
Took 0.0236 seconds
hbase(main):003:0> put 'student','s001','name','zhangsan'
Took 0.0057 seconds
hbase(main):004:0> scan 'student'
ROW COLUMN+CELL
s001 column=name:, timestamp=1679058447572, value=zhangsan
s001 column=no:, timestamp=1679058447550, value=2015001
1 row(s)
Took 0.0179 seconds

查看整行

1
2
3
4
5
6
hbase(main):001:0> get 'student','s001'
COLUMN CELL
name: timestamp=1679058447572, value=zhangsan
no: timestamp=1679058447550, value=2015001
1 row(s)
Took 0.2910 seconds

查看单元格

1
2
3
4
5
hbase(main):008:0> get 'student','s001','name'
COLUMN CELL
name: timestamp=1679058447572, value=zhangsan
1 row(s)
Took 0.0053 seconds

订单例子

image-20230317212813880

创建order表

1
2
3
4
5
6
7
8
9
10
11
12
13
14
15
16
17
18
19
20
21
22
23
24
25
26
27
28
29
30
31
32
33
34
35
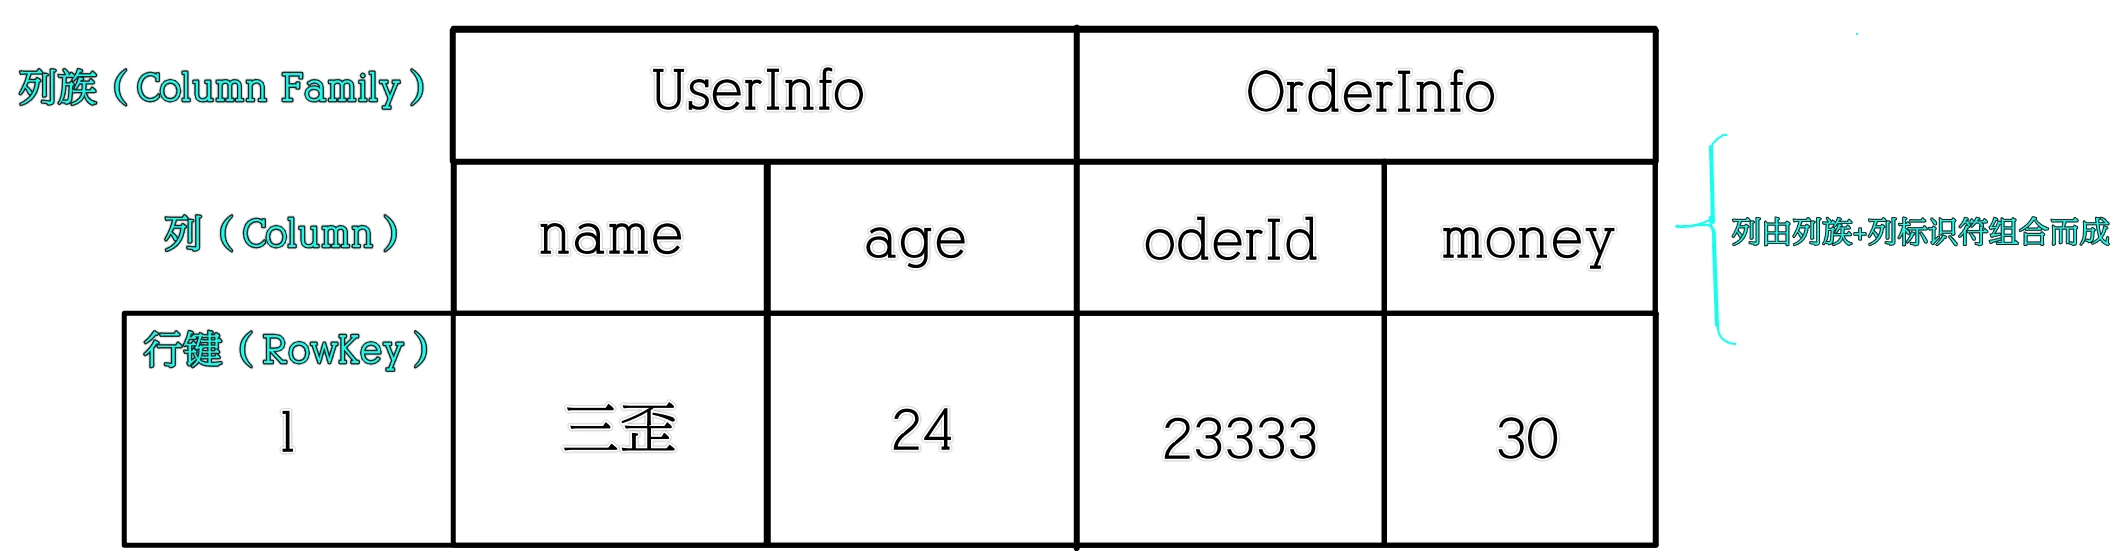
create 'order','userinfo','orderinfo'
list
put 'order','1','userinfo:name','sw'
put 'order','1','userinfo:age','24'
put 'order','1','orderinfo:id','23333'
put 'order','1','orderinfo:money','30'
scan 'order'
-----------------------------------------------------------
hbase(main):017:0* create 'order','userinfo','orderinfo'
Created table order
Took 2.3102 seconds
=> Hbase::Table - order
hbase(main):018:0> list
TABLE
order
student
2 row(s)
Took 0.0104 seconds
=> ["order", "student"]
hbase(main):019:0> put 'order','1','userinfo:name','sw'
Took 0.0326 seconds
hbase(main):020:0> put 'order','1','userinfo:age','24'
Took 0.0031 seconds
hbase(main):021:0> put 'order','1','orderinfo:id','23333'
Took 0.0036 seconds
hbase(main):022:0> put 'order','1','orderinfo:money','30'
Took 0.0031 seconds
hbase(main):023:0> scan 'order'
ROW COLUMN+CELL
1 column=orderinfo:id, timestamp=1679060732699, value=23333
1 column=orderinfo:money, timestamp=1679060732711, value=30
1 column=userinfo:age, timestamp=1679060732685, value=24
1 column=userinfo:name, timestamp=1679060732667, value=sw
1 row(s)
Took 0.0116 seconds

修改数据

1
2
3
4
5
6
7
hbase(main):001:0> put 'student','s001','name','zhangxiaosan'
Took 0.2879 seconds
hbase(main):002:0> get 'student','s001','name'
COLUMN CELL
name: timestamp=1679061655288, value=zhangxiaosan
1 row(s)
Took 0.0280 seconds
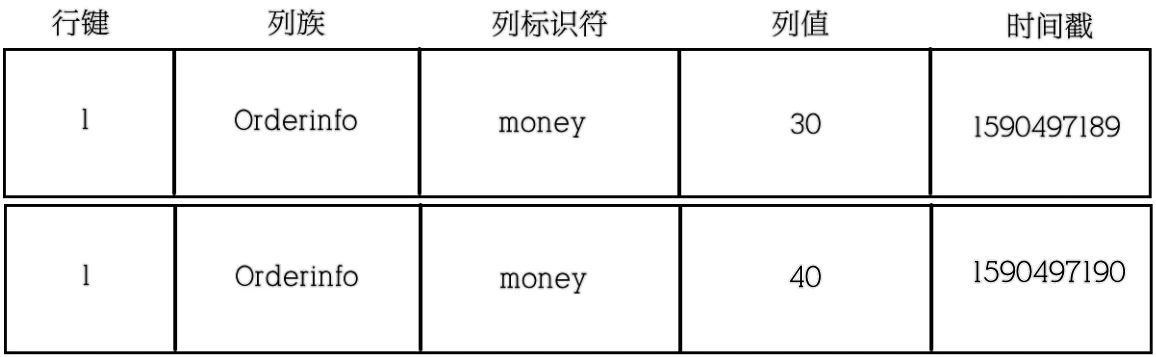
时间戳

#数据添加到HBase的时候都会被记录一个时间戳,这个时间戳被我们当做一个版本。

当修改某一条的时候,本质上是往里边新增一条数据,记录的版本加一。

image-20230317220909473

#现在要把这条记录的值改为40,实际上就是多添加一条记录,在读的时候按照时间戳读最新的记录

image-20230317221537086

1
2
3
4
5
6
7
8
9
10
11
put 'order','1','orderinfo:money','40'
get 'order','1','orderinfo:money'

hbase(main):008:0> put 'order','1','orderinfo:money','40'
Took 0.0190 seconds
hbase(main):009:0> get 'order','1','orderinfo:money'
COLUMN CELL
orderinfo:money timestamp=1679064515487, value=40
1 row(s)
Took 0.0096 seconds

删除数据

1
2
3
scan 'student'
delete 'student','s001','name'
get 'student','s001','name'

删除表

1
2
3
disable 'student'
describe 'student'
drop 'student'

访问网页

ip:16010

NoSQL数据库安装

(Redis键值对非关系型数据库)

安装redis

1
2
3
4
5
6
7
8
9
10
11
12
13
14
15
16
17
18
19
20
21
22
23
24
25
26
27
28
29
30
31
tar -xf redis-5.0.5.tar.gz
mv redis-5.0.5 /opt/redis
cd /opt/redis
yum install -y gcc automake autoconf libtool
#编译安装
make && make install
cd src
[root@yjx48 src]# ./redis-server
5861:C 30 Mar 2023 08:49:48.699 # oO0OoO0OoO0Oo Redis is starting oO0OoO0OoO0Oo
5861:C 30 Mar 2023 08:49:48.699 # Redis version=5.0.5, bits=64, commit=00000000, modified=0, pid=5861, just started
5861:C 30 Mar 2023 08:49:48.699 # Warning: no config file specified, using the default config. In order to specify a config file use ./redis-server /path/to/redis.conf
5861:M 30 Mar 2023 08:49:48.699 * Increased maximum number of open files to 10032 (it was originally set to 1024).
_._
_.-``__ ''-._
_.-`` `. `_. ''-._ Redis 5.0.5 (00000000/0) 64 bit
.-`` .-```. ```\/ _.,_ ''-._
( ' , .-` | `, ) Running in standalone mode
|`-._`-...-` __...-.``-._|'` _.-'| Port: 6379
| `-._ `._ / _.-' | PID: 5861
`-._ `-._ `-./ _.-' _.-'
|`-._`-._ `-.__.-' _.-'_.-'|
| `-._`-._ _.-'_.-' | http://redis.io
`-._ `-._`-.__.-'_.-' _.-'
|`-._`-._ `-.__.-' _.-'_.-'|
| `-._`-._ _.-'_.-' |
`-._ `-._`-.__.-'_.-' _.-'
`-._ `-.__.-' _.-'
`-._ _.-'
`-.__.-'

5861:M 30 Mar 2023 08:49:48.700 # WARNING: The TCP backlog setting of 511 cannot be enforced because /proc/sys/net/core/somaxconn is set to the lower value of 128.
1
2
3
4
5
6
7
8
9
#另开一个会话
[root@yjx48 ~]# cd /opt/redis/src
[root@yjx48 src]# ./redis-cli
127.0.0.1:6379> set hello world
OK
127.0.0.1:6379> get hello
"world"
127.0.0.1:6379> exit
[root@yjx48 src]#

数据库管理

image-20230330112542140

redis语法

1
2
3
4
5
6
7
8
9
10
11
12
13
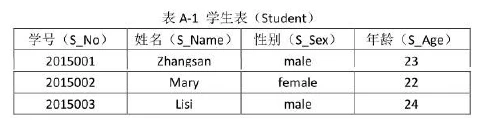
#插入数据
set student:2015001:sname zhangsan
get student:2015001:sname
set student:2015001:sex male
get student:2015001:sex
#修改数据
set student:2015001:sname zhangxiaosan
get student:2015001:sname
#删除数据
get set student:2015001:sname
del set student:2015001:sname
get set student:2015001:sname
#没数据了

Hash数据库

student表

1
2
3
4
5
2015001={
name=zhangsan
sex=male
age=23
}

插入和查询数据

1
2
3
4
5
6
hset student:2015001 name zhangsan
hset student:2015001 sex male
hset student:2015001 age 23
hget student:2015001 name
hget student:2015001 sex
hgetall student:2015001

修改数据

1
2
hset student:2015001 sex female
hget student:2015001 sex female

删除数据

1
2
3
hdel student:2015001 sex
hget student:2015001 sex
#无数据

MongoDB

​ Mongodb是一个基于分布式文件存储的文档数据库,介于关系数据库和非关系数据库之间,是非关系数
据库当中功能最丰富、最像关系数据库的一种 NOSQL数据库。
​ Mongo最大的特点是支持的查询语言非常强大,语法有点类似于面向对象的查询语言,几乎可以实现类
似关系数据库单表查询的绝大部分功能,而且还支持对数据建立索引。
​ Mongodb支持的数据结构非常松散,是类似json的bson格式,因此可以存储比较复杂的数据类型。

JSON语法

JSON 语法是 JavaScript 语法的子集。

JSON 数字

JSON 数字可以是整型或者浮点型:
{ “age”:30 }

JSON 对象

JSON 对象在大括号 {} 中书写:
对象可以包含多个名称/值对:

JSON 数组

JSON 数组在中括号 [] 中书写:
数组可包含多个对象:

1
2
3
4
5
6
7
8
9
10
11
12
13
14
15
[
{ key1 : value1-1 , key2:value1-2 },
{ key1 : value2-1 , key2:value2-2 },
{ key1 : value3-1 , key2:value3-2 },
...
{ key1 : valueN-1 , key2:valueN-2 },
]

{
"sites": [
{ "name":"菜鸟教程" , "url":"www.runoob.com" },
{ "name":"google" , "url":"www.google.com" },
{ "name":"微博" , "url":"www.weibo.com" }
]
}

在上面的例子中,对象 sites 是包含三个对象的数组。每个对象代表一条关于某个网站(name、url)
的记录。

JSON 布尔值

JSON 布尔值可以是 true 或者 false:

1
{ "flag":true }

JSON null

JSON 可以设置 null 值:

1
{ "runoob":null }

MongoDB安装

1
2
3
4
5
6
7
8
9
10
11
12
13
14
15
tar -xf mongodb-linux-x86_64-rhel70-5.0.5.tgz 
mv mongodb-linux-x86_64-rhel70-5.0.5 /opt/mongodb
cd /opt/mongodb/bin
./mongo -version

#默认情况下 MongoDB 启动后会初始化以下两个目录,事先创建好:
#数据存储目录:/var/lib/mongodb
#日志文件目录:/var/log/mongodb
mkdir -p /var/lib/mongo
mkdir -p /var/log/mongodb
#启动mongodb服务
cd /opt/mongodb/bin
./mongod --dbpath /var/lib/mongo --logpath /var/log/mongodb/mongod.log --fork
ps ax | grep mongod
./mongo

数据库管理

常用命令

#列出所有数据库

1
2
3
4
>show dbs
admin 0.000GB
config 0.000GB
local 0.000GB

#切换数据库

1
2
>use admin
switched to db admin

#显示当前数据库的所有集合

1
2
>show collections
system.version

#显示集合的所有数据

1
2
>db.system.version.find()
{ "_id" : "featureCompatibilityVersion", "version" : "5.0" }

创建数据库和集合

1
2
3
4
5
6
7
8
9
10
11
12
13
#mongodb没有创建数据库命令
> use school
switched to db school
#创建集合,同时会自动创建以上的数据库
> db.createCollection('student')
{ "ok" : 1 }
> show dbs
admin 0.000GB
config 0.000GB
local 0.000GB
school 0.000GB
> show collections
Student

插入数据

1
2
3
4
5
6
7
8
9
10
11
12
13
14
15
16
17
18
19
#两种方法插入数据:insert和save
#_id可以手动输入,否则会自动生成
>db.student.insert({
sno: 2015001,
name: "zhangsan",
sex: "male",
age: 23
})
WriteResult({ "nInserted" : 1 })

> db.student.find()
{ "_id" : ObjectId("642e21279c9d145e592fda70"), "sno" : 2015001, "name" : "zhangsan", "sex" : "male", "age" : 23 }

> db.student.save({sno:2015002,name:'marry',sex:'female',age:22})
WriteResult({ "nInserted" : 1 })

> db.student.find()
{ "_id" : ObjectId("642e259014c45ed3f90756c0"), "sno" : 2015001, "name" : "zhangsan", "sex" : "male", "age" : 23 }
{ "_id" : ObjectId("642e259614c45ed3f90756c1"), "sno" : 2015002, "name" : "marry", "sex" : "female", "age" : 22 }
1
2
3
4
5
6
7
8
9
10
11
12
13
14
15
16
17
#insert和save区别:手动插入一行时,如_id已经存在,insert则出错,save则替代原值。
> db.student.insert({"_id": ObjectId("642e259014c45ed3f90756c0"), "sno": 2015001, "name": "zhangsan", "sex": "male", "age": 23 })

WriteResult({
"nInserted" : 0,
"writeError" : {
"code" : 11000,
"errmsg" : "E11000 duplicate key error collection: test.student index: _id_ dup key: { _id: ObjectId('642e21279c9d145e592fda70') }"
}
})
#更改年龄2324
> db.student.save({"_id": ObjectId("642e259014c45ed3f90756c0"), "sno": 2015001, "name": "zhangsan", "sex": "male", "age": 24 })
WriteResult({ "nMatched" : 1, "nUpserted" : 0, "nModified" : 1 })

> db.student.find()
{ "_id" : ObjectId("642e259014c45ed3f90756c0"), "sno" : 2015001, "name" : "zhangsan", "sex" : "male", "age" : 24 }
{ "_id" : ObjectId("642e259614c45ed3f90756c1"), "sno" : 2015002, "name" : "marry", "sex" : "female", "age" : 22 }

查找数据

1
2
3
4
5
6
7
8
9
10
11
12
13
14
15
16
17
18
19
20
21
22
23
24
25
#查询
#查询格式:find([query],[fields]),类似于sql的select语句,query相当于where,fields相当
于显示的列
#查询名字为zhangsan的数据
> db.student.find({name:'zhangsan'})
{ "_id" : ObjectId("642e259014c45ed3f90756c0"), "sno" : 2015001, "name" : "zhangsan", "sex" : "male", "age" : 24 }
#查询名字为zhangsan的人的性别
> db.student.find({name:'zhangsan'},{name:1,sex:1})
{ "_id" : ObjectId("642e259014c45ed3f90756c0"), "name" : "zhangsan", "sex" : "male" }
#不显示_id
> db.student.find({name:'zhangsan'},{_id:0,name:1,sex:1})
{ "name" : "zhangsan", "sex" : "male" }
#查询指定列
> db.student.find({},{name:1})
{ "_id" : ObjectId("642e259014c45ed3f90756c0"), "name" : "zhangsan" }
{ "_id" : ObjectId("642e259614c45ed3f90756c1"), "name" : "marry" }
#and查询条件
> db.student.find({name:'zhangsan',sex:'female'})
> db.student.find({name:'zhangsan',sex:'male'})
{ "_id" : ObjectId("642e259014c45ed3f90756c0"), "sno" : 2015001, "name" : "zhangsan", "sex" : "male", "age" : 24 }
>db.student.find({$or:[{age:24},{age:22}]})
#or查询
> db.student.find({ $or:[{age:24},{age:22}] })
{ "_id" : ObjectId("642e259014c45ed3f90756c0"), "sno" : 2015001, "name" : "zhangsan", "sex" : "male", "age" : 24 }
{ "_id" : ObjectId("642e259614c45ed3f90756c1"), "sno" : 2015002, "name" : "marry", "sex" : "female", "age" : 22 }

修改数据

#格式:update( query, [, upsert_bool, multi_bool] )
#query : update的查询条件,类似sql update查询内where后面的。
#update : update的对象和一些更新的操作符(如$,$inc…)等,也可以理解为sql update查询内
set后面的
#upsert : 可选,这个参数的意思是,如果不存在update的记录,是否插入objNew,true为插入,默认是
false,不插入。
#multi : 可选,mongodb 默认是false,只更新找到的第一条记录,如果这个参数为true,就把按条件查
出来多条记录全部更新。

1
2
3
4
5
6
> db.student.update({name:'zhangsan'},{$set:{age:23}})
WriteResult({ "nMatched" : 1, "nUpserted" : 0, "nModified" : 1 })

> db.student.find()
{ "_id" : ObjectId("642e259014c45ed3f90756c0"), "sno" : 2015001, "name" : "zhangsan", "sex" : "male", "age" : 23 }
{ "_id" : ObjectId("642e259614c45ed3f90756c1"), "sno" : 2015002, "name" : "marry", "sex" : "female", "age" : 22 }

删除数据

1
2
3
4
> db.student.remove({name:'zhangsan'})
WriteResult({ "nRemoved" : 1 })
> db.student.find()
{ "_id" : ObjectId("642e259614c45ed3f90756c1"), "sno" : 2015002, "name" : "marry", "sex" : "female", "age" : 22 }

删除集合

1
2
3
4
5
6
7
8
9
10
> db.createCollection('course')
{ "ok" : 1 }
> show collections
course
student
> db.course.drop()
true
> show collections
student

Hive数据仓库安装

hive 是一种底层封装了Hadoop 的数据仓库处理工具,使用类SQL 的hiveSQL 语言实现数据查询,所有hive 的数据都存储在Hadoop 兼容的文件系统(例如,[Amazon S3](https://baike.baidu.com/item/Amazon S3/10809744)、HDFS)中。hive 在加载数据过程中不会对数据进行任何的修改,只是将数据移动到HDFS 中hive 设定的目录下,因此,hive 不支持对数据的改写和添加,所有的数据都是在加载的时候确定的。

用户接口Client

用户接口主要有三个:CLI,Client 和 WUI。其中最常用的是 Cli,Cli 启动的时候,会同时启动一个 hive 副本。Client 是 hive 的客户端,用户连接至 hive Server。在启动 Client 模式的时候,需要指出 hive Server 所在节点,并且在该节点启动 hive Server。 WUI 是通过浏览器访问 hive。

元数据存储 Metastore

hive 将元数据存储在数据库中,如 mysql、derby。hive 中的元数据包括表的名字,表的列和分区及其属性,表的属性(是否为外部表等),表的数据所在目录等。

驱动器:Driver 解释器、编译器、优化器、执行器

解释器、编译器、优化器完成 HQL 查询语句从词法分析、语法分析、编译、优化以及查询计划的生成。生成的查询计划存储在 HDFS 中,并在随后由 MapReduce 调用执行。

Hadoop

hive 的数据存储在 HDFS 中,大部分的查询由 MapReduce 完成(不包含 * 的查询,比如 select * from tbl 不会生成 MapReduce 任务)。

image-20230413095240448

image-20230413095305455

安装hive

1
2
3
4
5
6
7
8
9
10
11
12
13
14
15
16
17
18
19
20
21
22
23
24
25
26
27
28
29
30
31
32
tar -xf apache-hive-3.1.2-bin.tar.gz
mv apache-hive-3.1.2-bin /usr/local/hive
echo "export HIVE_HOME=/usr/local/hive" >> /etc/profile
echo "export PATH=\$HIVE_HOME/bin:\$PATH" >> /etc/profile
source /etc/profile
cd /usr/local/hive/conf/
cp hive-default.xml.template hive-default.xml
vi hive-site.xml
<?xml version="1.0" encoding="UTF-8" standalone="no"?>
<?xml-stylesheet type="text/xsl" href="configuration.xsl"?>
<configuration>
<property>
<name>javax.jdo.option.ConnectionURL</name>
<value>jdbc:mysql://yjx48:3306/hive?useSSL=false</value>
<description>JDBC connect string for a JDBC metastore</description>
</property>
<property>
<name>javax.jdo.option.ConnectionDriverName</name>
<value>com.mysql.jdbc.Driver</value>
<description>Driver class name for a JDBC metastore</description>
</property>
<property>
<name>javax.jdo.option.ConnectionUserName</name>
<value>root</value>
<description>username to use against metastore database</description>
</property>
<property>
<name>javax.jdo.option.ConnectionPassword</name>
<value>Yjx@666.</value>
<description>password to use against metastore database</description>
</property>
</configuration>

其中Yjx@666.是mysql密码

安装mysql

1
2
3
4
5
6
7
8
9
10
11
12
13
14
15
16
17
18
19
20
21
22
cd
yum remove mariadb-libs.x86_64 -y
yum install -y net-tools
mkdir mysql
tar -xf mysql-5.7.37-1.el7.x86_64.rpm-bundle.tar -C mysql
cd mysql
rpm -ivh mysql-community-common-5.7.37-1.el7.x86_64.rpm
rpm -ivh mysql-community-libs-5.7.37-1.el7.x86_64.rpm
rpm -ivh mysql-community-libs-compat-5.7.37-1.el7.x86_64.rpm
rpm -ivh mysql-community-client-5.7.37-1.el7.x86_64.rpm
rpm -ivh mysql-community-devel-5.7.37-1.el7.x86_64.rpm
rpm -ivh mysql-community-server-5.7.37-1.el7.x86_64.rpm
systemctl enable --now mysqld
grep 'temporary password' /var/log/mysqld.log
mysqladmin -uroot -p'darm4hb.2Rsy' password 'Yjx@666.'
mysql -uroot -pYjx@666.
#给root用户授权
grant all privileges on *.* to 'root'@'localhost' identified by 'Yjx@666.' with grant option;
grant all privileges on *.* to 'root'@'%' identified by 'Yjx@666.' with grant option;
flush privileges;
create database hive;
exit

配置和启动hive

1
2
3
4
5
6
7
8
cd
tar -xf mysql-connector-java-5.1.40.tar.gz
cp mysql-connector-java-5.1.40/mysql-connector-java-5.1.40-bin.jar /usr/local/hive/lib/
mv /usr/local/hive/lib/guava-19.0.jar{,.bak}
cp /usr/local/hadoop/share/hadoop/common/lib/guava-27.0-jre.jar /usr/local/hive/lib
start-all.sh
schematool -dbType mysql -initSchema
hive

Hive数据类型

类型 描述 示例
TINYINT(tinyint) 一个字节(8位)有符号整数, -128~127 1
SMALLINT(smallint) 2字节(16位)有符号整数,-32768~32767 1
INT(int) 4字节(32位)有符号整数 1
BIGINT(bigint) 8字节(64位)有符号整数 1
FLOAT(float) 4字节(32位)单精度浮点数 1
DOUBLE(double) 8字节(64位)双精度浮点数 1
DECIMAL(decimal) 任意精度的带符号小数 1
BOOLEAN(boolean) true/false true/false
STRING(string) 字符串,变长 ‘a’,‘b’,‘1’
VARCHAR(varchar) 变长字符串 ‘a’
CHAR(char) 固定长度字符串 ‘a’
BINANY(binany) 字节数组 无法表示
TIMESTAMP(timestamp) 时间戳,纳秒精度 1.22327E+11
DATE(date) 日期 ‘2016-03-29’

hive的集合数据类型

类型 描述 示例
ARRAY 有序数组,字段的类型必须相同 Array(1,2)
MAP 一组无序的键值对,键的类型必须是原始数据类型,他的值可以是任何类型,同一个映射的键的类型必须相同,值得类型也必须相同 Map(‘a’,1)
STRUCT 一组命名的字段,字段类型可以不同 Struct(‘a’,1,2.0
UNION UNION则类似于C语言中的UNION结构,在给定的任何一个时间点,UNION类型可以保存指定数据类型中的任意一种

基本命令

创建数据库和表

1
2
3
create database hive;
use hive;
create table usr(id int,name string,age int);

查看和描述数据库和表

1
2
3
4
show databases;
show tables;
describe database hive;
describe hive.usr;

向表中装载数据

1
2
3
4
5
6
7
insert into usr values(1,'sina',20);

#从linux读取数据
[root@yjx48 ~]# echo "2,zhangsan,22" >> /opt/data
hive> use hive;
create table usr1(id int,name string,age int) row format delimited fields terminated by ",";
load data local inpath '/opt/data' overwrite into table usr1;

从hdfs中读取数据

1
2
3
4
echo "3,lisi,25" >> /opt/test.txt
hdfs dfs -put /opt/test.txt /
hive
load data inpath 'hdfs://yjx48:9000/test.txt' overwrite into table usr1;

从别的表中读取数据

1
2
3
4
5
6
7
8
9
10
11
12
13
hive> select * from usr;
OK
1 sina 20

hive> select * from usr1;
OK
3 lisi 25
#读取usr1的id=3的数据到usr
insert overwrite table usr select * from usr1 where id=3;

hive> select * from usr;
OK
3 lisi 25

查询表中数据

1
select * from usr1;

Hive实验:词频统计

在linux上创建输入目录:/opt/input;

1
mkdir /opt/input

在以上输入目录中添加多个文本文件,其中文件中包含单词:姓名学号,例如:yjx48;

1
2
3
echo "hello1 yjx48" >> /opt/input/text1.txt
echo "hello2 yjx48" >> /opt/input/text2.txt
echo "hello3 yjx48" >> /opt/input/text3.txt

在Hive中创建表“docs”,并把输入目录的文件数据加载到该表中;

1
2
3
4
use hive;
create table docs(line string);
load data local inpath '/opt/input' overwrite into table docs;
select * from docs;

编写HiveQL语句对输入目录的文本进行词频统计,统计单词“姓名学号”出现的次数。

1
2
3
4
5
6
7
8
create table word_count as
select word,count(1) as count from
(select explode(split(line,' ')) as word from docs) w
group by word
order by word;

select * from word_count;
describe word_count;

image-20230413214018276

特别声明
千屹博客旗下的所有文章,是通过本人课堂学习和课外自学所精心整理的知识巨著
难免会有出错的地方
如果细心的你发现了小失误,可以在下方评论区告诉我,或者私信我!
非常感谢大家的热烈支持!

Hadoop组件部署
https://blog.qianyios.top/posts/4909/
作者
严千屹
发布于
2023年4月13日
更新于
2024年9月14日
许可协议