大数据hadoop实验
镜像下载:ubuntu-18.04.6-desktop-amd64.iso
大作业
下面两个文档,自己选一个,那个你会用你就用,替换逻辑是一样的
word文档:大作业文档
markdown文档:markdown文档
下载之后,打开按Ctrl+H进行替换内容
查找内容:student/202206150540/yanjiaxi
替换为:student/你的学号/你的名字
注意:前后没有斜杠
确定之后你就可以自己复制代码运行了
先给自己的虚拟机打快照,在做大作业
安装ubuntu系统
一路确定就行了
设置dhcp模式否则无法联网安装
#dhcp服务
然后开机,然后选择中文 ,然后按提示安装
然后就开始安装就行了,到后面重启之后,可能会遇到这个界面
解决办法
然后你再开机就行了
切换阿里云镜像源
等待更新缓存
到桌面后右键桌面空白处打开终端进行输入下面指令
一键安装vm-tools可以实现跨端复制粘贴
1
2
3
4
sudo apt-get install -y wgetsudo wget https://resource.qianyios.top/init.shsudo chmod +x init.shbash init.sh
接下来重启等待软件生效之后,你就关机,这时候你要打个快照,以便后面做项目出错可以恢复,然后开机
创建hadoop用户
创建hadoop用户并且设置密码
1
2
sudo useradd -m hadoop -s /bin/bash sudo passwd hadoop
给hadoop用户添加sudo权限
1 sudo adduser hadoop sudo
这时候桌面右上角注销账号切换成hadoop
设置ssh免密
一键全部复制,然后粘贴回车就会自动进行免密
代码中有password=“123456”,记得改成你的hadoop用户的密码
1
2
3
4
5
6
7
8
9
10
11
12
13
14
15
16
17
18
19
20
21
22
23
24
25
26
27
28
29
30
31
32
33
34
35
36
37
38
39
40
41
42
43
44
45
46
47
48
49
50
51
52
53
54
55
sudo cat >ssh.sh<<"EOF" sudo apt-get install openssh-server -ysudo systemctl disable ufw --nowecho "正在更新 SSH 配置..." sudo sed -i 's/^#*PasswordAuthentication.*/PasswordAuthentication yes/' /etc/ssh/sshd_configsudo systemctl restart sshecho "正在安装 sshpass..." sudo apt updatesudo apt install -y sshpass || { echo "安装 sshpass 失败" ; exit 1; }echo "sshpass 安装完成。" echo "正在检查 .ssh 目录..." if [ ! -d ~/.ssh ]; then sudo mkdir -p ~/.ssh fi sudo chmod 700 ~/.sshsudo chown -R hadoop:hadoop ~/.sshhosts=("localhost" ) password="123456" echo "正在生成 SSH 密钥对..." if [ ! -f ~/.ssh/id_rsa ]; then ssh-keygen -t rsa -N "" -f ~/.ssh/id_rsa || { echo "生成 SSH 密钥对失败" ; exit 1; } fi chmod 600 ~/.ssh/id_rsachmod 644 ~/.ssh/id_rsa.pubecho "SSH 密钥对已生成。" for host in "${hosts[@]} " do echo "正在为 $host 配置免密登录..." sshpass -p "$password " ssh -o StrictHostKeyChecking=no "$host " "mkdir -p ~/.ssh && chmod 700 ~/.ssh" sshpass -p "$password " ssh-copy-id -i ~/.ssh/id_rsa.pub -o StrictHostKeyChecking=no "$host " || { echo "复制公钥到 $host 失败" ; exit 1; } sshpass -p "$password " ssh -o StrictHostKeyChecking=no "$host " "echo '免密登录成功'" || { echo "验证免密登录失败" ; exit 1; } done echo "所有配置已完成。" EOF
运行脚本
测试登入localhost是否可以实现无密码登入
成功
安装java和hadoop
将两个文件复制到下载的目录去
然后在这个文件夹下,空白处右键,打开终端
以下的全部复制运行
1
2
3
4
5
6
7
8
9
10
11
12
13
14
15
16
sudo mkdir /usr/lib/jvmsudo tar -xf jdk-8u162-linux-x64.tar.gz -C /usr/lib/jvmecho "export JAVA_HOME=/usr/lib/jvm/jdk1.8.0_162" >> ~/.bashrcecho "export PATH=\$JAVA_HOME/bin:\$PATH" >> ~/.bashrcsource ~/.bashrcjava -version sudo tar -zxf hadoop-3.1.3.tar.gz -C /usr/localsudo mv /usr/local/hadoop-3.1.3/ /usr/local/hadoopecho "export HADOOP_HOME=/usr/local/hadoop" >> ~/.bashrcecho "export PATH=\$HADOOP_HOME/bin/:\$HADOOP_HOME/sbin/:\$PATH" >> ~/.bashrcsource ~/.bashrcsudo chown -R hadoop /usr/local/hadoophadoop version
这里是作业要截图的地方
这时候关机打个快照,命名为基础
伪分布安装
编写cort-site.yaml文件
以下的全部复制运行
1
2
3
4
5
6
7
8
9
10
11
12
13
14
15
cat > /usr/local/hadoop/etc/hadoop/core-site.xml<< "EOF" <?xml version="1.0" encoding="UTF-8"?> <?xml-stylesheet type="text/xsl" href="configuration.xsl"?> <configuration> <property> <name>hadoop.tmp.dir</name> <value>file:/usr/local/hadoop/tmp</value> <description>Abase for other temporary directories.</description> </property> <property> <name>fs.defaultFS</name> <value>hdfs://localhost:9000</value> </property> </configuration> EOF
编写hdfs-site.xml
以下的全部复制运行
1
2
3
4
5
6
7
8
9
10
11
12
13
14
15
16
17
cat >/usr/local/hadoop/etc/hadoop/hdfs-site.xml<<"EOF" <configuration> <property> <name>dfs.replication</name> <value>1</value> </property> <property> <name>dfs.namenode.name.dir</name> <value>file:/usr/local/hadoop/tmp/dfs/name</value> </property> <property> <name>dfs.datanode.data.dir</name> <value>file:/usr/local/hadoop/tmp/dfs/data</value> </property> </configuration> EOF
启动hhdfs服务
hdfs初始化
这条命令只需要运行一次,以后都不要再运行了!!!!!!
这条命令只需要运行一次,以后都不要再运行了!!!!!!
这条命令只需要运行一次,以后都不要再运行了!!!!!!
出现这个说明初始化成功
添加hdfs yarn的环境变量
以下的全部复制运行
1
2
3
4
5
6
7
echo "export HDFS_NAMENODE_USER=hadoop" >> ~/.bashrcecho "export HDFS_DATANODE_USER=hadoop" >> ~/.bashrcecho "export HDFS_SECONDARYNAMENODE_USER=hadoop" >> ~/.bashrcecho "export YARN_RESOURCEMANAGER_USER=hadoop" >> ~/.bashrcecho "export YARN_NODEMANAGER_USER=hadoop" >> ~/.bashrcsource ~/.bashrcecho "export JAVA_HOME=/usr/lib/jvm/jdk1.8.0_162" >> /usr/local/hadoop/etc/hadoop/hadoop-env.sh
1 2 3 4 start-all.sh stop-all.sh
这里是作业要截图的地方
jps命令用来查看进程是否启动,以上是hadoop正常启动的进程,总共有6个
访问hadoop网页
看看你的ip
如果你这里没有ip说明你没有开启dhcp服务,自行回到最开始,找开启dhcp的方法,关机开启dhcp,然后开机就会有ip了
这里是作业要截图的地方
http://ip:9870
1 http://192.168.48.132:9870/
http://ip:8088
关机步骤
这时候关闭hadoop集群
然后关机打快照,命名伪分布
然后在这里打个快照,命名为伪分布安装成功,等你哪天机子坏了,你就可以恢复快照
严肃告知,别说我没提醒你,不要直接关机,也不要挂起虚拟机,否则你的虚拟机和hadoop坏了,你就重装吧
第一次实验
熟悉常用的Linux操作
1)cd命令:切换目录
(1) 切换到目录“/usr/local”
(2) 切换到当前目录的上一级目录
(3) 切换到当前登录Linux系统的用户的自己的主文件夹
2)ls命令:查看文件与目录
查看目录“/usr”下的所有文件和目录
3)mkdir命令:新建目录
(1)进入“/tmp”目录,创建一个名为“a”的目录,并查看“/tmp”目录下已经存在哪些目录
(2)进入“/tmp”目录,创建目录“a1/a2/a3/a4”
1
2
cd /tmp mkdir -p a1/a2/a3/a4
4)rmdir命令:删除空的目录
(1)将上面创建的目录a(在“/tmp”目录下面)删除
(2)删除上面创建的目录“a1/a2/a3/a4” (在“/tmp”目录下面),然后查看“/tmp”目录下面存在哪些目录
1 2 3 4 5 cd /tmp rmdir a cd /tmp rmdir -p a1/a2/a3/a4 ls -al
5)cp命令:复制文件或目录
(1)将当前用户的主文件夹下的文件.bashrc复制到目录“/usr”下,并重命名为bashrc1
1 sudo cp ~/.bashrc /usr/bashrc1
(2)在目录“/tmp”下新建目录test,再把这个目录复制到“/usr”目录下
1 2 3 cd /tmp mkdir test sudo cp -r /tmp/test /usr
6)mv命令:移动文件与目录,或更名
(1)将“/usr”目录下的文件bashrc1移动到“/usr/test”目录下
1 sudo mv /usr/bashrc1 /usr/test
(2)将“/usr”目录下的test目录重命名为test2
1 sudo mv /usr/test /usr/test2
7)rm命令:移除文件或目录
(1)将“/usr/test2”目录下的bashrc1文件删除
1 sudo rm /usr/test2/bashrc1
(2)将“/usr”目录下的test2目录删除
8)cat命令:查看文件内容
查看当前用户主文件夹下的.bashrc文件内容
9)tac命令:反向查看文件内容
反向查看当前用户主文件夹下的.bashrc文件的内容
10)more命令:一页一页翻动查看
翻页查看当前用户主文件夹下的.bashrc文件的内容
11)head命令:取出前面几行
(1)查看当前用户主文件夹下.bashrc文件内容前20行
(2)查看当前用户主文件夹下.bashrc文件内容,后面50行不显示,只显示前面几行
12)tail命令:取出后面几行
(1)查看当前用户主文件夹下.bashrc文件内容最后20行
(2)查看当前用户主文件夹下.bashrc文件内容,并且只列出50行以后的数据
13)touch命令:修改文件时间或创建新文件
(1)在“/tmp”目录下创建一个空文件hello,并查看文件时间
1 2 3 cd /tmp touch hello ls -l hello
(2)修改hello文件,将文件时间整为5天前
1 touch -d "5 days ago" hello
14)chown命令:修改文件所有者权限
将hello文件所有者改为root帐号,并查看属性
1 2 sudo chown root /tmp/hello ls -l /tmp/hello
15)find命令:文件查找
找出主文件夹下文件名为.bashrc的文件
16)tar命令:压缩命令
(1)在根目录“/”下新建文件夹test,然后在根目录“/”下打包成test.tar.gz
1 2 sudo mkdir /test sudo tar -zcv -f /test.tar.gz test
(2)把上面的test.tar.gz压缩包,解压缩到“/tmp”目录
1 sudo tar -zxv -f /test.tar.gz -C /tmp
17)grep命令:查找字符串
从“~/.bashrc”文件中查找字符串’examples’
1 grep -n 'examples' ~/.bashrc
18)配置环境变量
(1)请在“~/.bashrc”中设置,配置Java环境变量
1 2 3 4 echo "export JAVA_HOME=/usr/lib/jvm/jdk1.8.0_162" >> ~/.bashrc echo "export PATH=\$JAVA_HOME/bin:\$PATH" >> ~/.bashrc source ~/.bashrc java -version
(2)查看JAVA_HOME变量的值
熟悉常用的Hadoop操作
(1)使用hadoop用户登录Linux系统,启动Hadoop(Hadoop的安装目录为“/usr/local/hadoop”),为hadoop用户在HDFS中创建用户目录“/user/hadoop”
1 2 start-dfs.sh hdfs dfs -mkdir -p /user/hadoop
(2)接着在HDFS的目录“/user/hadoop”下,创建test文件夹,并查看文件列表
1 2 hdfs dfs -mkdir test hdfs dfs -ls .
(3)将Linux系统本地的“~/.bashrc”文件上传到HDFS的test文件夹中,并查看test
1 2 hdfs dfs -put ~/.bashrc test hdfs dfs -ls test
(4)将HDFS文件夹test复制到Linux系统本地文件系统的“/usr/local/hadoop”目录下
(3.7.3)实验
安装eclipse
为了提高程序编写和调试效率,本教程采用Eclipse工具编写Java程序。hdfs://localhost:9000/user/hadoop下面有几个文件,分别是file1.txt、file2.txt、file3.txt、file4.abc和file5.abc,这里需要从该目录中过滤出所有后缀名不为.abc的文件,对过滤之后的文件进行读取,并将这些文件的内容合并到文件hdfs://localhost:9000/user/hadoop/merge.txt中。
要确保HDFS的/user/hadoop目录下已经存在file1.txt、file2.txt、file3.txt、file4.abc和file5.abc,每个文件里面有内容。这里,假设文件内容如下:
后面我会给命令,上面的内容就先看看
登入hadoop用户不多说了,启动hadoop集群
下载eclipse安装包到ubuntu的下载目录,然后在空白处右键打开终端
1 2 3 4 5 sudo tar -zxvf eclipse-4.7.0-linux.gtk.x86_64.tar.gz -C /usr/local sudo chown -R hadoop /usr/local/eclipseecho "export ECLIPSE_HOME=/usr/local/eclipse" >> ~/.bashrcecho "export PATH=\$ECLIPSE_HOME/:\$PATH" >> ~/.bashrcsource ~/.bashrc
启动eclipse
在Eclipse中创建项目
启动Eclipse。当Eclipse启动以后,会弹出如下图所示界面,提示设置工作空间(workspace)。
选择File-->New-->Java Project菜单,开始创建一个Java工程,会弹出如下图所示界面。在Project name后面输入工程名称HDFSExample,选中Use default location,让这个Java工程的所有文件都保存到/home/hadoop/workspace/HDFSExample目录下。在JRE这个选项卡中,可以选择当前的Linux系统中已经安装好的JDK,比如jdk1.8.0_162。然后,点击界面底部的Next>按钮,进入下一步的设置。
为项目添加需要用到的JAR包
为了能够运行程序,我们有四个目录的jar包要添加到工程去
(1)/usr/local/hadoop/share/hadoop/common目录下的所有JAR包,包括
hadoop-common-3.1.3.jar、hadoop-kms-3.1.3.jarhadoop-common-3.1.3-tests.jar、hadoop-nfs-3.1.3.jar
注意,不包括目录jdiff、lib、sources和webapps;
(2)/usr/local/hadoop/share/hadoop/common/lib目录下的所有JAR包;/usr/local/hadoop/share/hadoop/hdfs目录下的所有JAR包,注意,不包括目录jdiff、lib、sources和webapps;/usr/local/hadoop/share/hadoop/hdfs/lib目录下的所有JAR包。
以下我只演示第一种和第二种!!!!!!!!!
以下我只演示第一种和第二种!!!!!!!!!
以下我只演示第一种和第二种!!!!!!!!!
以下我只演示第一种和第二种!!!!!!!!!
第一种
/usr/local/hadoop/share/hadoop/common目录下的所有JAR包
点击Add External JARs…按钮,点击其他位置,自己看这个路径定位到这/usr/local/hadoop/share/hadoop/common,选择下面的四个包,然后点击ok
第二种
/usr/local/hadoop/share/hadoop/common/lib目录下的所有JAR包;
以下两个目录,我就不演示了,如果有文件夹被全选中,你就按住ctrl然后点击文件夹,就可以取消选中了,我们只添加所有后缀名为.jar的包
(3)/usr/local/hadoop/share/hadoop/hdfs目录下的所有JAR包,注意,不包括目录jdiff、lib、sources和webapps;/usr/local/hadoop/share/hadoop/hdfs/lib目录下的所有JAR包。
最后是这样的
编写Java应用程序
在该界面中,只需要在Name后面输入新建的Java类文件的名称,这里采用称MergeFile,其他都可以采用默认设置,然后,点击界面右下角Finish按钮。
把下面的代码直接写到MergeFile.java,全选复制粘贴,这就不多说了,然后记得Ctrl+S保存
1 2 3 4 5 6 7 8 9 10 11 12 13 14 15 16 17 18 19 20 21 22 23 24 25 26 27 28 29 30 31 32 33 34 35 36 37 38 39 40 41 42 43 44 45 46 47 48 49 50 51 52 53 54 55 56 57 58 59 60 61 62 63 64 import java.io.IOException;import java.io.PrintStream;import java.net.URI;import org.apache.hadoop.conf.Configuration;import org.apache.hadoop.fs.*;class MyPathFilter implements PathFilter { String reg = null ; MyPathFilter(String reg) { this .reg = reg; } public boolean accept (Path path) { if (!(path.toString().matches(reg))) return true ; return false ; } } public class MergeFile { Path inputPath = null ; Path outputPath = null ; public MergeFile (String input, String output) { this .inputPath = new Path (input); this .outputPath = new Path (output); } public void doMerge () throws IOException { Configuration conf = new Configuration (); conf.set("fs.defaultFS" ,"hdfs://localhost:9000" ); conf.set("fs.hdfs.impl" ,"org.apache.hadoop.hdfs.DistributedFileSystem" ); FileSystem fsSource = FileSystem.get(URI.create(inputPath.toString()), conf); FileSystem fsDst = FileSystem.get(URI.create(outputPath.toString()), conf); FileStatus[] sourceStatus = fsSource.listStatus(inputPath, new MyPathFilter (".*\\.abc" )); FSDataOutputStream fsdos = fsDst.create(outputPath); PrintStream ps = new PrintStream (System.out); for (FileStatus sta : sourceStatus) { System.out.print("路径:" + sta.getPath() + " 文件大小:" + sta.getLen() + " 权限:" + sta.getPermission() + " 内容:" ); FSDataInputStream fsdis = fsSource.open(sta.getPath()); byte [] data = new byte [1024 ]; int read = -1 ; while ((read = fsdis.read(data)) > 0 ) { ps.write(data, 0 , read); fsdos.write(data, 0 , read); } fsdis.close(); } ps.close(); fsdos.close(); } public static void main (String[] args) throws IOException { MergeFile merge = new MergeFile ( "hdfs://localhost:9000/user/hadoop/" , "hdfs://localhost:9000/user/hadoop/merge.txt" ); merge.doMerge(); } }
编译运行程序
在这里强调一下,如果你没启动hadoop自行启动,我早已在7.1告知启动了
编写测试文件
1 2 3 4 5 6 7 8 9 10 11 12 echo "this is file1.txt" > file1.txtecho "this is file2.txt" > file2.txtecho "this is file3.txt" > file3.txtecho "this is file4.abc" > file4.abcecho "this is file5.abc" > file5.abchdfs dfs -mkdir -p /user/hadoop hdfs dfs -put file1.txt /user/hadoop/ hdfs dfs -put file2.txt /user/hadoop/ hdfs dfs -put file3.txt /user/hadoop/ hdfs dfs -put file4.abc /user/hadoop/ hdfs dfs -put file5.abc /user/hadoop/ hdfs dfs -ls /user/hadoop
最后验证是否成功
1 hdfs dfs -cat /user/hadoop/merge.txt
应用程序的部署
因为前面只是在eclipse运行java项目才会生成merge.txt,我们的目的是通过hadoop去执行这个java项目,所以我们要对工程打包
创建myapp目录
目的:用来存放hadoop应用程序目录
1 mkdir /usr/local/hadoop/myapp
开始打包程序
Launch configuration下拉选择MergeFile-HDFSExample
Export destination填写 /usr/local/hadoop/myapp/HDFSExample.jar
查看是否生成
1 ls /usr/local/hadoop/myapp
重新验证项目的运行
由于我们在eclipse测试过了项目,之前就在hdfs目录生成了/user/hadoop/merge.txt,为了验证刚刚打包的项目,我们要删掉这个/user/hadoop/merge.txt,等等重新运行项目
1 2 3 hdfs dfs -rm /user/hadoop/merge.txt hadoop jar /usr/local/hadoop/myapp/HDFSExample.jar hdfs dfs -cat /user/hadoop/merge.txt
如果你没事了,要关机了就回到这里5.6 关机步骤 ,去执行关机
顺便把eclipse的窗口关掉
严肃告知,别说我没提醒你,不要直接关机,也不要挂起虚拟机,否则你的虚拟机和你的hadoop坏了,你就重装,如果你坏了你也可以恢复快照到伪分布安装成功,但是你只是要重新做这周的实验
练习文件
写入文件
1 2 3 4 5 6 7 8 9 10 11 12 13 14 15 16 17 18 19 20 21 22 23 24 import org.apache.hadoop.conf.Configuration; import org.apache.hadoop.fs.FileSystem; import org.apache.hadoop.fs.FSDataOutputStream; import org.apache.hadoop.fs.Path; public class write { public static void main(String[] args) { try { Configuration conf = new Configuration(); conf.set("fs.defaultFS","hdfs://localhost:9000"); conf.set("fs.hdfs.impl","org.apache.hadoop.hdfs.DistributedFileSystem"); FileSystem fs = FileSystem.get(conf); byte[] buff = "Hello world".getBytes(); // 要写入的内容 String filename = "gcc-test"; //要写入的文件名 FSDataOutputStream os = fs.create(new Path(filename)); os.write(buff,0,buff.length); System.out.println("Create:"+ filename); os.close(); fs.close(); } catch (Exception e) { e.printStackTrace(); } } }
1 2 hdfs dfs -ls /user/hadoop hdfs dfs -cat /user/hadoop/gcc-test
判断文件是否存在
1 2 3 4 5 6 7 8 9 10 11 12 13 14 15 16 17 18 19 20 21 22 23 24 import org.apache.hadoop.conf.Configuration; import org.apache.hadoop.fs.FileSystem; import org.apache.hadoop.fs.Path; public class panduan { public static void main(String[] args) { try { String filename = "gcc-test"; Configuration conf = new Configuration(); conf.set("fs.defaultFS","hdfs://localhost:9000"); conf.set("fs.hdfs.impl","org.apache.hadoop.hdfs.DistributedFileSystem"); FileSystem fs = FileSystem.get(conf); if(fs.exists(new Path(filename))){ System.out.println("文件存在"); }else{ System.out.println("文件不存在"); } fs.close(); } catch (Exception e) { e.printStackTrace(); } } }
读取文件
1 2 3 4 5 6 7 8 9 10 11 12 13 14 15 16 17 18 19 20 21 22 23 24 25 26 27 import java.io.BufferedReader; import java.io.InputStreamReader; import org.apache.hadoop.conf.Configuration; import org.apache.hadoop.fs.FileSystem; import org.apache.hadoop.fs.Path; import org.apache.hadoop.fs.FSDataInputStream; public class read { public static void main(String[] args) { try { Configuration conf = new Configuration(); conf.set("fs.defaultFS","hdfs://localhost:9000"); conf.set("fs.hdfs.impl","org.apache.hadoop.hdfs.DistributedFileSystem"); FileSystem fs = FileSystem.get(conf); Path file = new Path("gcc-test"); FSDataInputStream getIt = fs.open(file); BufferedReader d = new BufferedReader(new InputStreamReader(getIt)); String content = d.readLine(); //读取文件一行 System.out.println(content); d.close(); //关闭文件 fs.close(); //关闭hdfs } catch (Exception e) { e.printStackTrace(); } } }
第二次实验
编程实现以下指定功能,并利用Hadoop提供的Shell命令完成相同的任务。
① 向HDFS中上传任意文本文件,如果指定的文件在HDFS中已经存在,由用户指定是追加到原有文件末尾还是覆盖原有的文件。
shell
检查文件是否存在,可以使用如下命令:
1 2 3 4 echo "gcc-text" > /home/hadoop/text.txthdfs dfs -put /home/hadoop/text.txt /user/hadoop/text.txt hdfs dfs -test -e text.txt echo $?
返回 0 表示文件存在。
返回 1 表示文件不存在。
如果结果显示文件已经存在,则用户可以选择追加到原来文件末尾或者覆盖原来文件,具体命令如下:
1 echo "gcc-local" > /home/hadoop/local.txt
local.txt
/text.txt
1 2 3 4 5 6 7 8 9 hdfs dfs -appendToFile local.txt text.txt hdfs dfs -cat text.txt hdfs dfs -copyFromLocal -f local.txt text.txt hdfs dfs -cat text.txt hdfs dfs -cp -f file:///home/hadoop/local.txt text.txt hdfs dfs -cat text.txt
实际上,也可以不用上述方式,而是采用如下命令 来实现:
1 2 3 4 5 6 7 8 hdfs dfs -rm text.txt hdfs dfs -put text.txt hdfs dfs -cat text.txt if $(hdfs dfs -test -e text.txt);then $(hdfs dfs -appendToFile local.txt text.txt);else $(hdfs dfs -copyFromLocal -f local.txt text.txt);fi hdfs dfs -cat text.txt
Java
我这里只说一次,自己创建好HDFSApi.java后面的每个实验,都会覆盖前面一个实验的代码
你就不要手欠,去创建别的,你要是自己会也行
后面就不会再说了
1 2 3 4 5 6 7 8 9 10 11 12 13 14 15 16 17 18 19 20 21 22 23 24 25 26 27 28 29 30 31 32 33 34 35 36 37 38 39 40 41 42 43 44 45 46 47 48 49 50 51 52 53 54 55 56 57 58 59 60 61 62 63 64 65 66 67 68 69 70 71 72 73 74 75 76 77 78 import org.apache.hadoop.conf.Configuration;import org.apache.hadoop.fs.*;import java.io.*;public class HDFSApi { public static boolean test (Configuration conf, String path) throws IOException { FileSystem fs = FileSystem.get(conf); return fs.exists(new Path (path)); } public static void copyFromLocalFile (Configuration conf, String localFilePath, String remoteFilePath) throws IOException { FileSystem fs = FileSystem.get(conf); Path localPath = new Path (localFilePath); Path remotePath = new Path (remoteFilePath); fs.copyFromLocalFile(false , true , localPath, remotePath); fs.close(); } public static void appendToFile (Configuration conf, String localFilePath, String remoteFilePath) throws IOException { FileSystem fs = FileSystem.get(conf); Path remotePath = new Path (remoteFilePath); FileInputStream in = new FileInputStream (localFilePath); FSDataOutputStream out = fs.append(remotePath); byte [] data = new byte [1024 ]; int read = -1 ; while ( (read = in.read(data)) > 0 ) { out.write(data, 0 , read); } out.close(); in.close(); fs.close(); } public static void main (String[] args) { Configuration conf = new Configuration (); conf.set("fs.default.name" ,"hdfs://localhost:9000" ); String localFilePath = "/home/hadoop/text.txt" ; String remoteFilePath = "/user/hadoop/text.txt" ; String choice = "append" ; try { Boolean fileExists = false ; if (HDFSApi.test(conf, remoteFilePath)) { fileExists = true ; System.out.println(remoteFilePath + " 已存在." ); } else { System.out.println(remoteFilePath + " 不存在." ); } if ( !fileExists) { HDFSApi.copyFromLocalFile(conf, localFilePath, remoteFilePath); System.out.println(localFilePath + " 已上传至 " + remoteFilePath); } else if ( choice.equals("overwrite" ) ) { HDFSApi.copyFromLocalFile(conf, localFilePath, remoteFilePath); System.out.println(localFilePath + " 已覆盖 " + remoteFilePath); } else if ( choice.equals("append" ) ) { HDFSApi.appendToFile(conf, localFilePath, remoteFilePath); System.out.println(localFilePath + " 已追加至 " + remoteFilePath); } } catch (Exception e) { e.printStackTrace(); } } }
验证
② 从HDFS中下载指定文件,如果本地文件与要下载的文件名称相同,则自动对下载的文件重命名。
shell
1 2 3 4 5 6 ls | grep textif $(hdfs dfs -test -e file:///home/hadoop/text.txt);then $(hdfs dfs -copyToLocal text.txt ./text2.txt); else $(hdfs dfs -copyToLocal text.txt ./text.txt); fi ls | grep text
Java
1 2 3 4 5 6 7 8 9 10 11 12 13 14 15 16 17 18 19 20 21 22 23 24 25 26 27 28 29 30 31 32 33 34 35 36 37 38 39 40 41 42 43 44 45 46 47 import org.apache.hadoop.conf.Configuration;import org.apache.hadoop.fs.*;import java.io.*;public class HDFSApi { public static void copyToLocal (Configuration conf, String remoteFilePath, String localFilePath) throws IOException { FileSystem fs = FileSystem.get(conf); Path remotePath = new Path (remoteFilePath); File f = new File (localFilePath); if (f.exists()) { System.out.println(localFilePath + " 已存在." ); Integer i = 0 ; while (true ) { f = new File (localFilePath + "_" + i.toString()); if (!f.exists()) { localFilePath = localFilePath + "_" + i.toString(); break ; } } System.out.println("将重新命名为: " + localFilePath); } Path localPath = new Path (localFilePath); fs.copyToLocalFile(remotePath, localPath); fs.close(); } public static void main (String[] args) { Configuration conf = new Configuration (); conf.set("fs.default.name" ,"hdfs://localhost:9000" ); String localFilePath = "/home/hadoop/text.txt" ; String remoteFilePath = "/user/hadoop/text.txt" ; try { HDFSApi.copyToLocal(conf, remoteFilePath, localFilePath); System.out.println("下载完成" ); } catch (Exception e) { e.printStackTrace(); } } }
验证:
③ 将HDFS中指定文件的内容输出到终端。
shell
Java
1 2 3 4 5 6 7 8 9 10 11 12 13 14 15 16 17 18 19 20 21 22 23 24 25 26 27 28 29 30 31 32 33 34 35 36 37 import org.apache.hadoop.conf.Configuration;import org.apache.hadoop.fs.*;import java.io.*;public class HDFSApi { public static void cat (Configuration conf, String remoteFilePath) throws IOException { FileSystem fs = FileSystem.get(conf); Path remotePath = new Path (remoteFilePath); FSDataInputStream in = fs.open(remotePath); BufferedReader d = new BufferedReader (new InputStreamReader (in)); String line = null ; while ( (line = d.readLine()) != null ) { System.out.println(line); } d.close(); in.close(); fs.close(); } public static void main (String[] args) { Configuration conf = new Configuration (); conf.set("fs.default.name" ,"hdfs://localhost:9000" ); String remoteFilePath = "/user/hadoop/text.txt" ; try { System.out.println("读取文件: " + remoteFilePath); HDFSApi.cat(conf, remoteFilePath); System.out.println("\n读取完成" ); } catch (Exception e) { e.printStackTrace(); } } }
④ 显示HDFS中指定的文件读写权限、大小、创建时间、路径等信息。
shell
1 hdfs dfs -ls -h text.txt
Java
1 2 3 4 5 6 7 8 9 10 11 12 13 14 15 16 17 18 19 20 21 22 23 24 25 26 27 28 29 30 31 32 33 34 35 36 37 38 39 40 41 import org.apache.hadoop.conf.Configuration;import org.apache.hadoop.fs.*;import java.io.*;import java.text.SimpleDateFormat;public class HDFSApi { public static void ls (Configuration conf, String remoteFilePath) throws IOException { FileSystem fs = FileSystem.get(conf); Path remotePath = new Path (remoteFilePath); FileStatus[] fileStatuses = fs.listStatus(remotePath); for (FileStatus s : fileStatuses) { System.out.println("路径: " + s.getPath().toString()); System.out.println("权限: " + s.getPermission().toString()); System.out.println("大小: " + s.getLen()); Long timeStamp = s.getModificationTime(); SimpleDateFormat format = new SimpleDateFormat ("yyyy-MM-dd HH:mm:ss" ); String date = format.format(timeStamp); System.out.println("时间: " + date); } fs.close(); } public static void main (String[] args) { Configuration conf = new Configuration (); conf.set("fs.default.name" ,"hdfs://localhost:9000" ); String remoteFilePath = "/user/hadoop/text.txt" ; try { System.out.println("读取文件信息: " + remoteFilePath); HDFSApi.ls(conf, remoteFilePath); System.out.println("\n读取完成" ); } catch (Exception e) { e.printStackTrace(); } } }
⑤ 给定HDFS中某一个目录,输出该目录下的所有文件的读写权限、大小、创建时间、路径等信息,如果该文件是目录,则递归输出该目录下所有文件相关信息。
shell
1 hdfs dfs -ls -R -h /user/hadoop
别管我这里有什么文件,你能显示出来就行
Java
1 2 3 4 5 6 7 8 9 10 11 12 13 14 15 16 17 18 19 20 21 22 23 24 25 26 27 28 29 30 31 32 33 34 35 36 37 38 39 40 41 42 43 44 45 import org.apache.hadoop.conf.Configuration;import org.apache.hadoop.fs.*;import java.io.*;import java.text.SimpleDateFormat;public class HDFSApi { public static void lsDir (Configuration conf, String remoteDir) throws IOException { FileSystem fs = FileSystem.get(conf); Path dirPath = new Path (remoteDir); RemoteIterator<LocatedFileStatus> remoteIterator = fs.listFiles(dirPath, true ); while (remoteIterator.hasNext()) { FileStatus s = remoteIterator.next(); System.out.println("路径: " + s.getPath().toString()); System.out.println("权限: " + s.getPermission().toString()); System.out.println("大小: " + s.getLen()); Long timeStamp = s.getModificationTime(); SimpleDateFormat format = new SimpleDateFormat ("yyyy-MM-dd HH:mm:ss" ); String date = format.format(timeStamp); System.out.println("时间: " + date); System.out.println(); } fs.close(); } public static void main (String[] args) { Configuration conf = new Configuration (); conf.set("fs.default.name" ,"hdfs://localhost:9000" ); String remoteDir = "/user/hadoop" ; try { System.out.println("(递归)读取目录下所有文件的信息: " + remoteDir); HDFSApi.lsDir(conf, remoteDir); System.out.println("读取完成" ); } catch (Exception e) { e.printStackTrace(); } } }
⑥ 提供一个HDFS中的文件的路径,对该文件进行创建和删除操作。如果文件所在目录不存在,则自动创建目录。
shell
1 2 3 4 5 if $(hdfs dfs -test -d dir1/dir2);then $(hdfs dfs -touchz dir1/dir2/filename);else $(hdfs dfs -mkdir -p dir1/dir2 && hdfs dfs -touchz dir1/dir2/filename); fi hdfs dfs -rm dir1/dir2/filename
Java
1 2 3 4 5 6 7 8 9 10 11 12 13 14 15 16 17 18 19 20 21 22 23 24 25 26 27 28 29 30 31 32 33 34 35 36 37 38 39 40 41 42 43 44 45 46 47 48 49 50 51 52 53 54 55 56 57 58 59 60 61 62 63 64 65 66 67 68 import org.apache.hadoop.conf.Configuration;import org.apache.hadoop.fs.*;import java.io.*;public class HDFSApi { public static boolean test (Configuration conf, String path) throws IOException { FileSystem fs = FileSystem.get(conf); return fs.exists(new Path (path)); } public static boolean mkdir (Configuration conf, String remoteDir) throws IOException { FileSystem fs = FileSystem.get(conf); Path dirPath = new Path (remoteDir); boolean result = fs.mkdirs(dirPath); fs.close(); return result; } public static void touchz (Configuration conf, String remoteFilePath) throws IOException { FileSystem fs = FileSystem.get(conf); Path remotePath = new Path (remoteFilePath); FSDataOutputStream outputStream = fs.create(remotePath); outputStream.close(); fs.close(); } public static boolean rm (Configuration conf, String remoteFilePath) throws IOException { FileSystem fs = FileSystem.get(conf); Path remotePath = new Path (remoteFilePath); boolean result = fs.delete(remotePath, false ); fs.close(); return result; } public static void main (String[] args) { Configuration conf = new Configuration (); conf.set("fs.default.name" ,"hdfs://localhost:9000" ); String remoteFilePath = "/user/hadoop/input/text.txt" ; String remoteDir = "/user/hadoop/input" ; try { if ( HDFSApi.test(conf, remoteFilePath) ) { HDFSApi.rm(conf, remoteFilePath); System.out.println("删除路径: " + remoteFilePath); } else { if ( !HDFSApi.test(conf, remoteDir) ) { HDFSApi.mkdir(conf, remoteDir); System.out.println("创建文件夹: " + remoteDir); } HDFSApi.touchz(conf, remoteFilePath); System.out.println("创建路径: " + remoteFilePath); } } catch (Exception e) { e.printStackTrace(); } } }
⑦ 提供一个HDFS的目录的路径,对该目录进行创建和删除操作。创建目录时,如果目录文件所在目录不存在则自动创建相应目录;删除目录时,由用户指定当该目录不为空时是否还删除该目录。
shell
1 2 3 4 hdfs dfs -mkdir -p dir1/dir2 hdfs dfs -rmdir dir1/dir2 hdfs dfs -rm -R dir1/dir2
Java
1 2 3 4 5 6 7 8 9 10 11 12 13 14 15 16 17 18 19 20 21 22 23 24 25 26 27 28 29 30 31 32 33 34 35 36 37 38 39 40 41 42 43 44 45 46 47 48 49 50 51 52 53 54 55 56 57 58 59 60 61 62 63 64 65 66 67 68 69 import org.apache.hadoop.conf.Configuration;import org.apache.hadoop.fs.*;import java.io.*;public class HDFSApi { public static boolean test (Configuration conf, String path) throws IOException { FileSystem fs = FileSystem.get(conf); return fs.exists(new Path (path)); } public static boolean isDirEmpty (Configuration conf, String remoteDir) throws IOException { FileSystem fs = FileSystem.get(conf); Path dirPath = new Path (remoteDir); RemoteIterator<LocatedFileStatus> remoteIterator = fs.listFiles(dirPath, true ); return !remoteIterator.hasNext(); } public static boolean mkdir (Configuration conf, String remoteDir) throws IOException { FileSystem fs = FileSystem.get(conf); Path dirPath = new Path (remoteDir); boolean result = fs.mkdirs(dirPath); fs.close(); return result; } public static boolean rmDir (Configuration conf, String remoteDir) throws IOException { FileSystem fs = FileSystem.get(conf); Path dirPath = new Path (remoteDir); boolean result = fs.delete(dirPath, true ); fs.close(); return result; } public static void main (String[] args) { Configuration conf = new Configuration (); conf.set("fs.default.name" ,"hdfs://localhost:9000" ); String remoteDir = "/user/hadoop/input" ; Boolean forceDelete = false ; try { if ( !HDFSApi.test(conf, remoteDir) ) { HDFSApi.mkdir(conf, remoteDir); System.out.println("创建目录: " + remoteDir); } else { if ( HDFSApi.isDirEmpty(conf, remoteDir) || forceDelete ) { HDFSApi.rmDir(conf, remoteDir); System.out.println("删除目录: " + remoteDir); } else { System.out.println("目录不为空,不删除: " + remoteDir); } } } catch (Exception e) { e.printStackTrace(); } } }
⑧ 向HDFS中指定的文件追加内容,由用户指定将内容追加到原有文件的开头或结尾。
shell
1 2 3 4 5 6 rm -rf text.txt hdfs dfs -appendToFile local.txt text.txt hdfs dfs -get text.txt cat text.txt >> local.txt hdfs dfs -copyFromLocal -f text.txt text.txt hdfs dfs -cat text.txt
Java
1 2 3 4 5 6 7 8 9 10 11 12 13 14 15 16 17 18 19 20 21 22 23 24 25 26 27 28 29 30 31 32 33 34 35 36 37 38 39 40 41 42 43 44 45 46 47 48 49 50 51 52 53 54 55 56 57 58 59 60 61 62 63 64 65 66 67 68 69 70 71 72 73 74 75 76 77 78 79 80 81 82 83 84 85 86 87 88 89 90 91 92 93 94 95 96 97 98 99 100 101 102 import org.apache.hadoop.conf.Configuration;import org.apache.hadoop.fs.*;import java.io.*;public class HDFSApi { public static boolean test (Configuration conf, String path) throws IOException { FileSystem fs = FileSystem.get(conf); return fs.exists(new Path (path)); } public static void appendContentToFile (Configuration conf, String content, String remoteFilePath) throws IOException { FileSystem fs = FileSystem.get(conf); Path remotePath = new Path (remoteFilePath); FSDataOutputStream out = fs.append(remotePath); out.write(content.getBytes()); out.close(); fs.close(); } public static void appendToFile (Configuration conf, String localFilePath, String remoteFilePath) throws IOException { FileSystem fs = FileSystem.get(conf); Path remotePath = new Path (remoteFilePath); FileInputStream in = new FileInputStream (localFilePath); FSDataOutputStream out = fs.append(remotePath); byte [] data = new byte [1024 ]; int read = -1 ; while ( (read = in.read(data)) > 0 ) { out.write(data, 0 , read); } out.close(); in.close(); fs.close(); } public static void moveToLocalFile (Configuration conf, String remoteFilePath, String localFilePath) throws IOException { FileSystem fs = FileSystem.get(conf); Path remotePath = new Path (remoteFilePath); Path localPath = new Path (localFilePath); fs.moveToLocalFile(remotePath, localPath); } public static void touchz (Configuration conf, String remoteFilePath) throws IOException { FileSystem fs = FileSystem.get(conf); Path remotePath = new Path (remoteFilePath); FSDataOutputStream outputStream = fs.create(remotePath); outputStream.close(); fs.close(); } public static void main (String[] args) { Configuration conf = new Configuration (); conf.set("fs.default.name" ,"hdfs://localhost:9000" ); String remoteFilePath = "/user/hadoop/text.txt" ; String content = "新追加的内容\n" ; String choice = "after" ; try { if ( !HDFSApi.test(conf, remoteFilePath) ) { System.out.println("文件不存在: " + remoteFilePath); } else { if ( choice.equals("after" ) ) { HDFSApi.appendContentToFile(conf, content, remoteFilePath); System.out.println("已追加内容到文件末尾" + remoteFilePath); } else if ( choice.equals("before" ) ) { String localTmpPath = "/user/hadoop/tmp.txt" ; HDFSApi.moveToLocalFile(conf, remoteFilePath, localTmpPath); HDFSApi.touchz(conf, remoteFilePath); HDFSApi.appendContentToFile(conf, content, remoteFilePath); HDFSApi.appendToFile(conf, localTmpPath, remoteFilePath); System.out.println("已追加内容到文件开头: " + remoteFilePath); } } } catch (Exception e) { e.printStackTrace(); } } }
⑨ 删除HDFS中指定的文件。
shell
1 2 3 rm text.txt hdfs dfs -get text.txt hdfs dfs -rm text.txt
Java
1 2 3 4 5 6 7 8 9 10 11 12 13 14 15 16 17 18 19 20 21 22 23 24 25 26 27 28 29 30 31 32 33 import org.apache.hadoop.conf.Configuration;import org.apache.hadoop.fs.*;import java.io.*;public class HDFSApi { public static boolean rm (Configuration conf, String remoteFilePath) throws IOException { FileSystem fs = FileSystem.get(conf); Path remotePath = new Path (remoteFilePath); boolean result = fs.delete(remotePath, false ); fs.close(); return result; } public static void main (String[] args) { Configuration conf = new Configuration (); conf.set("fs.default.name" ,"hdfs://localhost:9000" ); String remoteFilePath = "/user/hadoop/text.txt" ; try { if ( HDFSApi.rm(conf, remoteFilePath) ) { System.out.println("文件删除: " + remoteFilePath); } else { System.out.println("操作失败(文件不存在或删除失败)" ); } } catch (Exception e) { e.printStackTrace(); } } }
⑩ 在HDFS中将文件从源路径移动到目的路径。
shell
1 2 3 hdfs dfs -put text.txt hdfs dfs -mv text.txt text2.txt hdfs dfs -ls
Java
1 2 3 4 5 6 7 8 9 10 11 12 13 14 15 16 17 18 19 20 21 22 23 24 25 26 27 28 29 30 31 32 33 34 35 import org.apache.hadoop.conf.Configuration;import org.apache.hadoop.fs.*;import java.io.*;public class HDFSApi { public static boolean mv (Configuration conf, String remoteFilePath, String remoteToFilePath) throws IOException { FileSystem fs = FileSystem.get(conf); Path srcPath = new Path (remoteFilePath); Path dstPath = new Path (remoteToFilePath); boolean result = fs.rename(srcPath, dstPath); fs.close(); return result; } public static void main (String[] args) { Configuration conf = new Configuration (); conf.set("fs.default.name" ,"hdfs://localhost:9000" ); String remoteFilePath = "hdfs:///user/hadoop/text.txt" ; String remoteToFilePath = "hdfs:///user/hadoop/new.txt" ; try { if ( HDFSApi.mv(conf, remoteFilePath, remoteToFilePath) ) { System.out.println("将文件 " + remoteFilePath + " 移动到 " + remoteToFilePath); } else { System.out.println("操作失败(源文件不存在或移动失败)" ); } } catch (Exception e) { e.printStackTrace(); } } }
(2)编程实现一个类“MyFSDataInputStream”,该类继承“org.apache.hadoop.fs.FSDataInput Stream”,要求如下: 实现按行读取HDFS中指定文件的方法“readLine()”,如果读到文件末尾,则返回空,否则返回文件一行的文本。
shell
Java
自己创建好MyFSDataInputStream.java
1 2 3 4 5 6 7 8 9 10 11 12 13 14 15 16 17 18 19 20 21 22 23 24 25 26 27 28 29 30 31 32 33 34 35 36 37 38 39 40 41 42 43 44 45 46 47 48 49 50 51 52 53 54 55 56 57 58 59 60 61 62 63 import org.apache.hadoop.conf.Configuration;import org.apache.hadoop.fs.FSDataInputStream;import org.apache.hadoop.fs.FileSystem;import org.apache.hadoop.fs.Path;import java.io.*;public class MyFSDataInputStream extends FSDataInputStream { public MyFSDataInputStream (InputStream in) { super (in); } public static String readline (BufferedReader br) throws IOException { char [] data = new char [1024 ]; int read = -1 ; int off = 0 ; while ( (read = br.read(data, off, 1 )) != -1 ) { if (String.valueOf(data[off].equals("\n" ) ) { off += 1 ; break ; } off += 1 ; } if (off > 0 ) { return String.valueOf(data); } else { return null ; } } public static void cat (Configuration conf, String remoteFilePath) throws IOException { FileSystem fs = FileSystem.get(conf); Path remotePath = new Path (remoteFilePath); FSDataInputStream in = fs.open(remotePath); BufferedReader br = new BufferedReader (new InputStreamReader (in)); String line = null ; while ( (line = MyFSDataInputStream.readline(br)) != null ) { System.out.println(line); } br.close(); in.close(); fs.close(); } public static void main (String[] args) { Configuration conf = new Configuration (); conf.set("fs.default.name" ,"hdfs://localhost:9000" ); String remoteFilePath = "/user/hadoop/text.txt" ; try { MyFSDataInputStream.cat(conf, remoteFilePath); } catch (Exception e) { e.printStackTrace(); } } }
(3)查看Java帮助手册或其他资料,用“java.net.URL”和“org.apache.hadoop.fs.FsURLStream HandlerFactory”编程来输出HDFS中指定文件的文本到终端中。
Java
用回HDFSApi
1 2 3 4 5 6 7 8 9 10 11 12 13 14 15 16 17 18 19 20 21 22 23 24 25 26 27 import org.apache.hadoop.fs.*;import org.apache.hadoop.io.IOUtils;import java.io.*;import java.net.URL;public class HDFSApi { static { URL.setURLStreamHandlerFactory(new FsUrlStreamHandlerFactory ()); } public static void main (String[] args) throws Exception { String remoteFilePath = "hdfs://localhost:9000/user/hadoop/text.txt" ; InputStream in = null ; try { in = new URL (remoteFilePath).openStream(); IOUtils.copyBytes(in, System.out, 4096 , false ); } finally { IOUtils.closeStream(in); } } }
Hbase安装(4.6.1)
这里有两个题,就是要交两个截图,我会注明
进hadoop用户
自行启动hadoop
安装hbase
1 2 3 4 5 6 7 8 9 10 11 12 13 14 15 16 17 18 19 20 21 22 23 24 25 26 27 28 29 30 sudo tar -xf hbase-2.5.4-bin.tar.gz -C /usr/local/sudo mv /usr/local/hbase-2.5.4 /usr/local/hbasesudo chown -R hadoop:hadoop /usr/local/hbaseecho "export HBASE_HOME=/usr/local/hbase" >> ~/.bashrcecho "export PATH=\$PATH:\$HBASE_HOME/bin" >> ~/.bashrcsource ~/.bashrcsudo sed -i "s/CLASSPATH=\${CLASSPATH}:\$JAVA_HOME\/lib\/tools.jar/CLASSPATH=\${CLASSPATH}:\$JAVA_HOME\/lib\/tools.jar:\/usr\/local\/hbase\/lib\/*/g" /usr/local/hbase/bin/hbaseecho "export JAVA_HOME=/usr/lib/jvm/jdk1.8.0_162" >> $HBASE_HOME /conf/hbase-env.shecho "export HBASE_CLASSPATH=/usr/local/hbase/conf" >> $HBASE_HOME /conf/hbase-env.shecho "export HBASE_MANAGES_ZK=true" >> $HBASE_HOME /conf/hbase-env.shecho "export HBASE_DISABLE_HADOOP_CLASSPATH_LOOKUP=true" >> $HBASE_HOME /conf/hbase-env.shcat >$HBASE_HOME /conf/hbase-site.xml<<"EOF" <configuration> <property> <name>hbase.rootdir</name> <value>hdfs://localhost:9000/hbase</value> </property> <property> <name>hbase.cluster.distributed</name> <value>true </value> </property> <property> <name>hbase.unsafe.stream.capability.enforce</name> <value>false </value> </property> </configuration> EOF hbase version
这个截图交到4.6.1开头第一个作业
启动hbase
开机顺序:一定是先启动hadoop(大)在启动hbase(小)
开机顺序:一定是先启动hadoop(大)在启动hbase(小)
开机顺序:一定是先启动hadoop(大)在启动hbase(小)
1 2 start-all.sh start-hbase.sh
然后输入jps,有以下三个个就安装成功
这是4.6.1里最下面的第二个作业截图
测试hbase
能运行没报错就行
退出hbase数据库用exit
访问hbase网页
http://ip:16010/
关闭hbase
关机顺序:先关habse(小)再关hadoop(大)
关机顺序:先关habse(小)再关hadoop(大)
关机顺序:先关habse(小)再关hadoop(大)
关机顺序:先关habse(小)再关hadoop(大)
不按操作来,机器坏了,自己重装吧
1 2 3 stop-hbase.sh stop-all.sh sudo poweroff
关机后自己打个habse的快照
(4.6.2)实验
启动eclipse
新建项目
名为HBaseExample
现在有几个目录要添加注意了!!!
现在有几个目录要添加注意了!!!
现在有几个目录要添加注意了!!!
现在有几个目录要添加注意了!!!
/usr/local/hbase/lib下所有的jar包
/usr/local/hbase/lib/client-facing-thirdparty下所有的jar包
最后直接点击finish完成创建
新建class
然后在你创建的这个java文件输入,别运行
1 2 3 4 5 6 7 8 9 10 11 12 13 14 15 16 17 18 19 20 21 22 23 24 25 26 27 28 29 30 31 32 33 34 35 36 37 38 39 40 41 42 43 44 45 46 47 48 49 50 51 52 53 54 55 56 57 58 59 60 61 62 63 64 65 66 67 68 69 70 71 72 73 74 75 76 import org.apache.hadoop.conf.Configuration;import org.apache.hadoop.hbase.*;import org.apache.hadoop.hbase.client.*;import org.apache.hadoop.hbase.util.Bytes; import java.io.IOException;public class ExampleForHBase { public static Configuration configuration; public static Connection connection; public static Admin admin; public static void main (String[] args) throws IOException{ init(); createTable("student" ,new String []{"score" }); insertData("student" ,"zhangsan" ,"score" ,"English" ,"69" ); insertData("student" ,"zhangsan" ,"score" ,"Math" ,"86" ); insertData("student" ,"zhangsan" ,"score" ,"Computer" ,"77" ); getData("student" , "zhangsan" , "score" ,"English" ); close(); } public static void init () { configuration = HBaseConfiguration.create(); configuration.set("hbase.rootdir" ,"hdfs://localhost:9000/hbase" ); try { connection = ConnectionFactory.createConnection(configuration); admin = connection.getAdmin(); }catch (IOException e){ e.printStackTrace(); } } public static void close () { try { if (admin != null ){ admin.close(); } if (null != connection){ connection.close(); } }catch (IOException e){ e.printStackTrace(); } } public static void createTable (String myTableName,String[] colFamily) throws IOException { TableName tableName = TableName.valueOf(myTableName); if (admin.tableExists(tableName)){ System.out.println("talbe is exists!" ); }else { TableDescriptorBuilder tableDescriptor = TableDescriptorBuilder.newBuilder(tableName); for (String str:colFamily){ ColumnFamilyDescriptor family = ColumnFamilyDescriptorBuilder.newBuilder(Bytes.toBytes(str)).build(); tableDescriptor.setColumnFamily(family); } admin.createTable(tableDescriptor.build()); } } public static void insertData (String tableName,String rowKey,String colFamily,String col,String val) throws IOException { Table table = connection.getTable(TableName.valueOf(tableName)); Put put = new Put (rowKey.getBytes()); put.addColumn(colFamily.getBytes(),col.getBytes(), val.getBytes()); table.put(put); table.close(); } public static void getData (String tableName,String rowKey,String colFamily, String col) throws IOException{ Table table = connection.getTable(TableName.valueOf(tableName)); Get get = new Get (rowKey.getBytes()); get.addColumn(colFamily.getBytes(),col.getBytes()); Result result = table.get(get); System.out.println(new String (result.getValue(colFamily.getBytes(),col==null ?null :col.getBytes()))); table.close(); } }
自行启动hadoop和hbase,不记得了回去翻记录,我有写启动顺序,别搞错了,搞错了就恢复快照吧,下面是关闭和启动的顺序
9.2 启动hbase
9.3 关闭hbase
没启动就不要做下面的内容!!!
没启动就不要做下面的内容!!!
没启动就不要做下面的内容!!!
没启动就不要做下面的内容!!!
运行代码
就会出现这样的结果
4.6.2实验要交的截图1
这时候进入hbase数据库查看有没有student表
这是进入hbase数据库的命令,我前面也有写后面不会再说了,记不住就自己找办法
4.6.2实验要交的截图2
(4.8实验3)
如果这里你输入第一条和第二条命令就报错,自己找找原因,我不想说了
第一题
(1)编程实现以下指定功能,并用Hadoop提供的HBaseShell命令完成相同的任务。
①列出HBase所有表的相关信息,如表名、创建时间等。
shell
java
自己创建一个test.java,要在HBaseExample的项目下,后面一直都会用这个java
1 2 3 4 5 6 7 8 9 10 11 12 13 14 15 16 17 18 19 20 21 22 23 24 25 26 27 28 29 30 31 32 33 34 35 36 37 38 39 40 41 42 43 44 45 46 47 48 49 50 51 52 53 54 55 56 57 58 59 60 61 62 63 64 65 66 67 68 69 70 71 72 73 74 75 76 77 78 79 80 81 82 83 84 85 86 import org.apache.hadoop.conf.Configuration;import org.apache.hadoop.hbase.*;import org.apache.hadoop.hbase.client.*;import org.apache.hadoop.hbase.util.Bytes;import java.util.List;import java.io.IOException;public class test { public static Configuration configuration; public static Connection connection; public static Admin admin; public static void main (String[] args) throws IOException{ init(); List<TableDescriptor> tableDescriptors = admin.listTableDescriptors(); for (TableDescriptor tableDescriptor : tableDescriptors){ TableName tableName = tableDescriptor.getTableName(); System.out.println("Table:" + tableName); } close(); } public static void init () { configuration = HBaseConfiguration.create(); configuration.set("hbase.rootdir" , "hbase://localhost:9000/hbase" ); try { connection = ConnectionFactory.createConnection(configuration); if (connection == null ) { System.err.println("Failed to create HBase connection." ); } else { System.out.println("HBase connection created successfully." ); } admin = connection.getAdmin(); if (admin == null ) { System.err.println("Failed to get HBase Admin." ); } else { System.out.println("HBase Admin initialized successfully." ); } } catch (IOException e) { e.printStackTrace(); } } public static void close () { try { if (admin != null ){ admin.close(); } if (null != connection){ connection.close(); } }catch (IOException e){ e.printStackTrace(); } } public static void createTable (String myTableName,String[] colFamily) throws IOException { TableName tableName = TableName.valueOf(myTableName); if (admin.tableExists(tableName)){ System.out.println("talbe is exists!" ); }else { TableDescriptorBuilder tableDescriptor = TableDescriptorBuilder.newBuilder(tableName); for (String str:colFamily){ ColumnFamilyDescriptor family = ColumnFamilyDescriptorBuilder.newBuilder(Bytes.toBytes(str)).build(); tableDescriptor.setColumnFamily(family); } admin.createTable(tableDescriptor.build()); } } public static void insertData (String tableName,String rowKey,String colFamily,String col,String val) throws IOException { Table table = connection.getTable(TableName.valueOf(tableName)); Put put = new Put (rowKey.getBytes()); put.addColumn(colFamily.getBytes(),col.getBytes(), val.getBytes()); table.put(put); table.close(); } public static void getData (String tableName,String rowKey,String colFamily, String col) throws IOException{ Table table = connection.getTable(TableName.valueOf(tableName)); Get get = new Get (rowKey.getBytes()); get.addColumn(colFamily.getBytes(),col.getBytes()); Result result = table.get(get); System.out.println(new String (result.getValue(colFamily.getBytes(),col==null ?null :col.getBytes()))); table.close(); } }
②在终端输出指定表的所有记录数据。
shell
java
1 2 3 4 5 6 7 8 9 10 11 12 13 14 15 16 17 18 19 20 21 22 23 24 25 26 27 28 29 30 31 32 33 34 35 36 37 38 39 40 41 42 43 44 45 46 47 48 49 50 51 52 53 54 55 56 57 58 59 60 61 62 63 64 65 66 67 68 69 70 71 72 73 74 75 76 77 78 79 80 81 82 83 84 85 86 87 88 89 90 91 92 93 94 95 96 97 98 99 100 101 102 103 104 105 import org.apache.hadoop.conf.Configuration;import org.apache.hadoop.hbase.*;import org.apache.hadoop.hbase.client.*;import org.apache.hadoop.hbase.util.Bytes;import java.util.List;import java.io.IOException;public class test { public static Configuration configuration; public static Connection connection; public static Admin admin; public static void main (String[] args) throws IOException { String tableName = "student" ; getData(tableName); } public static void getData (String tableName) throws IOException { init(); Table table = connection.getTable(TableName.valueOf(tableName)); Scan scan = new Scan (); ResultScanner scanner = table.getScanner(scan); System.out.println("表 " + tableName + " 的所有记录如下:" ); for (Result result : scanner) { printRecoder(result); } close(); } public static void printRecoder (Result result) throws IOException { for (Cell cell : result.rawCells()) { System.out.print("行键: " + new String (Bytes.toString(cell.getRowArray(), cell.getRowOffset(), cell.getRowLength()))); System.out.print(" 列簇: " + new String (Bytes.toString(cell.getFamilyArray(), cell.getFamilyOffset(), cell.getFamilyLength()))); System.out.print(" 列: " + new String (Bytes.toString(cell.getQualifierArray(), cell.getQualifierOffset(), cell.getQualifierLength()))); System.out.print(" 值: " + new String (Bytes.toString(cell.getValueArray(), cell.getValueOffset(), cell.getValueLength()))); System.out.println(" 时间戳: " + cell.getTimestamp()); } } public static void init () { configuration = HBaseConfiguration.create(); configuration.set("hbase.rootdir" , "hbase://localhost:9000/hbase" ); try { connection = ConnectionFactory.createConnection(configuration); if (connection == null ) { System.err.println("Failed to create HBase connection." ); } else { System.out.println("HBase connection created successfully." ); } admin = connection.getAdmin(); if (admin == null ) { System.err.println("Failed to get HBase Admin." ); } else { System.out.println("HBase Admin initialized successfully." ); } } catch (IOException e) { e.printStackTrace(); } } public static void close () { try { if (admin != null ){ admin.close(); } if (null != connection){ connection.close(); } }catch (IOException e){ e.printStackTrace(); } } public static void createTable (String myTableName,String[] colFamily) throws IOException { TableName tableName = TableName.valueOf(myTableName); if (admin.tableExists(tableName)){ System.out.println("talbe is exists!" ); }else { TableDescriptorBuilder tableDescriptor = TableDescriptorBuilder.newBuilder(tableName); for (String str:colFamily){ ColumnFamilyDescriptor family = ColumnFamilyDescriptorBuilder.newBuilder(Bytes.toBytes(str)).build(); tableDescriptor.setColumnFamily(family); } admin.createTable(tableDescriptor.build()); } } public static void insertData (String tableName,String rowKey,String colFamily,String col,String val) throws IOException { Table table = connection.getTable(TableName.valueOf(tableName)); Put put = new Put (rowKey.getBytes()); put.addColumn(colFamily.getBytes(),col.getBytes(), val.getBytes()); table.put(put); table.close(); } public static void getData (String tableName,String rowKey,String colFamily, String col) throws IOException{ Table table = connection.getTable(TableName.valueOf(tableName)); Get get = new Get (rowKey.getBytes()); get.addColumn(colFamily.getBytes(),col.getBytes()); Result result = table.get(get); System.out.println(new String (result.getValue(colFamily.getBytes(),col==null ?null :col.getBytes()))); table.close(); } }
运行结果如下
③向已经创建好的表添加和删除指定的列族或列。
shell
1 2 3 create 's1','score' put 's1','zhangsan','score:Math','69' delete 's1','zhangsan','score:Math'
JAVA
1 2 3 4 5 6 7 8 9 10 11 12 13 14 15 16 17 18 19 20 21 22 23 24 25 26 27 28 29 30 31 32 33 34 35 36 37 38 39 40 41 42 43 44 45 46 47 48 49 50 51 52 53 54 55 56 57 58 59 60 61 62 63 64 65 66 67 68 69 70 71 72 73 74 75 76 77 78 79 80 81 82 83 84 85 86 87 88 89 90 91 92 93 94 95 96 97 98 99 100 101 102 103 104 105 106 107 108 109 110 111 112 113 114 115 116 117 118 119 120 import org.apache.hadoop.conf.Configuration;import org.apache.hadoop.hbase.*;import org.apache.hadoop.hbase.client.*;import org.apache.hadoop.hbase.util.Bytes;import java.io.IOException;public class test { public static Configuration configuration; public static Connection connection; public static Admin admin; public static void main (String[] args) throws IOException { init(); String tableName = "s1" ; String[] columnFamilies = {"score" }; String rowKey = "zhangsan" ; String colFamily = "score" ; String col = "Math" ; String val = "69" ; System.out.println("开始创建表..." ); createTable(tableName, columnFamilies); System.out.println("开始插入数据..." ); insertRow(tableName, rowKey, colFamily, col, val); System.out.println("验证插入的数据..." ); getData(tableName, rowKey, colFamily, col); System.out.println("开始删除数据..." ); deleteRow(tableName, rowKey, colFamily, col); System.out.println("验证删除后的数据..." ); getData(tableName, rowKey, colFamily, col); close(); } public static void init () { configuration = HBaseConfiguration.create(); configuration.set("hbase.rootdir" , "hdfs://localhost:9000/hbase" ); configuration.set("hbase.zookeeper.quorum" , "localhost" ); try { connection = ConnectionFactory.createConnection(configuration); admin = connection.getAdmin(); System.out.println("HBase connection and Admin initialized successfully." ); } catch (IOException e) { e.printStackTrace(); } } public static void close () { try { if (admin != null ) { admin.close(); } if (connection != null ) { connection.close(); } } catch (IOException e) { e.printStackTrace(); } } public static void createTable (String myTableName, String[] colFamilies) throws IOException { TableName tableName = TableName.valueOf(myTableName); if (admin.tableExists(tableName)) { System.out.println("表已存在!" ); } else { TableDescriptorBuilder tableDescriptor = TableDescriptorBuilder.newBuilder(tableName); for (String cf : colFamilies) { ColumnFamilyDescriptor family = ColumnFamilyDescriptorBuilder.newBuilder(Bytes.toBytes(cf)).build(); tableDescriptor.setColumnFamily(family); } admin.createTable(tableDescriptor.build()); System.out.println("表 " + myTableName + " 创建成功!" ); } } public static void insertRow (String tableName, String rowKey, String colFamily, String col, String val) throws IOException { Table table = connection.getTable(TableName.valueOf(tableName)); Put put = new Put (Bytes.toBytes(rowKey)); put.addColumn(Bytes.toBytes(colFamily), Bytes.toBytes(col), Bytes.toBytes(val)); table.put(put); table.close(); System.out.println("数据插入成功!" ); } public static void getData (String tableName, String rowKey, String colFamily, String col) throws IOException { Table table = connection.getTable(TableName.valueOf(tableName)); Get get = new Get (Bytes.toBytes(rowKey)); get.addColumn(Bytes.toBytes(colFamily), Bytes.toBytes(col)); Result result = table.get(get); byte [] value = result.getValue(Bytes.toBytes(colFamily), Bytes.toBytes(col)); if (value != null ) { System.out.println("获取到数据: " + new String (value)); } else { System.out.println("未找到数据。" ); } table.close(); } public static void deleteRow (String tableName, String rowKey, String colFamily, String col) throws IOException { Table table = connection.getTable(TableName.valueOf(tableName)); Delete delete = new Delete (Bytes.toBytes(rowKey)); delete.addColumn(Bytes.toBytes(colFamily), Bytes.toBytes(col)); table.delete(delete); table.close(); System.out.println("数据删除成功!" ); } }
④清空指定表的所有记录数据。
shell
1 2 3 4 create 's1','score' put 's1','zhangsan','score:Math','69' truncate 's1' scan 's1'
1 put 's1','zhangsan','score:Math','69'
java
教材中的代码
clearRows() 方法缺了一个 关键点 :
在删除表之后重新创建时,需要重新添加原来的列簇(否则建出来的表是空结构)。
所以我用新的
1 2 3 4 5 6 7 8 9 10 11 12 13 14 15 16 17 18 19 20 21 22 23 24 25 26 27 28 29 30 31 32 33 34 35 36 37 38 39 40 41 42 43 44 45 46 47 48 49 50 51 import org.apache.hadoop.conf.Configuration;import org.apache.hadoop.hbase.HBaseConfiguration;import org.apache.hadoop.hbase.TableName;import org.apache.hadoop.hbase.client.*;import org.apache.hadoop.hbase.util.Bytes;import java.io.IOException;public class test { public static Configuration configuration; public static Connection connection; public static Admin admin; public static void main (String[] args) throws IOException { String tableName = "s1" ; clearRows(tableName); } public static void init () throws IOException { configuration = HBaseConfiguration.create(); configuration.set("hbase.rootdir" , "hdfs://localhost:9000/hbase" ); configuration.set("hbase.zookeeper.quorum" , "localhost" ); connection = ConnectionFactory.createConnection(configuration); admin = connection.getAdmin(); } public static void close () throws IOException { if (admin != null ) admin.close(); if (connection != null ) connection.close(); } public static void clearRows (String tableNameStr) throws IOException { init(); TableName tableName = TableName.valueOf(tableNameStr); if (!admin.tableExists(tableName)) { System.out.println("表不存在,无法清空!" ); close(); return ; } TableDescriptor descriptor = admin.getDescriptor(tableName); if (!admin.isTableDisabled(tableName)) { admin.disableTable(tableName); } admin.deleteTable(tableName); admin.createTable(descriptor); System.out.println("表 [" + tableNameStr + "] 已清空(保留列簇结构)" ); close(); } }
这时候再去查表
⑤统计表的行数。
shell
1 2 put 's1','zhangsan','score:Math','69' count 's1'
java
1 2 3 4 5 6 7 8 9 10 11 12 13 14 15 16 17 18 19 20 21 22 23 24 25 26 27 28 29 30 31 32 33 34 35 36 37 38 39 40 41 42 43 44 45 46 47 48 49 50 51 52 53 54 55 import org.apache.hadoop.conf.Configuration; import org.apache.hadoop.hbase.HBaseConfiguration; import org.apache.hadoop.hbase.TableName; import org.apache.hadoop.hbase.client.*; import java.io.IOException; public class test { public static Configuration configuration; public static Connection connection; public static Admin admin; public static void main(String[] args) throws IOException { String tableName = "s1"; // 你要统计的表名 countRows(tableName); } // 初始化 HBase 连接 public static void init() throws IOException { configuration = HBaseConfiguration.create(); configuration.set("hbase.rootdir", "hdfs://localhost:9000/hbase"); configuration.set("hbase.zookeeper.quorum", "localhost"); connection = ConnectionFactory.createConnection(configuration); admin = connection.getAdmin(); } // 关闭 HBase 连接 public static void close() throws IOException { if (admin != null) admin.close(); if (connection != null) connection.close(); } // 统计表的行数 public static void countRows(String tableName) throws IOException { init(); // 初始化连接 Table table = connection.getTable(TableName.valueOf(tableName)); Scan scan = new Scan(); scan.setCaching(500); // 可选优化,加快扫描速度 ResultScanner scanner = table.getScanner(scan); int num = 0; for (Result result = scanner.next(); result != null; result = scanner.next()) { num++; } System.out.println("表 [" + tableName + "] 的总行数为: " + num); scanner.close(); table.close(); // 关闭 Table 对象 close(); // 关闭连接 } }
第二题
(2)现有以下关系数据库中的表(见表4-21、表4-22和表4-23),要求将其转换为适合HBase存储的表并插入数据。
表4-21 学生(Student)表
学号(S_No)
姓名(S_Name)
性别(S_Sex)
年龄(S_Age)
2015001
Zhangsan
male
23
2015002
Mary
female
22
2015003
Lisi
male
24
表4-22 课程(Course)表
课程号(C_No)
课程名(C_Name)
学分(C_Credit)
123001
Math
2.0
123002
Computer Science
5.0
123003
English
3.0
表4-23 选课(SC)表
学号(SC_Sno)
课程号(SC_Cno)
成绩(SC_Score)
2015001
123001
86
2015001
123003
69
2015002
123002
77
2015002
123003
99
2015003
123001
98
2015003
123002
95
shell
1 2 disable 'student' drop 'student'
创建学生 student表
1 2 3 4 5 6 7 8 9 10 11 12 13 14 create 'Student','S_No','S_Name','S_Sex','S_Age' put 'Student','s001','S_No','2015001' put 'Student','s001','S_Name','Zhangsan' put 'Student','s001','S_Sex','male' put 'Student','s001','S_Age','23' put 'Student','s002','S_No','2015002' put 'Student','s002','S_Name','Mary' put 'Student','s002','S_Sex','female' put 'Student','s002','S_Age','22' put 'Student','s003','S_No','2015003' put 'Student','s003','S_Name','Lisi' put 'Student','s003','S_Sex','male' put 'Student','s003','S_Age','24'
创建课程 Course 表
1 2 3 4 5 6 7 8 9 10 create 'Course','C_No','C_Name','C_Credit' put 'Course','c001','C_No','123001' put 'Course','c001','C_Name','Math' put 'Course','c001','C_Credit','2.0' put 'Course','c002','C_No','123002' put 'Course','c002','C_Name','Computer' put 'Course','c002','C_Credit','5.0' put 'Course','c003','C_No','123003' put 'Course','c003','C_Name','English' put 'Course','c003','C_Credit','3.0'
创建选课 SC 表
1 2 3 4 5 6 7 8 9 10 11 12 13 14 15 16 17 18 19 create 'SC','SC_Sno','SC_Cno','SC_Score' put 'SC','sc001','SC_Sno','2015001' put 'SC','sc001','SC_Cno','123001' put 'SC','sc001','SC_Score','86' put 'SC','sc002','SC_Sno','2015001' put 'SC','sc002','SC_Cno','123003' put 'SC','sc002','SC_Score','69' put 'SC','sc003','SC_Sno','2015002' put 'SC','sc003','SC_Cno','123002' put 'SC','sc003','SC_Score','77' put 'SC','sc004','SC_Sno','2015002' put 'SC','sc004','SC_Cno','123003' put 'SC','sc004','SC_Score','99' put 'SC','sc005','SC_Sno','2015003' put 'SC','sc005','SC_Cno','123001' put 'SC','sc005','SC_Score','98' put 'SC','sc006','SC_Sno','2015003' put 'SC','sc006','SC_Cno','123002' put 'SC','sc006','SC_Score','95'
验证
1 2 3 scan 'Student' scan 'Course' scan 'SC'
1 2 3 4 5 6 disable 'Student' drop 'Student' disable 'Course' drop 'Course' disable 'SC' drop 'SC'
java
① createTable(String tableName, String[] fields)。
② addRecord(String tableName, String row, String[] fields, String[]values)。
③ scanColumn(String tableName, String column)。
④ modifyData(String tableName, String row, String column)。
⑤ deleteRow(String tableName, String row)。
1 2 3 4 5 6 7 8 9 10 11 12 13 14 15 16 17 18 19 20 21 22 23 24 25 26 27 28 29 30 31 32 33 34 35 36 37 38 39 40 41 42 43 44 45 46 47 48 49 50 51 52 53 54 55 56 57 58 59 60 61 62 63 64 65 66 67 68 69 70 71 72 73 74 75 76 77 78 79 80 81 82 83 84 85 86 87 88 89 90 91 92 93 94 95 96 97 98 99 100 101 102 103 104 105 106 107 108 109 110 111 112 113 114 115 116 117 118 119 120 121 122 123 124 125 126 127 128 129 130 131 132 133 134 135 136 137 138 139 140 141 142 143 144 145 146 147 148 149 150 151 152 153 import java.io.IOException;import org.apache.hadoop.conf.Configuration;import org.apache.hadoop.hbase.*;import org.apache.hadoop.hbase.client.*;import org.apache.hadoop.hbase.util.Bytes;public class test { static Connection connection; static Admin admin; public static void init () throws IOException { Configuration conf = HBaseConfiguration.create(); conf.set("hbase.zookeeper.quorum" , "localhost" ); connection = ConnectionFactory.createConnection(conf); admin = connection.getAdmin(); } public static void close () throws IOException { if (admin != null ) admin.close(); if (connection != null ) connection.close(); } public static void createTable (String tableName, String[] fields) throws IOException { init(); TableName tablename = TableName.valueOf(tableName); if (admin.tableExists(tablename)) { System.out.println("表 " + tableName + " 已存在,正在删除..." ); admin.disableTable(tablename); admin.deleteTable(tablename); } TableDescriptorBuilder tableDescriptor = TableDescriptorBuilder.newBuilder(tablename); for (String str : fields) { tableDescriptor.setColumnFamily(ColumnFamilyDescriptorBuilder.newBuilder(Bytes.toBytes(str)).build()); } admin.createTable(tableDescriptor.build()); System.out.println("表 " + tableName + " 创建成功" ); close(); } public static void addRecord (String tableName, String row, String[] fields, String[] values) throws IOException { init(); Table table = connection.getTable(TableName.valueOf(tableName)); Put put = new Put (Bytes.toBytes(row)); for (int i = 0 ; i < fields.length; i++) { String[] parts = fields[i].split(":" ); put.addColumn(Bytes.toBytes(parts[0 ], Bytes.toBytes(parts[1 ], Bytes.toBytes(values[i]); } table.put(put); table.close(); close(); } public static void scanColumn (String tableName, String column) throws IOException { init(); Table table = connection.getTable(TableName.valueOf(tableName)); Scan scan = new Scan (); if (column.contains(":" )) { String[] parts = column.split(":" ); scan.addColumn(Bytes.toBytes(parts[0 ], Bytes.toBytes(parts[1 ]); } else { scan.addFamily(Bytes.toBytes(column)); } ResultScanner scanner = table.getScanner(scan); for (Result result = scanner.next(); result != null ; result = scanner.next()) { showCell(result); } scanner.close(); table.close(); close(); } public static void showCell (Result result) { for (Cell cell : result.rawCells()) { System.out.println("RowName: " + Bytes.toString(CellUtil.cloneRow(cell))); System.out.println("Timestamp: " + cell.getTimestamp()); System.out.println("ColumnFamily: " + Bytes.toString(CellUtil.cloneFamily(cell))); System.out.println("Column: " + Bytes.toString(CellUtil.cloneQualifier(cell))); System.out.println("Value: " + Bytes.toString(CellUtil.cloneValue(cell))); System.out.println("----------------------------------------" ); } } public static void modifyData (String tableName, String row, String column, String val) throws IOException { init(); Table table = connection.getTable(TableName.valueOf(tableName)); String[] parts = column.split(":" ); Put put = new Put (Bytes.toBytes(row)); put.addColumn(Bytes.toBytes(parts[0 ], Bytes.toBytes(parts[1 ], Bytes.toBytes(val)); table.put(put); System.out.println("修改表 " + tableName + " 中 " + row + " 行的列 " + column + " 为 " + val); table.close(); close(); } public static void deleteRow (String tableName, String row) throws IOException { init(); Table table = connection.getTable(TableName.valueOf(tableName)); Delete delete = new Delete (Bytes.toBytes(row)); table.delete(delete); System.out.println("删除表 " + tableName + " 中的行 " + row); table.close(); close(); } public static void main (String[] args) throws IOException { createTable("Student" , new String []{"S_No" , "S_Name" , "S_Sex" , "S_Age" }); addRecord("Student" , "s001" , new String []{"S_No:S_No" , "S_Name:S_Name" , "S_Sex:S_Sex" , "S_Age:S_Age" }, new String []{"2015001" , "Zhangsan" , "male" , "23" }); addRecord("Student" , "s002" , new String []{"S_No:S_No" , "S_Name:S_Name" , "S_Sex:S_Sex" , "S_Age:S_Age" }, new String []{"2015002" , "Mary" , "female" , "22" }); addRecord("Student" , "s003" , new String []{"S_No:S_No" , "S_Name:S_Name" , "S_Sex:S_Sex" , "S_Age:S_Age" }, new String []{"2015003" , "Lisi" , "male" , "24" }); System.out.println("Student 表插入数据成功" ); createTable("Course" , new String []{"C_No" , "C_Name" , "C_Credit" }); addRecord("Course" , "c001" , new String []{"C_No:C_No" , "C_Name:C_Name" , "C_Credit:C_Credit" }, new String []{"123001" , "Math" , "2.0" }); addRecord("Course" , "c002" , new String []{"C_No:C_No" , "C_Name:C_Name" , "C_Credit:C_Credit" }, new String []{"123002" , "Computer" , "5.0" }); addRecord("Course" , "c003" , new String []{"C_No:C_No" , "C_Name:C_Name" , "C_Credit:C_Credit" }, new String []{"123003" , "English" , "3.0" }); System.out.println("Course 表插入数据成功" ); createTable("SC" , new String []{"SC_Sno" , "SC_Cno" , "SC_Score" }); addRecord("SC" , "sc001" , new String []{"SC_Sno:SC_Sno" , "SC_Cno:SC_Cno" , "SC_Score:SC_Score" }, new String []{"2015001" , "123001" , "86" }); addRecord("SC" , "sc002" , new String []{"SC_Sno:SC_Sno" , "SC_Cno:SC_Cno" , "SC_Score:SC_Score" }, new String []{"2015001" , "123003" , "69" }); addRecord("SC" , "sc003" , new String []{"SC_Sno:SC_Sno" , "SC_Cno:SC_Cno" , "SC_Score:SC_Score" }, new String []{"2015002" , "123002" , "77" }); addRecord("SC" , "sc004" , new String []{"SC_Sno:SC_Sno" , "SC_Cno:SC_Cno" , "SC_Score:SC_Score" }, new String []{"2015002" , "123003" , "99" }); addRecord("SC" , "sc005" , new String []{"SC_Sno:SC_Sno" , "SC_Cno:SC_Cno" , "SC_Score:SC_Score" }, new String []{"2015003" , "123001" , "98" }); addRecord("SC" , "sc006" , new String []{"SC_Sno:SC_Sno" , "SC_Cno:SC_Cno" , "SC_Score:SC_Score" }, new String []{"2015003" , "123002" , "95" }); System.out.println("SC 表插入数据成功" ); System.out.println("===== 浏览 Student 表的全部 S_Name 列族 =====" ); scanColumn("Student" , "S_Name" ); System.out.println("===== 修改 Student 表中 s002 的 S_Age 为 25 =====" ); modifyData("Student" , "s002" , "S_Age:S_Age" , "25" ); System.out.println("===== 删除 Student 表中的 s003 =====" ); deleteRow("Student" , "s003" ); } }
(7.5.5)
基础
自行开启hadoop集群和hbase
1 2 3 4 5 6 7 8 9 10 11 12 13 14 cd cat > wordfile1.txt<<"EOF" I love Spark I love Hadoop EOF cat > wordfile2.txt<<"EOF" Hadoop is good Spark is fast EOF hdfs dfs -rm -r input hdfs dfs -rm -r output hdfs dfs -mkdir input hdfs dfs -put wordfile1.txt input hdfs dfs -put wordfile2.txt input
在eclipse创建项目
启动eclipse
创建项目
File-new-project
名字:WordCount
为了编写一个MapReduce程序,一般需要向Java工程中添加以下JAR包:/usr/local/hadoop/share/hadoop/common目录下的hadoop-common-3.1.3.jar和haoop-nfs-3.1.3.jar;/usr/local/hadoop/share/hadoop/common/lib目录下的所有JAR包;/usr/local/hadoop/share/hadoop/mapreduce目录下的所有JAR包,但是,不包括jdiff、lib-examples和sources目录.
添加完成就finish就行
编写Java应用程序
创建WordCount.java,自己看好,以后不会再说了
添加代码
1 2 3 4 5 6 7 8 9 10 11 12 13 14 15 16 17 18 19 20 21 22 23 24 25 26 27 28 29 30 31 32 33 34 35 36 37 38 39 40 41 42 43 44 45 46 47 48 49 50 51 52 53 54 55 56 57 58 59 60 61 62 63 64 import java.io.IOException;import java.util.Iterator;import java.util.StringTokenizer;import org.apache.hadoop.conf.Configuration;import org.apache.hadoop.fs.Path;import org.apache.hadoop.io.IntWritable;import org.apache.hadoop.io.Text;import org.apache.hadoop.mapreduce.Job;import org.apache.hadoop.mapreduce.Mapper;import org.apache.hadoop.mapreduce.Reducer;import org.apache.hadoop.mapreduce.lib.input.FileInputFormat;import org.apache.hadoop.mapreduce.lib.output.FileOutputFormat;import org.apache.hadoop.util.GenericOptionsParser;public class WordCount { public WordCount () { } public static void main (String[] args) throws Exception { Configuration conf = new Configuration (); String[] otherArgs = (new GenericOptionsParser (conf, args)).getRemainingArgs(); if (otherArgs.length < 2 ) { System.err.println("Usage: wordcount <in> [<in>...] <out>" ); System.exit(2 ); } Job job = Job.getInstance(conf, "word count" ); job.setJarByClass(WordCount.class); job.setMapperClass(WordCount.TokenizerMapper.class); job.setCombinerClass(WordCount.IntSumReducer.class); job.setReducerClass(WordCount.IntSumReducer.class); job.setOutputKeyClass(Text.class); job.setOutputValueClass(IntWritable.class); for (int i = 0 ; i < otherArgs.length - 1 ; ++i) { FileInputFormat.addInputPath(job, new Path (otherArgs[i]); } FileOutputFormat.setOutputPath(job, new Path (otherArgs[otherArgs.length - 1 ]); System.exit(job.waitForCompletion(true )?0 :1 ); } public static class TokenizerMapper extends Mapper <Object, Text, Text, IntWritable> { private static final IntWritable one = new IntWritable (1 ); private Text word = new Text (); public TokenizerMapper () { } public void map (Object key, Text value, Mapper<Object, Text, Text, IntWritable>.Context context) throws IOException, InterruptedException { StringTokenizer itr = new StringTokenizer (value.toString()); while (itr.hasMoreTokens()) { this .word.set(itr.nextToken()); context.write(this .word, one); } } } public static class IntSumReducer extends Reducer <Text, IntWritable, Text, IntWritable> { private IntWritable result = new IntWritable (); public IntSumReducer () { } public void reduce (Text key, Iterable<IntWritable> values, Reducer<Text, IntWritable, Text, IntWritable>.Context context) throws IOException, InterruptedException { int sum = 0 ; IntWritable val; for (Iterator i$ = values.iterator(); i$.hasNext(); sum += val.get()) { val = (IntWritable)i$.next(); } this .result.set(sum); context.write(key, this .result); } } }
运行一下
7.5.5截图1
编译打包程序
如果你没有myapp文件夹你就自己创建,我的是有的
选择WordCount项目
填写路径/usr/local/hadoop/myapp/WordCount.jar
然后finish
这时候会有弹窗,一路ok下来就行了
1 ll /usr/local/hadoop/myapp
运行程序
1 2 hadoop jar /usr/local/hadoop/myapp/WordCount.jar input output hdfs dfs -cat output/*
7.5.5 截图2和3
(7.3.4)
第四题
shell
1 2 3 4 5 6 7 8 9 10 cat > avg.txt <<"EOF" math 80 math 90 english 70 english 100 EOF hdfs dfs -rm -r input hdfs dfs -rm -r output hdfs dfs -mkdir input hdfs dfs -put avg.txt input
创建AverageCalculator.java
1 2 3 4 5 6 7 8 9 10 11 12 13 14 15 16 17 18 19 20 21 22 23 24 25 26 27 28 29 30 31 32 33 34 35 36 37 38 39 40 41 42 43 44 45 46 47 48 49 50 51 52 53 54 55 56 57 58 59 60 61 62 63 64 65 66 67 68 69 70 71 72 73 import org.apache.hadoop.conf.Configuration;import org.apache.hadoop.fs.Path;import org.apache.hadoop.io.IntWritable;import org.apache.hadoop.io.LongWritable;import org.apache.hadoop.io.Text;import org.apache.hadoop.mapreduce.Job;import org.apache.hadoop.mapreduce.Mapper;import org.apache.hadoop.mapreduce.Reducer;import org.apache.hadoop.mapreduce.lib.input.FileInputFormat;import org.apache.hadoop.mapreduce.lib.output.FileOutputFormat;import java.io.IOException;public class AverageCalculator { public static class AvgMapper extends Mapper <LongWritable, Text, Text, IntWritable> { private Text keyOut = new Text (); private IntWritable valOut = new IntWritable (); @Override protected void map (LongWritable key, Text value, Context context) throws IOException, InterruptedException { String[] parts = value.toString().split("\\s+" ); if (parts.length == 2 ) { keyOut.set(parts[0 ]; valOut.set(Integer.parseInt(parts[1 ]); context.write(keyOut, valOut); } } } public static class AvgReducer extends Reducer <Text, IntWritable, Text, IntWritable> { private IntWritable result = new IntWritable (); @Override protected void reduce (Text key, Iterable<IntWritable> values, Context context) throws IOException, InterruptedException { int sum = 0 ; int count = 0 ; for (IntWritable val : values) { sum += val.get(); count++; } if (count != 0 ) { result.set(sum / count); context.write(key, result); } } } public static void main (String[] args) throws Exception { if (args.length != 2 ) { System.err.println("Usage: AverageCalculator <input path> <output path>" ); System.exit(-1 ); } Configuration conf = new Configuration (); Job job = Job.getInstance(conf, "Average Calculator" ); job.setJarByClass(AverageCalculator.class); job.setMapperClass(AvgMapper.class); job.setReducerClass(AvgReducer.class); job.setOutputKeyClass(Text.class); job.setOutputValueClass(IntWritable.class); FileInputFormat.setInputPaths(job, new Path (args[0 ]); FileOutputFormat.setOutputPath(job, new Path (args[1 ]); System.exit(job.waitForCompletion(true ) ? 0 : 1 ); } }
自己运行一下,不然下面打包程序出现不了,运行报错别管,运行就对了,别问
自己运行一下,不然下面打包程序出现不了,运行报错别管,运行就对了,别问
自己运行一下,不然下面打包程序出现不了,运行报错别管,运行就对了,别问
自己运行一下,不然下面打包程序出现不了,运行报错别管,运行就对了,别问
打包项目
这是打包java项目的路径教程,自己看,后面还会有各种java要打包,后面不会再说了
一路ok
1 2 hadoop jar /usr/local/hadoop/myapp/AverageCalculator.jar input output hadoop dfs -cat output/*
这个是第四题的图片
第八题和第九题
1 2 3 4 5 6 7 8 9 10 11 12 13 cat > maxmin.txt <<"EOF" 23 45 12 67 89 34 56 EOF hdfs dfs -rm -r input hdfs dfs -rm -r output hdfs dfs -mkdir input hdfs dfs -put maxmin.txt input
创建MaxMinValue.java
1 2 3 4 5 6 7 8 9 10 11 12 13 14 15 16 17 18 19 20 21 22 23 24 25 26 27 28 29 30 31 32 33 34 35 36 37 38 39 40 41 42 43 44 45 46 47 48 49 50 51 52 53 54 55 56 57 58 59 60 61 62 63 64 65 66 import org.apache.hadoop.conf.Configuration;import org.apache.hadoop.fs.Path;import org.apache.hadoop.io.IntWritable;import org.apache.hadoop.io.LongWritable;import org.apache.hadoop.io.Text;import org.apache.hadoop.mapreduce.Job;import org.apache.hadoop.mapreduce.Mapper;import org.apache.hadoop.mapreduce.Reducer;import org.apache.hadoop.mapreduce.lib.input.FileInputFormat;import org.apache.hadoop.mapreduce.lib.output.FileOutputFormat;import java.io.IOException;public class MaxMinValue { public static class MaxMinMapper extends Mapper <LongWritable, Text, Text, IntWritable> { private IntWritable valueOut = new IntWritable (); @Override protected void map (LongWritable key, Text value, Context context) throws IOException, InterruptedException { int num = Integer.parseInt(value.toString()); valueOut.set(num); context.write(new Text ("max" ), valueOut); context.write(new Text ("min" ), valueOut); } } public static class MaxMinReducer extends Reducer <Text, IntWritable, Text, IntWritable> { private IntWritable result = new IntWritable (); @Override protected void reduce (Text key, Iterable<IntWritable> values, Context context) throws IOException, InterruptedException { int finalValue = key.toString().equals("max" ) ? Integer.MIN_VALUE : Integer.MAX_VALUE; for (IntWritable val : values) { if (key.toString().equals("max" )) { finalValue = Math.max(finalValue, val.get()); } else if (key.toString().equals("min" )) { finalValue = Math.min(finalValue, val.get()); } } result.set(finalValue); context.write(key, result); } } public static void main (String[] args) throws Exception { Configuration conf = new Configuration (); Job job = Job.getInstance(conf, "Max and Min Values" ); job.setJarByClass(MaxMinValue.class); job.setMapperClass(MaxMinMapper.class); job.setReducerClass(MaxMinReducer.class); job.setOutputKeyClass(Text.class); job.setOutputValueClass(IntWritable.class); FileInputFormat.setInputPaths(job, new Path (args[0 ]); FileOutputFormat.setOutputPath(job, new Path (args[1 ]); System.exit(job.waitForCompletion(true ) ? 0 : 1 ); } }
然后自己打包程序,不会就去翻前面,前面有说
1 2 hadoop jar /usr/local/hadoop/myapp/MaxMinValue.jar input output hadoop dfs -cat output/*
这个是第八题和第九题的图片
接下来的创建java打包程序不说了,自己翻前面的
第十题
1 2 3 4 5 6 7 8 9 10 11 12 cat > SalesVolume.txt <<"EOF" 2025-01-01 200 2025-01-15 150 2025-02-10 300 2025-02-25 250 2025-03-05 400 2025-03-15 350 EOF hdfs dfs -rm -r input hdfs dfs -rm -r output hdfs dfs -mkdir input hdfs dfs -put SalesVolume.txt input
创建SalesByMonth.java
1
2
3
4
5
6
7
8
9
10
11
12
13
14
15
16
17
18
19
20
21
22
23
24
25
26
27
28
29
30
31
32
33
34
35
36
37
38
39
40
41
42
43
44
45
46
47
48
49
50
51
52
53
54
55
56
57
58
59
60
61
62
63
64
65
66
67
68
69
import org.apache.hadoop.conf.Configuration;import org.apache.hadoop.fs.Path;import org.apache.hadoop.io.IntWritable;import org.apache.hadoop.io.LongWritable;import org.apache.hadoop.io.Text;import org.apache.hadoop.mapreduce.Job;import org.apache.hadoop.mapreduce.Mapper;import org.apache.hadoop.mapreduce.Reducer;import org.apache.hadoop.mapreduce.lib.input.FileInputFormat;import org.apache.hadoop.mapreduce.lib.output.FileOutputFormat;import java.io.IOException;public class SalesByMonth { public static class SalesMapper extends Mapper <LongWritable, Text, Text, IntWritable> { private Text month = new Text (); private IntWritable salesAmount = new IntWritable (); @Override protected void map (LongWritable key, Text value, Context context) throws IOException, InterruptedException { String[] parts = value.toString().split("\\s+" ); String date = parts[0 ]; int amount = Integer.parseInt(parts[1 ]; String yearMonth = date.substring(0 , 7 ); month.set(yearMonth); salesAmount.set(amount); context.write(month, salesAmount); } } public static class SalesReducer extends Reducer <Text, IntWritable, Text, IntWritable> { private IntWritable result = new IntWritable (); @Override protected void reduce (Text key, Iterable<IntWritable> values, Context context) throws IOException, InterruptedException { int totalSales = 0 ; for (IntWritable val : values) { totalSales += val.get(); } result.set(totalSales); context.write(key, result); } } public static void main (String[] args) throws Exception { Configuration conf = new Configuration (); Job job = Job.getInstance(conf, "Sales by Month" ); job.setJarByClass(SalesByMonth.class); job.setMapperClass(SalesMapper.class); job.setReducerClass(SalesReducer.class); job.setOutputKeyClass(Text.class); job.setOutputValueClass(IntWritable.class); FileInputFormat.setInputPaths(job, new Path (args[0 ]); FileOutputFormat.setOutputPath(job, new Path (args[1 ]); System.exit(job.waitForCompletion(true ) ? 0 : 1 ); } }
自己打包程序,然后运行程序
1 2 hadoop jar /usr/local/hadoop/myapp/SalesByMonth.jar input output hadoop dfs -cat output/*
这是第十题的图片
实验四
第一题
shell
1.编程实现文件合并和去重操作
shell
对于两个输入文件,即文件A和文件B,请编写MapReduce程序,对两个文件进行合并,并剔除其中重复的内容,得到一个新的输出文件C。下面是输入文件和输出文件的一个样例,以供参考。
1 2 3 4 5 6 7 8 9 10 11 12 13 14 15 16 17 18 19 20 cat >a.txt<<"EOF" 20150101 x 20150102 y 20150103 x 20150104 y 20150105 z 20150106 x EOF cat >b.txt<<"EOF" 20150101 y 20150102 y 20150103 x 20150104 z 20150105 y EOF hdfs dfs -rm -r input hdfs dfs -rm -r output hdfs dfs -mkdir input hdfs dfs -put a.txt input hdfs dfs -put b.txt input
创建Merge.java
1 2 3 4 5 6 7 8 9 10 11 12 13 14 15 16 17 18 19 20 21 22 23 24 25 26 27 28 29 30 31 32 33 34 35 36 37 38 39 40 41 42 43 44 45 46 47 48 49 50 51 52 53 54 55 56 57 58 59 60 61 62 63 64 65 66 67 68 69 70 71 import java.io.IOException;import java.util.StringTokenizer;import org.apache.hadoop.conf.Configuration;import org.apache.hadoop.fs.Path;import org.apache.hadoop.io.Text;import org.apache.hadoop.mapreduce.Job;import org.apache.hadoop.mapreduce.Mapper;import org.apache.hadoop.mapreduce.Reducer;import org.apache.hadoop.mapreduce.lib.input.FileInputFormat;import org.apache.hadoop.mapreduce.lib.output.FileOutputFormat;public class Merge { public static class Map extends Mapper <Object, Text, Text, Text> { private Text outKey = new Text (); public void map (Object key, Text value, Context context) throws IOException, InterruptedException { String line = value.toString().trim(); StringTokenizer tokenizer = new StringTokenizer (line); StringBuilder sb = new StringBuilder (); while (tokenizer.hasMoreTokens()) { sb.append(tokenizer.nextToken()).append(" " ); } if (sb.length() > 0 ) sb.setLength(sb.length() - 1 ); outKey.set(sb.toString()); context.write(outKey, new Text ("" )); } } public static class Reduce extends Reducer <Text, Text, Text, Text> { public void reduce (Text key, Iterable<Text> values, Context context) throws IOException, InterruptedException { context.write(key, new Text ("" )); } } public static void main (String[] args) throws Exception { Configuration conf = new Configuration (); conf.set("fs.default.name" , "hdfs://localhost:9000" ); String[] otherArgs = new String []{"input" , "output" }; if (otherArgs.length != 2 ) { System.err.println("Usage: Merge <in> <out>" ); System.exit(2 ); } Job job = Job.getInstance(conf, "Merge and Deduplicate" ); job.setJarByClass(Merge.class); job.setMapperClass(Map.class); job.setCombinerClass(Reduce.class); job.setReducerClass(Reduce.class); job.setOutputKeyClass(Text.class); job.setOutputValueClass(Text.class); FileInputFormat.addInputPath(job, new Path (otherArgs[0 ]); FileOutputFormat.setOutputPath(job, new Path (otherArgs[1 ]); job.setNumReduceTasks(1 ); System.exit(job.waitForCompletion(true ) ? 0 : 1 ); } }
打包程序,然后运行
1 2 hadoop jar /usr/local/hadoop/myapp/Merge.jar input output hadoop dfs -cat output/*
java
java
导入hdfs包
/usr/local/hadoop/share/hadoop/yarn/lib下的所有jar包
/usr/local/hadoop/share/hadoop/yarn下的所有jar包
/usr/local/hadoop/share/hadoop/hdfs下的这两个包也要添加
测试文件
1 2 3 4 5 6 7 8 9 10 11 12 13 14 15 16 17 18 19 20 cat >a.txt<<"EOF" 20150101 x 20150102 y 20150103 x 20150104 y 20150105 z 20150106 x EOF cat >b.txt<<"EOF" 20150101 y 20150102 y 20150103 x 20150104 z 20150105 y EOF hdfs dfs -rm -r input hdfs dfs -rm -r output hdfs dfs -mkdir input hdfs dfs -put a.txt input hdfs dfs -put b.txt input
更新Merge.java代码
1 2 3 4 5 6 7 8 9 10 11 12 13 14 15 16 17 18 19 20 21 22 23 24 25 26 27 28 29 30 31 32 33 34 35 36 37 38 39 40 41 42 43 44 45 46 47 48 49 50 51 52 53 54 55 56 57 58 59 60 61 62 63 64 65 66 67 68 import java.io.IOException;import java.util.StringTokenizer;import org.apache.hadoop.conf.Configuration;import org.apache.hadoop.fs.Path;import org.apache.hadoop.io.Text;import org.apache.hadoop.mapreduce.Job;import org.apache.hadoop.mapreduce.Mapper;import org.apache.hadoop.mapreduce.Reducer;import org.apache.hadoop.mapreduce.lib.input.FileInputFormat;import org.apache.hadoop.mapreduce.lib.output.FileOutputFormat;public class Merge { public static class Map extends Mapper <Object, Text, Text, Text> { private Text outKey = new Text (); public void map (Object key, Text value, Context context) throws IOException, InterruptedException { String line = value.toString().trim(); StringTokenizer tokenizer = new StringTokenizer (line); StringBuilder sb = new StringBuilder (); while (tokenizer.hasMoreTokens()) { sb.append(tokenizer.nextToken()).append(" " ); } if (sb.length() > 0 ) sb.setLength(sb.length() - 1 ); outKey.set(sb.toString()); context.write(outKey, new Text ("" )); } } public static class Reduce extends Reducer <Text, Text, Text, Text> { public void reduce (Text key, Iterable<Text> values, Context context) throws IOException, InterruptedException { context.write(key, new Text ("" )); } } public static void main (String[] args) throws Exception { Configuration conf = new Configuration (); conf.set("fs.default.name" , "hdfs://localhost:9000" ); String inputPath = "hdfs://localhost:9000/user/hadoop/input" ; String outputPath = "hdfs://localhost:9000/user/hadoop/output" ; Job job = Job.getInstance(conf, "Merge and Deduplicate" ); job.setJarByClass(Merge.class); job.setMapperClass(Map.class); job.setCombinerClass(Reduce.class); job.setReducerClass(Reduce.class); job.setOutputKeyClass(Text.class); job.setOutputValueClass(Text.class); FileInputFormat.addInputPath(job, new Path (inputPath)); FileOutputFormat.setOutputPath(job, new Path (outputPath)); job.setNumReduceTasks(1 ); System.exit(job.waitForCompletion(true ) ? 0 : 1 ); } }
查看结果
1 hadoop dfs -cat output/*
第二题
shell
2.编程实现对输入文件的排序
现在有多个输入文件,每个文件中的每行内容均为一个整数。要求读取所有文件中的整数,进行升序排列后,将其输出到一个新的文件中,输出的数据格式为每行两个整数,第一个整数为第二个整数的排序位次,第二个整数为原待排列的整数。下面是输入文件和输出文件的一个样例,以供参考。
shell
1 2 3 4 5 6 7 8 9 10 11 12 13 14 15 16 17 18 19 20 21 22 23 cat >a.txt<<"EOF" 33 37 12 40 EOF cat >b.txt<<"EOF" 4 16 39 5 EOF cat >c.txt<<"EOF" 1 45 25 EOF hdfs dfs -rm -r input hdfs dfs -rm -r output hdfs dfs -mkdir input hdfs dfs -put a.txt input hdfs dfs -put b.txt input hdfs dfs -put c.txt input
创建MergeSort.java
1 2 3 4 5 6 7 8 9 10 11 12 13 14 15 16 17 18 19 20 21 22 23 24 25 26 27 28 29 30 31 32 33 34 35 36 37 38 39 40 41 42 43 44 45 46 47 48 49 50 51 52 53 54 55 56 57 58 59 60 61 62 63 64 65 66 67 68 69 70 71 72 73 import java.io.IOException;import org.apache.hadoop.conf.Configuration;import org.apache.hadoop.fs.Path;import org.apache.hadoop.io.IntWritable;import org.apache.hadoop.io.Text;import org.apache.hadoop.mapreduce.Job;import org.apache.hadoop.mapreduce.Mapper;import org.apache.hadoop.mapreduce.Partitioner;import org.apache.hadoop.mapreduce.Reducer;import org.apache.hadoop.mapreduce.lib.input.FileInputFormat;import org.apache.hadoop.mapreduce.lib.output.FileOutputFormat;import org.apache.hadoop.util.GenericOptionsParser;public class MergeSort { public static class Map extends Mapper <Object, Text, IntWritable, IntWritable>{ private static IntWritable data = new IntWritable (); public void map (Object key, Text value, Context context) throws IOException,InterruptedException{ String text = value.toString(); data.set(Integer.parseInt(text)); context.write(data, new IntWritable (1 )); } } public static class Reduce extends Reducer <IntWritable, IntWritable, IntWritable, IntWritable>{ private static IntWritable line_num = new IntWritable (1 ); public void reduce (IntWritable key, Iterable<IntWritable> values, Context context) throws IOException,InterruptedException{ for (IntWritable val : values){ context.write(line_num, key); line_num = new IntWritable (line_num.get() + 1 ); } } } public static class Partition extends Partitioner <IntWritable, IntWritable>{ public int getPartition (IntWritable key, IntWritable value, int num_Partition) { int Maxnumber = 65223 ; int bound = Maxnumber/num_Partition+1 ; int keynumber = key.get(); for (int i = 0 ; i<num_Partition; i++){ if (keynumber<bound * (i+1 ) && keynumber>=bound * i){ return i; } } return -1 ; } } public static void main (String[] args) throws Exception{ Configuration conf = new Configuration (); conf.set("fs.default.name" ,"hdfs://localhost:9000" ); String[] otherArgs = new String []{"input" ,"output" }; if (otherArgs.length != 2 ) { System.err.println("Usage: wordcount <in><out>" ); System.exit(2 ); } Job job = Job.getInstance(conf,"Merge and sort" ); job.setJarByClass(MergeSort.class); job.setMapperClass(Map.class); job.setReducerClass(Reduce.class); job.setPartitionerClass(Partition.class); job.setOutputKeyClass(IntWritable.class); job.setOutputValueClass(IntWritable.class); FileInputFormat.addInputPath(job, new Path (otherArgs[0 ]); FileOutputFormat.setOutputPath(job, new Path (otherArgs[1 ]); System.exit(job.waitForCompletion(true ) ? 0 : 1 ); } }
自己打包项目
1 2 hadoop jar /usr/local/hadoop/myapp/MergeSort.jar input output hadoop dfs -cat output/*
java
java
写入测试文件
1 2 3 4 5 6 7 8 9 10 11 12 13 14 15 16 17 18 19 20 21 22 23 cat >a.txt<<"EOF" 33 37 12 40 EOF cat >b.txt<<"EOF" 4 16 39 5 EOF cat >c.txt<<"EOF" 1 45 25 EOF hdfs dfs -rm -r input hdfs dfs -rm -r output hdfs dfs -mkdir input hdfs dfs -put a.txt input hdfs dfs -put b.txt input hdfs dfs -put c.txt input
更新代码
MergeSort.java
1 2 3 4 5 6 7 8 9 10 11 12 13 14 15 16 17 18 19 20 21 22 23 24 25 26 27 28 29 30 31 32 33 34 35 36 37 38 39 40 41 42 43 44 45 46 47 48 49 50 51 52 53 54 55 56 57 58 59 60 61 62 63 64 65 66 67 68 69 70 71 72 73 74 75 76 77 78 79 80 81 82 83 84 85 86 87 88 89 90 import java.io.IOException;import org.apache.hadoop.conf.Configuration;import org.apache.hadoop.fs.Path;import org.apache.hadoop.io.IntWritable;import org.apache.hadoop.io.Text;import org.apache.hadoop.mapreduce.Job;import org.apache.hadoop.mapreduce.Mapper;import org.apache.hadoop.mapreduce.Partitioner;import org.apache.hadoop.mapreduce.Reducer;import org.apache.hadoop.mapreduce.lib.input.FileInputFormat;import org.apache.hadoop.mapreduce.lib.output.FileOutputFormat;public class MergeSort { public static class Map extends Mapper <Object, Text, IntWritable, IntWritable> { private static final IntWritable data = new IntWritable (); public void map (Object key, Text value, Context context) throws IOException, InterruptedException { String text = value.toString().trim(); if (!text.isEmpty()) { data.set(Integer.parseInt(text)); context.write(data, new IntWritable (1 )); } } } public static class Reduce extends Reducer <IntWritable, IntWritable, IntWritable, IntWritable> { private static IntWritable line_num = new IntWritable (1 ); public void reduce (IntWritable key, Iterable<IntWritable> values, Context context) throws IOException, InterruptedException { for (IntWritable val : values) { context.write(line_num, key); line_num = new IntWritable (line_num.get() + 1 ); } } } public static class Partition extends Partitioner <IntWritable, IntWritable> { public int getPartition (IntWritable key, IntWritable value, int num_Partition) { int Maxnumber = 65223 ; int bound = Maxnumber / num_Partition + 1 ; int keynumber = key.get(); for (int i = 0 ; i < num_Partition; i++) { if (keynumber < bound * (i + 1 ) && keynumber >= bound * i) { return i; } } return -1 ; } } public static void main (String[] args) throws Exception { Configuration conf = new Configuration (); conf.set("fs.defaultFS" , "hdfs://localhost:9000" ); conf.set("mapreduce.framework.name" , "local" ); conf.set("mapreduce.jobtracker.address" , "local" ); String inputPath = "hdfs://localhost:9000/user/hadoop/input" ; String outputPath = "hdfs://localhost:9000/user/hadoop/output" ; Job job = Job.getInstance(conf, "Merge and Sort" ); job.setJarByClass(MergeSort.class); job.setMapperClass(Map.class); job.setReducerClass(Reduce.class); job.setPartitionerClass(Partition.class); job.setOutputKeyClass(IntWritable.class); job.setOutputValueClass(IntWritable.class); FileInputFormat.addInputPath(job, new Path (inputPath)); FileOutputFormat.setOutputPath(job, new Path (outputPath)); System.exit(job.waitForCompletion(true ) ? 0 : 1 ); } }
1 hadoop dfs -cat output/*
第三题
shell
3.对给定的表格进行信息挖掘
下面给出一个child-parent的表格,要求挖掘其中的父子关系,给出祖孙关系的表格。
1 2 3 4 5 6 7 8 9 10 11 12 13 14 15 16 17 18 19 20 21 cat >a.txt<<"EOF" child parent Steven Lucy Steven Jack Jone Lucy Jone Jack Lucy Mary Lucy Frank Jack Alice Jack Jesse David Alice David Jesse Philip David Philip Alma Mark David Mark Alma EOF hdfs dfs -rm -r input hdfs dfs -rm -r output hdfs dfs -mkdir input hdfs dfs -put a.txt input
创建simple_data_mining.java
1 2 3 4 5 6 7 8 9 10 11 12 13 14 15 16 17 18 19 20 21 22 23 24 25 26 27 28 29 30 31 32 33 34 35 36 37 38 39 40 41 42 43 44 45 46 47 48 49 50 51 52 53 54 55 56 57 58 59 60 61 62 63 64 65 66 67 68 69 70 71 72 73 74 75 76 77 78 79 80 81 82 83 84 85 86 87 88 89 90 91 92 93 94 95 96 97 98 99 100 101 102 103 104 105 106 107 108 109 110 111 112 113 114 import java.io.IOException;import java.util.*;import org.apache.hadoop.conf.Configuration;import org.apache.hadoop.fs.Path;import org.apache.hadoop.io.IntWritable;import org.apache.hadoop.io.Text;import org.apache.hadoop.mapreduce.Job;import org.apache.hadoop.mapreduce.Mapper;import org.apache.hadoop.mapreduce.Reducer;import org.apache.hadoop.mapreduce.lib.input.FileInputFormat;import org.apache.hadoop.mapreduce.lib.output.FileOutputFormat;import org.apache.hadoop.util.GenericOptionsParser;public class simple_data_mining { public static int time = 0 ; public static class Map extends Mapper <Object, Text, Text, Text>{ public void map (Object key, Text value, Context context) throws IOException,InterruptedException{ String child_name = new String (); String parent_name = new String (); String relation_type = new String (); String line = value.toString(); int i = 0 ; while (line.charAt(i)!= ' ' ){ i++; } String[] values = {line.substring(0 ,i),line.substring(i+1 )}; if (values[0 ].compareTo("child" )!= 0 ){ child_name = values[0 ]; parent_name = values[1 ]; relation_type = "1" ; context.write(new Text (values[1 ], new Text (relation_type+"+" +child_name+"+" +parent_name)); relation_type = "2" ; context.write(new Text (values[0 ], new Text (relation_type+"+" +child_name+"+" +parent_name)); } } } public static class Reduce extends Reducer <Text, Text, Text, Text>{ public void reduce (Text key, Iterable<Text> values,Context context) throws IOException,InterruptedException{ if (time == 0 ){ context.write(new Text ("grand_child" ), new Text ("grand_parent" )); time++; } int grand_child_num = 0 ; String grand_child[] = new String [10 ]; int grand_parent_num = 0 ; String grand_parent[]= new String [10 ]; Iterator ite = values.iterator(); while (ite.hasNext()){ String record = ite.next().toString(); int len = record.length(); int i = 2 ; if (len == 0 ) continue ; char relation_type = record.charAt(0 ); String child_name = new String (); String parent_name = new String (); while (record.charAt(i)!= '+' ){ child_name = child_name + record.charAt(i); i++; } i=i+1 ; while (i<len){ parent_name = parent_name+record.charAt(i); i++; } if (relation_type == '1' ){ grand_child[grand_child_num] = child_name; grand_child_num++; } else { grand_parent[grand_parent_num] = parent_name; grand_parent_num++; } } if (grand_parent_num != 0 && grand_child_num != 0 ){ for (int m = 0 ;m<grand_child_num;m++){ for (int n=0 ;n<grand_parent_num;n++){ context.write(new Text (grand_child[m], new Text (grand_parent[n]); } } } } } public static void main (String[] args) throws Exception{ Configuration conf = new Configuration (); conf.set("fs.default.name" ,"hdfs://localhost:9000" ); String[] otherArgs = new String []{"input" ,"output" }; if (otherArgs.length != 2 ) { System.err.println("Usage: wordcount <in><out>" ); System.exit(2 ); } Job job = Job.getInstance(conf,"Single table join" ); job.setJarByClass(simple_data_mining.class); job.setMapperClass(Map.class); job.setReducerClass(Reduce.class); job.setOutputKeyClass(Text.class); job.setOutputValueClass(Text.class); FileInputFormat.addInputPath(job, new Path (otherArgs[0 ]); FileOutputFormat.setOutputPath(job, new Path (otherArgs[1 ]); System.exit(job.waitForCompletion(true ) ? 0 : 1 ); } }
自己打包文件
1 2 hadoop jar /usr/local/hadoop/myapp/simple_data_mining.jar input output hadoop dfs -cat output/*
java
java
更新测试文件
1 2 3 4 5 6 7 8 9 10 11 12 13 14 15 16 17 18 19 20 21 cat >a.txt<<"EOF" child parent Steven Lucy Steven Jack Jone Lucy Jone Jack Lucy Mary Lucy Frank Jack Alice Jack Jesse David Alice David Jesse Philip David Philip Alma Mark David Mark Alma EOF hdfs dfs -rm -r input hdfs dfs -rm -r output hdfs dfs -mkdir input hdfs dfs -put a.txt input
更新simple_data_mining.java
1 2 3 4 5 6 7 8 9 10 11 12 13 14 15 16 17 18 19 20 21 22 23 24 25 26 27 28 29 30 31 32 33 34 35 36 37 38 39 40 41 42 43 44 45 46 47 48 49 50 51 52 53 54 55 56 57 58 59 60 61 62 63 64 65 66 67 68 69 70 71 72 73 74 75 76 77 78 79 80 81 82 83 84 85 86 87 88 89 90 91 92 93 94 95 96 97 98 99 100 101 102 103 104 105 106 107 import java.io.IOException;import java.util.*;import org.apache.hadoop.conf.Configuration;import org.apache.hadoop.fs.Path;import org.apache.hadoop.io.Text;import org.apache.hadoop.mapreduce.Job;import org.apache.hadoop.mapreduce.Mapper;import org.apache.hadoop.mapreduce.Reducer;import org.apache.hadoop.mapreduce.lib.input.FileInputFormat;import org.apache.hadoop.mapreduce.lib.output.FileOutputFormat;public class simple_data_mining { public static int time = 0 ; public static class Map extends Mapper <Object, Text, Text, Text> { public void map (Object key, Text value, Context context) throws IOException, InterruptedException { String line = value.toString().trim(); if (line.isEmpty() || line.startsWith("child" )) return ; String[] parts = line.split("\\s+" ); if (parts.length < 2 ) return ; String child = parts[0 ]; String parent = parts[1 ]; context.write(new Text (parent), new Text ("1+" + child + "+" + parent)); context.write(new Text (child), new Text ("2+" + child + "+" + parent)); } } public static class Reduce extends Reducer <Text, Text, Text, Text> { public void reduce (Text key, Iterable<Text> values, Context context) throws IOException, InterruptedException { List<String> leftList = new ArrayList <>(); List<String> rightList = new ArrayList <>(); for (Text val : values) { String record = val.toString(); if (record.isEmpty()) continue ; char relationType = record.charAt(0 ); String[] fields = record.substring(2 ).split("\\+" ); if (fields.length < 2 ) continue ; String child = fields[0 ]; String parent = fields[1 ]; if (relationType == '1' ) { leftList.add(child); } else { rightList.add(parent); } } if (time == 0 ) { context.write(new Text ("grand_child" ), new Text ("grand_parent" )); time++; } for (String lc : leftList) { for (String rp : rightList) { context.write(new Text (lc), new Text (rp)); } } } } public static void main (String[] args) throws Exception { Configuration conf = new Configuration (); conf.set("fs.defaultFS" , "hdfs://localhost:9000" ); conf.set("mapreduce.framework.name" , "local" ); conf.set("mapreduce.jobtracker.address" , "local" ); String inputPath = "hdfs://localhost:9000/user/hadoop/input" ; String outputPath = "hdfs://localhost:9000/user/hadoop/output" ; Job job = Job.getInstance(conf, "Simple Data Mining - Grandchild to Grandparent" ); job.setJarByClass(simple_data_mining.class); job.setMapperClass(Map.class); job.setReducerClass(Reduce.class); job.setOutputKeyClass(Text.class); job.setOutputValueClass(Text.class); FileInputFormat.addInputPath(job, new Path (inputPath)); FileOutputFormat.setOutputPath(job, new Path (outputPath)); System.exit(job.waitForCompletion(true ) ? 0 : 1 ); } }
1 hadoop dfs -cat output/*
Hive
就在下载页面空白处,右键打开终端
1 2 3 4 5 6 7 8 9 10 11 12 13 14 15 16 17 18 19 20 21 22 23 24 25 26 27 28 29 30 31 32 33 34 35 36 37 38 39 40 41 sudo tar -xf apache-hive-3.1.3-bin.tar.gzsudo mv apache-hive-3.1.3-bin /usr/local/hiveecho "export HIVE_HOME=/usr/local/hive" >> ~/.bashrcecho "export PATH=\$HIVE_HOME/bin:\$PATH" >> ~/.bashrcsource ~/.bashrcsudo tee /usr/local/hive/conf/hive-site.xml > /dev/null <<'EOF' <?xml version="1.0" encoding="UTF-8" standalone="no" ?> <?xml-stylesheet type ="text/xsl" href="configuration.xsl" ?> <configuration> <property> <name>javax.jdo.option.ConnectionURL</name> <value>jdbc:mysql://localhost:3306/hive?createDatabaseIfNotExist=true &useSSL=false </value> <description>JDBC connect string for a JDBC metastore</description> </property> <property> <name>javax.jdo.option.ConnectionDriverName</name> <value>com.mysql.jdbc.Driver</value> <description>Driver class name for a JDBC metastore</description> </property> <property> <name>javax.jdo.option.ConnectionUserName</name> <value>hive</value> <description>username to use against metastore database</description> </property> <property> <name>javax.jdo.option.ConnectionPassword</name> <value>hive</value> <description>password to use against metastore database</description> </property> <property> <name>hive.exec.mode.local.auto</name> <value>true </value> </property> </configuration> EOF sudo mv mysql-connector-java-5.1.46.tar{\(2\).gz,.gz}sudo tar -xf mysql-connector-java-5.1.46*.tar.gzsudo mv mysql-connector-java-5.1.46/mysql-connector-java-5.1.46.jar /usr/local/hive/lib/sudo chown hadoop:hadoop /usr/local/hive/lib/mysql-connector-java-5.1.46.jarsudo chmod 644 /usr/local/hive/lib/mysql-connector-java-5.1.46.jar
安装mysql
1 2 3 4 sudo apt remove mariadb* -ysudo apt install -y net-tools wget mysql-serversudo systemctl enable --now mysql
进入mysql初始化
1 sudo mysql_secure_installation
下面开始要手动输入了,输入yes或no
下面开始要手动输入了,输入yes或no
下面开始要手动输入了,输入yes或no
下面开始要手动输入了,输入yes或no
1 2 3 4 5 6 7 8 9 10 11 12 13 14 1. Press y|Y for Yes, any other key for No: no Please set the password for root here. New password: 输入密码123456 Re-enter new password: 输入密码123456 .... 2. Remove anonymous users ? : yes .... 3.Disallow root login remotely? : no .... 4.Remove test database and access to it?: yes .... 5.Reload privilege tables now? : yes
登入数据库床创建用户
1 2 3 4 5 6 7 8 9 10 11 cd sudo mysql -uroot -p123456 UNINSTALL PLUGIN validate_password; create database hive; grant all on *.* to hive@localhost identified by 'hive'; flush privileges; exit sudo sed -i 's/^bind-address\s*=\s*127.0.0.1/bind-address = 0.0.0.0/' /etc/mysql/mysql.conf.d/mysqld.cnf sudo sed -i 's/^mysqlx-bind-address\s*=\s*127.0.0.1/mysqlx-bind-address = 0.0.0.0/' /etc/mysql/mysql.conf.d/mysqld.cnf sudo systemctl restart mysql
升级元数据
1 2 3 4 5 6 7 8 9 sudo rm -rf /usr/local/hive/lib/guava*.jar sudo cp /usr/local/hadoop/share/hadoop/common/lib/guava-*.jar /usr/local/hive/lib/ sudo cp /home/hadoop/下载/mysql-connector-java-5.1.46.tar* /usr/local/hive/lib/ sudo cp /home/hadoop/Downloads/mysql-connector-java-5.1.46.tar* /usr/local/hive/lib/ start-all.sh #hive初始化,这个命令只需要运行一次 schematool -dbType mysql -initSchema
这个是成功的意思
启动hive,要启动hadoop
1 2 3 hive show databases; exit;
这个图片交到9.9去
实验五
自己启动hadoop,在下载文件夹空白处右键
1 2 3 sudo mv data ../ cd ls | grep data
启动hive
(1)创建内部表 stocks
表A-6 stocks表结构
col_name
data_type
exchange
string
symbol
string
ymd
string
price_open
float
price_high
float
price_low
float
price_close
float
volume
int
price_adj_close
float
1 2 3 4 5 6 7 8 9 10 11 12 13 create table if not exists stocks ( `exchange` string, `symbol` string, `ymd` string, `price_open` float, `price_high` float, `price_low` float, `price_close` float, `volume` int, `price_adj_close` float ) row format delimited fields terminated by ',';
(2)创建一个外部分区表dividends(分区字段为exchange和symbol)
表A-7 dividends表结构
col_name
data_type
ymd
string
dividend
float
exchange
string
symbol
string
1 2 3 4 5 6 7 create external table if not exists dividends ( `ymd` string, `dividend` float ) partitioned by(`exchange` string ,`symbol` string) row format delimited fields terminated by ',';
(3)从stocks.csv文件向stocks表中导入数据。
1 load data local inpath '/home/hadoop/data/stocks/stocks.csv' overwrite into table stocks;
(4) 创建一个未分区的外部表dividends_unpartitioned,并从dividends.csv向其中导入数据,表结构如表A-8所示。
表A-8 dividends_unpartitioned表结构
col_name
data_type
ymd
string
dividend
float
exchange
string
symbol
string
1 2 3 4 5 6 7 8 9 create external table if not exists dividends_unpartitioned ( `exchange` string , `symbol` string, `ymd` string, `dividend` float ) row format delimited fields terminated by ','; load data local inpath '/home/hadoop/data/dividends/dividends.csv' overwrite into table dividends_unpartitioned;
(5)通过对dividends_unpartitioned的查询语句,利用Hive自动分区特性向分区表dividends各个分区中插入对应数据。
1 2 3 4 set hive.exec.dynamic.partition=true; set hive.exec.dynamic.partition.mode=nonstrict; set hive.exec.max.dynamic.partitions.pernode=1000; insert overwrite table dividends partition(`exchange`,`symbol`) select `ymd`,`dividend`,`exchange`,`symbol` from dividends_unpartitioned;
运行一分钟,有点慢
(6)查询IBM公司(symbol=IBM)从2000年起所有支付股息的交易日(dividends表中有对应记录)的收盘价(price_close)。
1 2 3 4 5 6 select s.ymd,s.symbol,s.price_close from stocks s LEFT SEMI JOIN dividends d ON s.ymd=d.ymd and s.symbol=d.symbol where s.symbol='IBM' and year(ymd)>=2000;
(7)查询苹果公司(symbol=AAPL)2008年10月每个交易日的涨跌情况,涨显示rise,跌显示fall,不变显示unchange。
1 2 3 4 5 6 7 8 select ymd, case when price_close-price_open>0 then 'rise' when price_close-price_open<0 then 'fall' else 'unchanged' end as situation from stocks where symbol='AAPL' and substring(ymd,0,7)='2008-10';
(8)查询stocks表中收盘价(price_close)比开盘价(price_open)高得最多的那条记录的交易所(exchange)、股票代码(symbol)、日期(ymd)、收盘价、开盘价及二者差价。
1 2 3 4 5 6 7 8 select `exchange`,symbol,ymd,price_close-price_open as `diff` from ( select * from stocks order by price_close-price_open desc limit 1 )t;
(9)从stocks表中查询苹果公司(symbol=AAPL)年平均调整后收盘价(price_adj_close) 大于50美元的年份及年平均调整后收盘价。
1 2 3 4 5 6 select year(ymd) as `year`, avg(price_adj_close) as avg_price from stocks where `exchange`='NASDAQ' and symbol='AAPL' group by year(ymd) having avg_price > 50;
(10)查询每年年平均调整后收盘价(price_adj_close)前三名的公司的股票代码及年平均调整后收盘价。
1 2 3 4 5 6 7 8 9 10 11 12 13 14 15 SET mapreduce.job.reduces=2; select t2.year, t2.symbol, t2.avg_price from ( select *, row_number() over (partition by year order by avg_price desc) as rn from ( select year(ymd) as year, symbol, avg(price_adj_close) as avg_price from stocks group by year(ymd), symbol ) t1 ) t2 where t2.rn <= 3;
(9.9.3)
1.利用mapreduce实现词频统计
1 2 3 4 5 6 7 8 9 10 11 cd hdfs dfs -rm -r input hdfs dfs -rm -r output hdfs dfs -mkdir input rm -rf inputmkdir inputecho "hello world" > input/file1.txtecho "hello hadoop" > input/file2.txthdfs dfs -put input/* input/ hadoop jar $HADOOP_HOME /share/hadoop/mapreduce/hadoop-mapreduce-examples-3.1.3.jar wordcount input output hdfs dfs -cat output/*
2.利用hive实现词频统计
1 2 3 4 5 6 7 create table docs(line string);load data inpath 'file:///home/hadoop/input' overwrite into table docs; create table word_count as select word, count (1 ) as count from (select explode(split(line,' ' ))as word from docs) w group by wordorder by word;
对文本进行“分词 + 炸裂”,得到所有单词列表
1 SELECT explode(split(line, ' ' )) AS word FROM docs;
对单词进行分组并计数
1 2 3 4 5 SELECT word, COUNT (* ) AS countFROM ( SELECT explode(split(line, ' ' )) AS word FROM docs ) w GROUP BY word;
三张图片都交到9.9.3

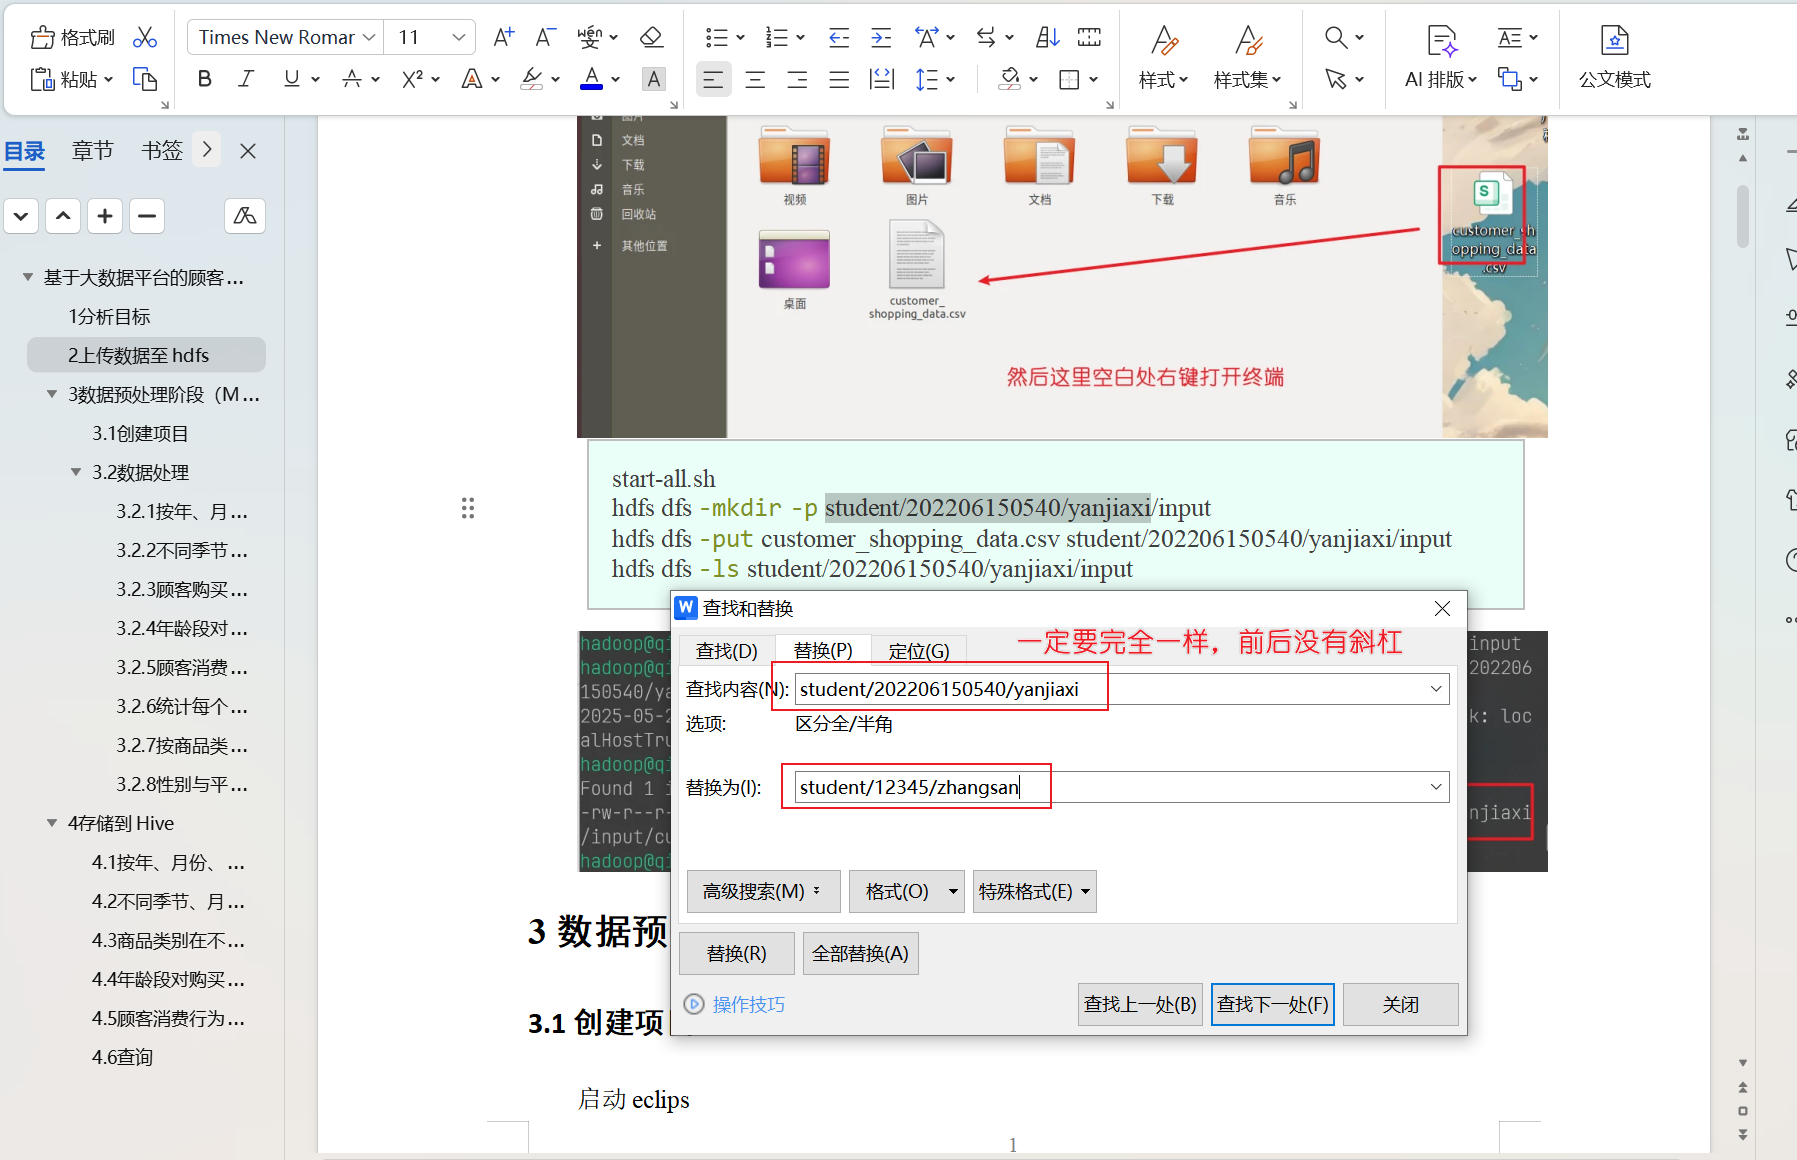
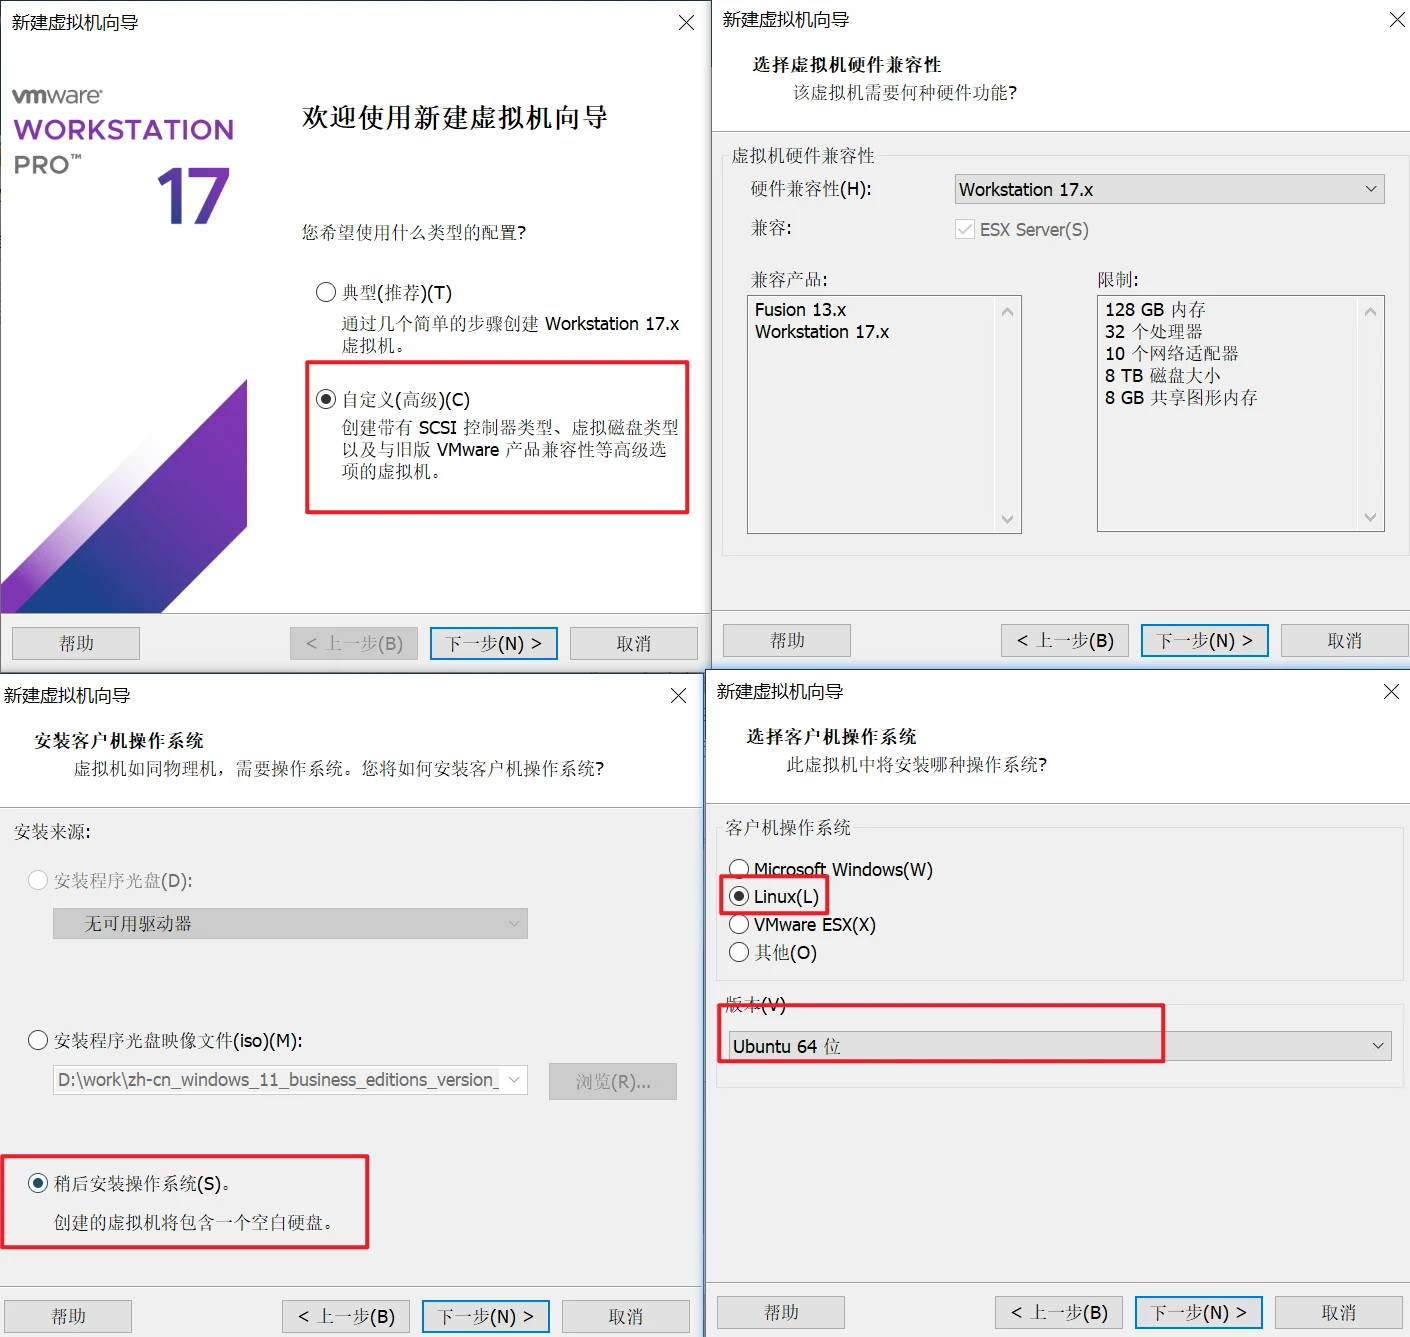
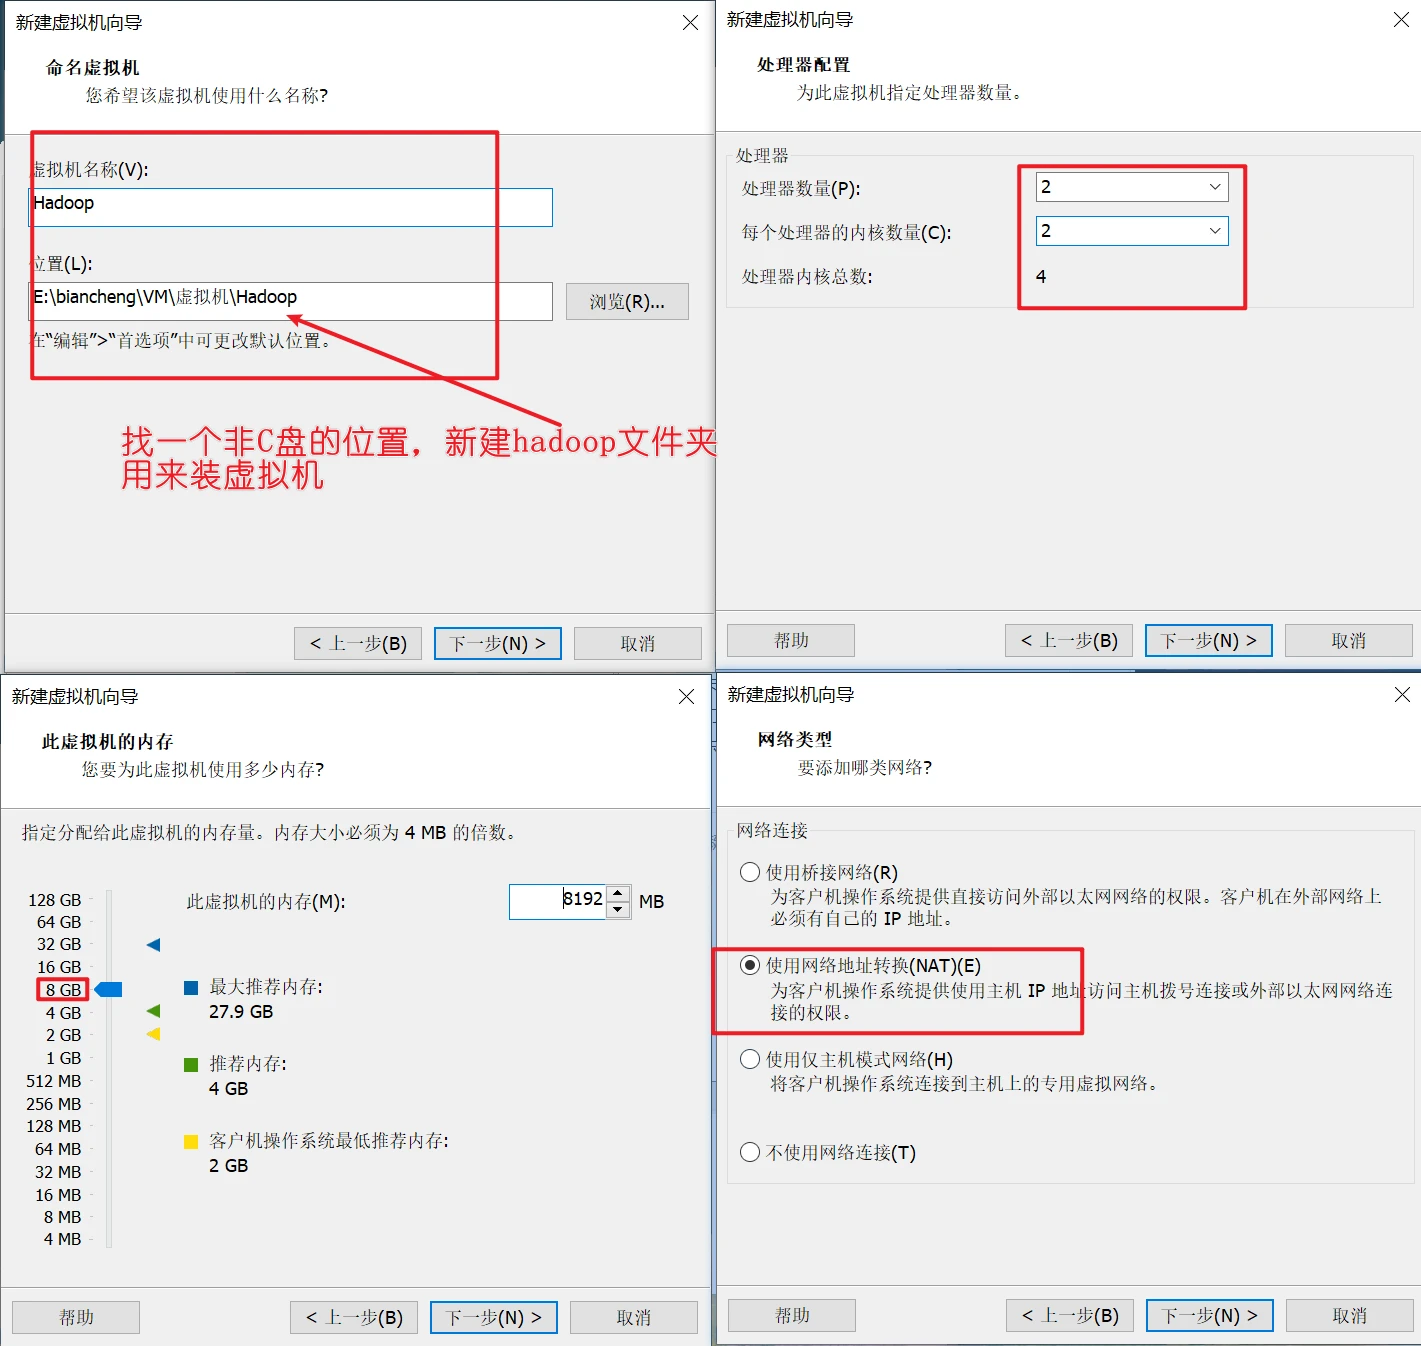
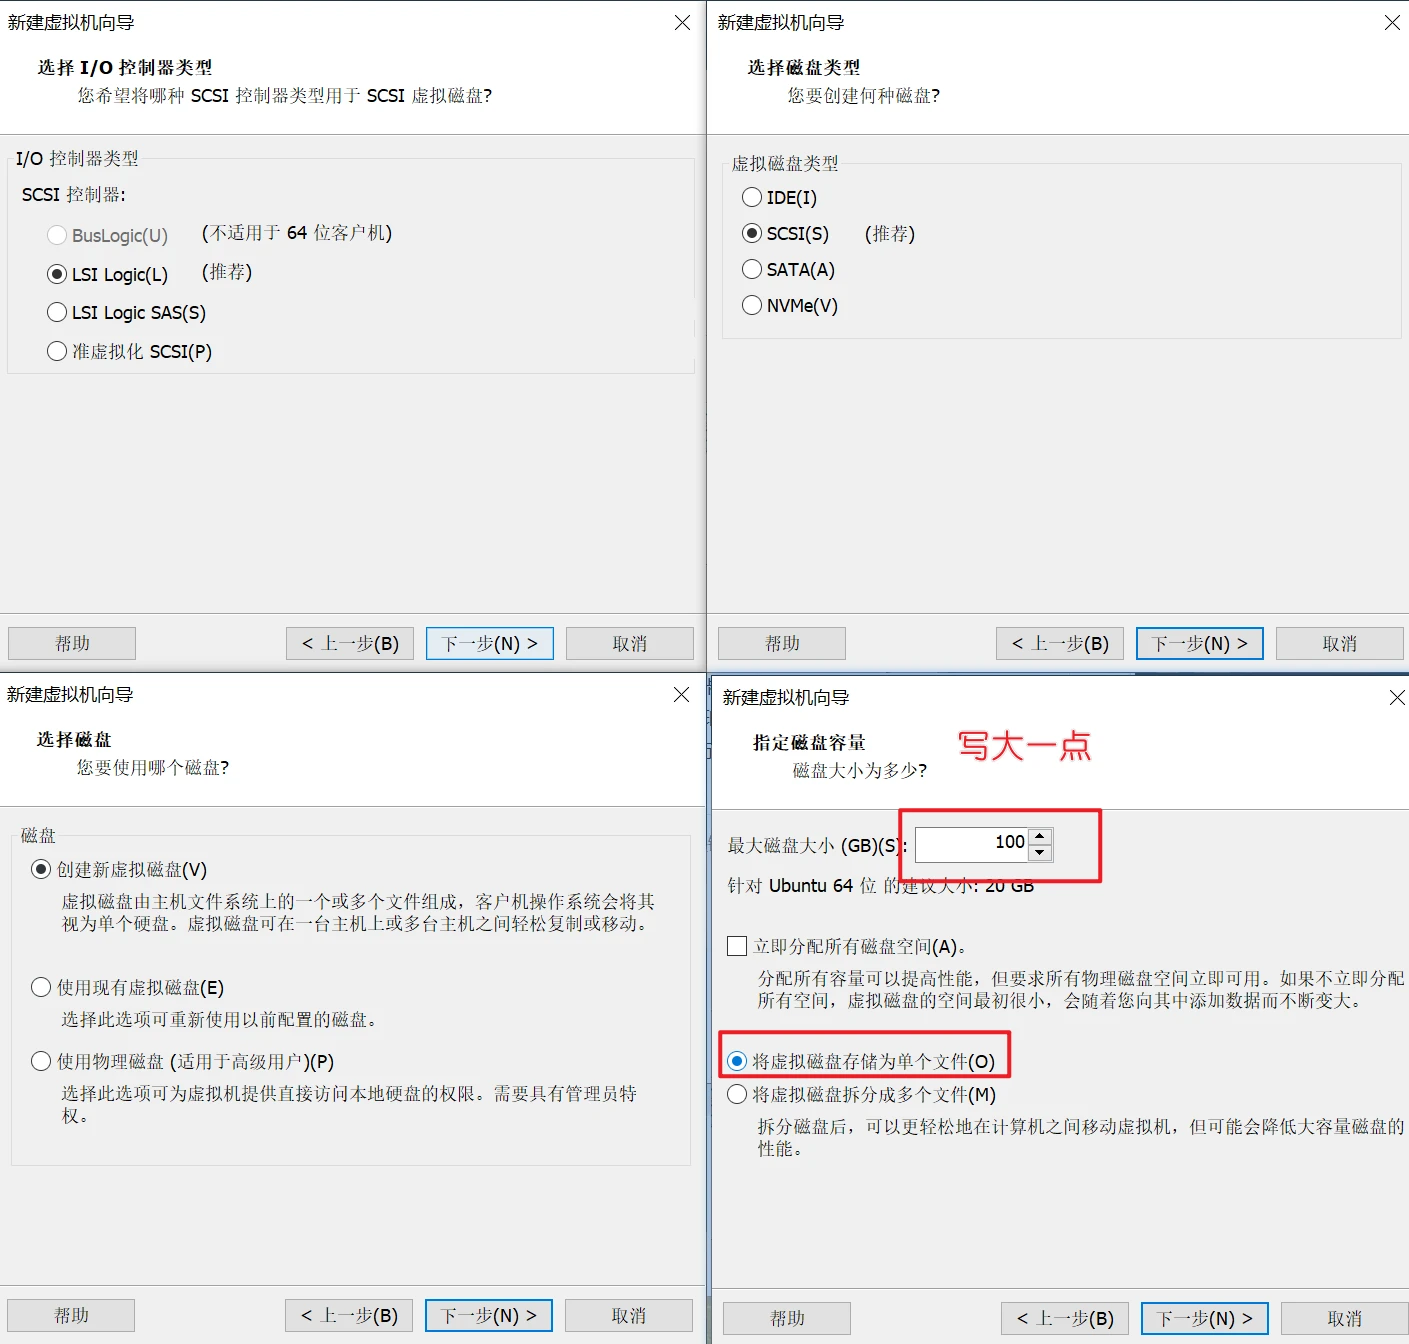
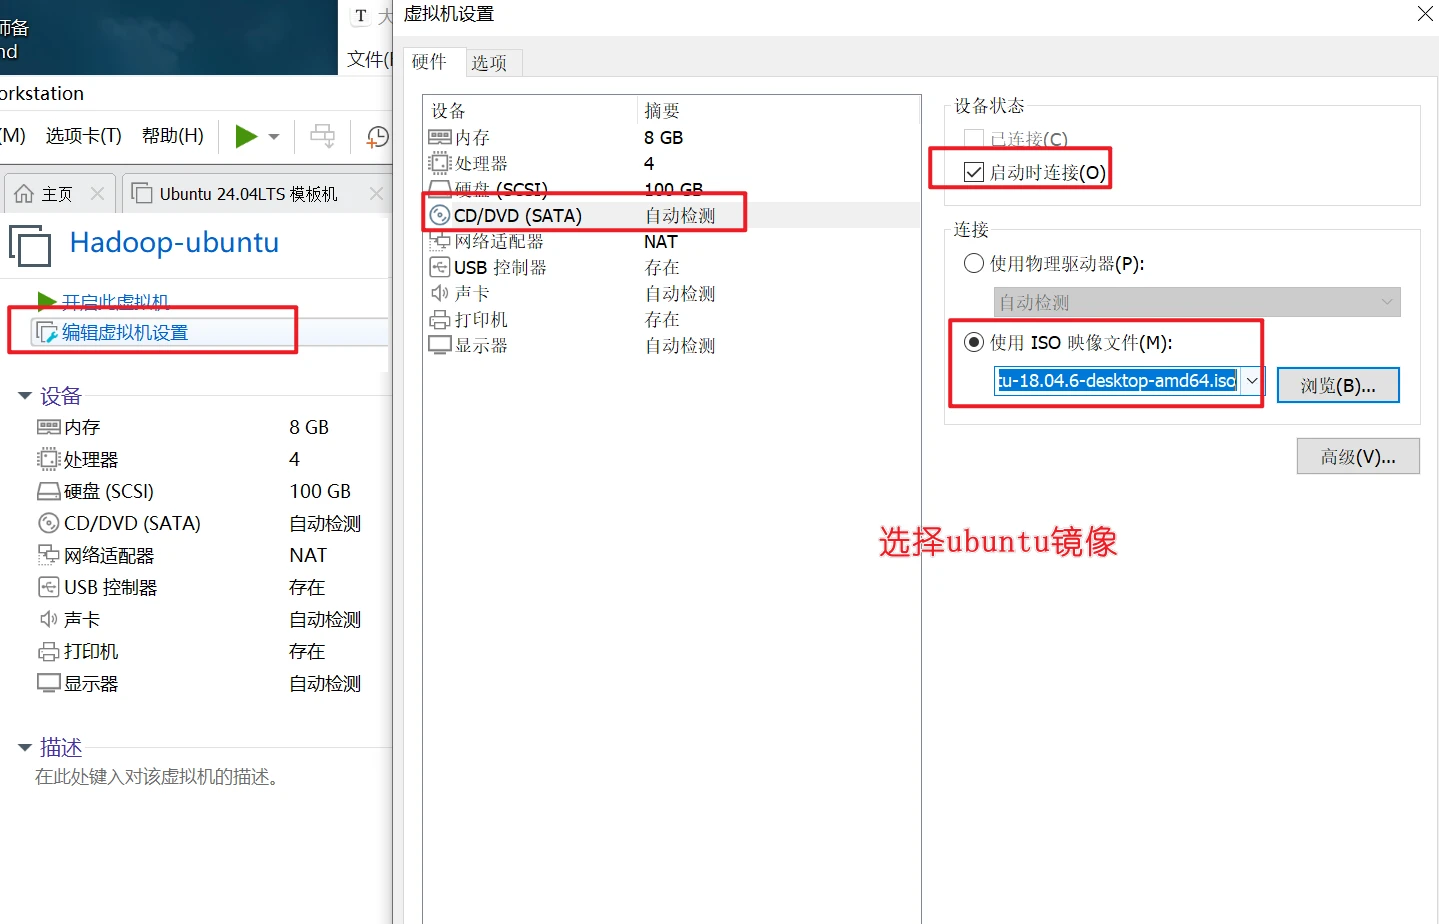
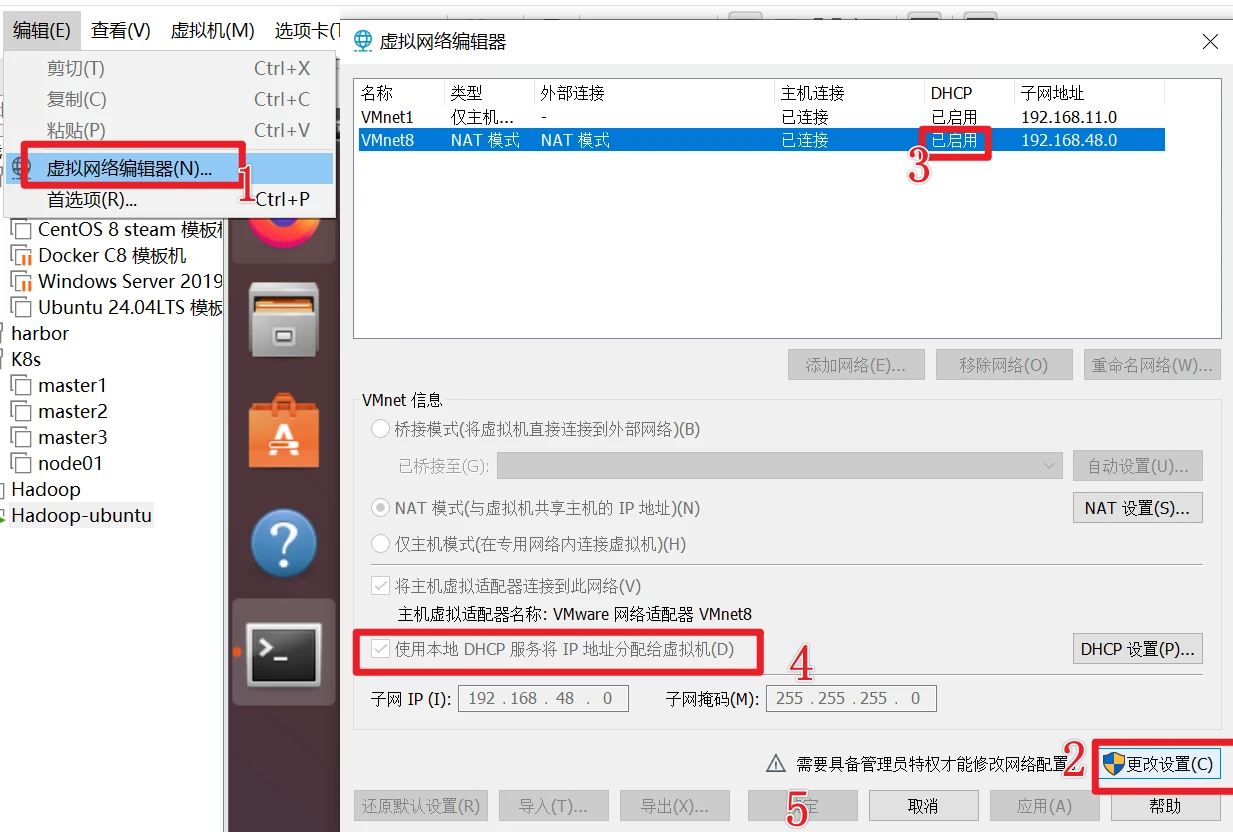
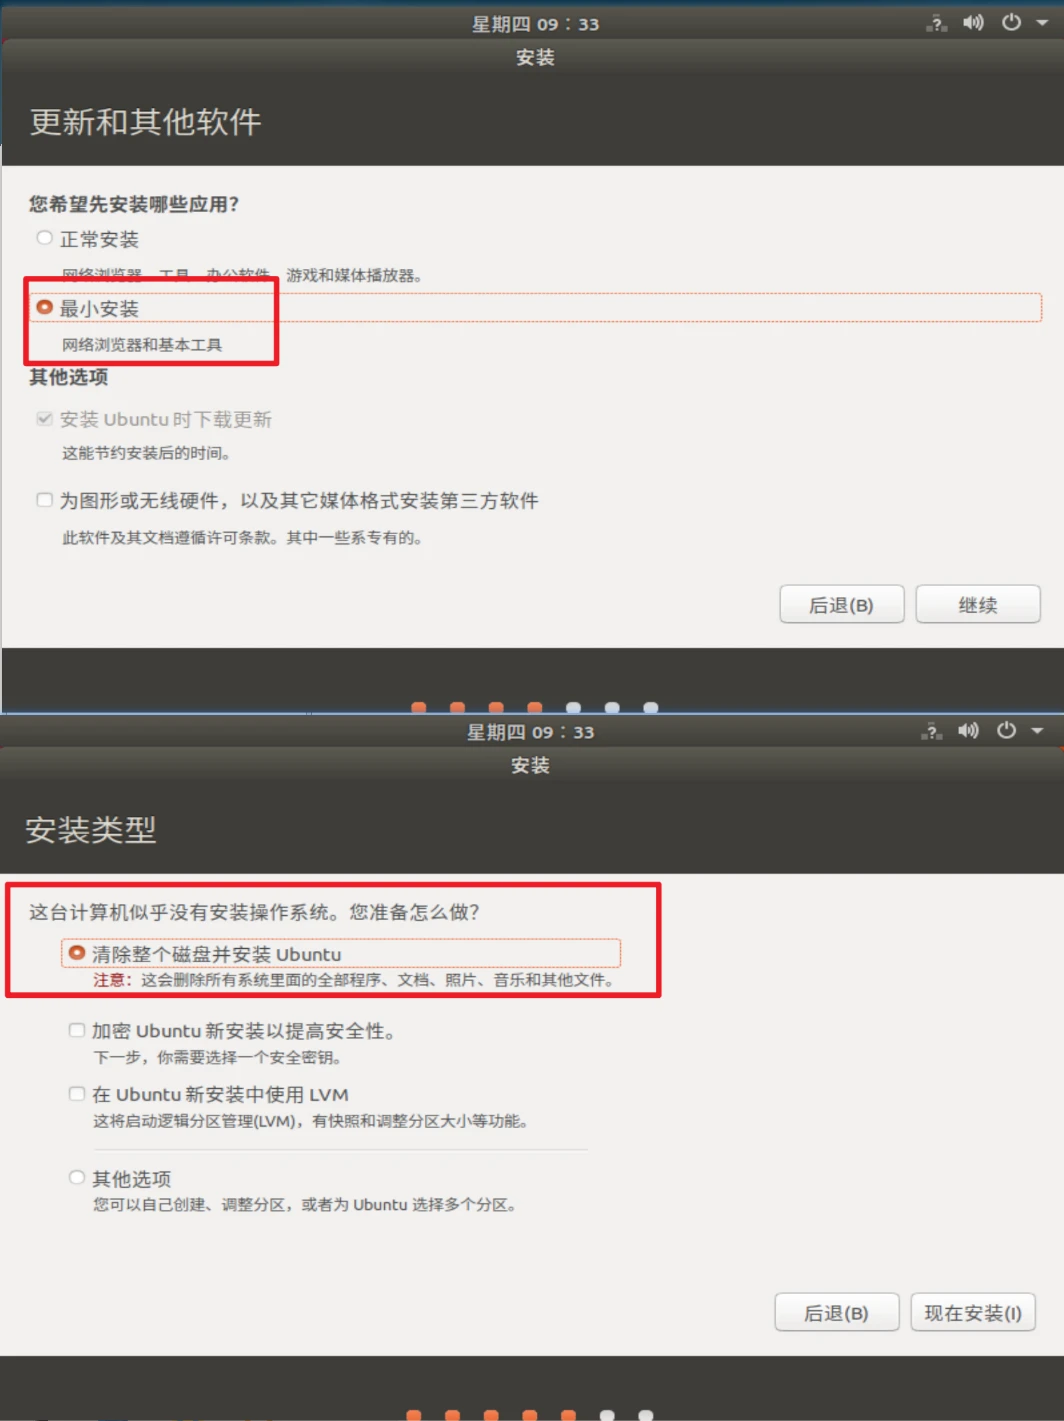
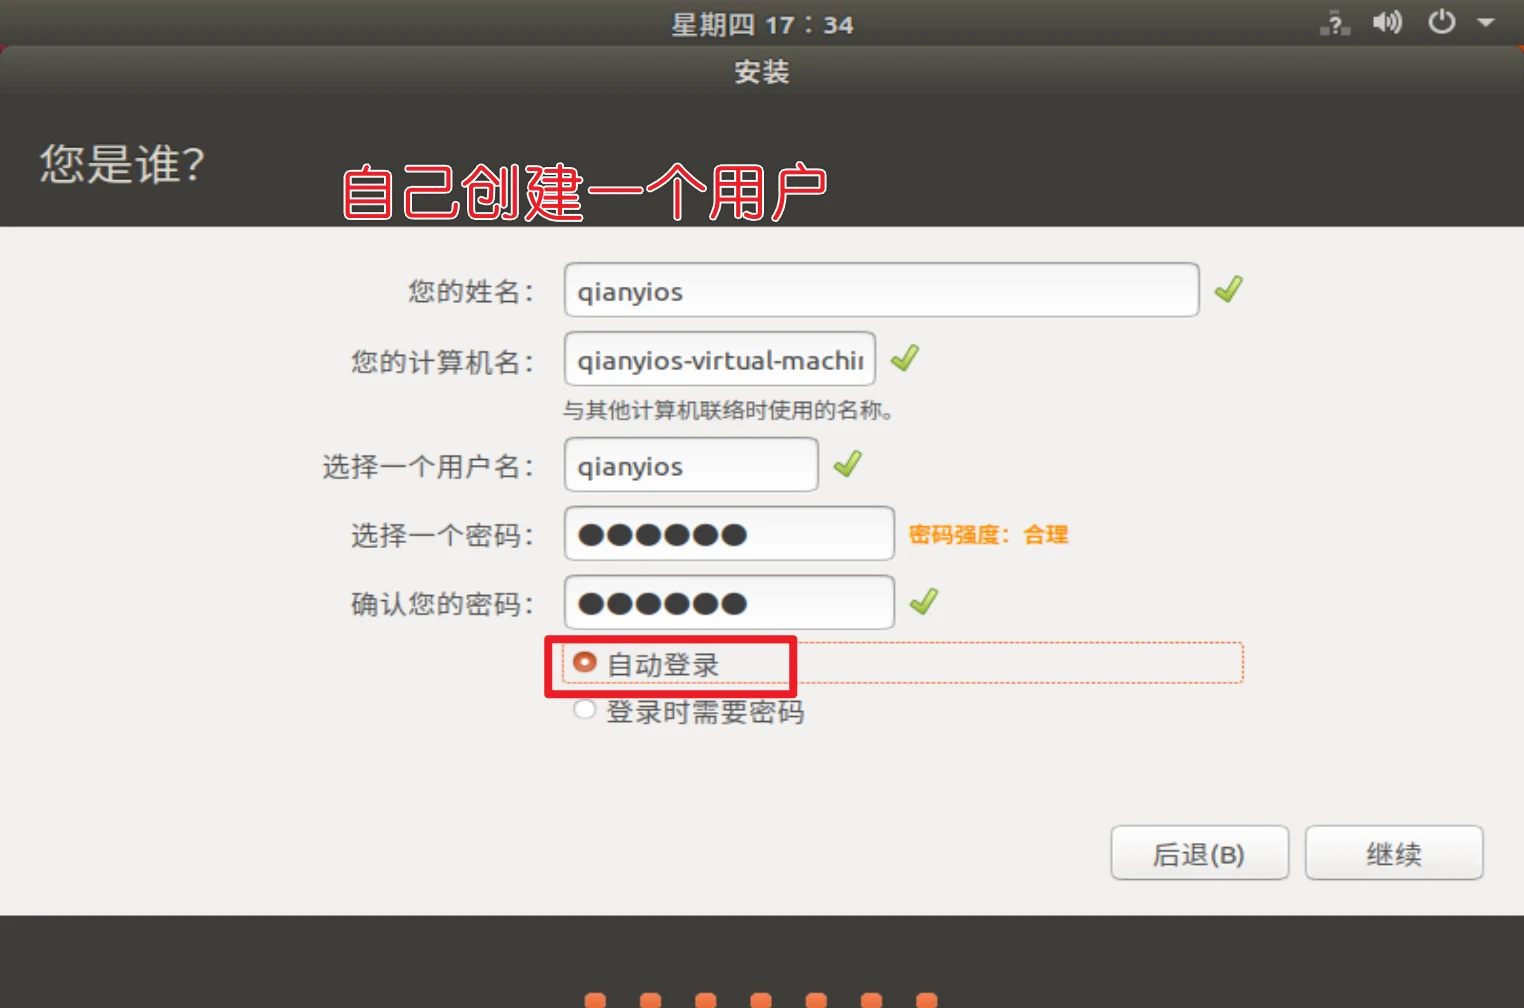
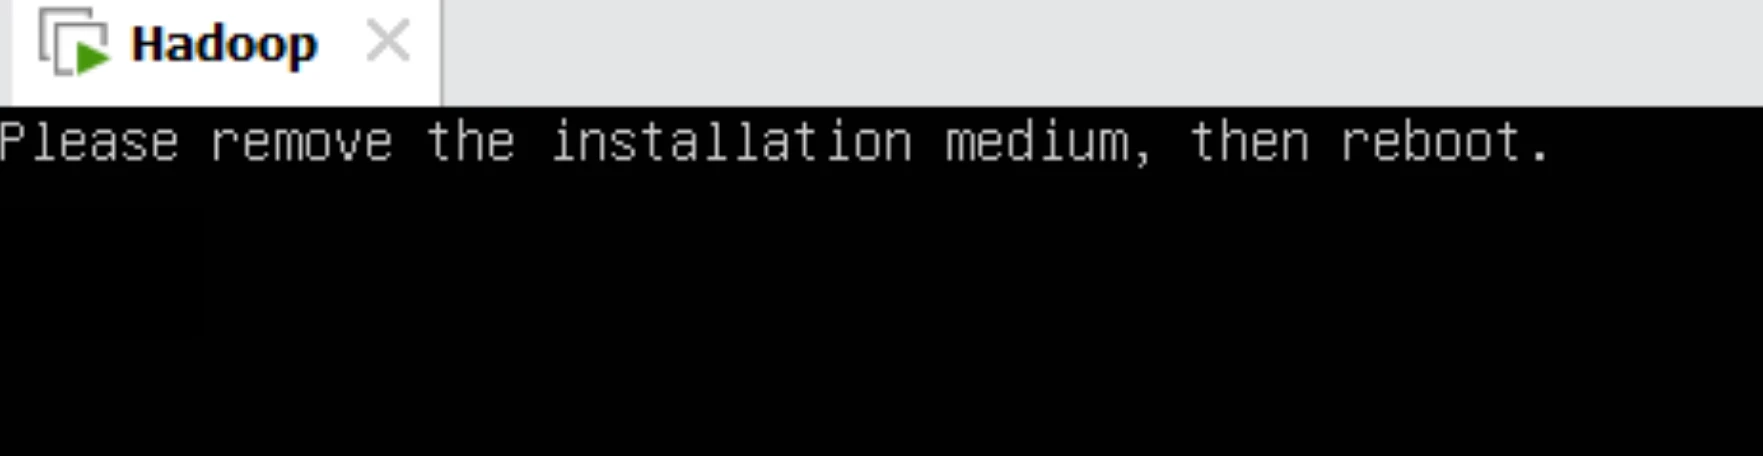
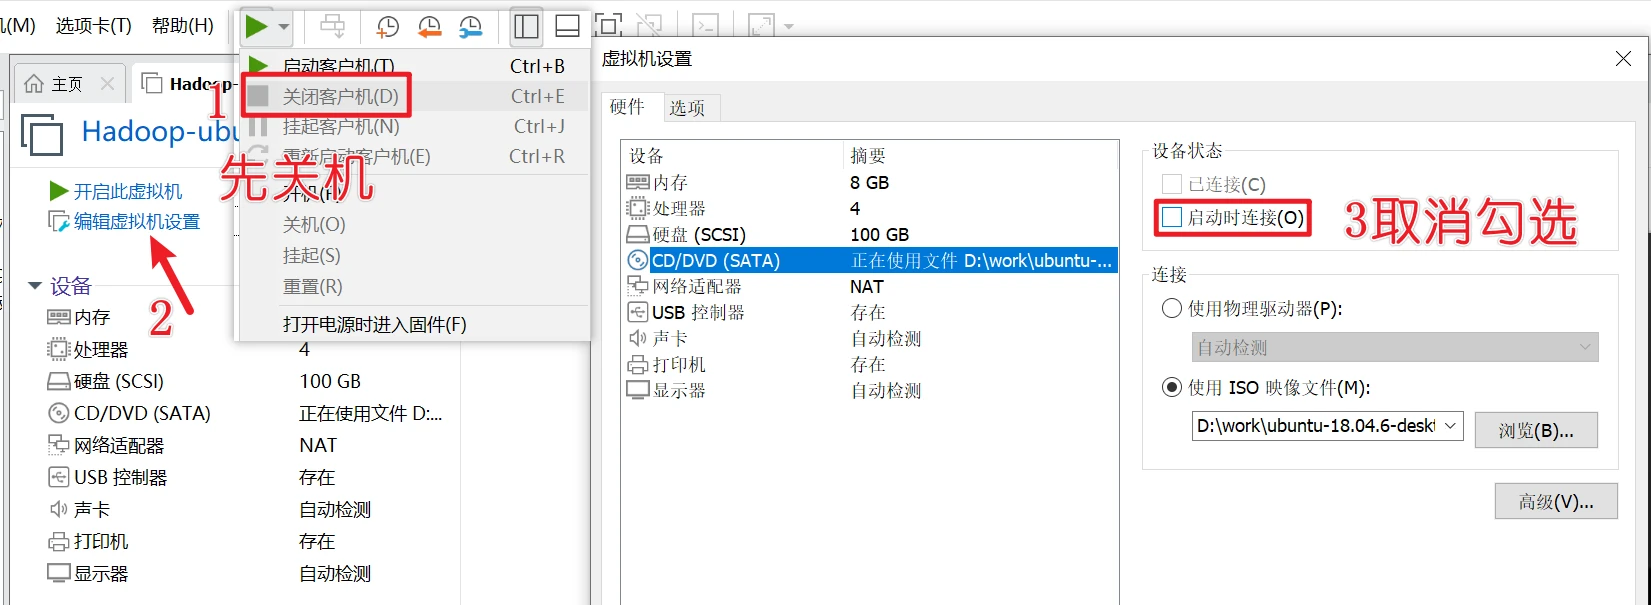
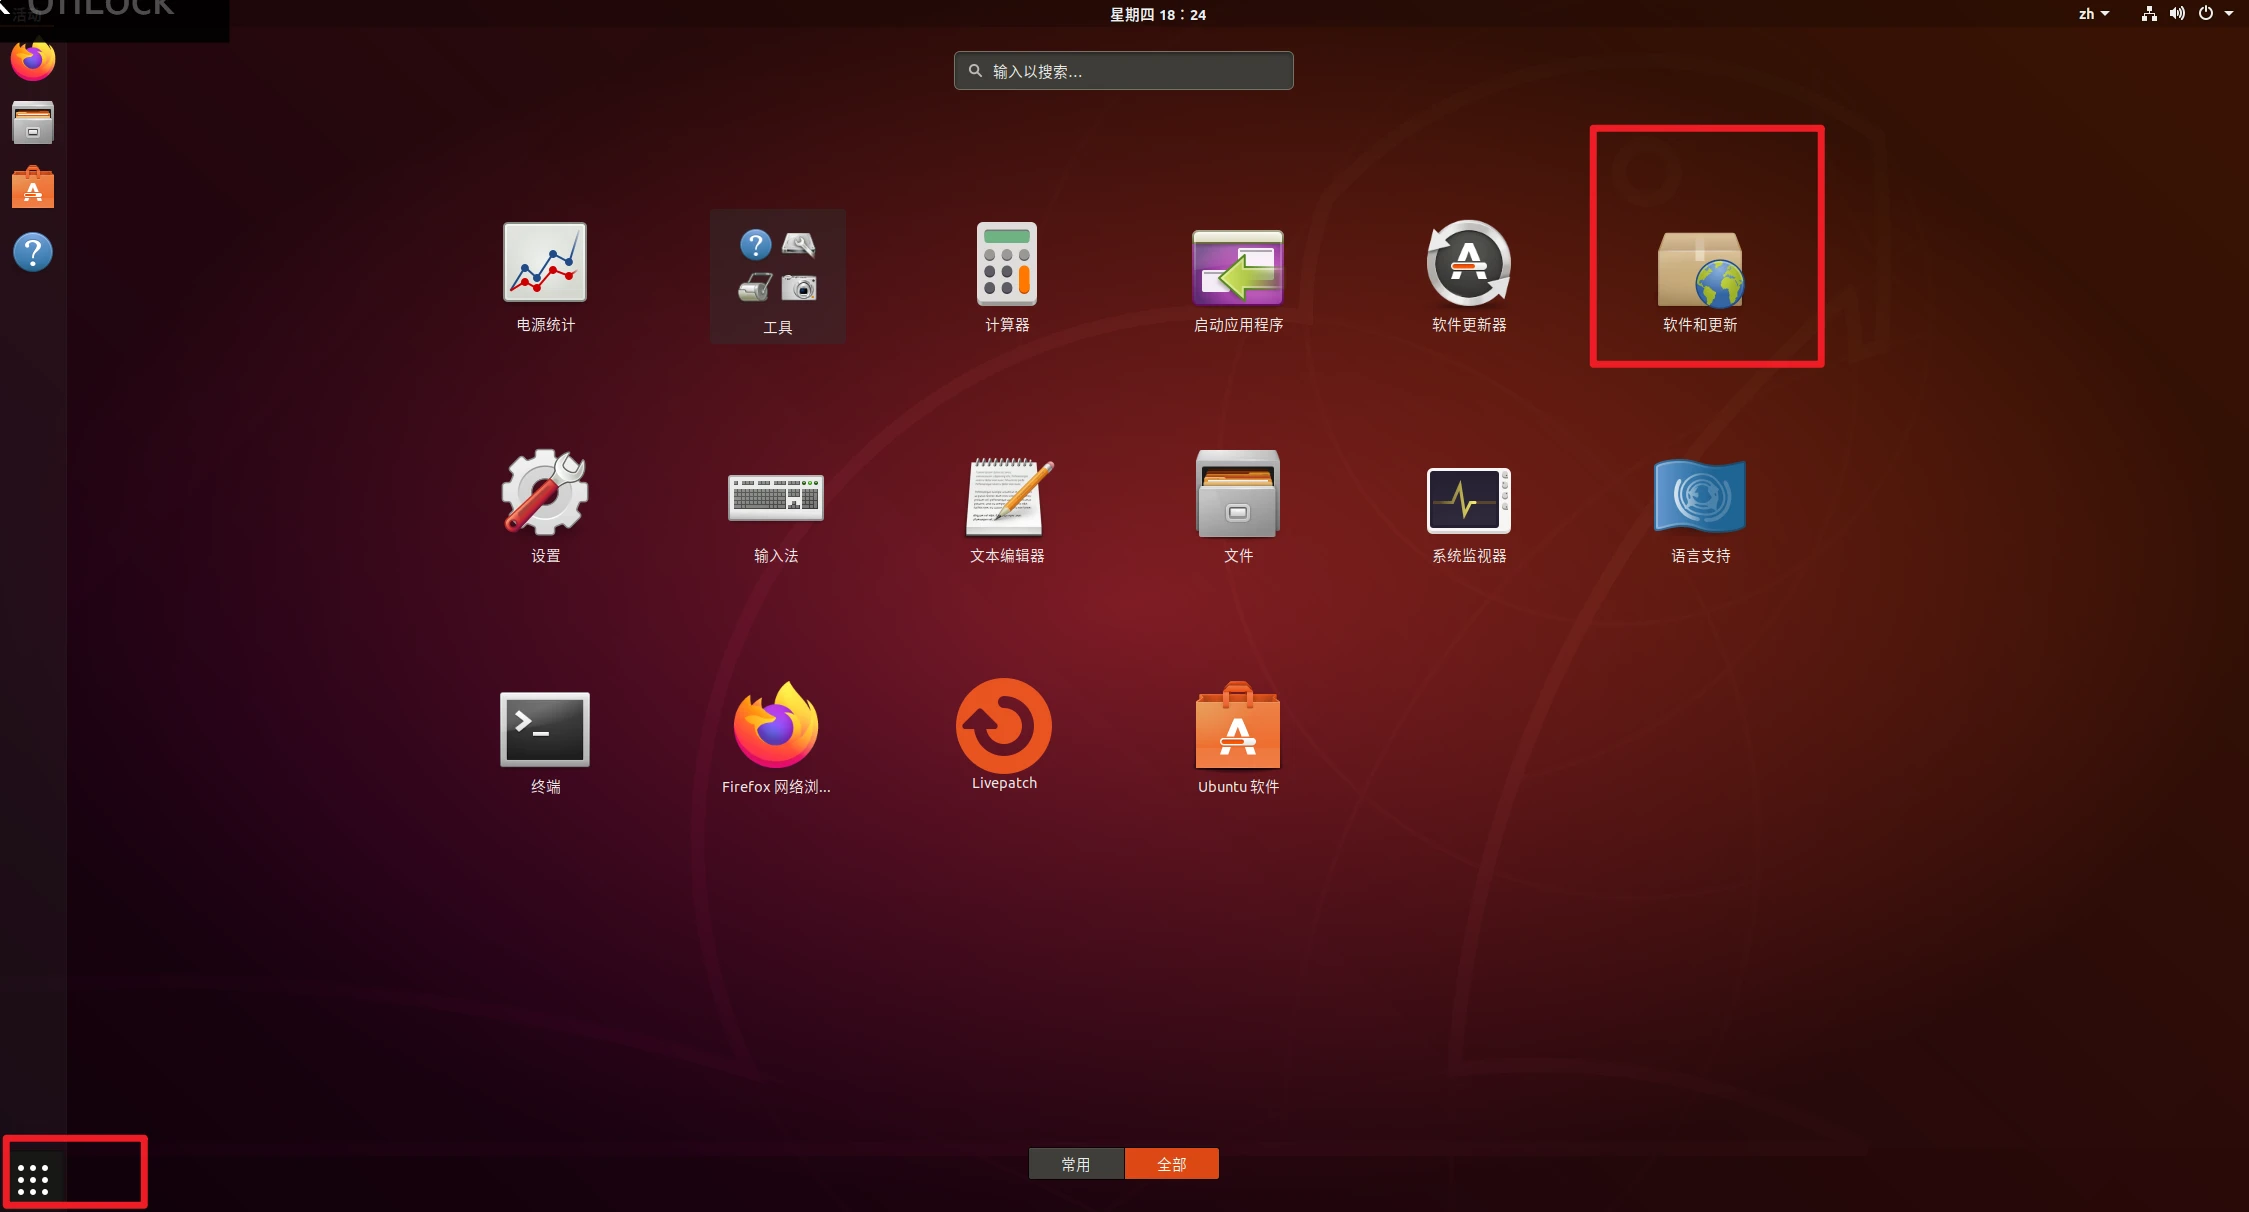
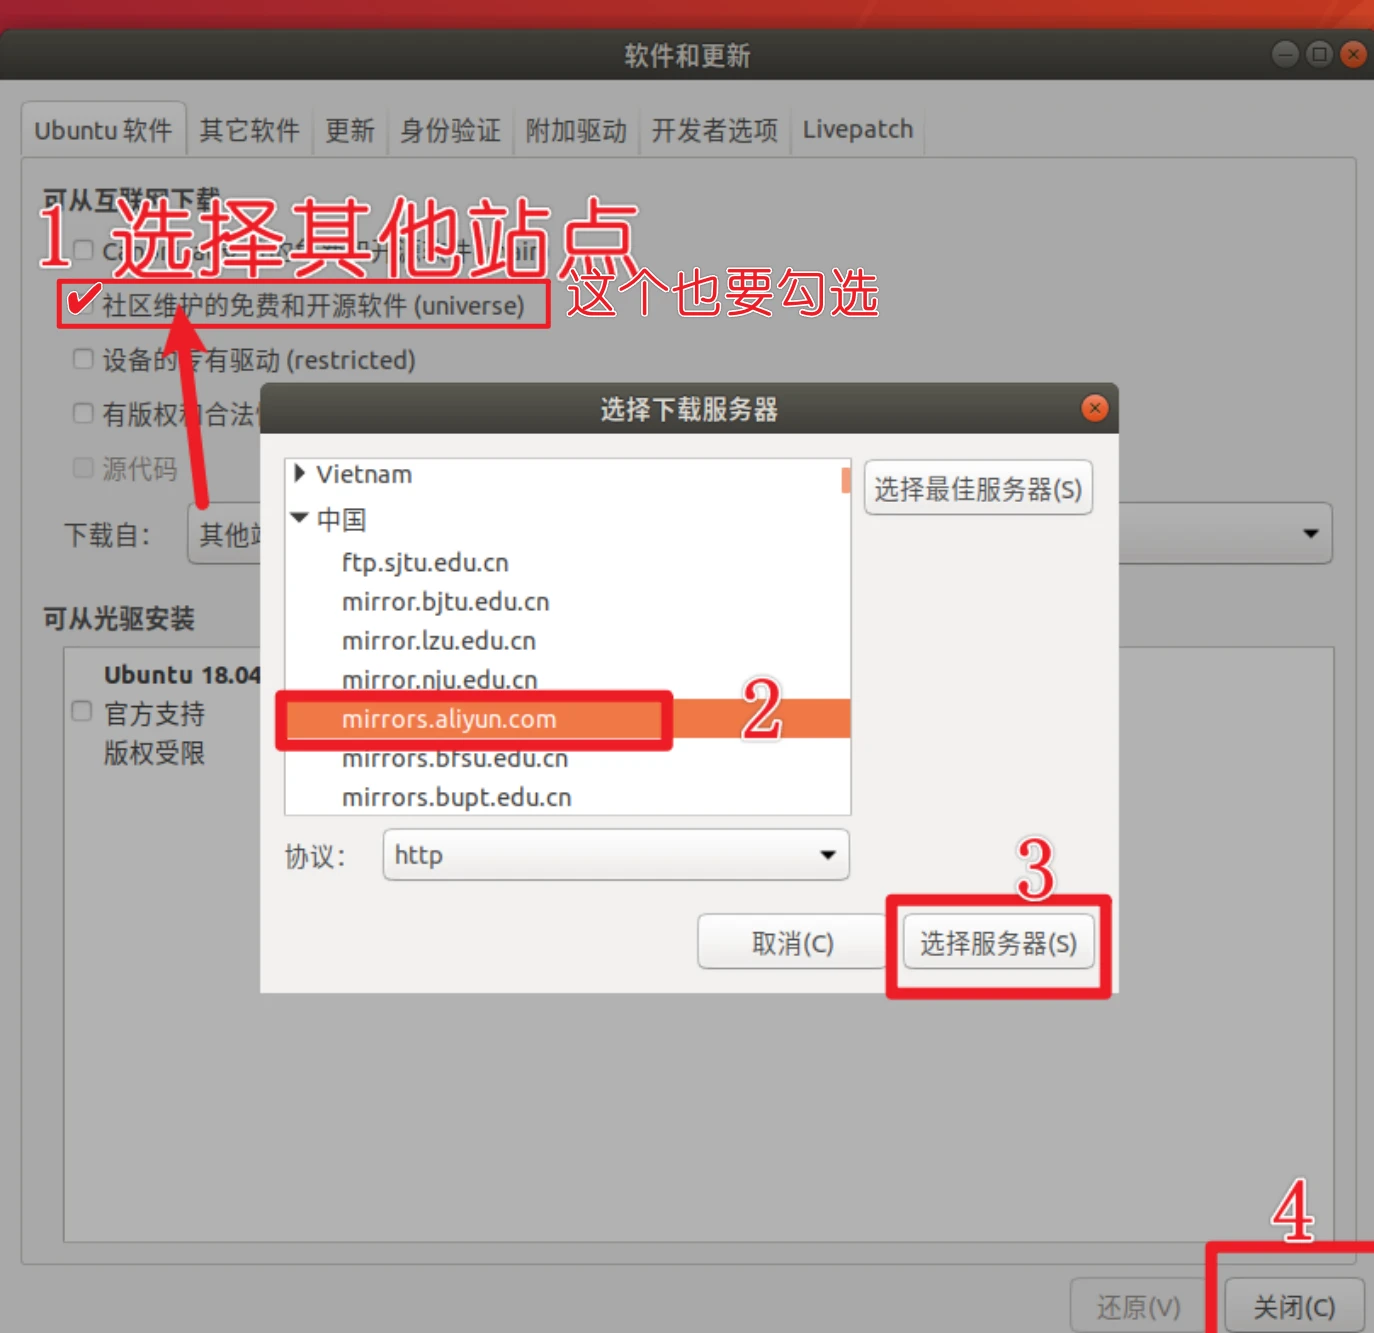
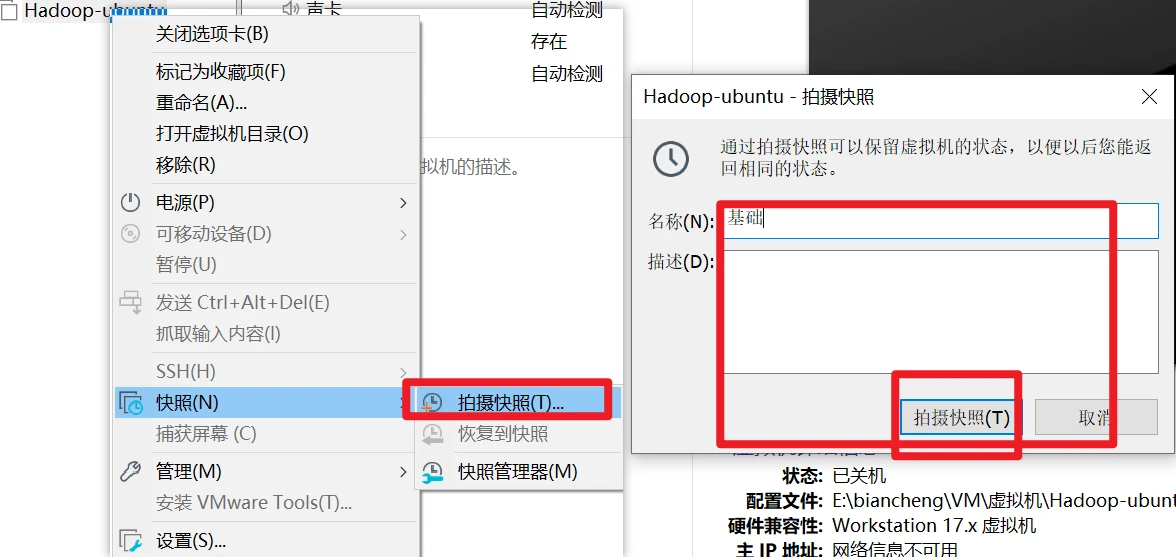
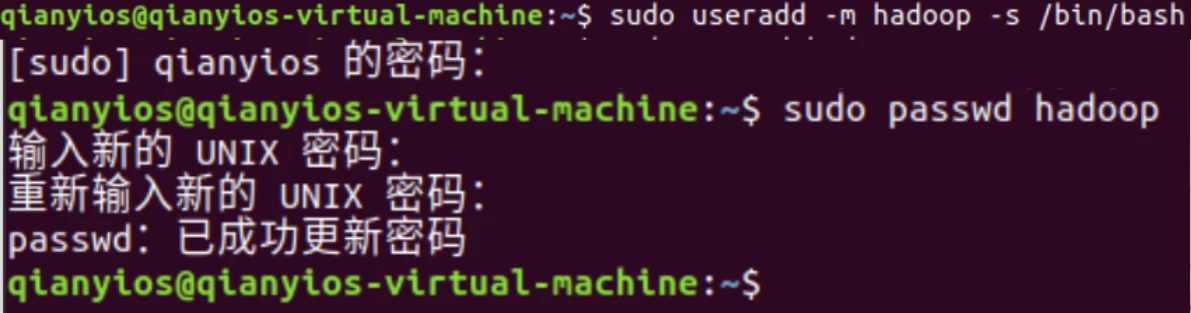

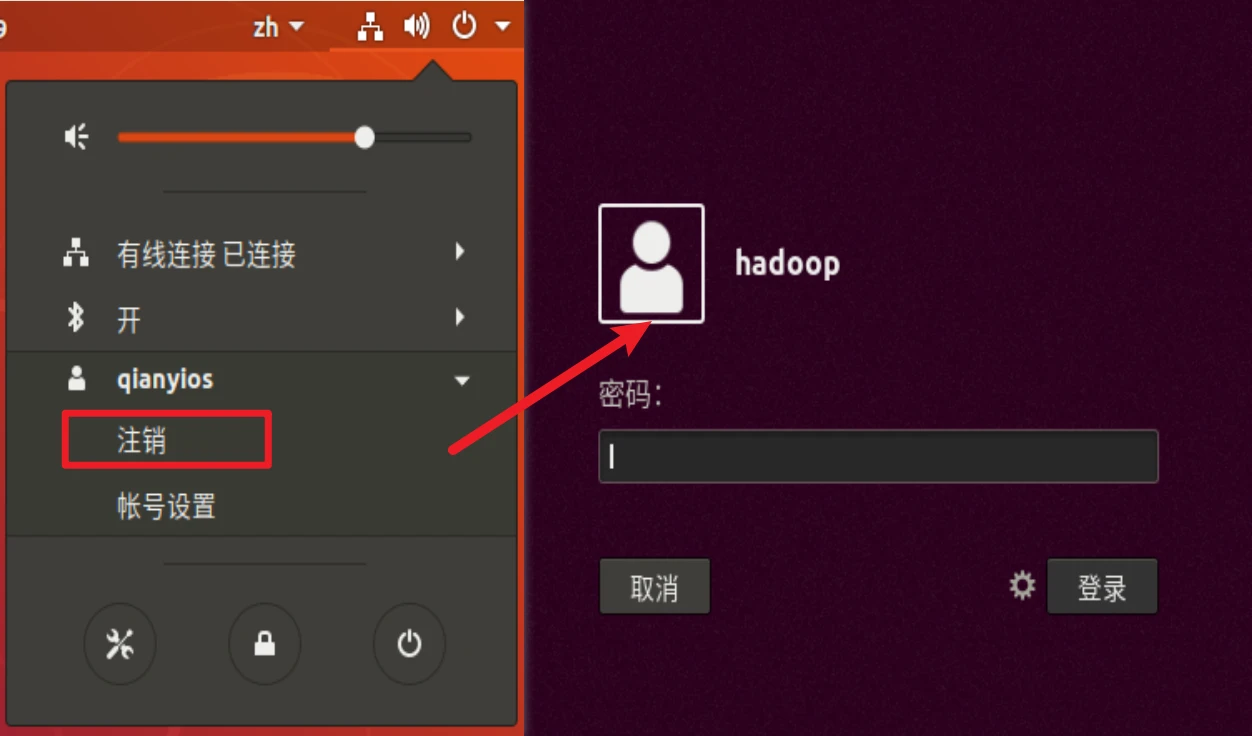
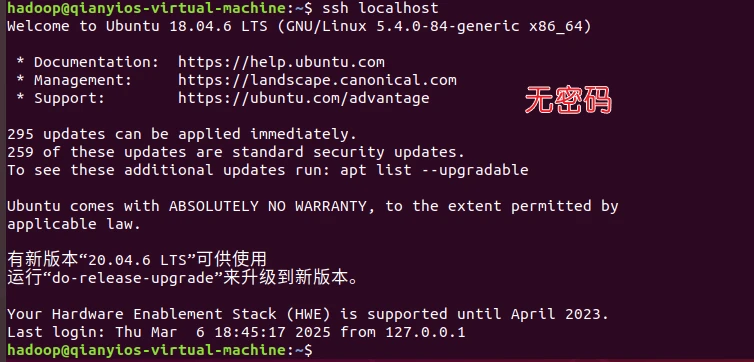
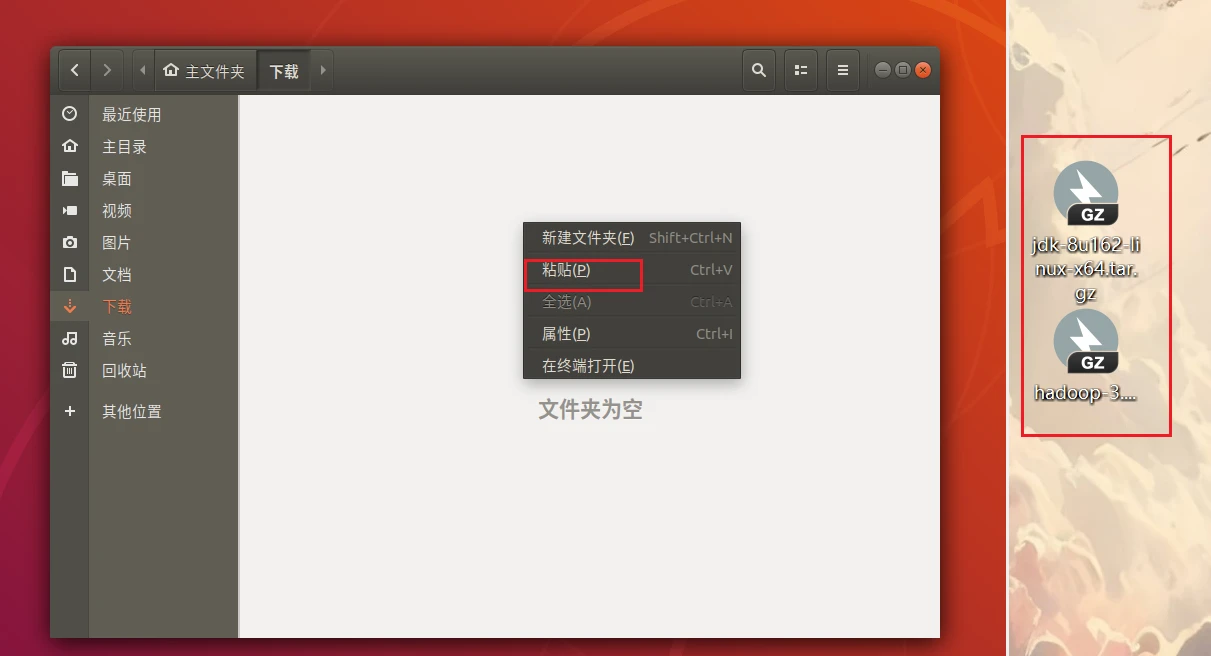
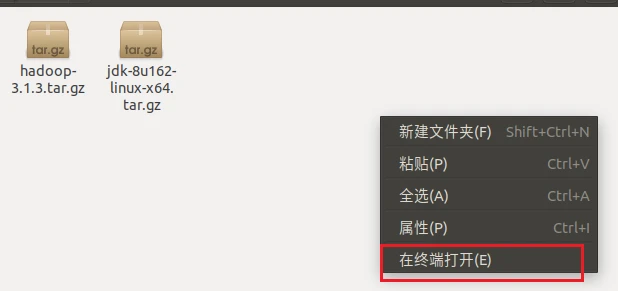
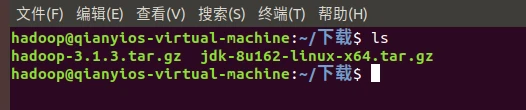

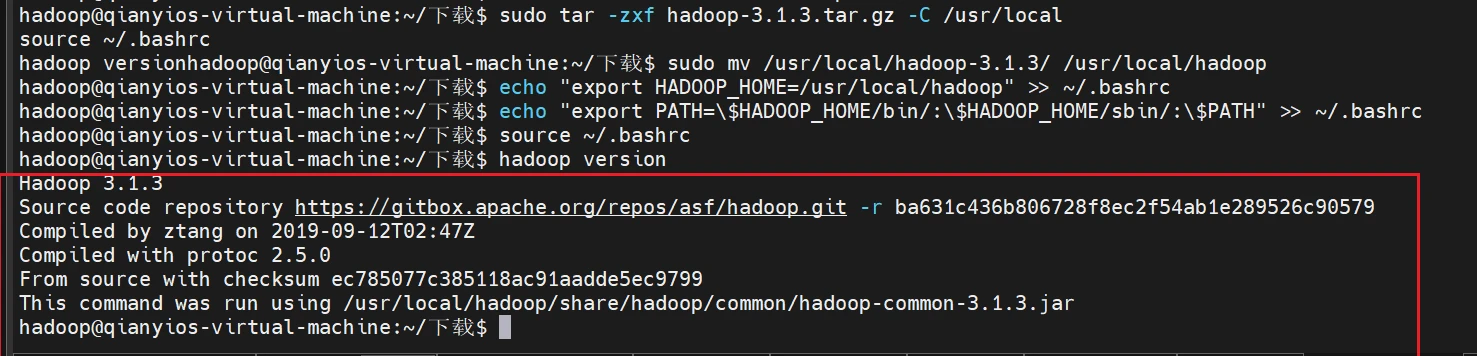
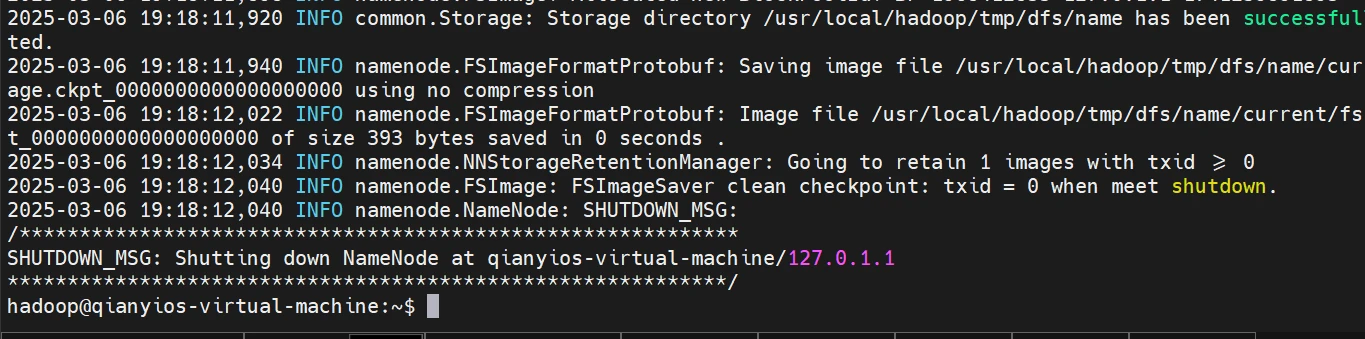
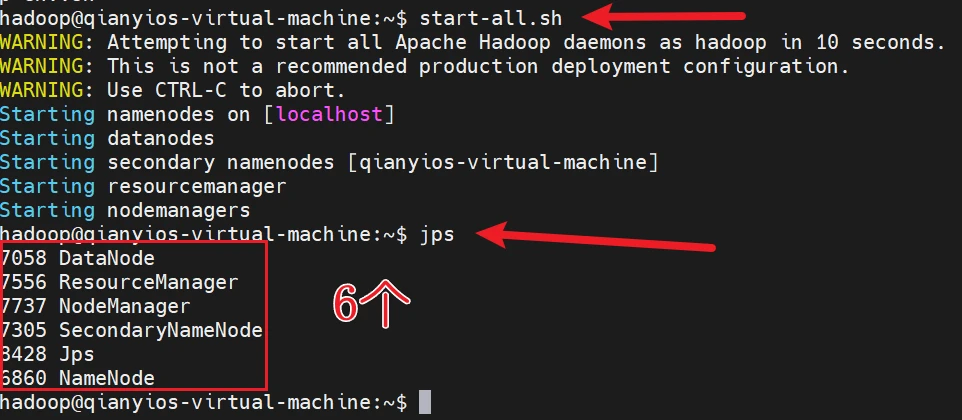
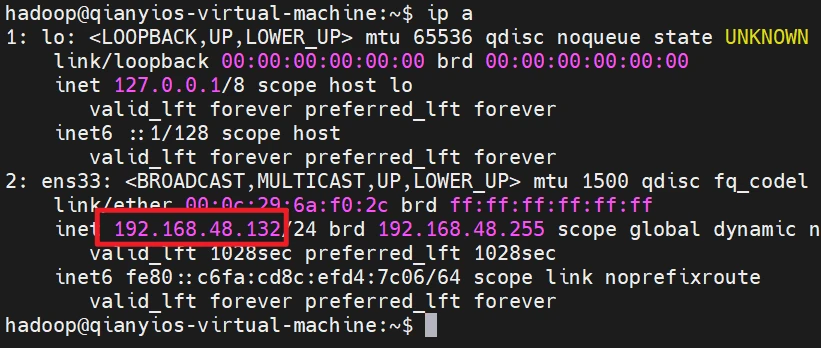
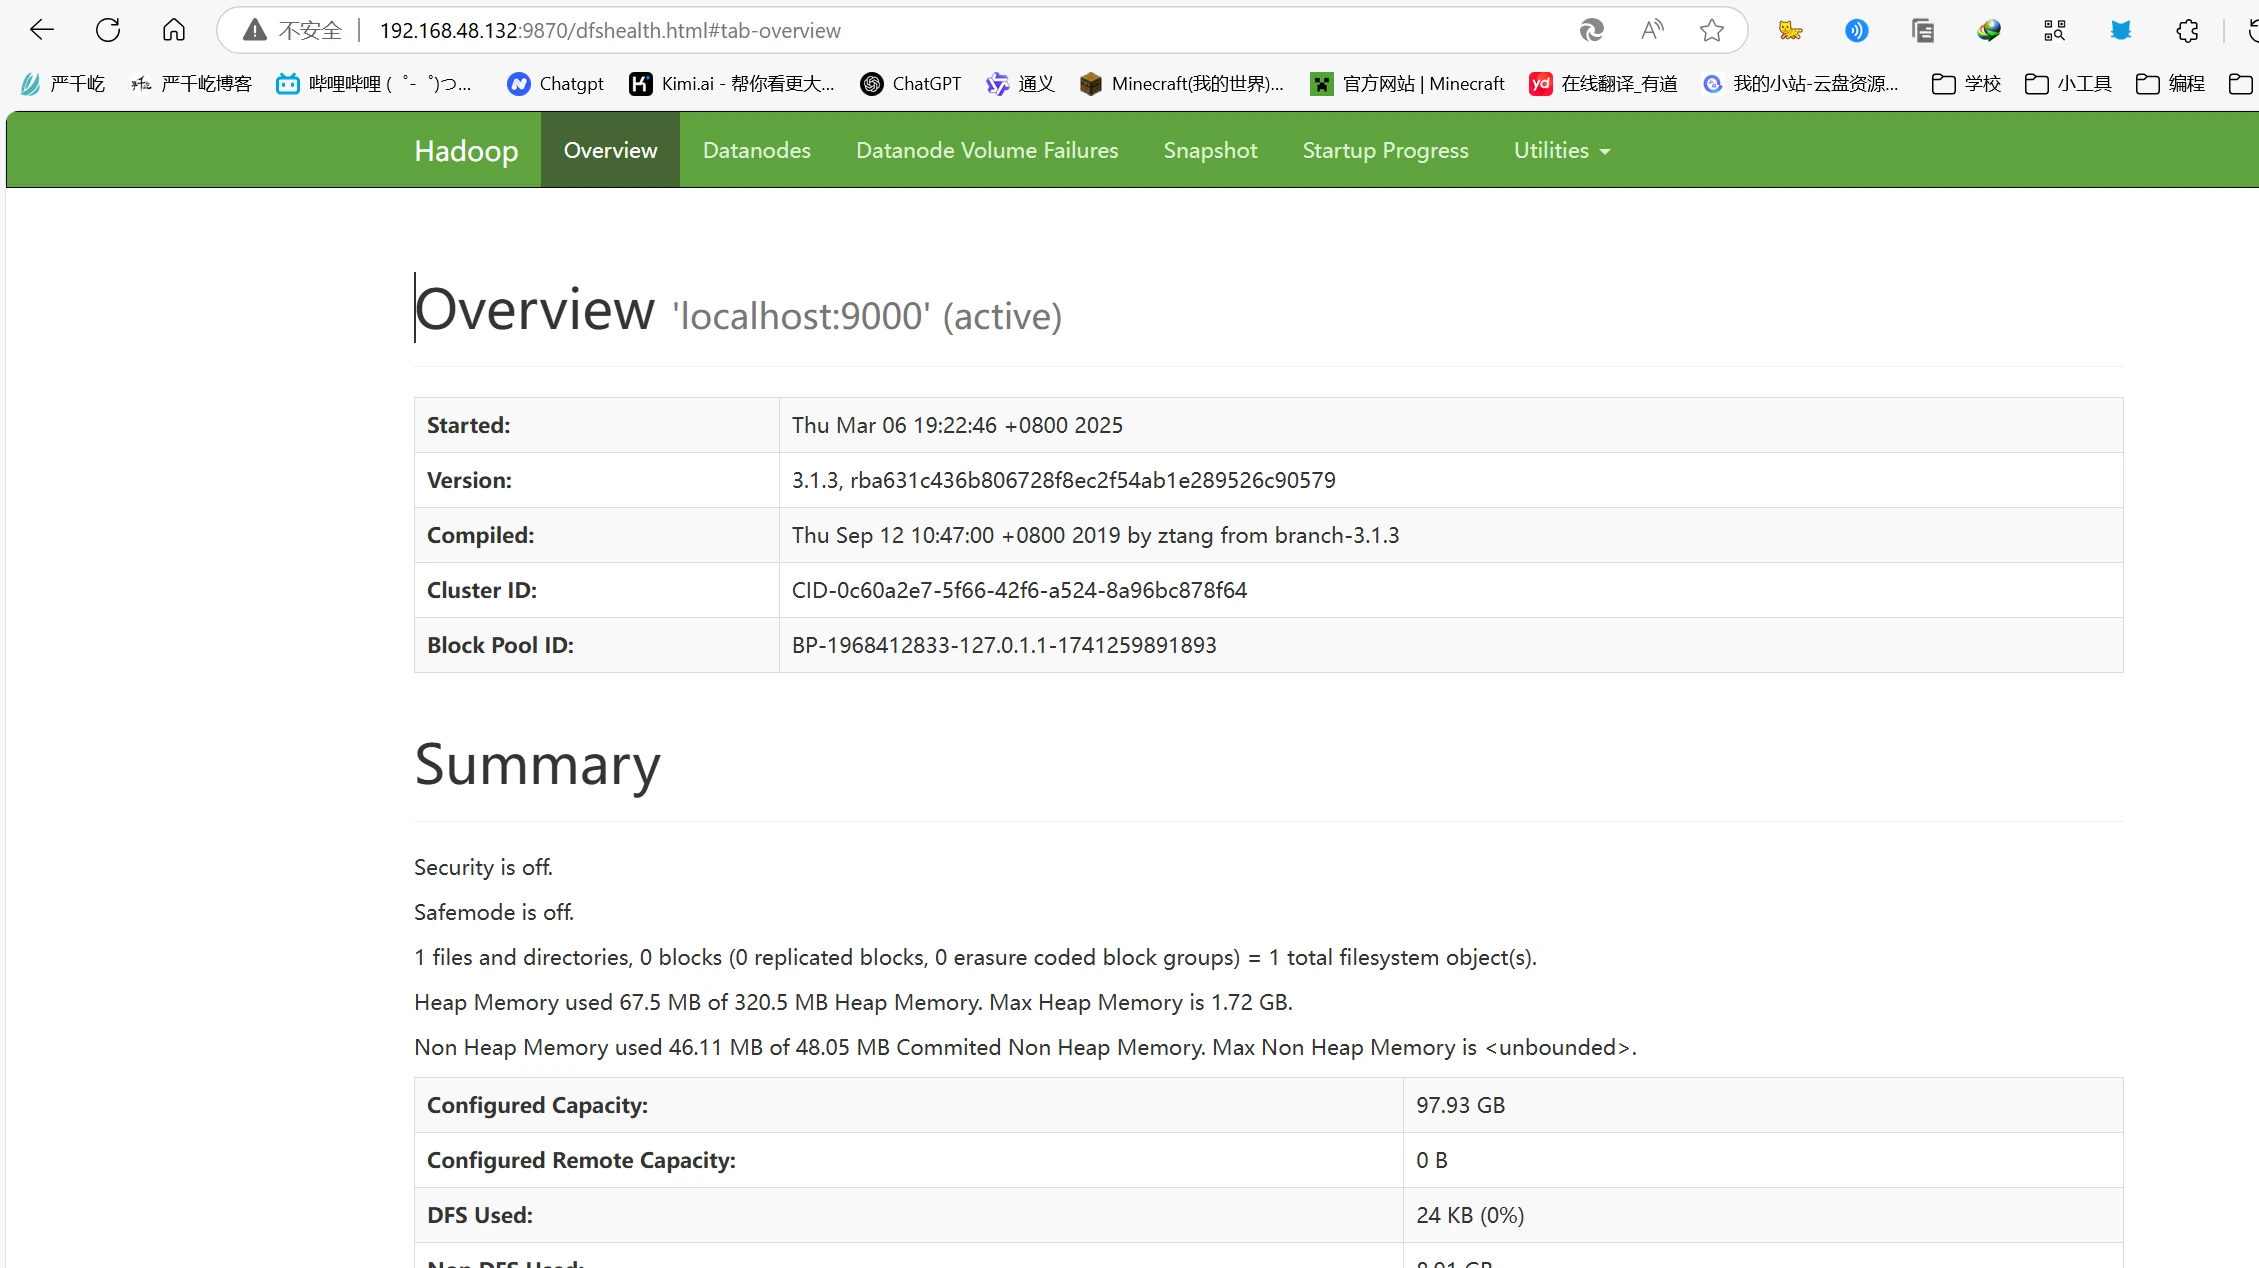
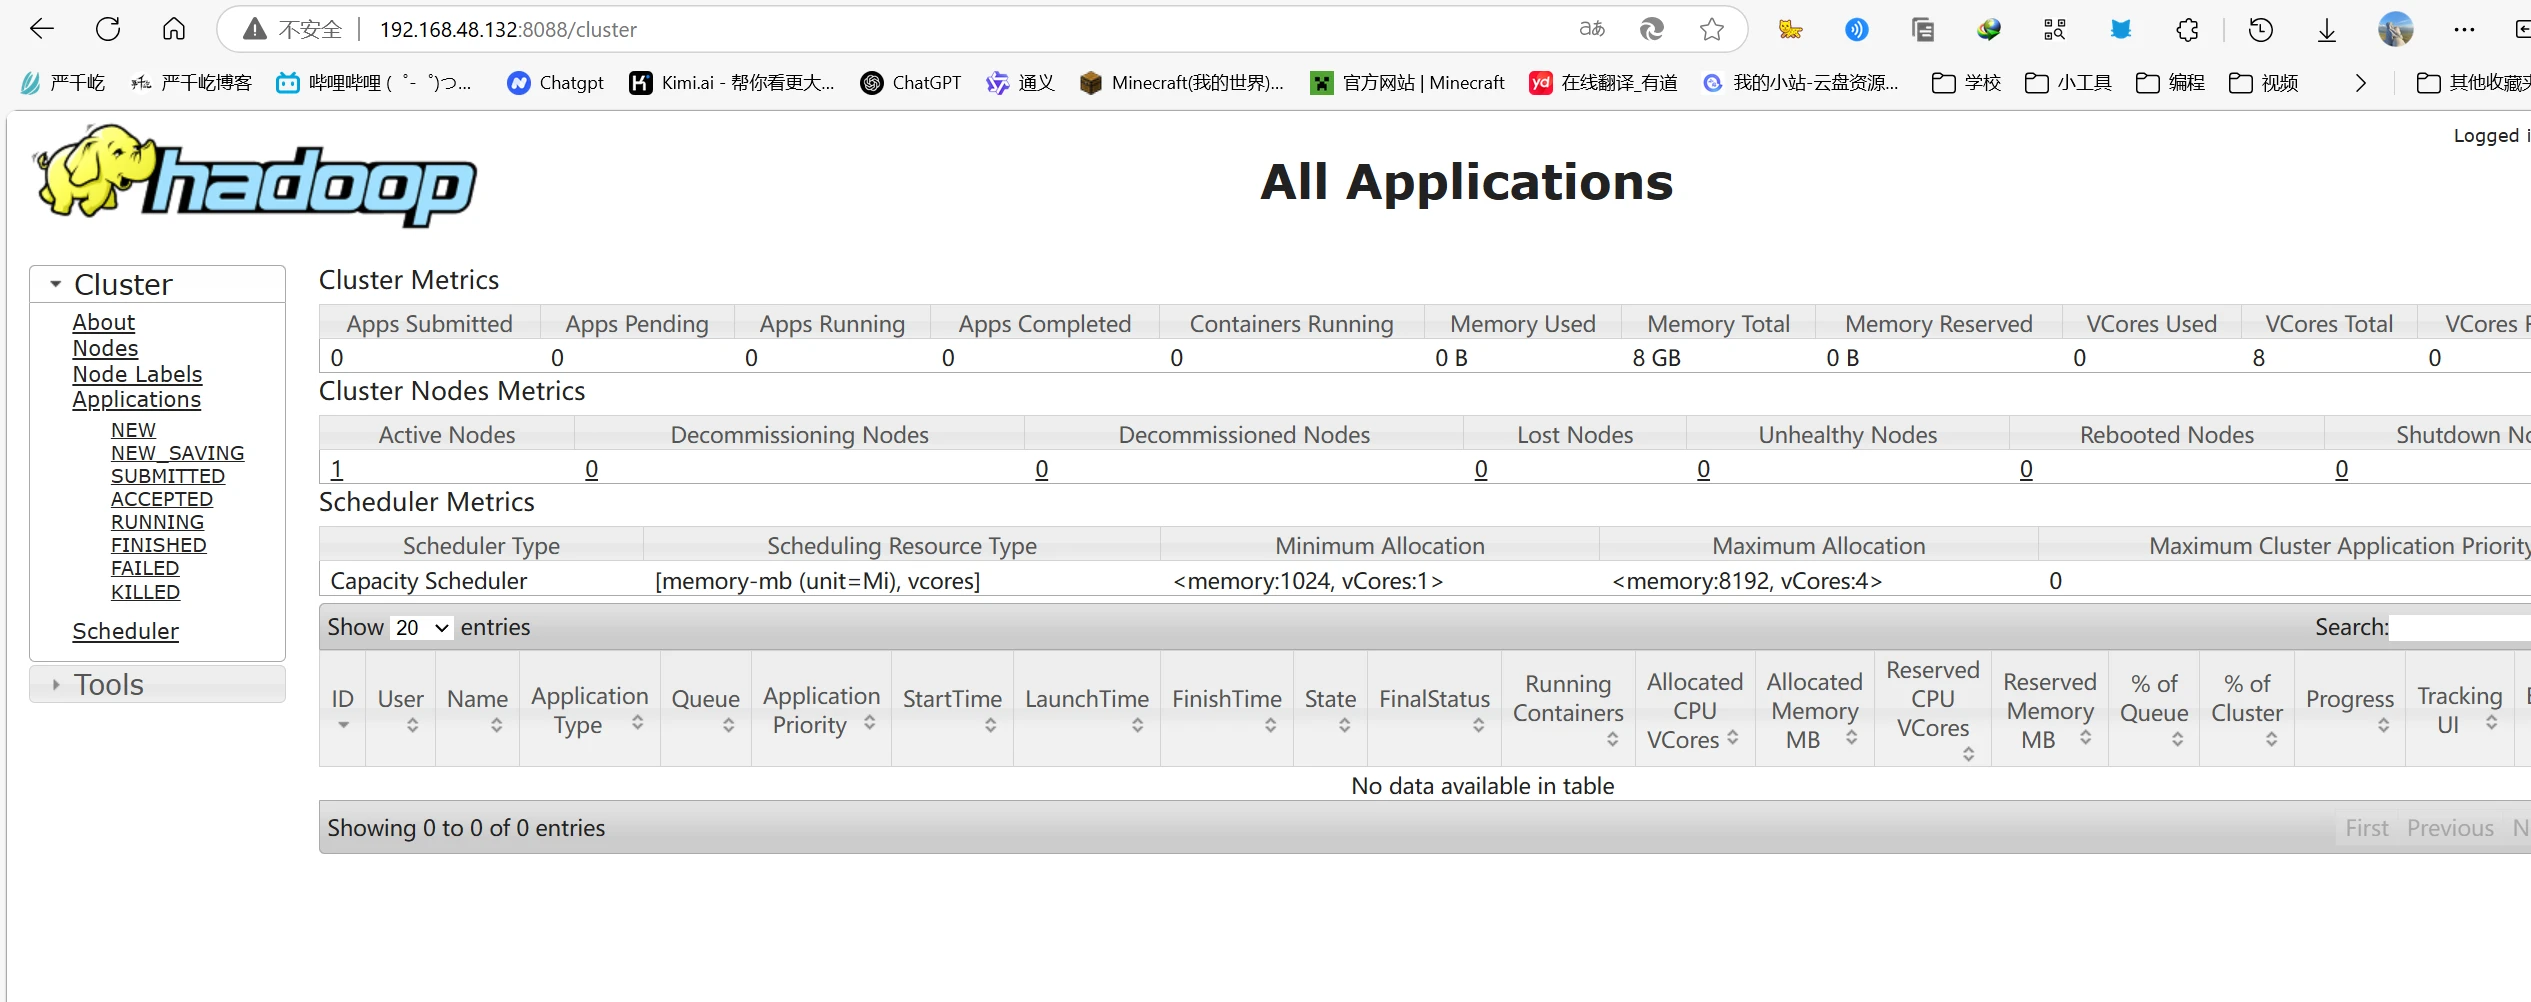
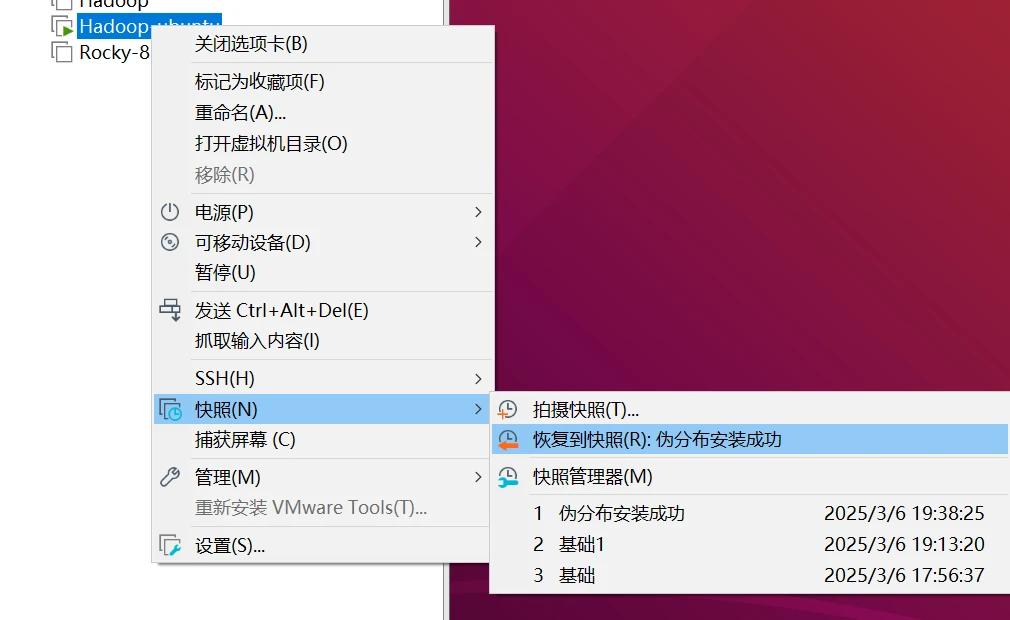

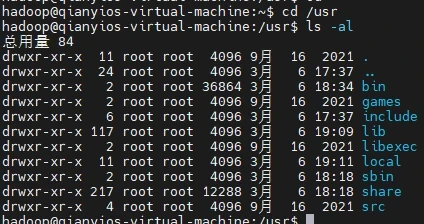


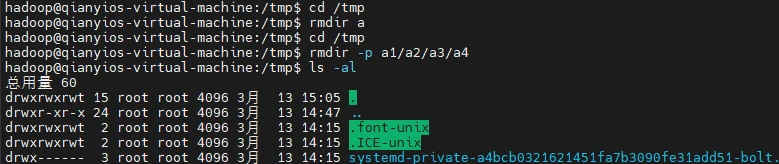


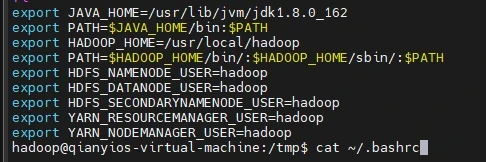
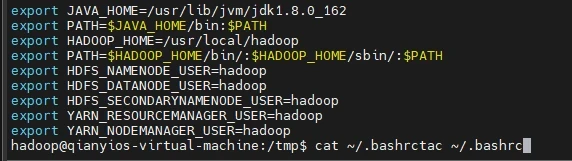
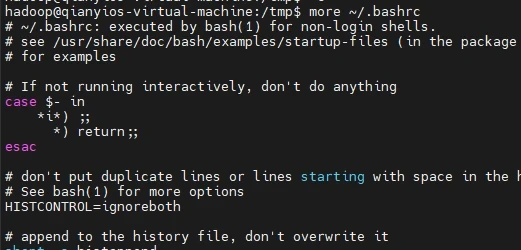
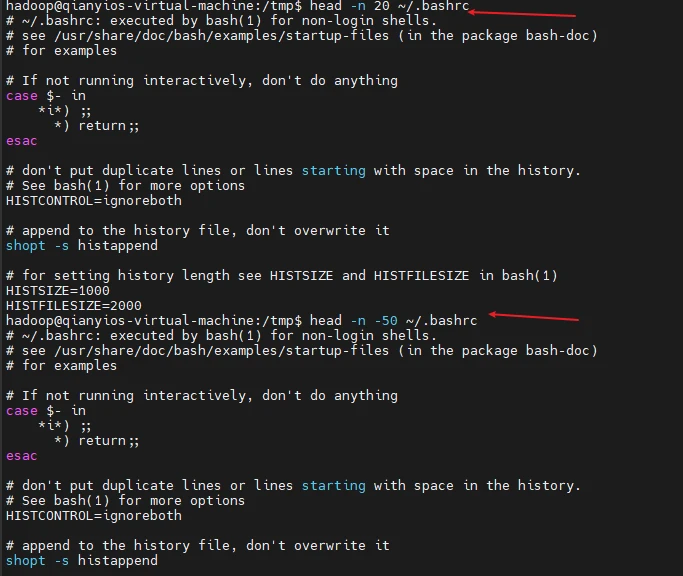
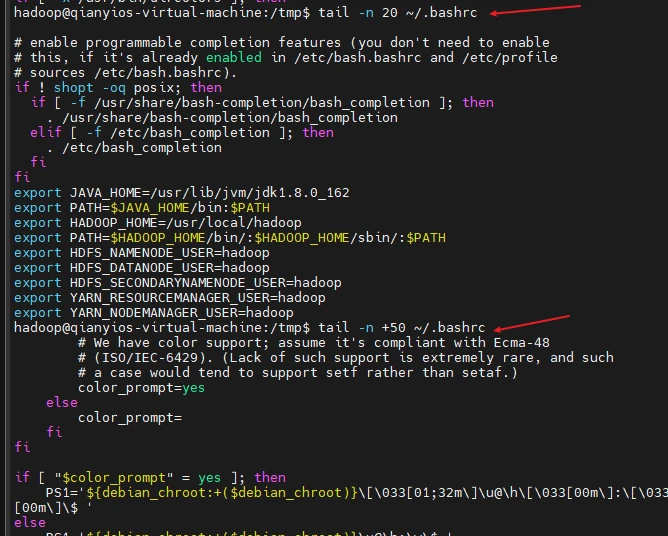
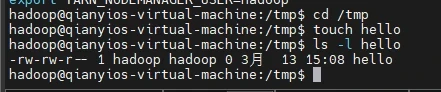
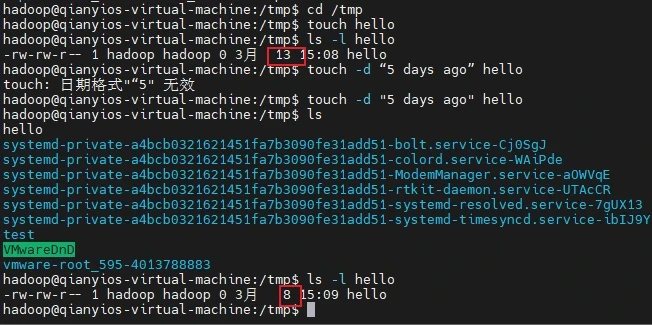


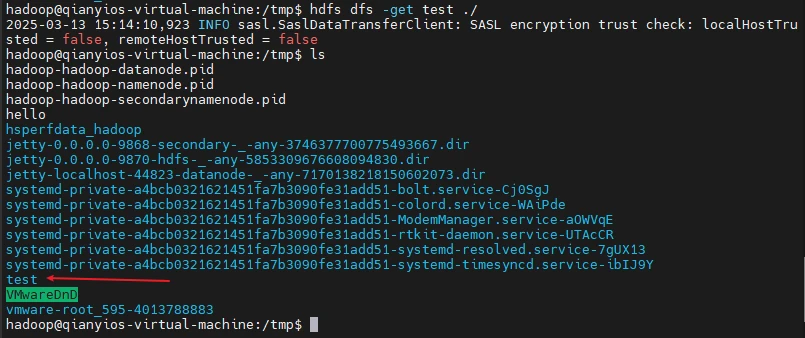
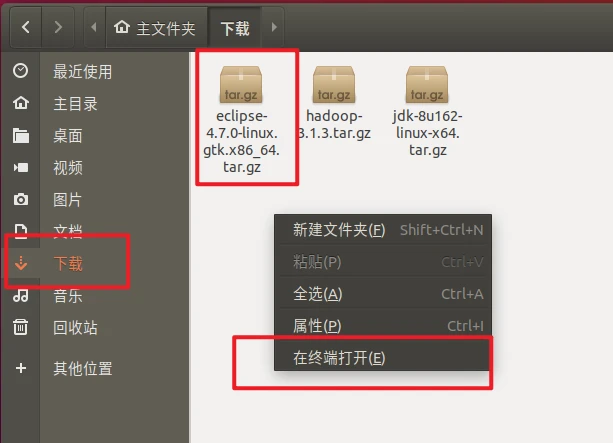
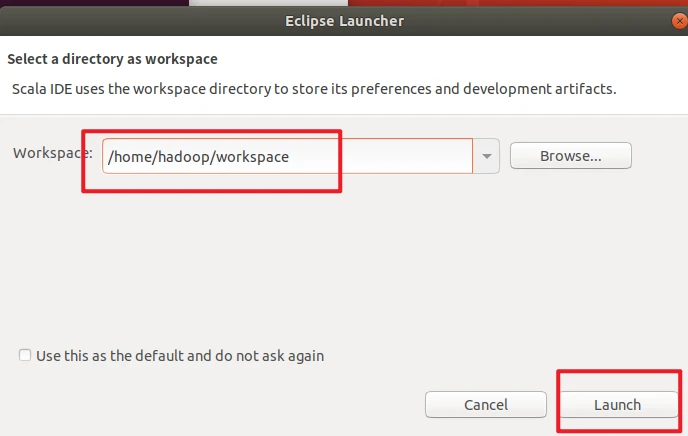
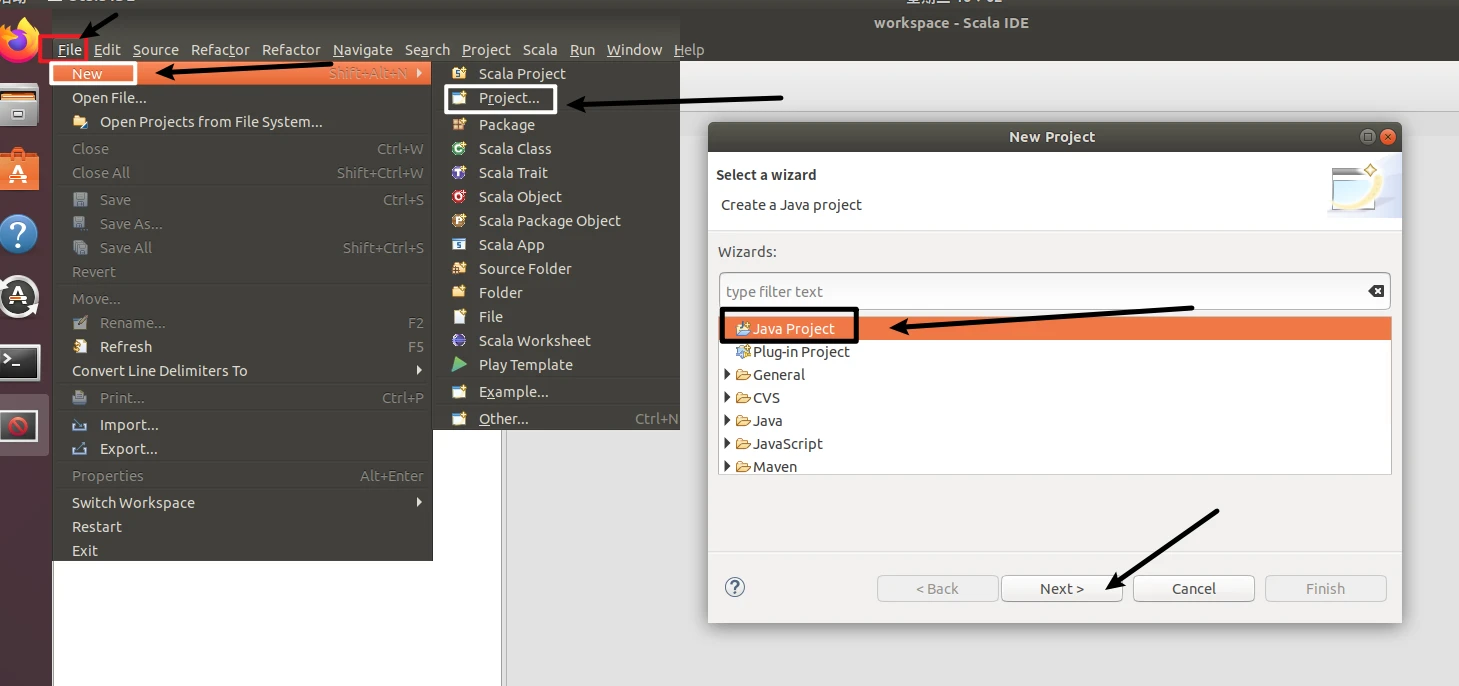
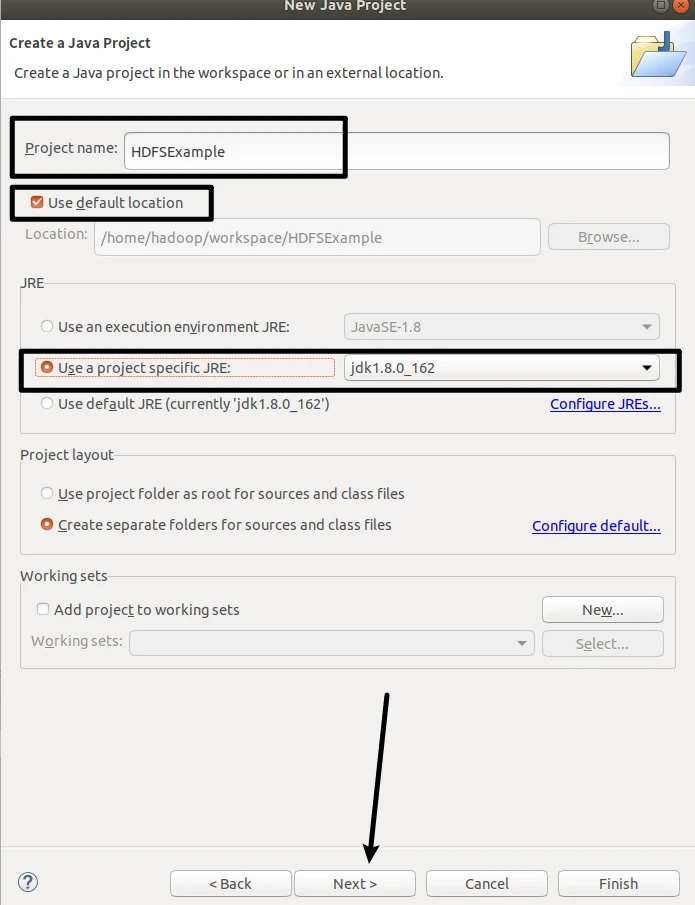
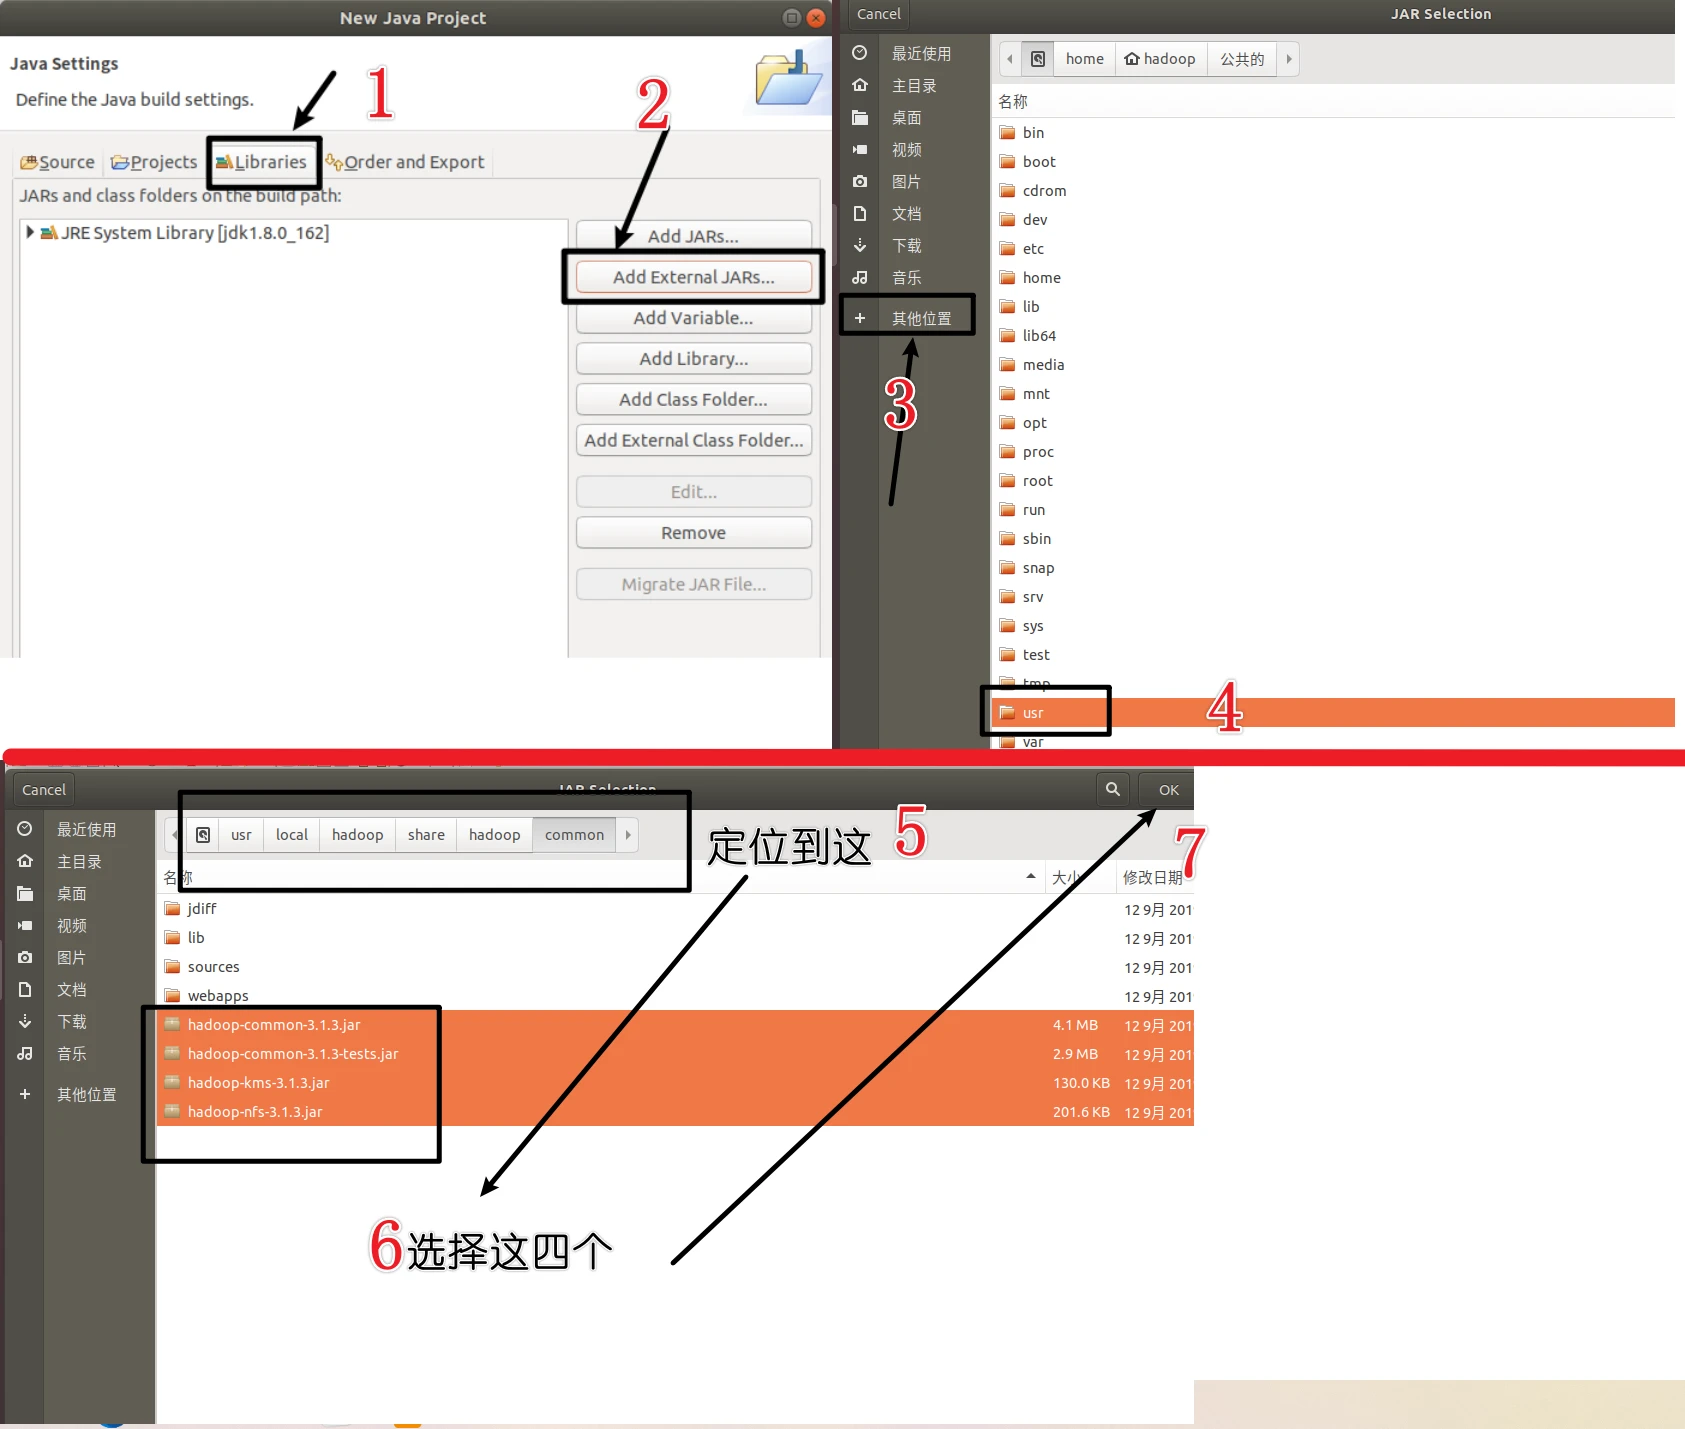

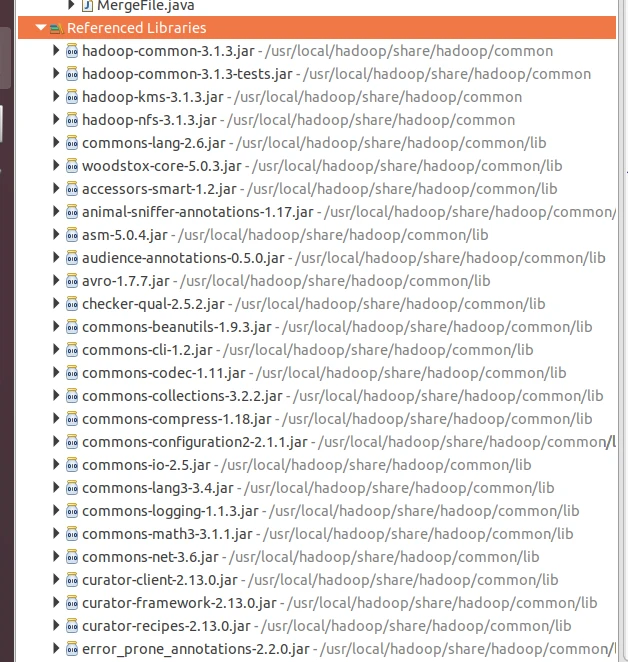
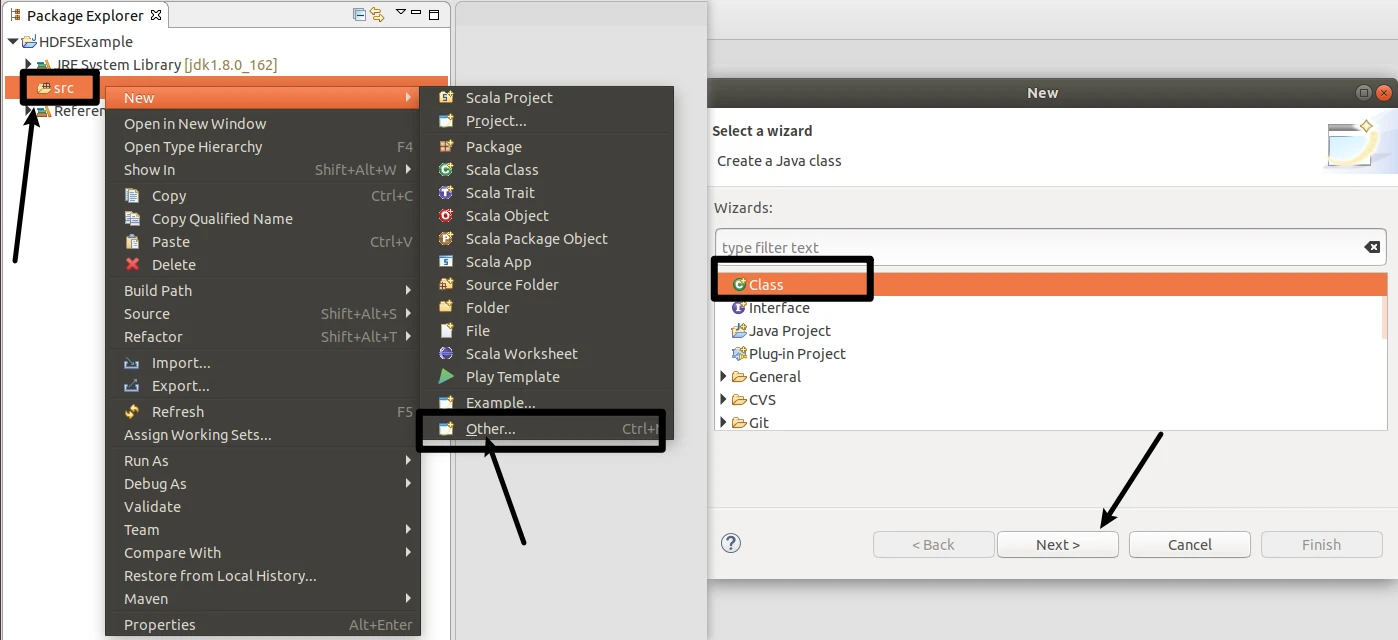
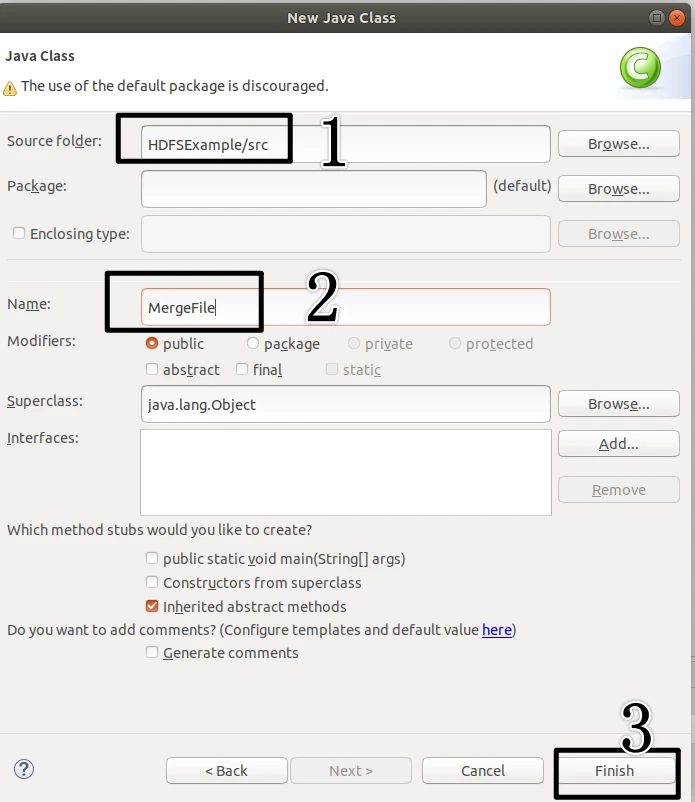
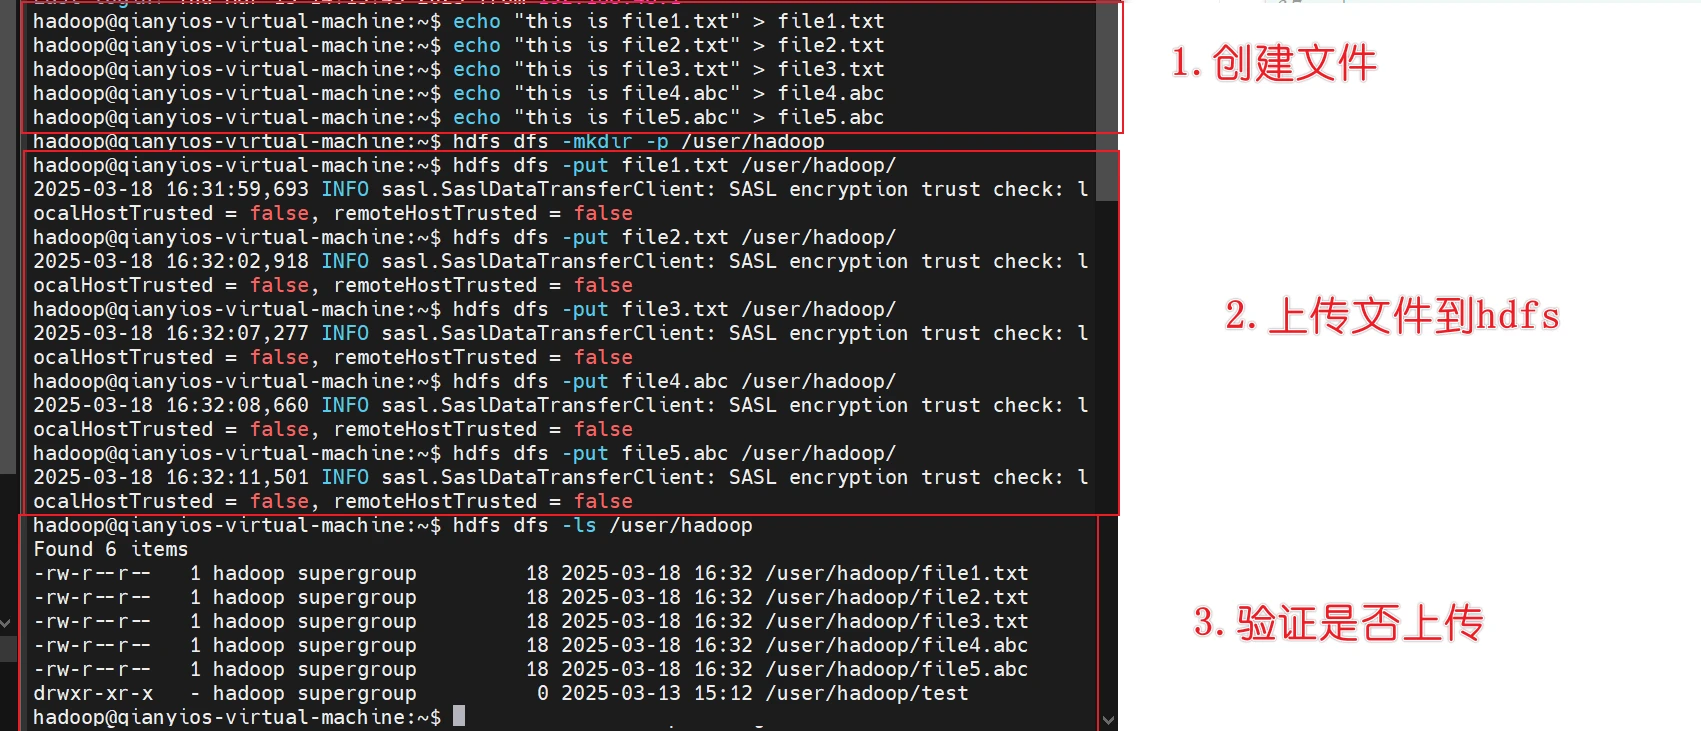
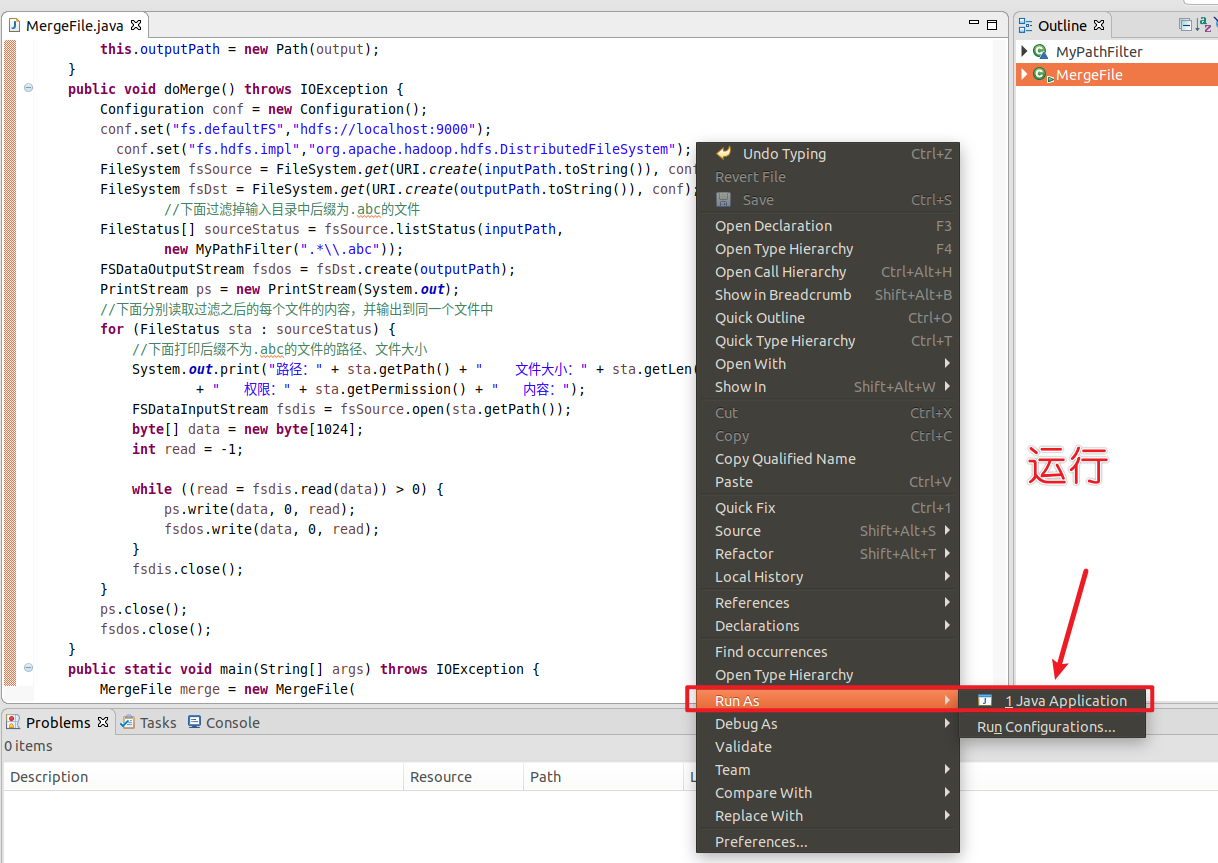
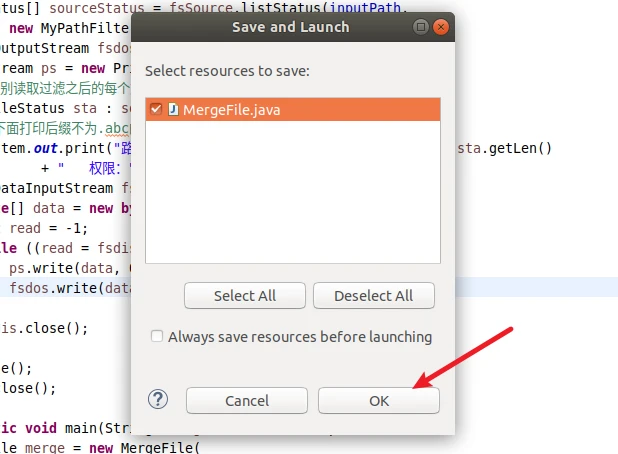
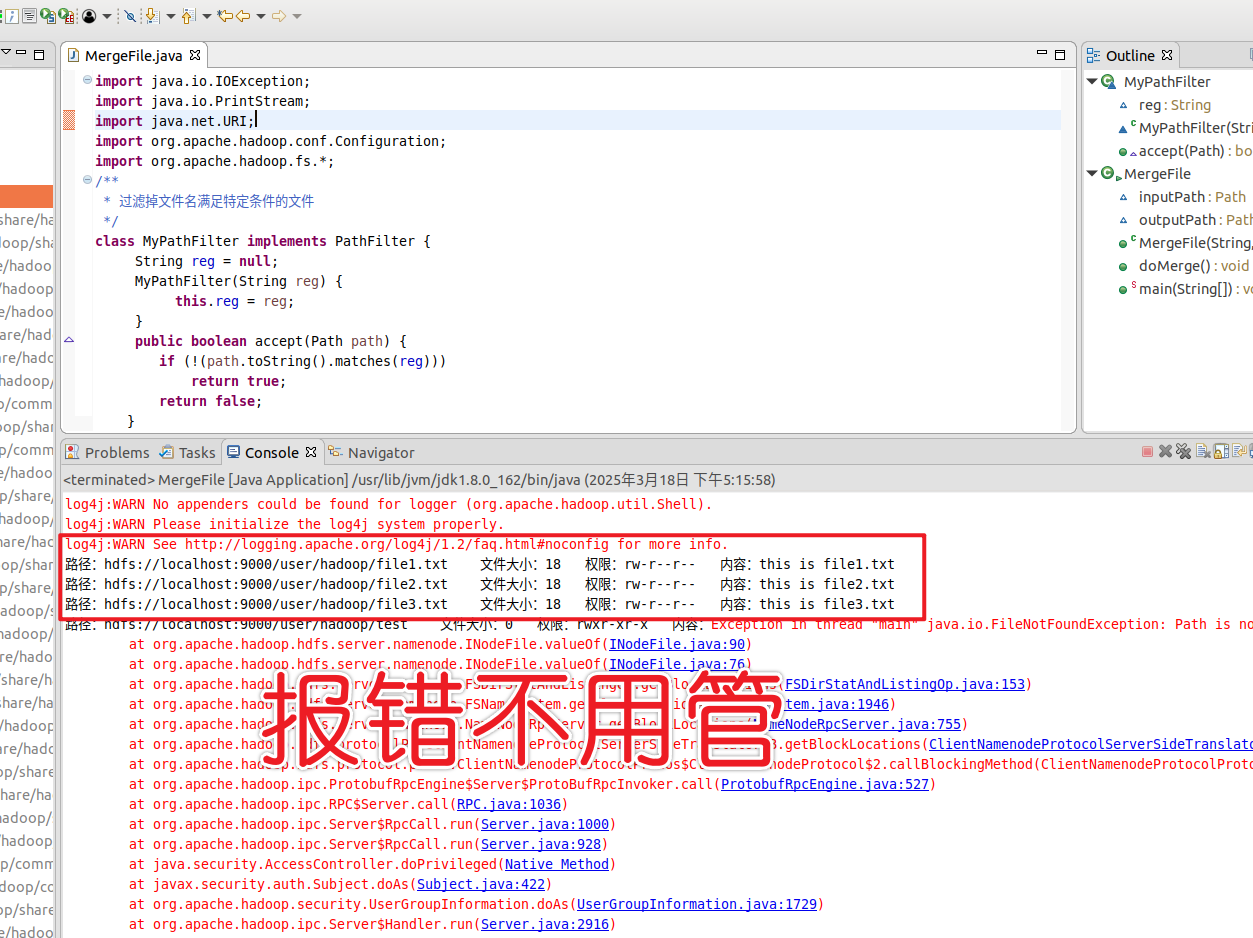


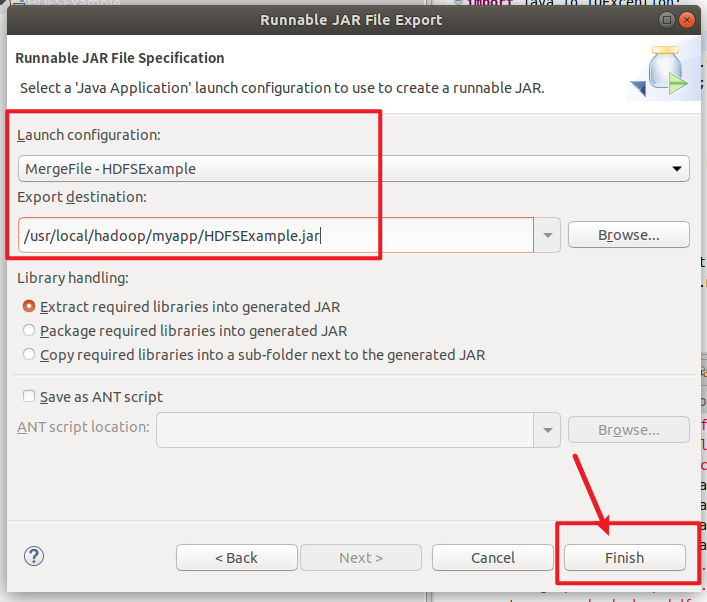
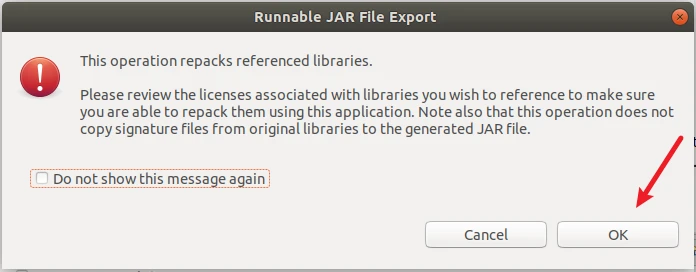
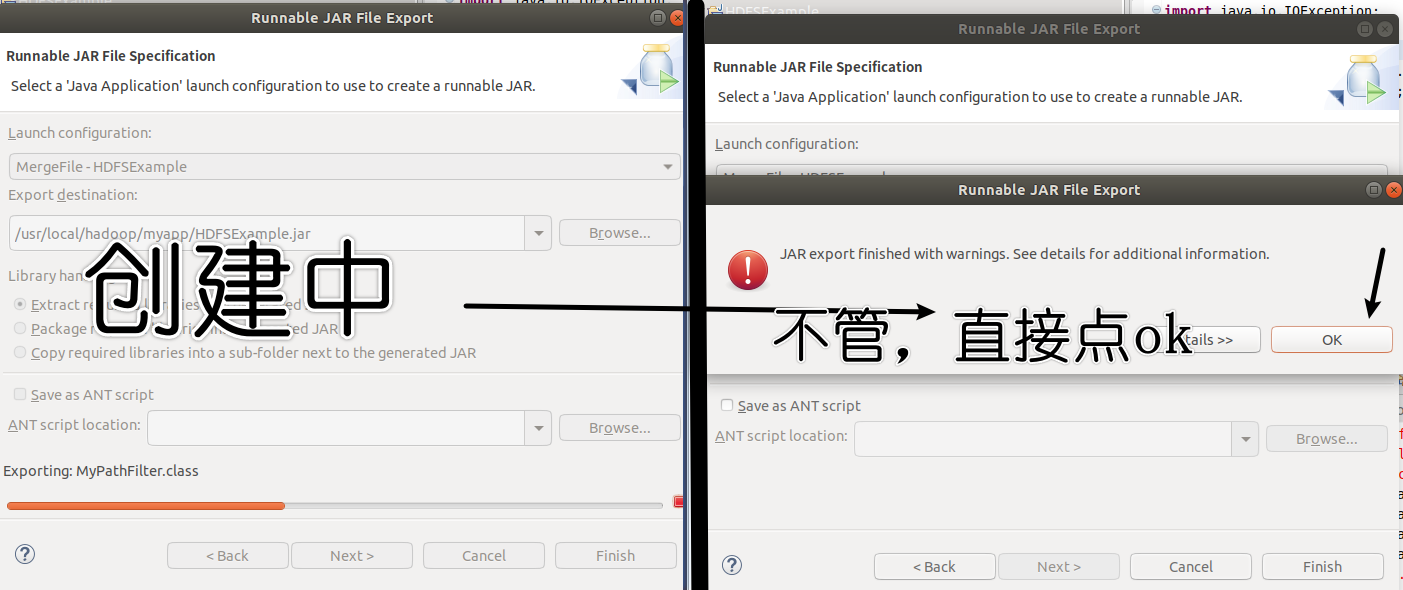

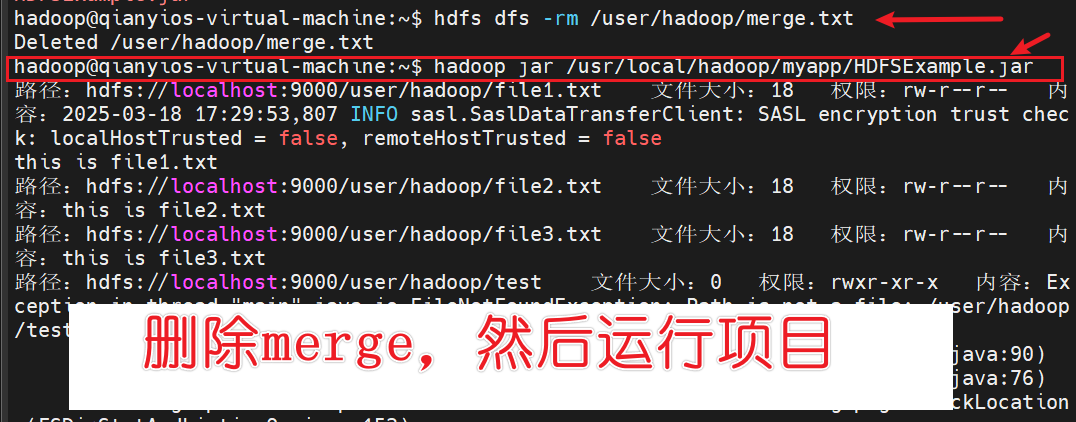

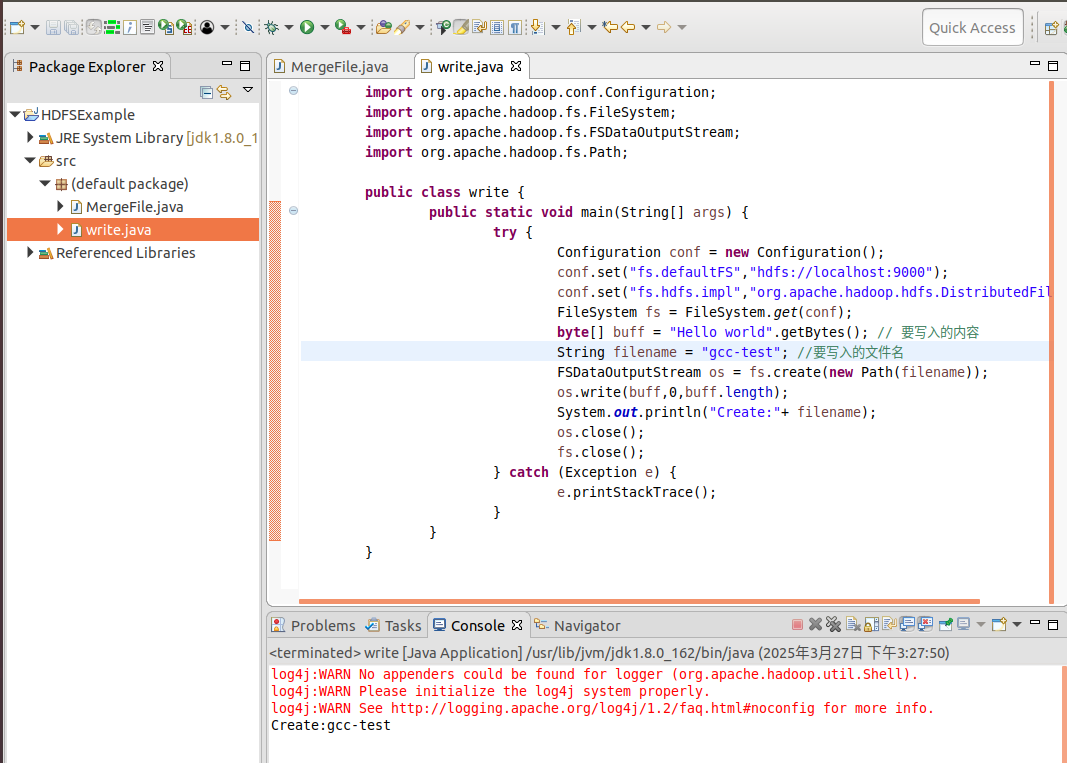
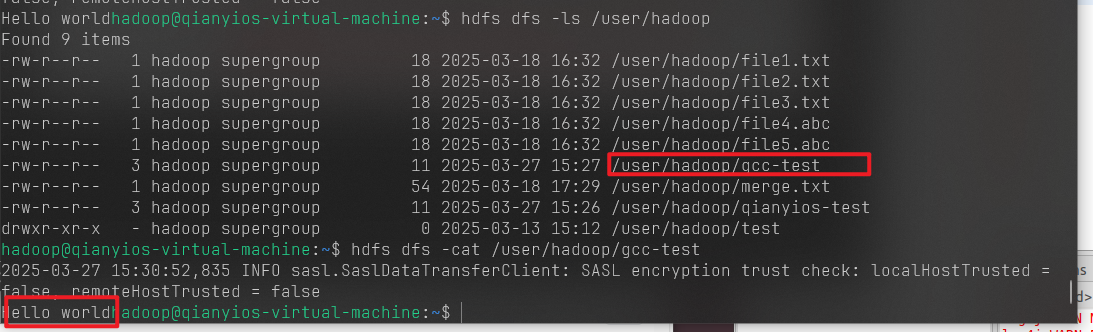
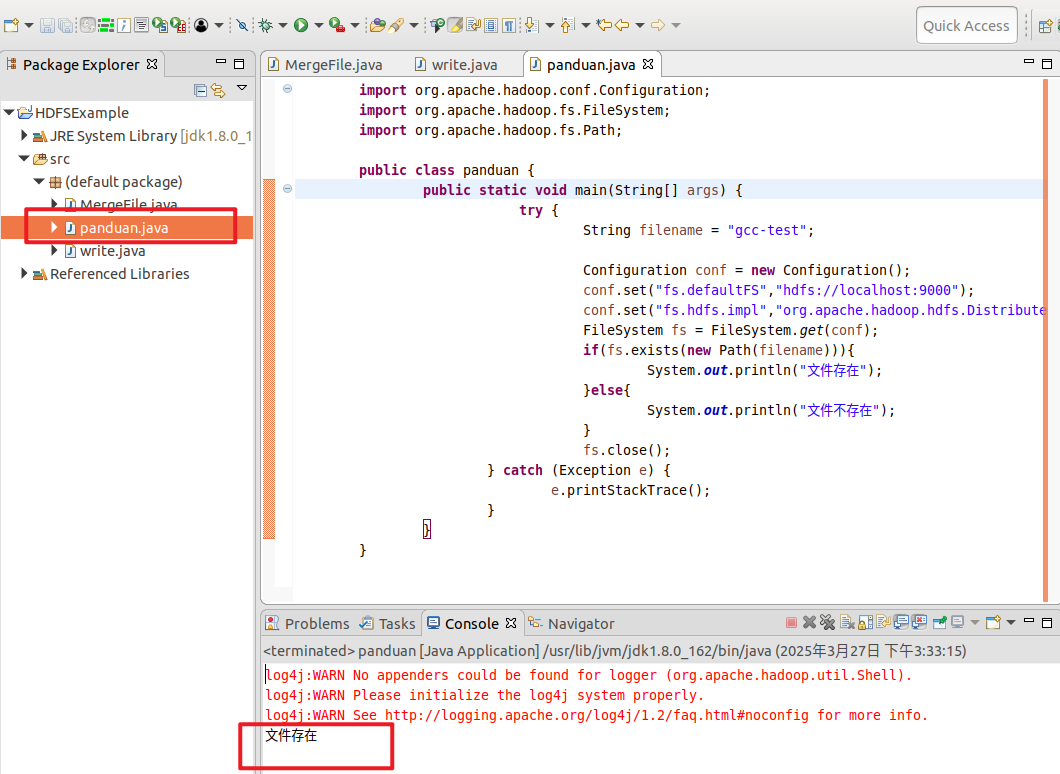
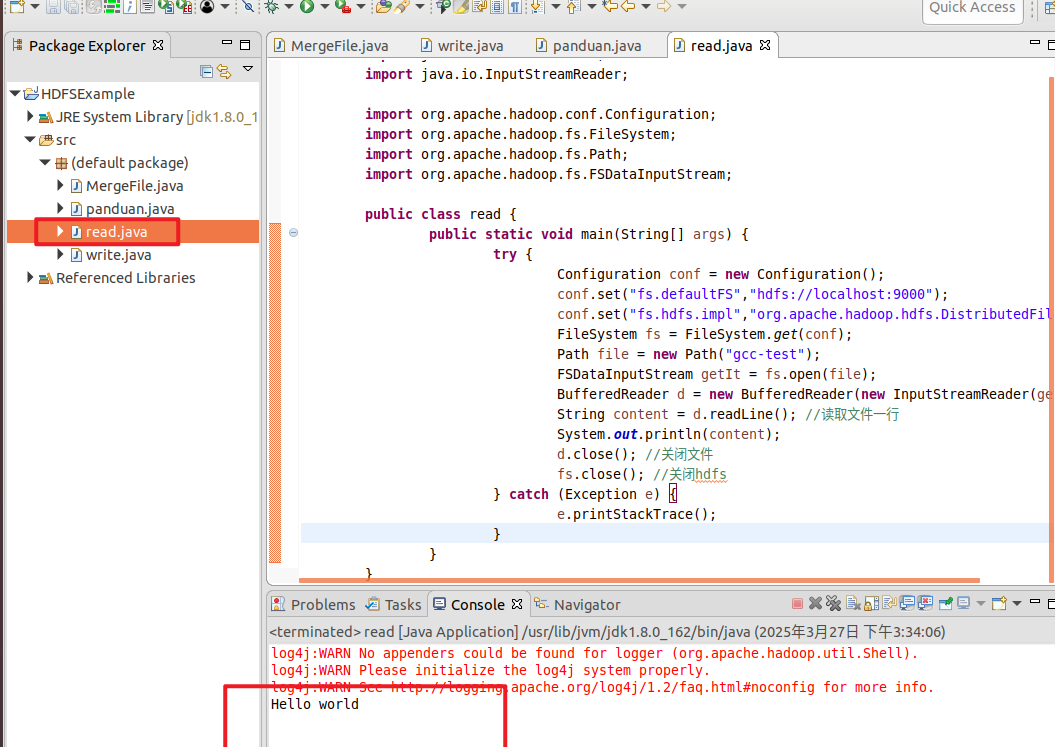


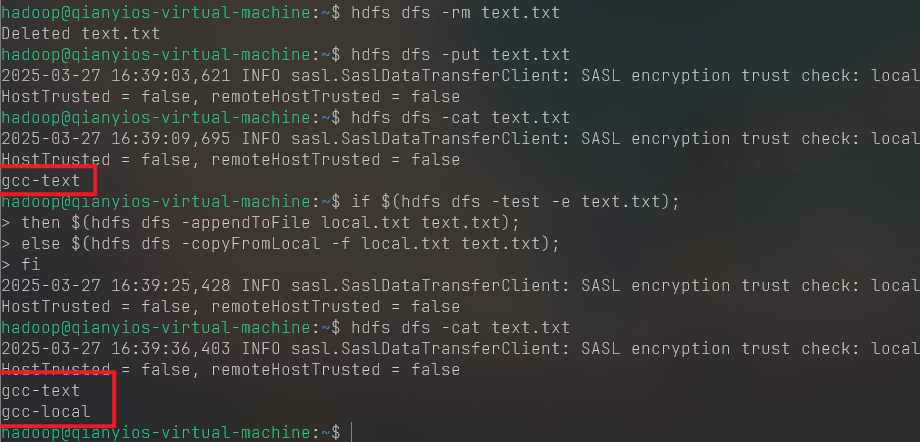
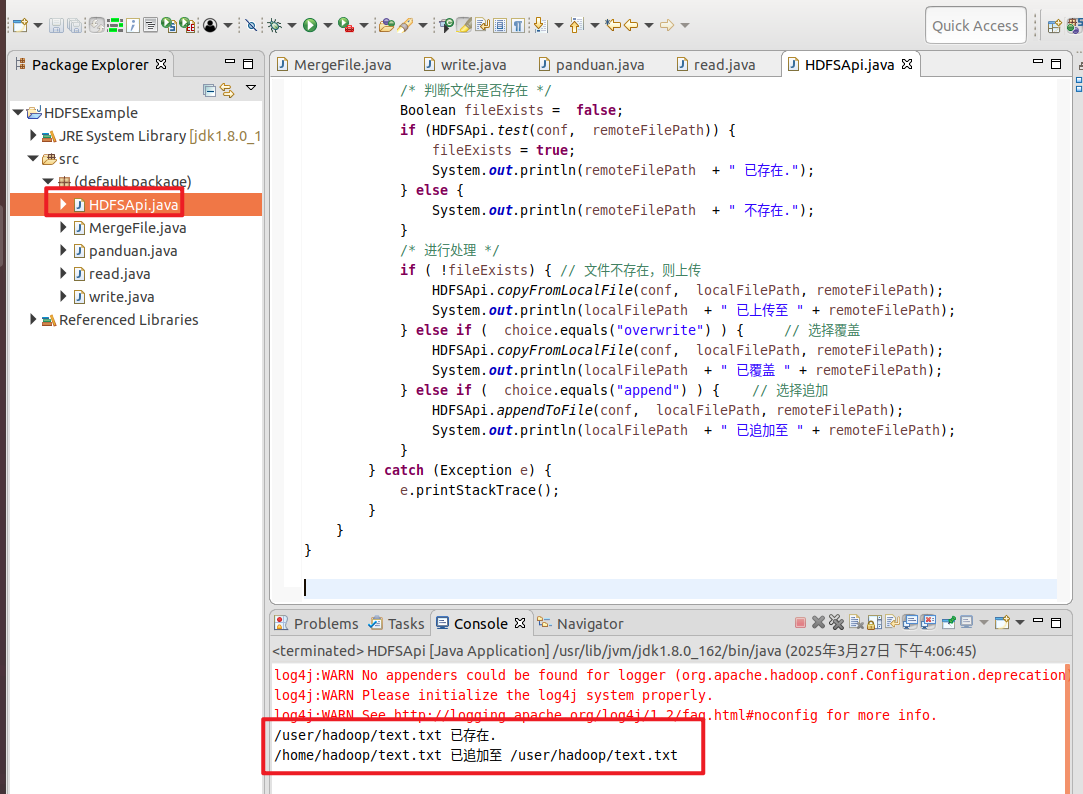
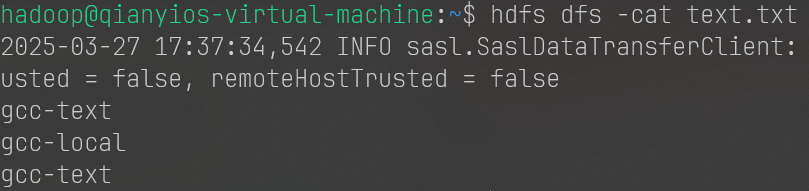
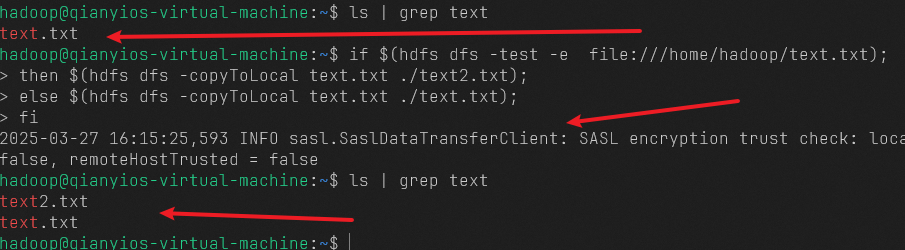
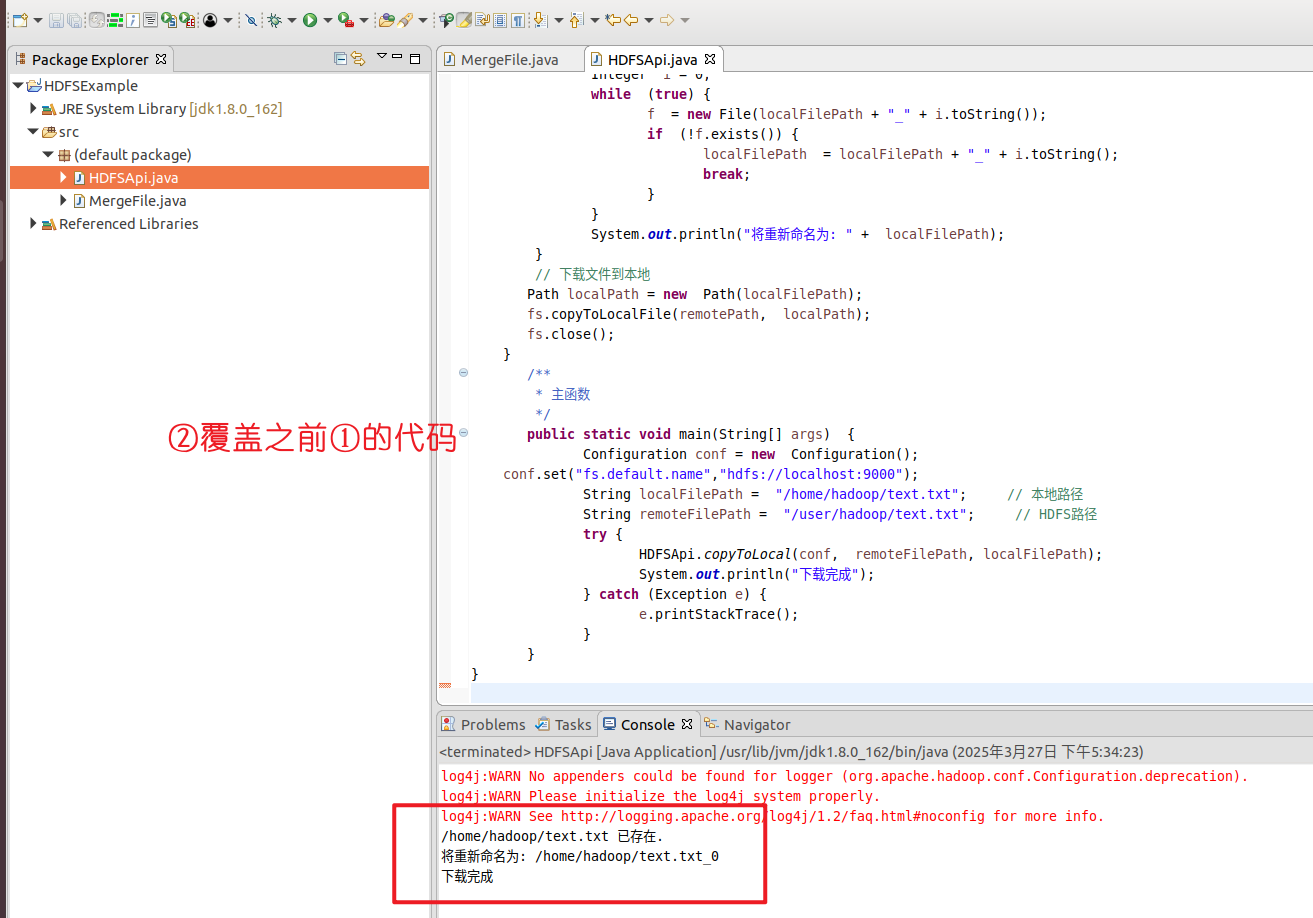


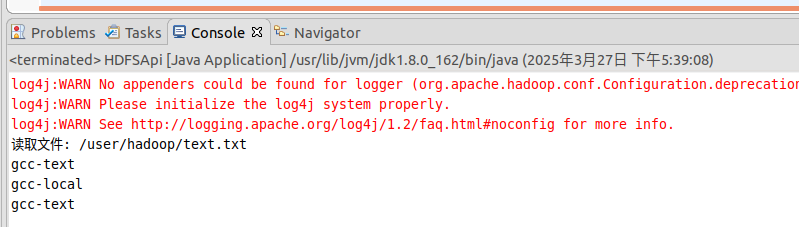

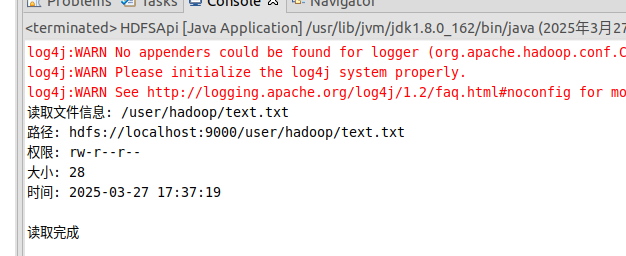
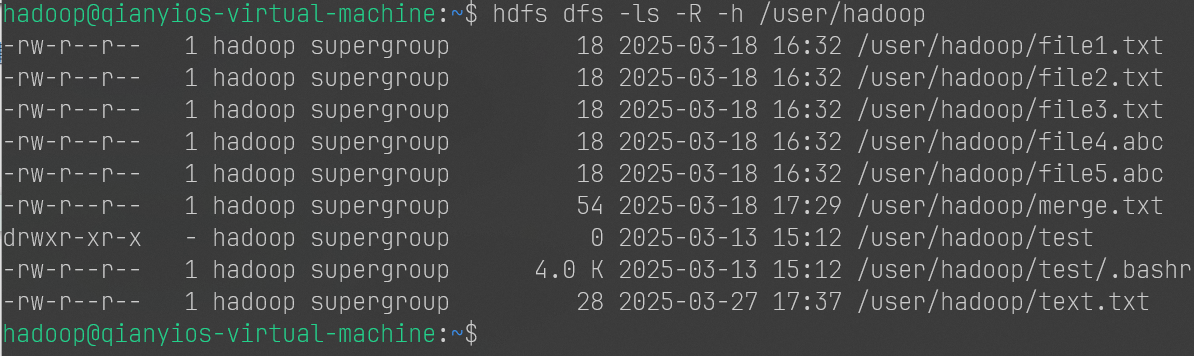
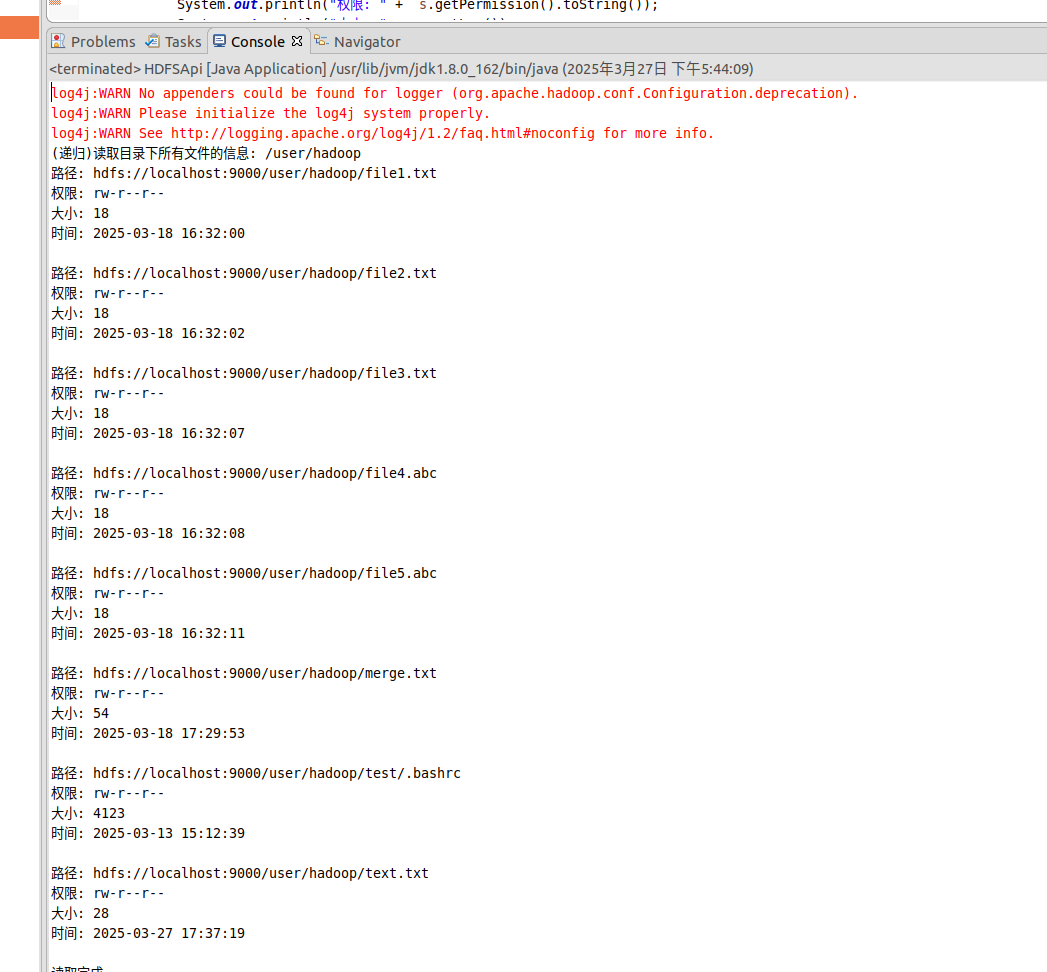
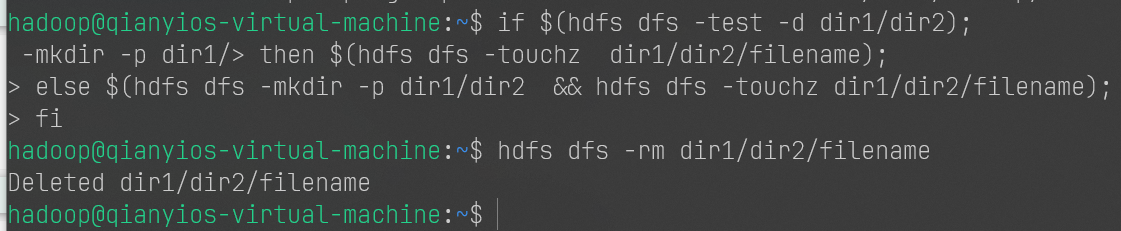
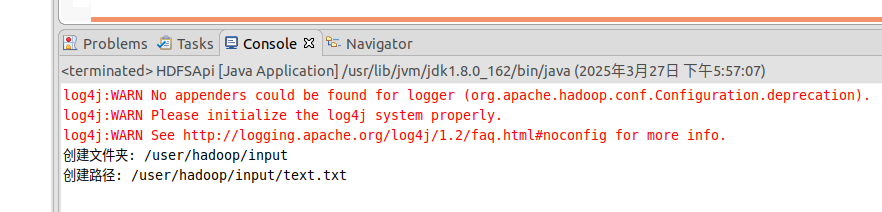


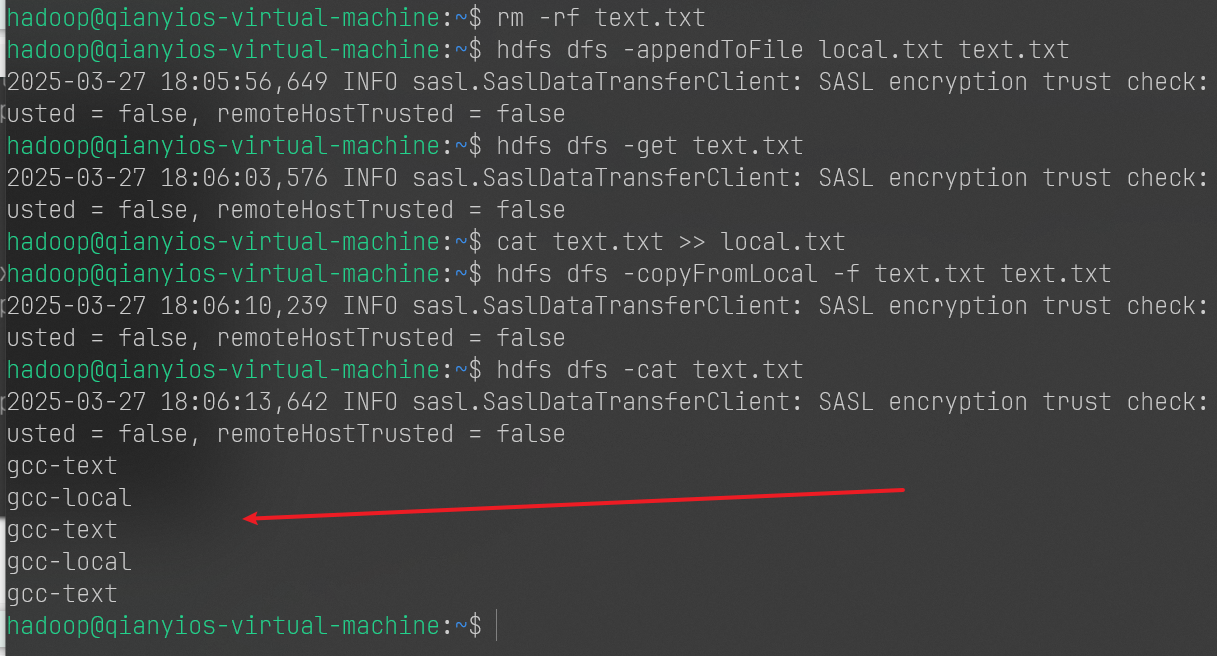

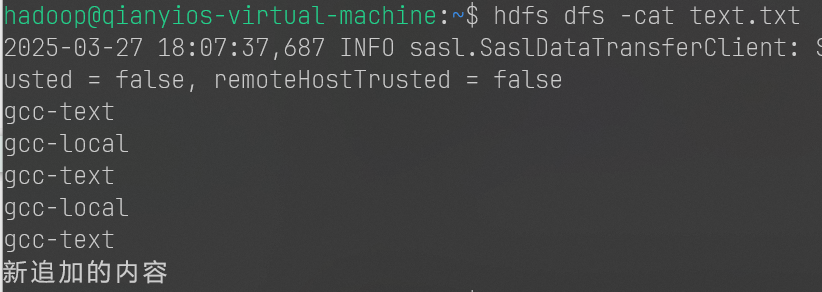
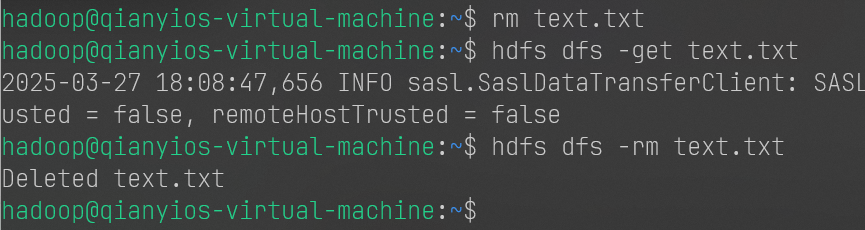
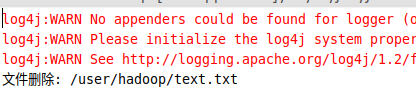
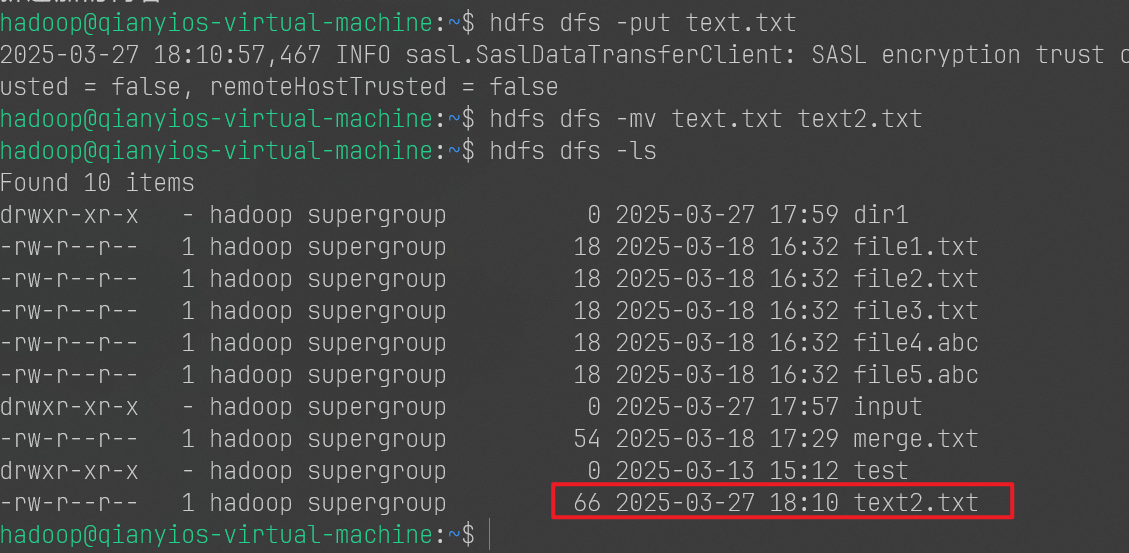


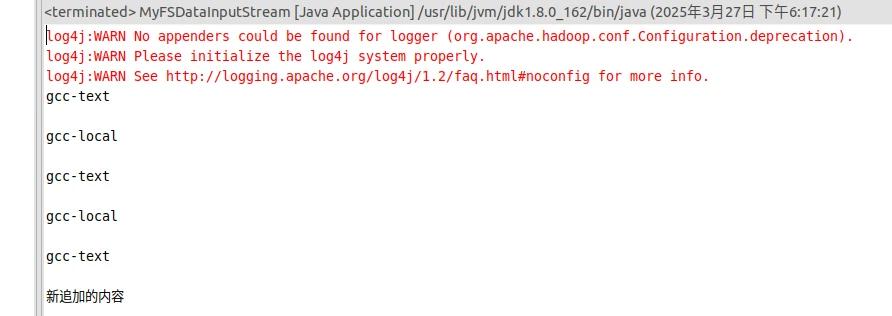
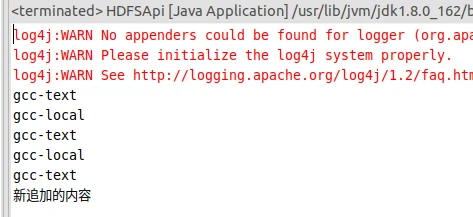
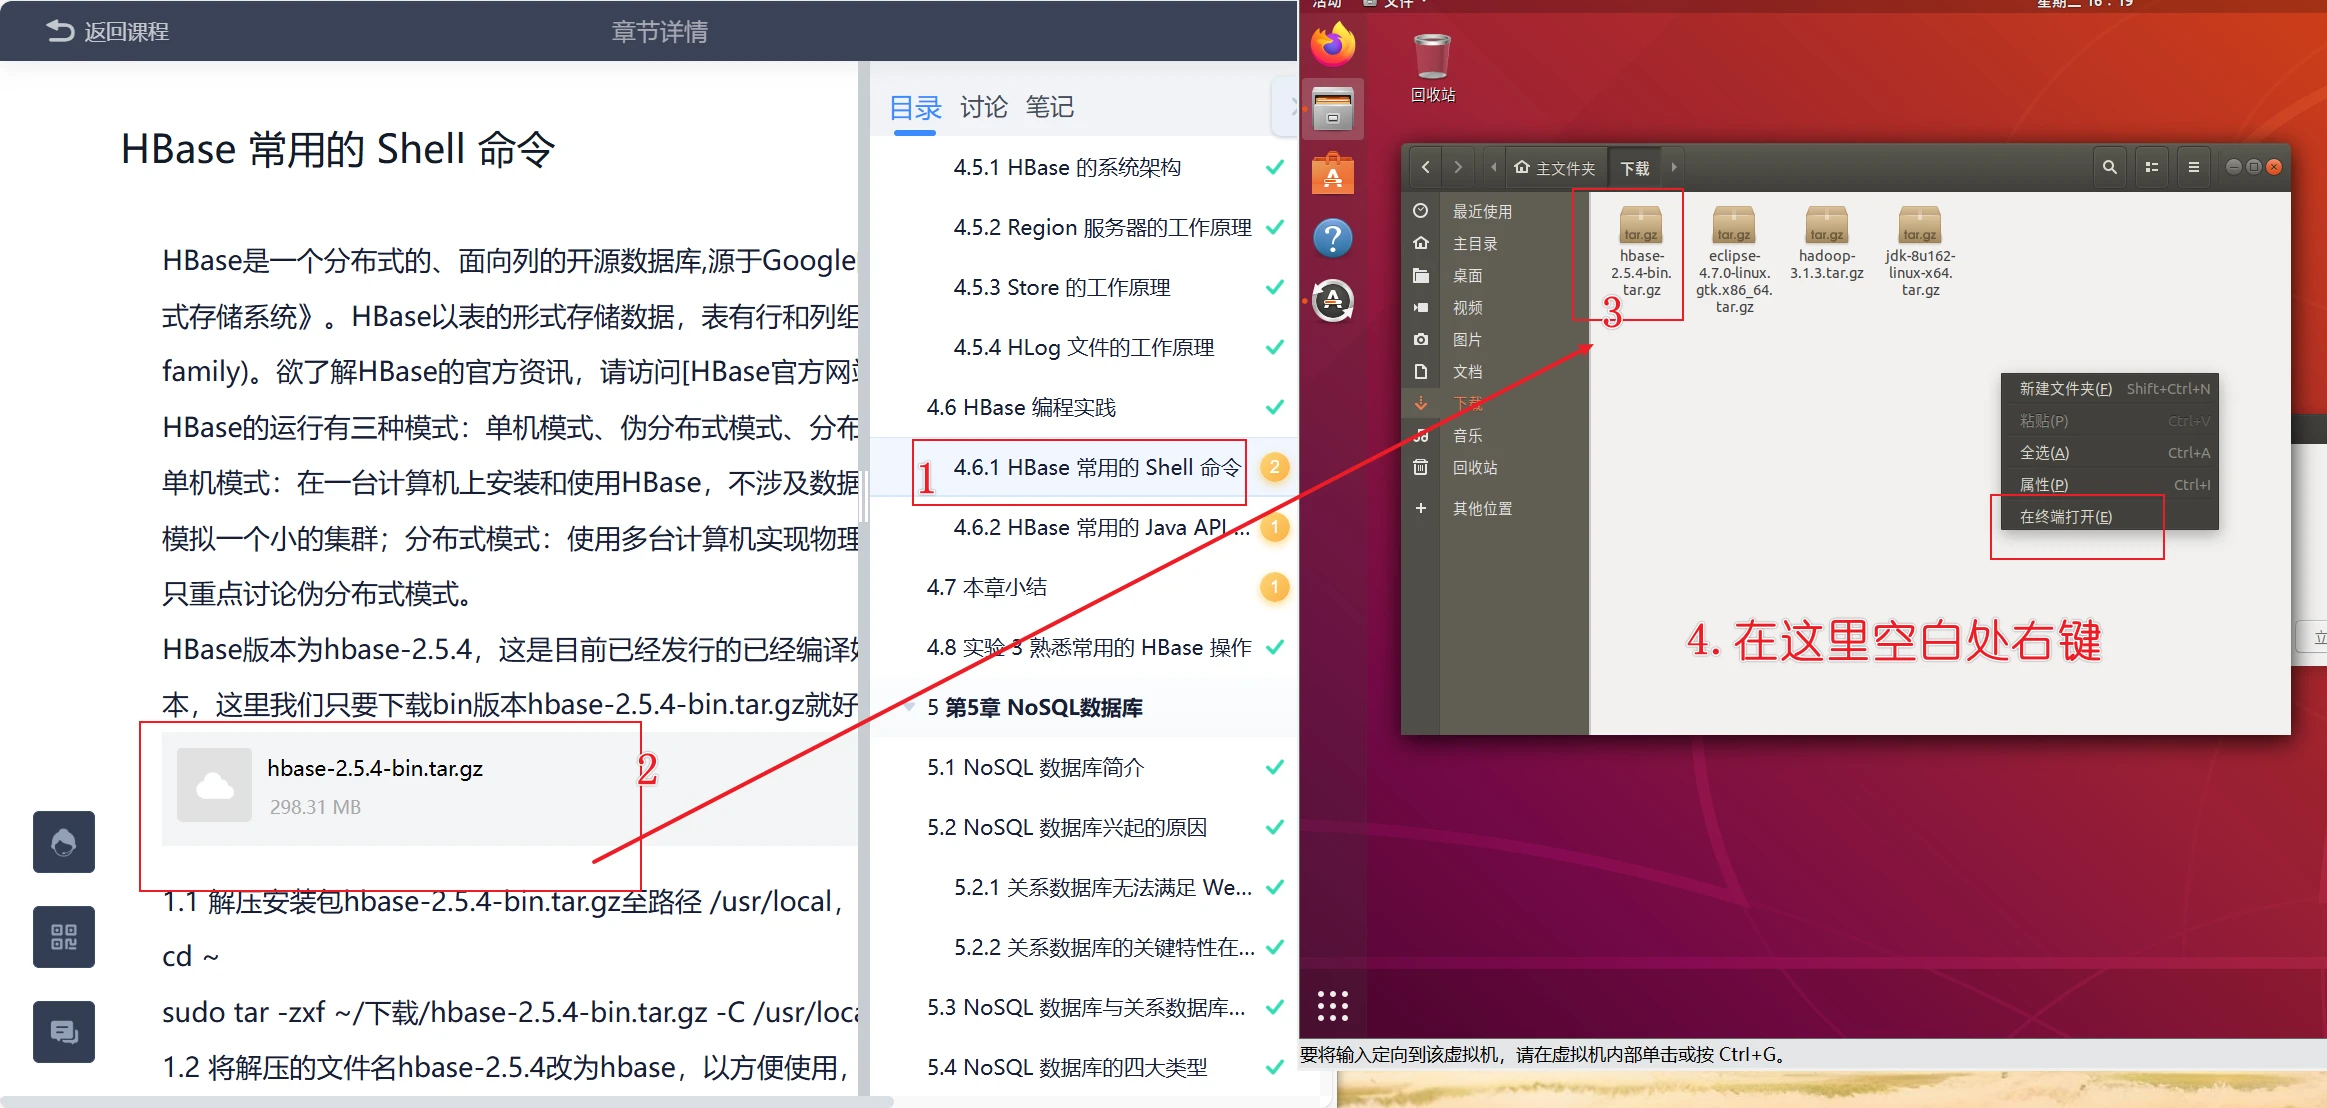

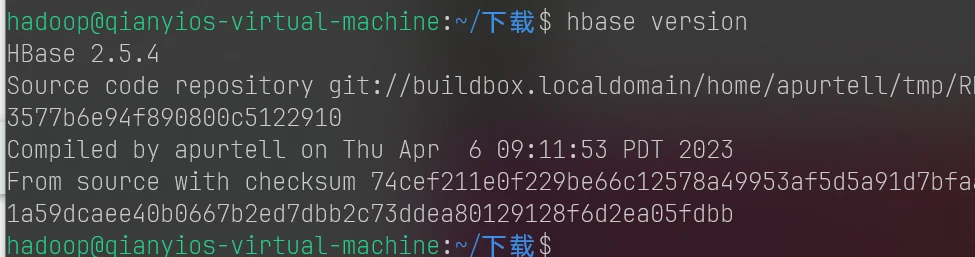
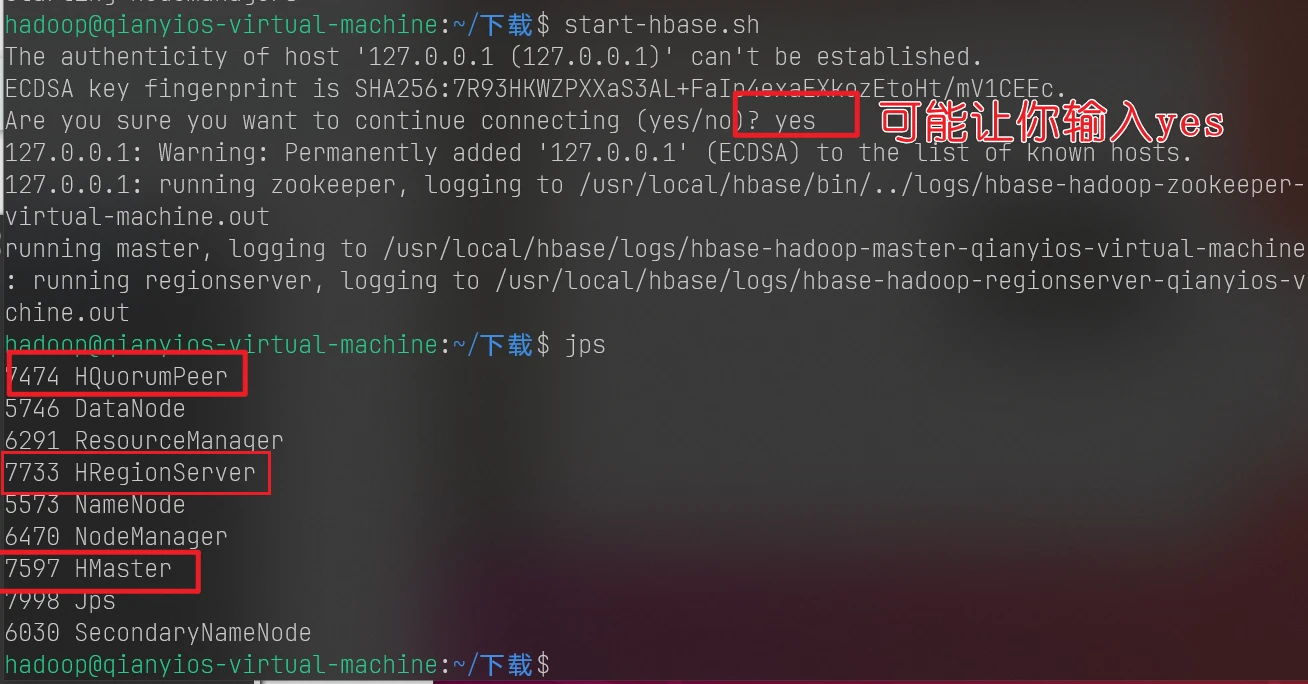
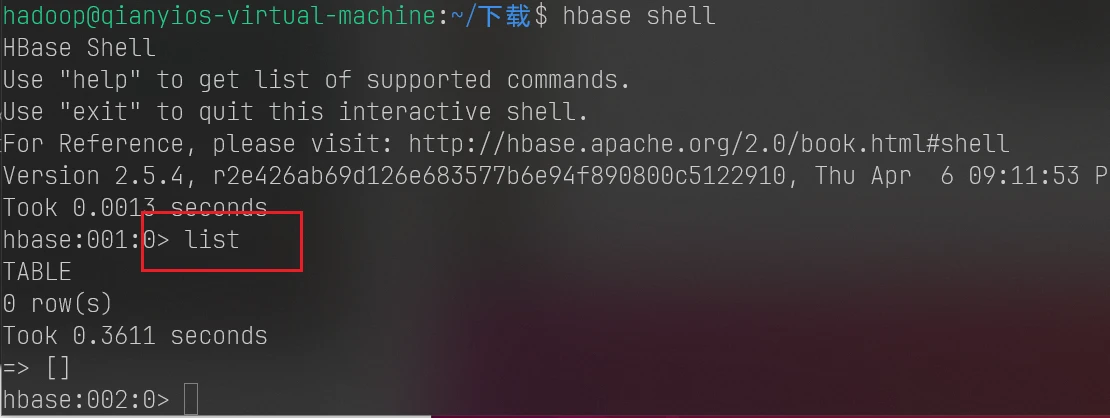

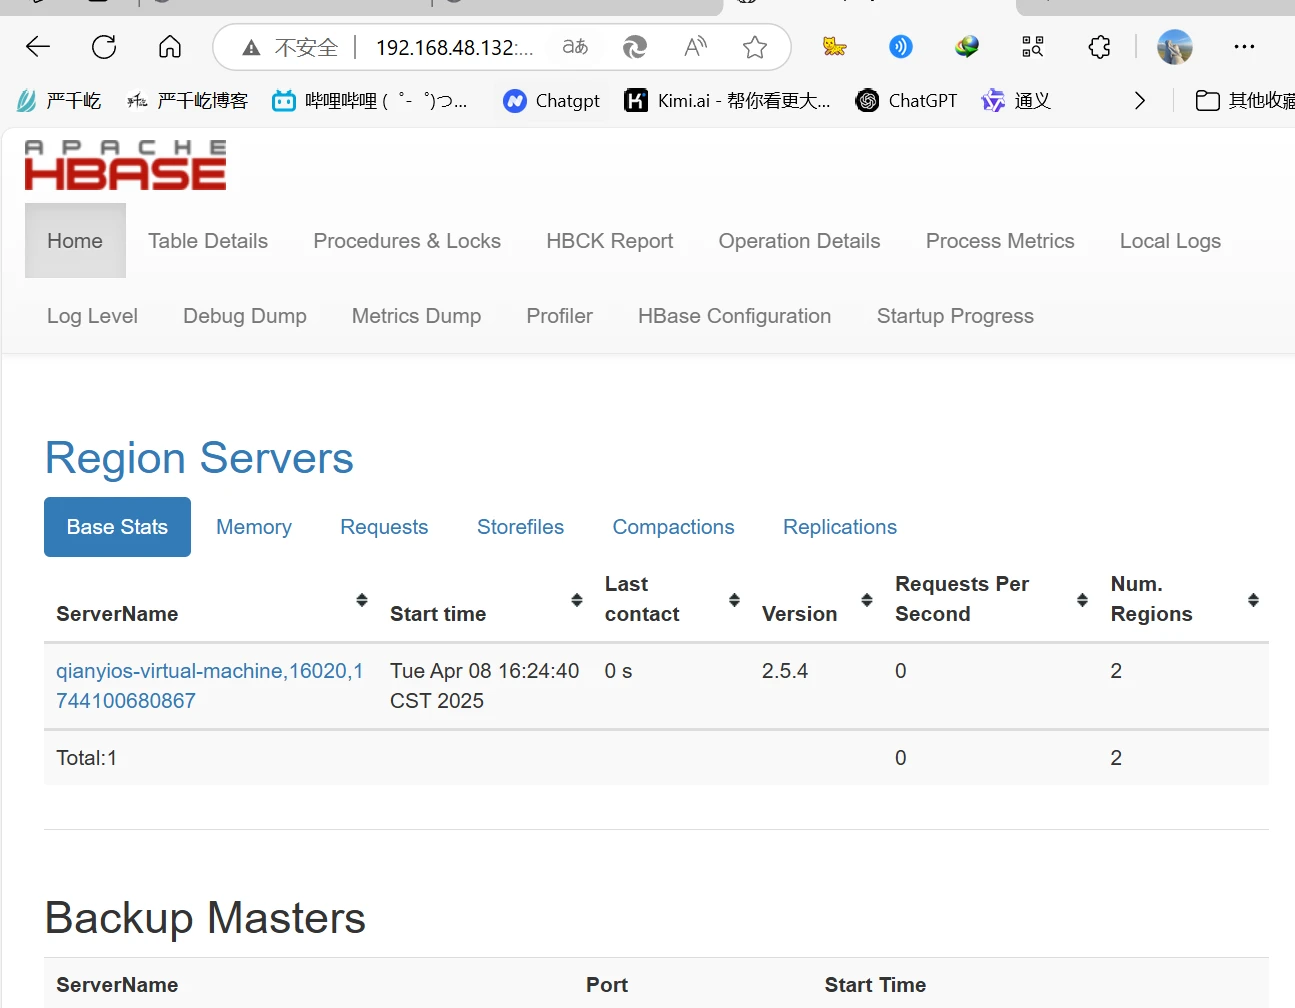

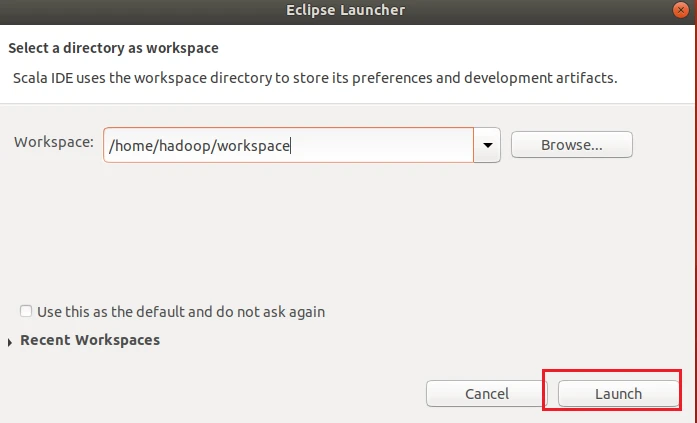


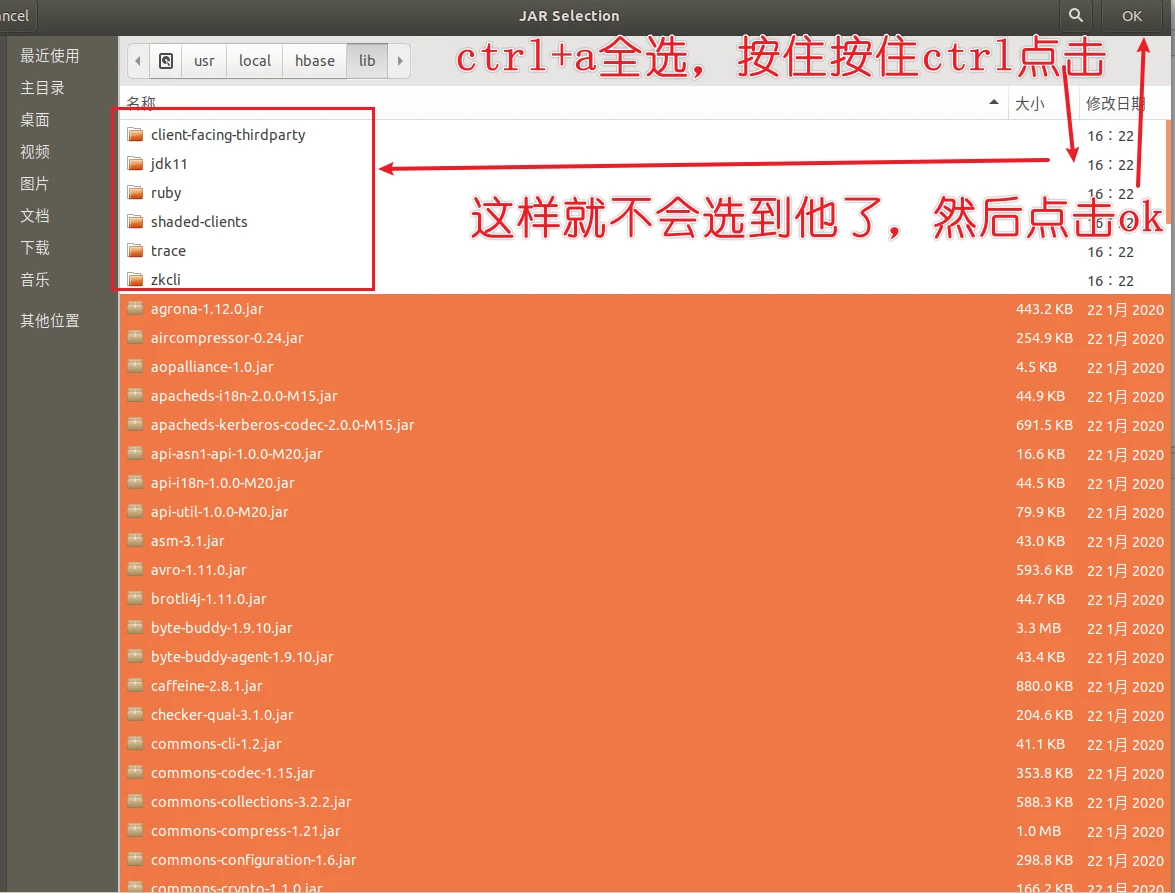
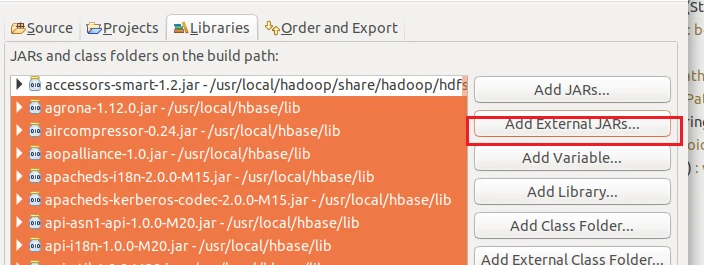
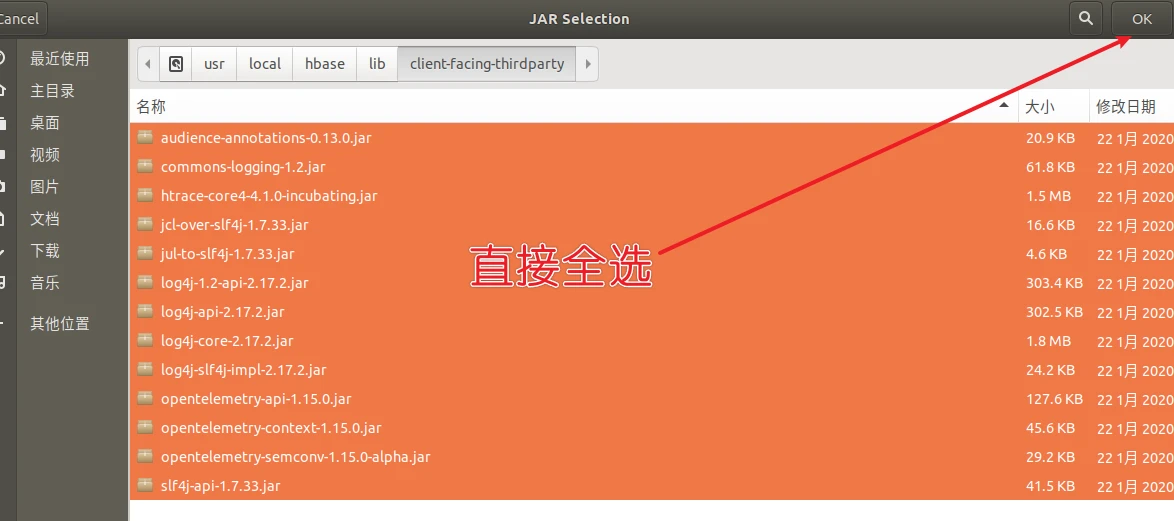
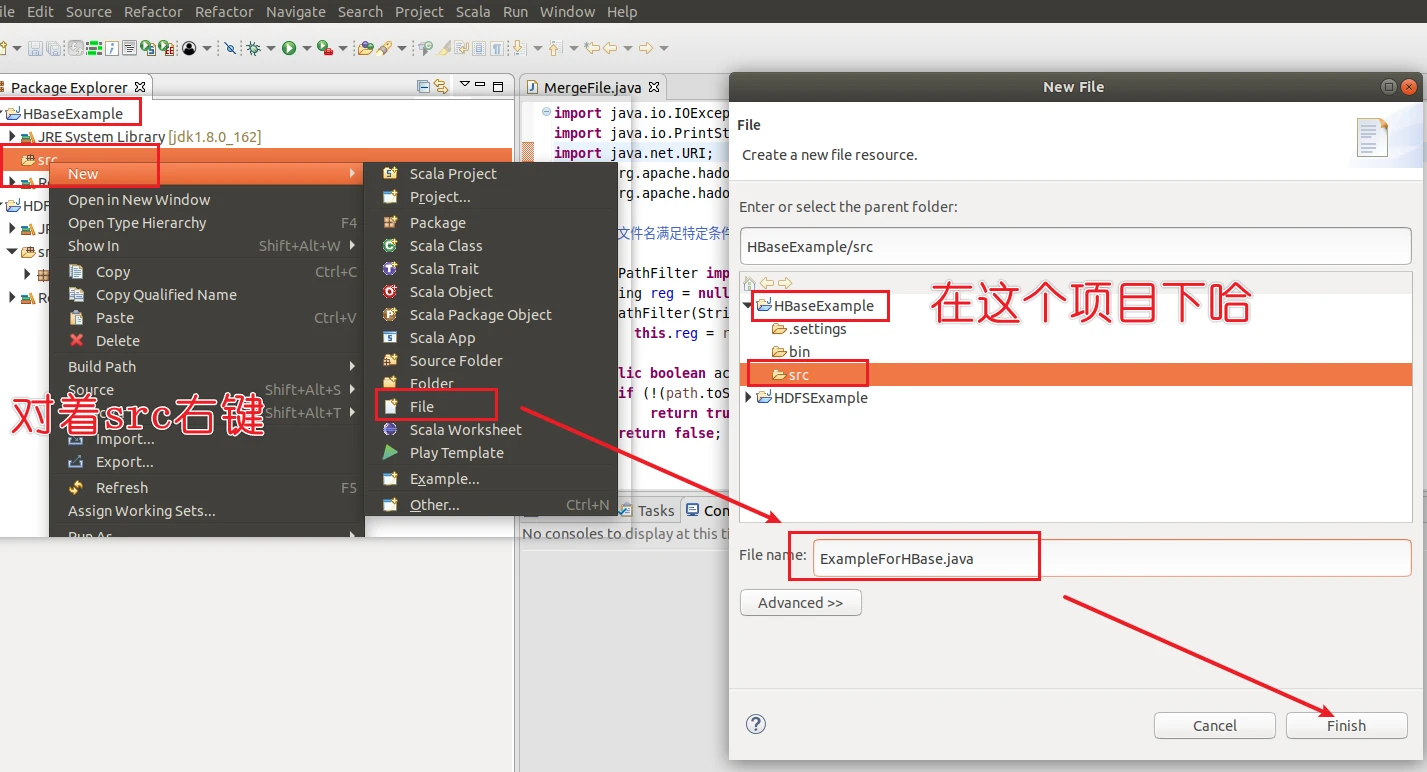
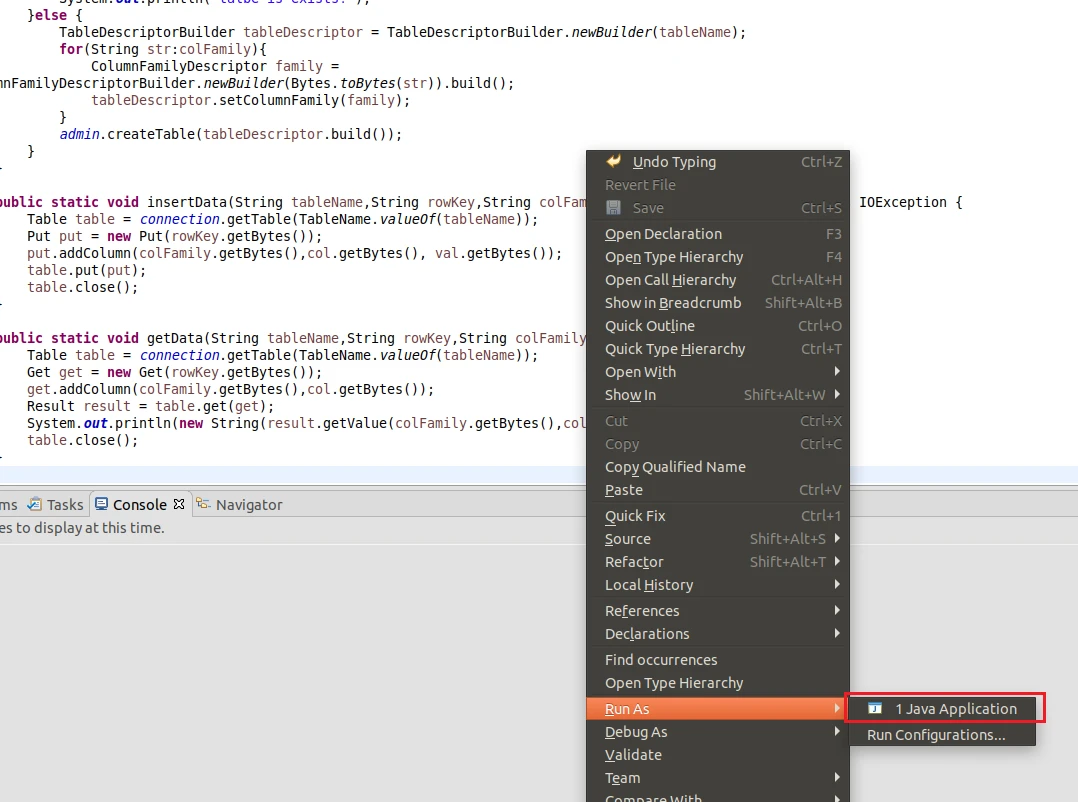
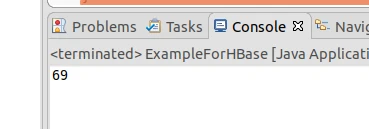
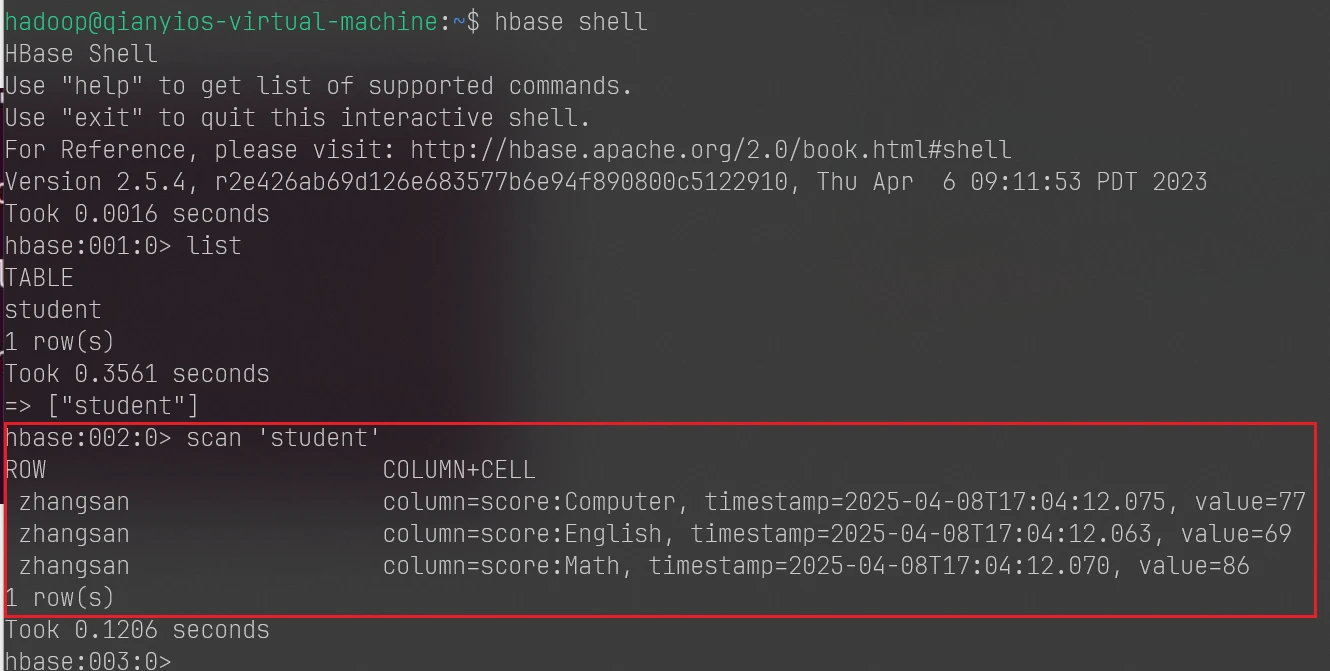
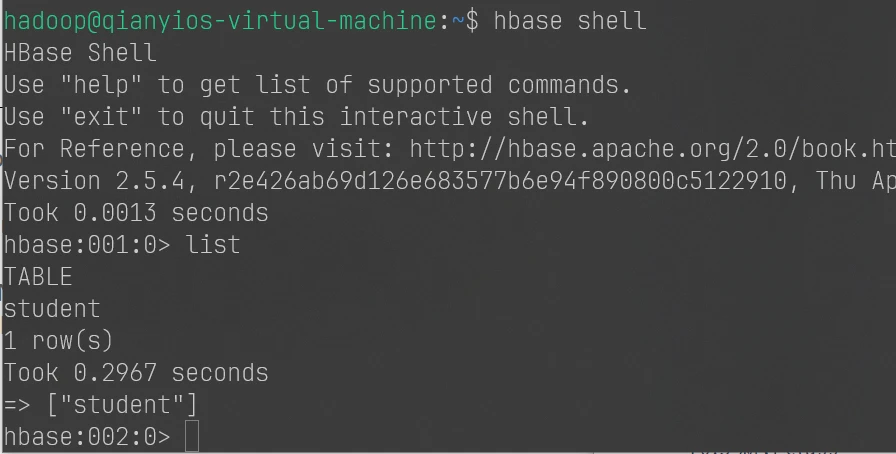
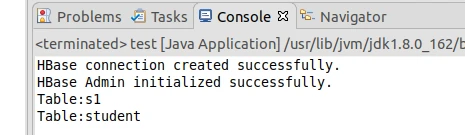
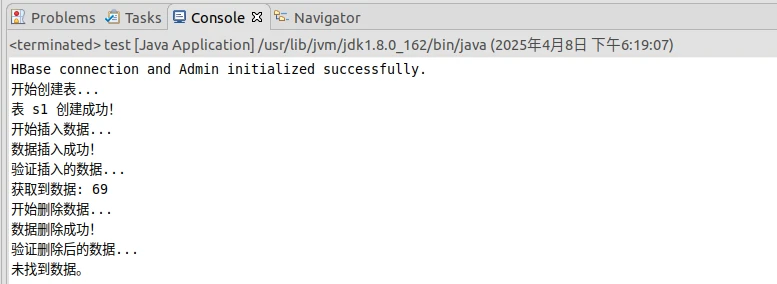
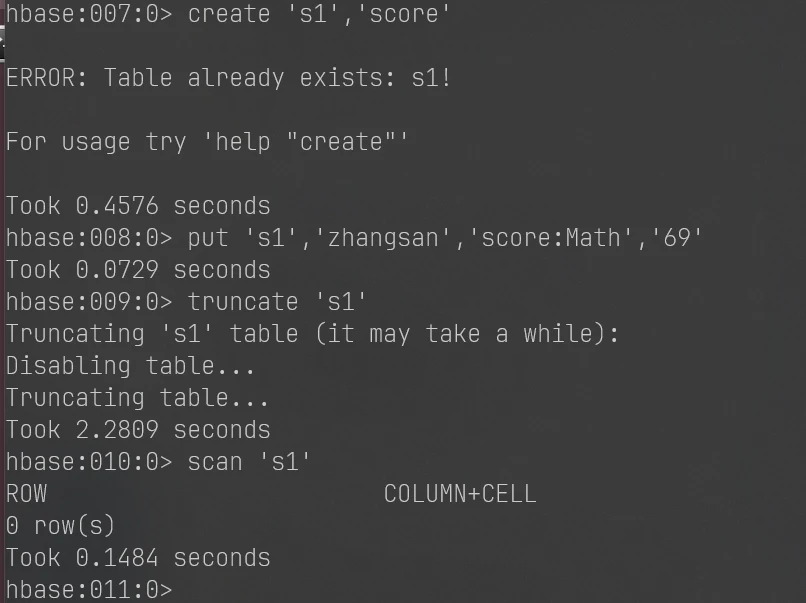
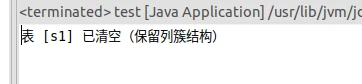

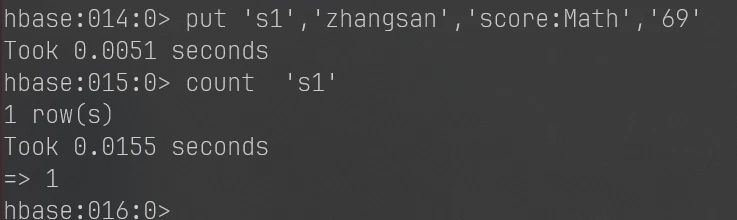
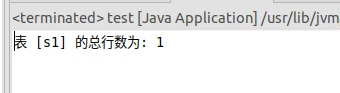
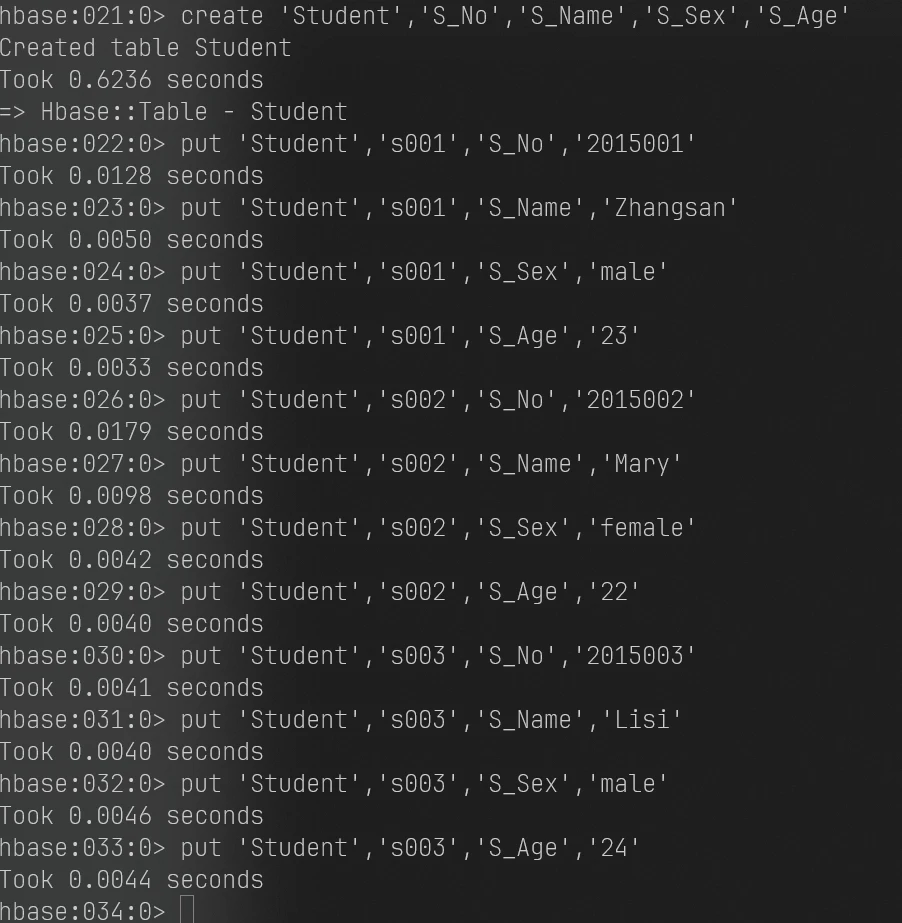
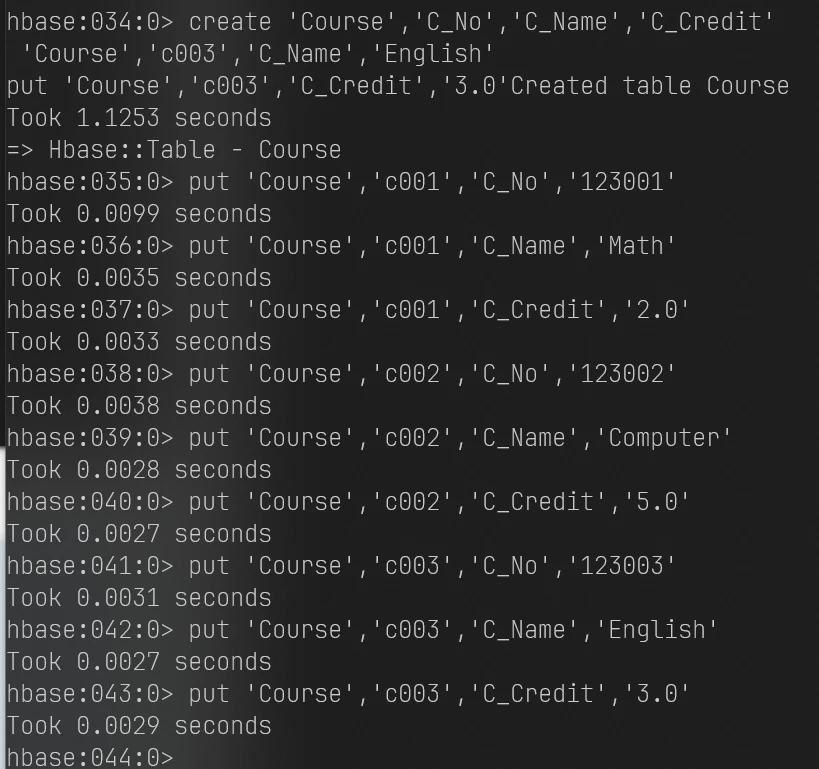
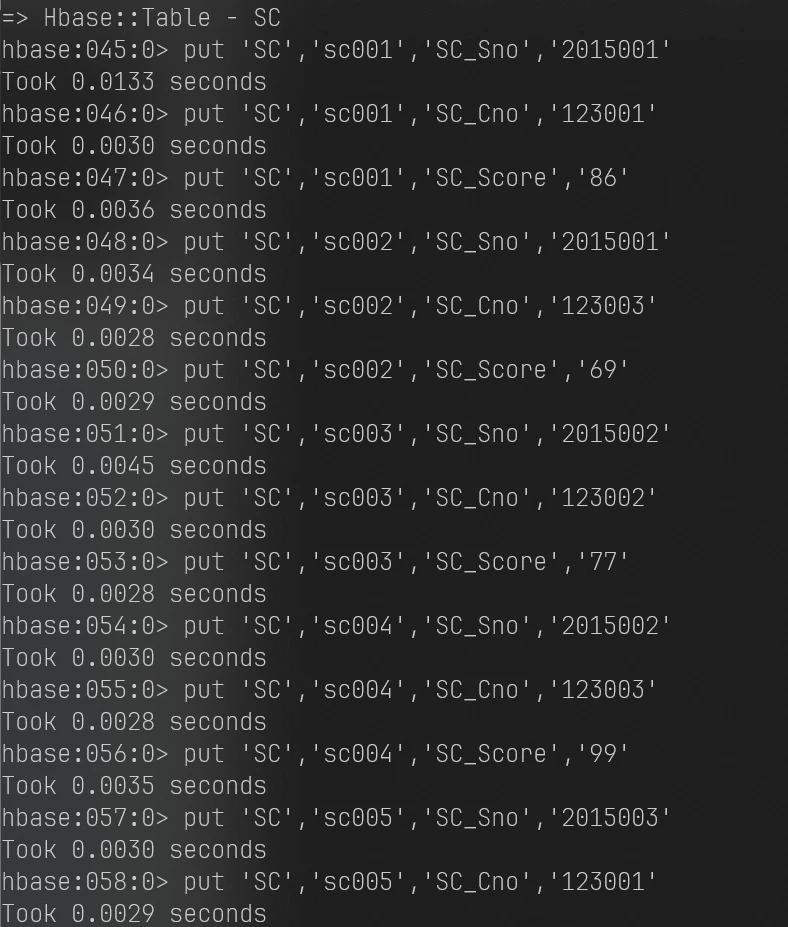
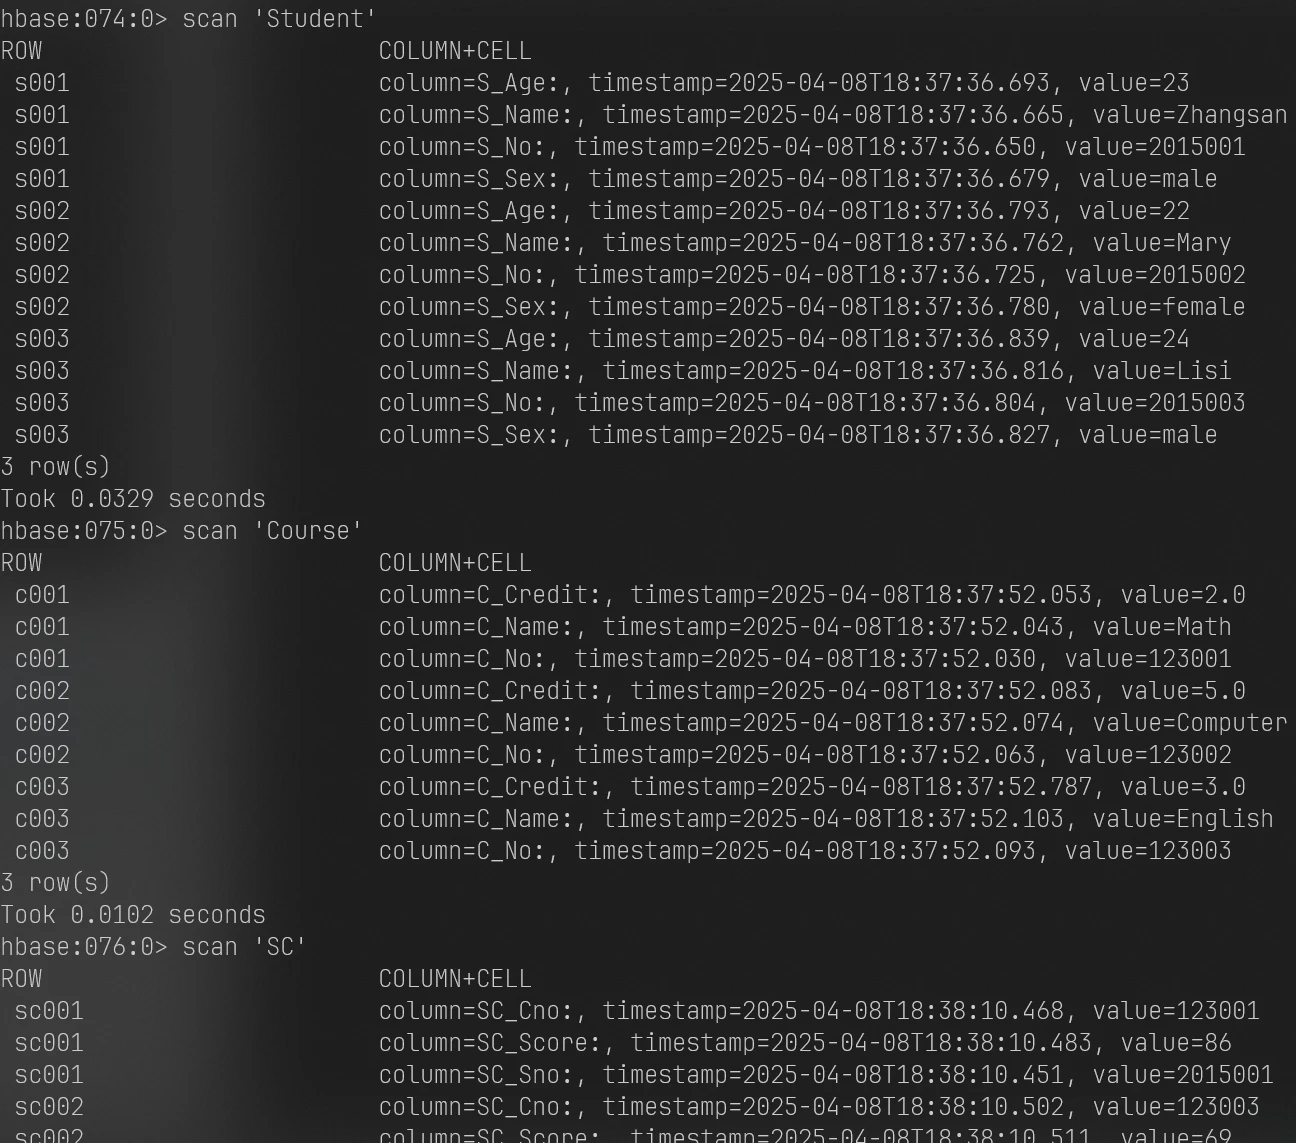
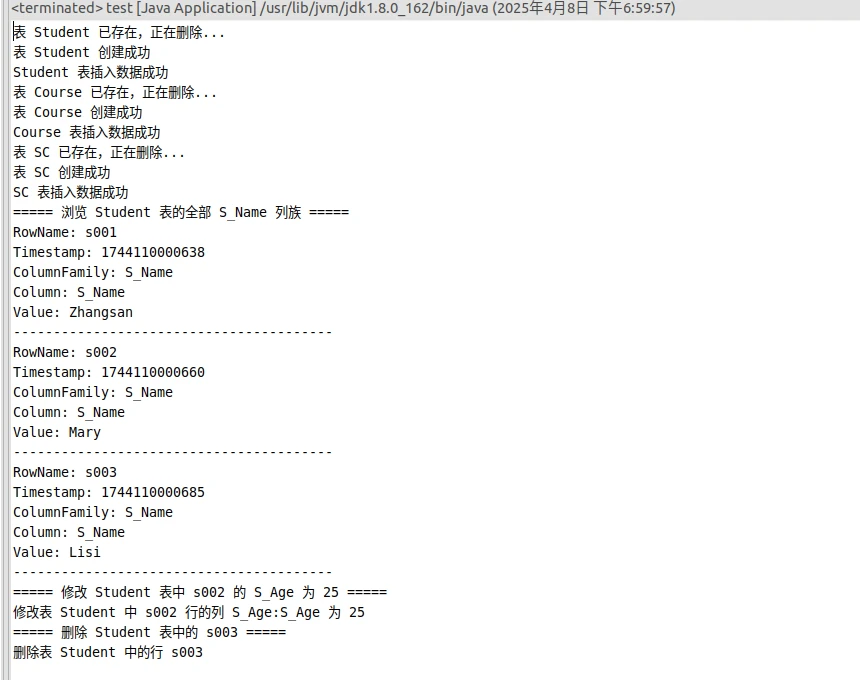

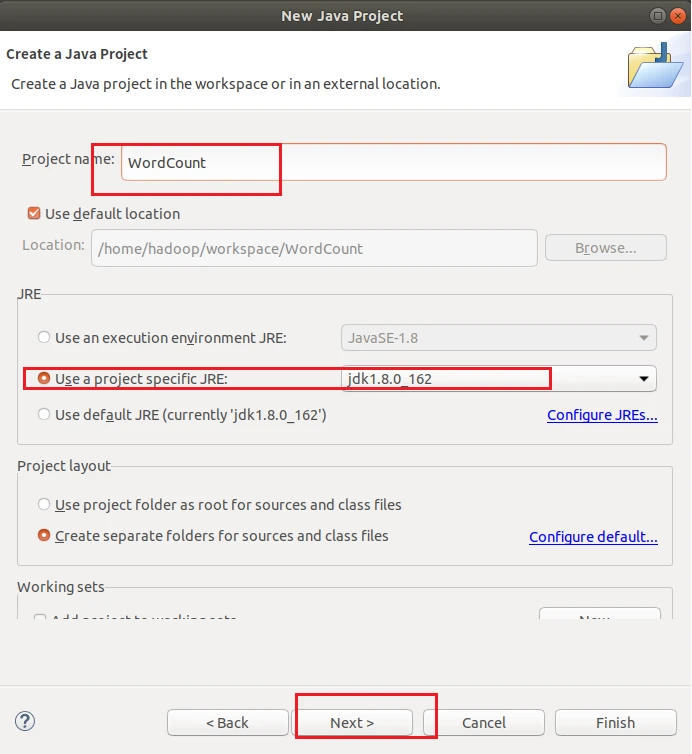
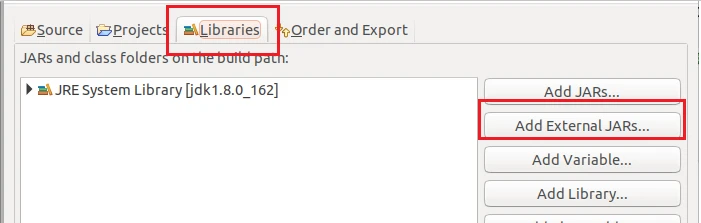
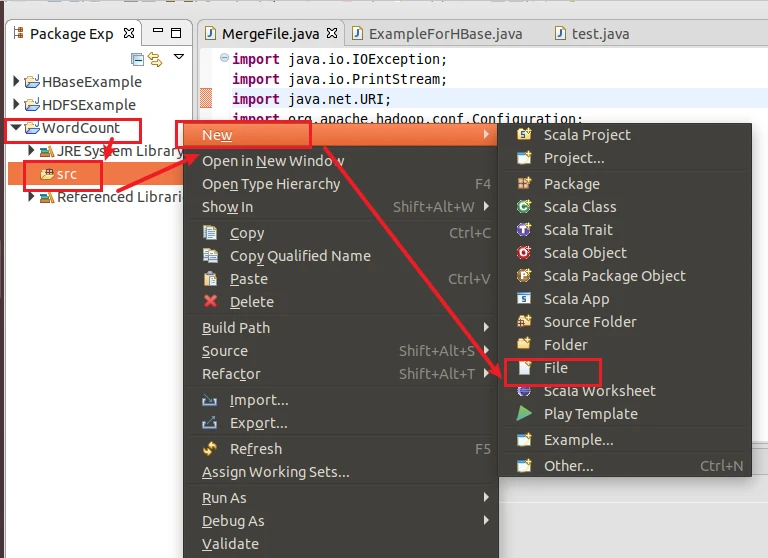
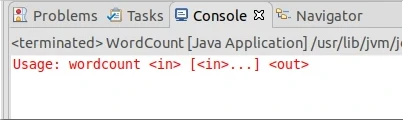

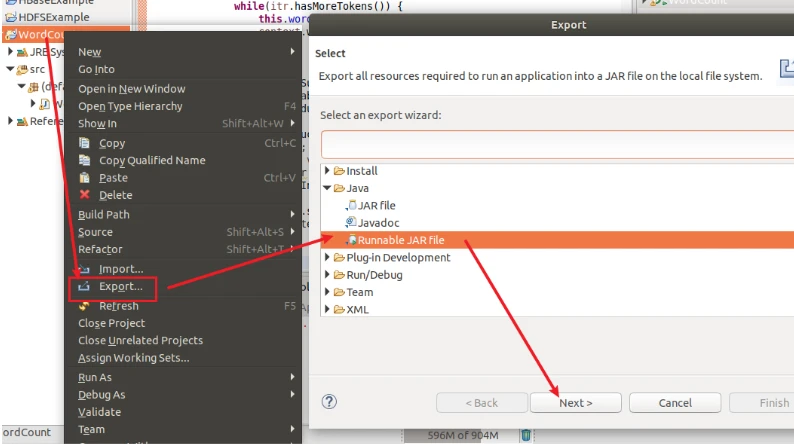
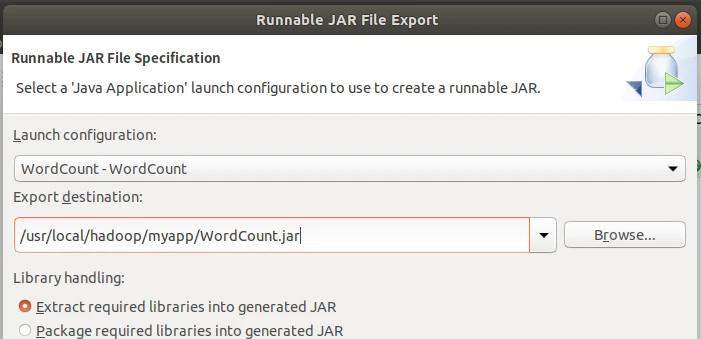
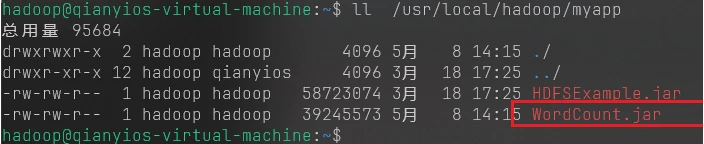
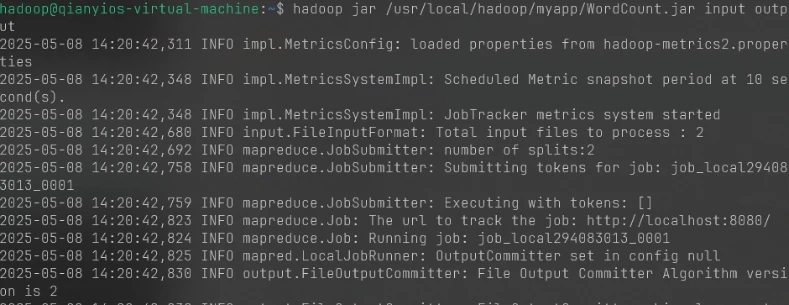
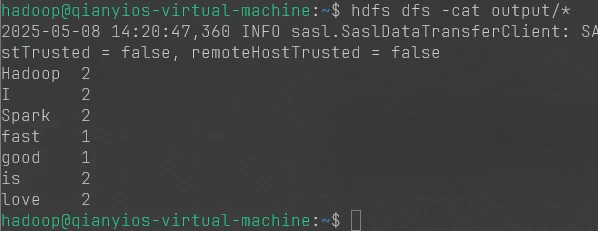
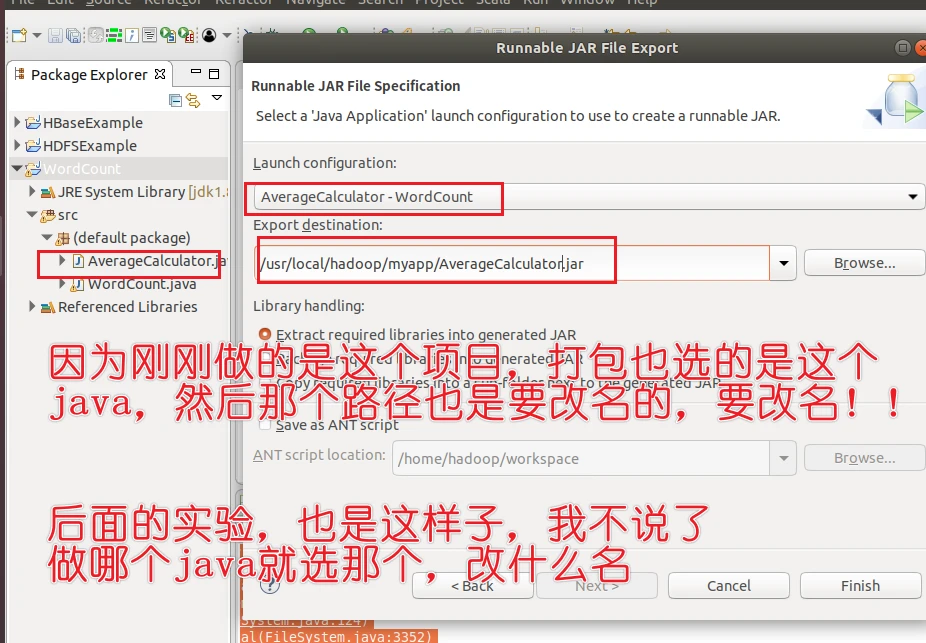
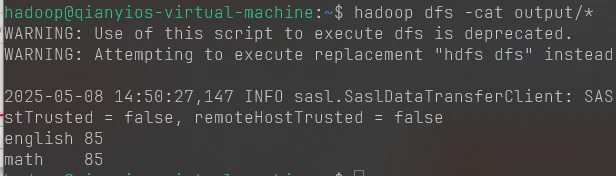
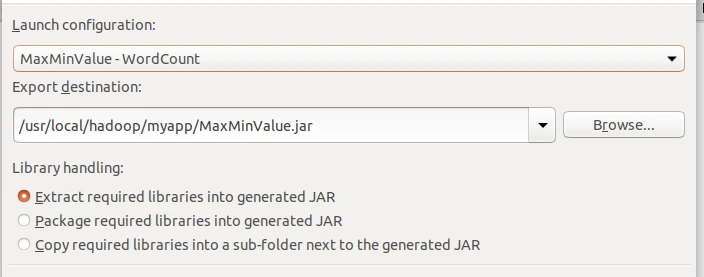
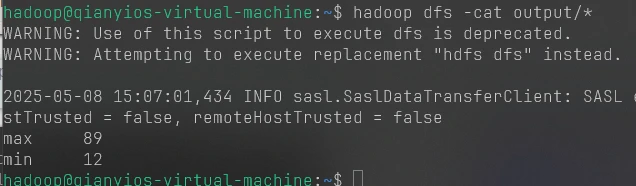
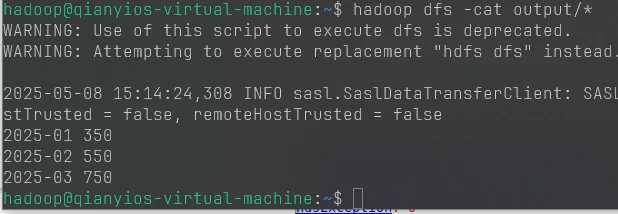

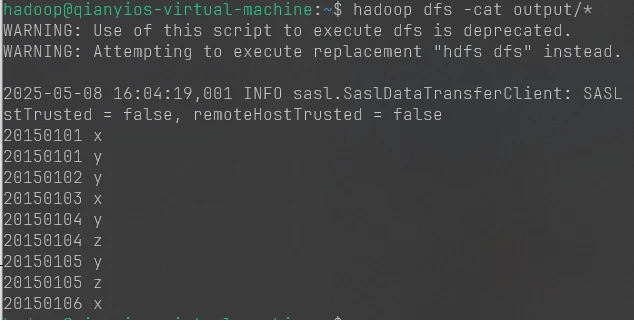
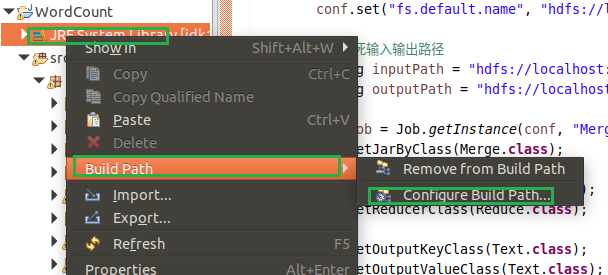
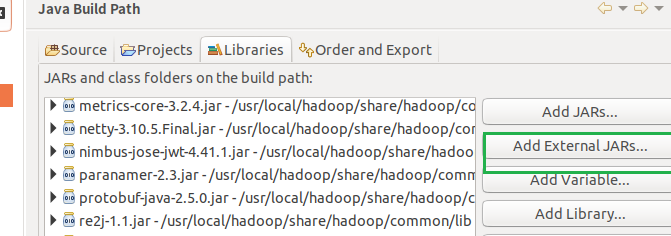
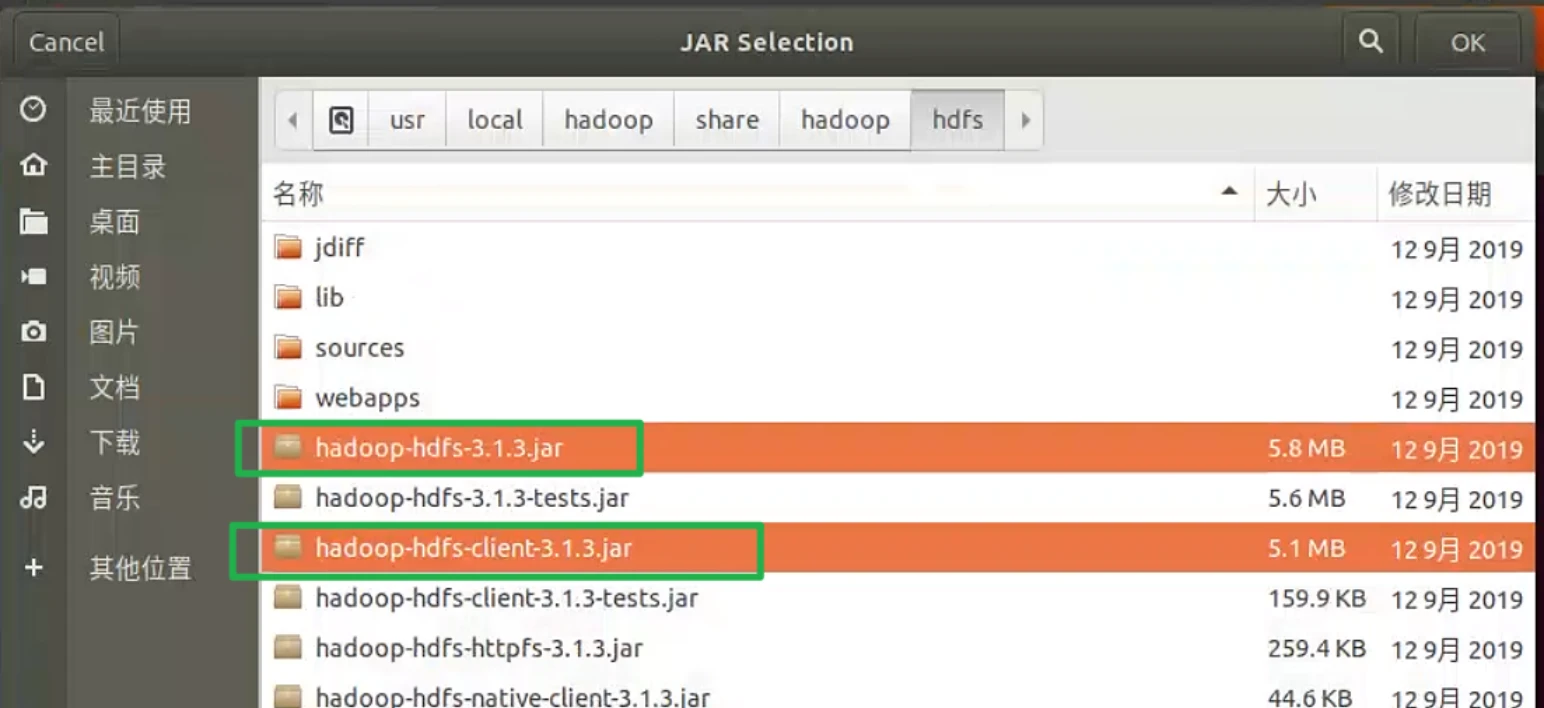
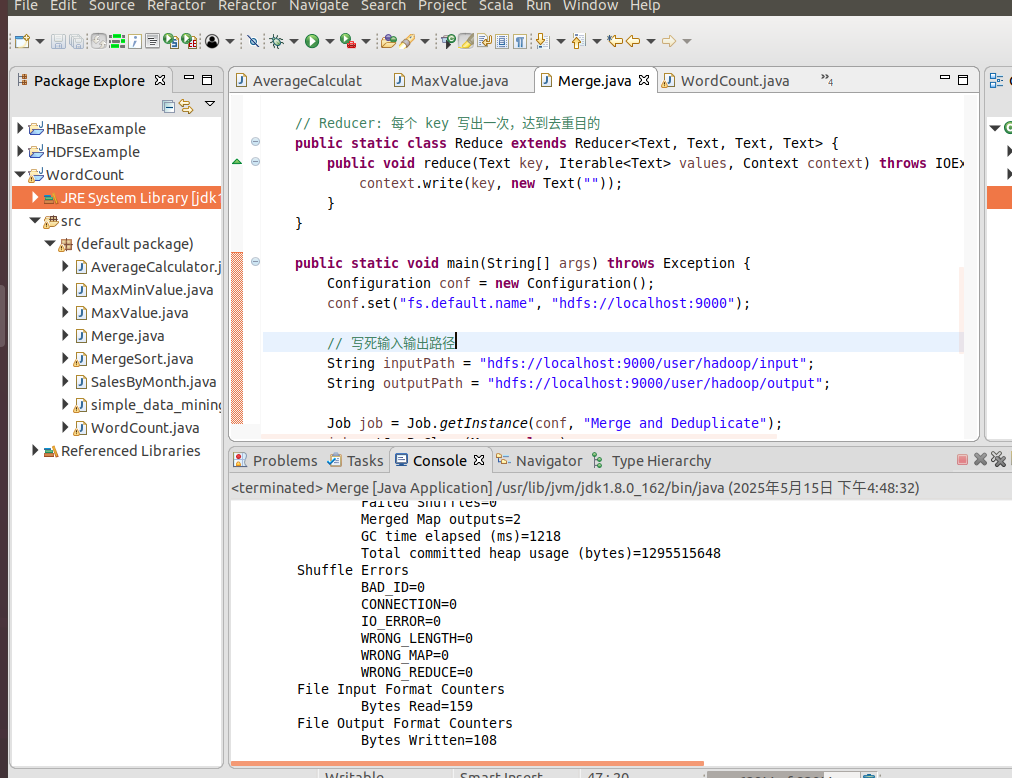
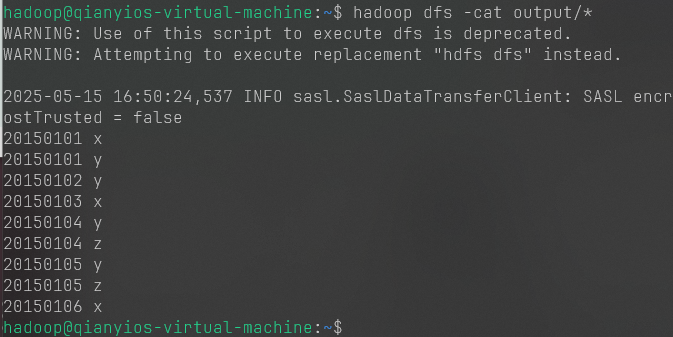
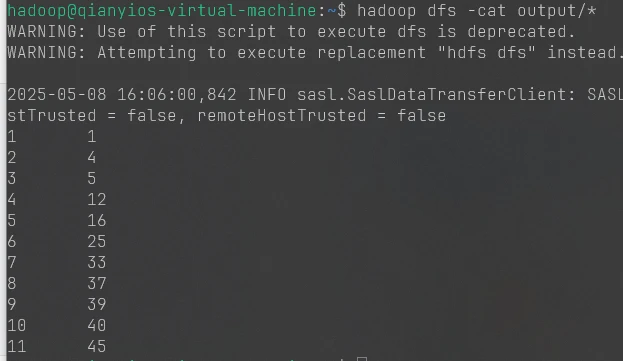
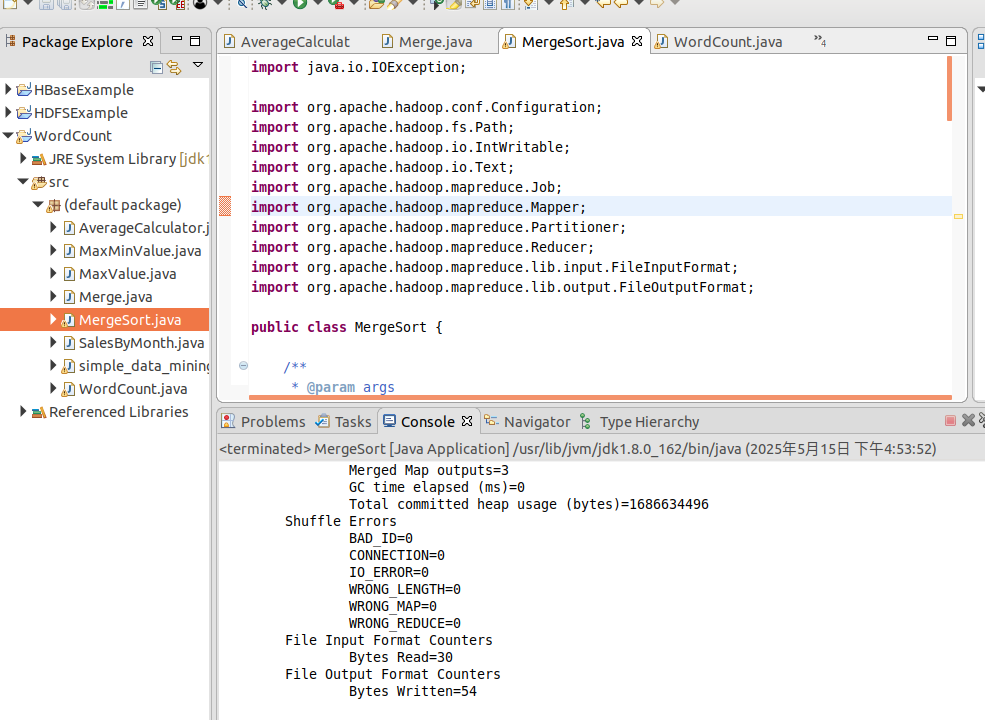
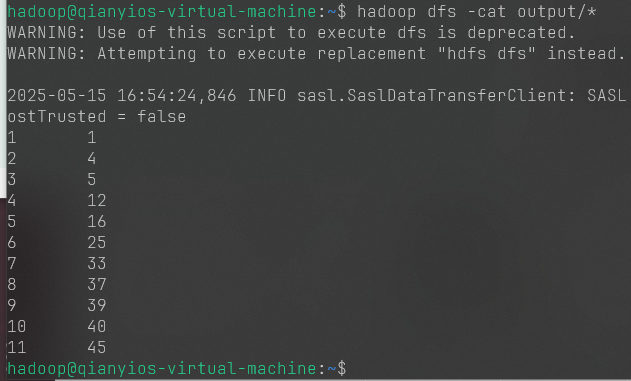
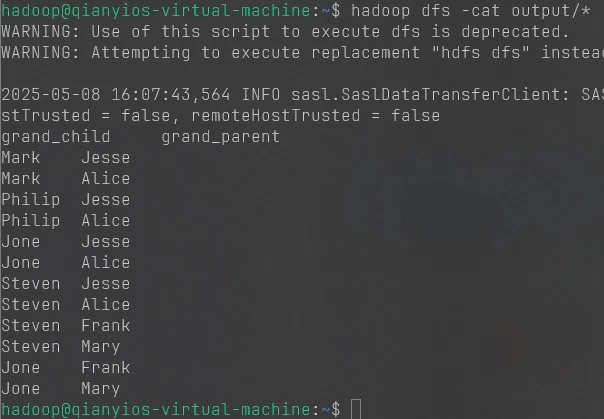
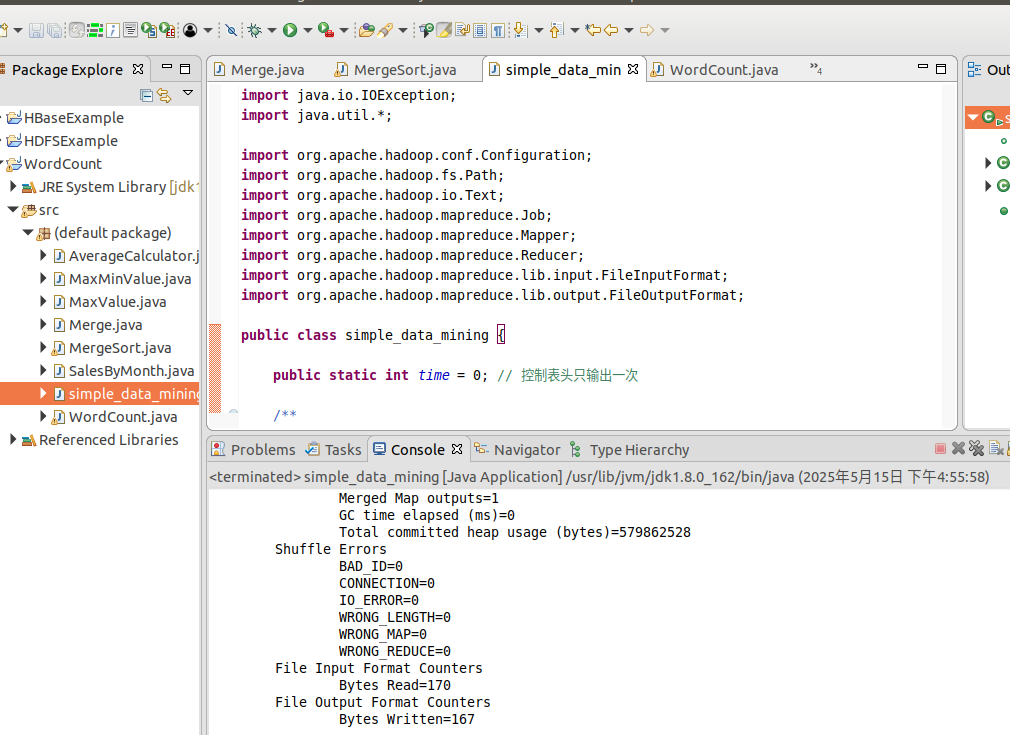
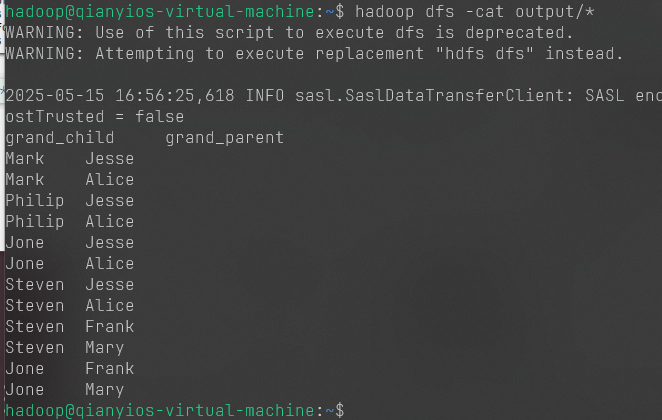
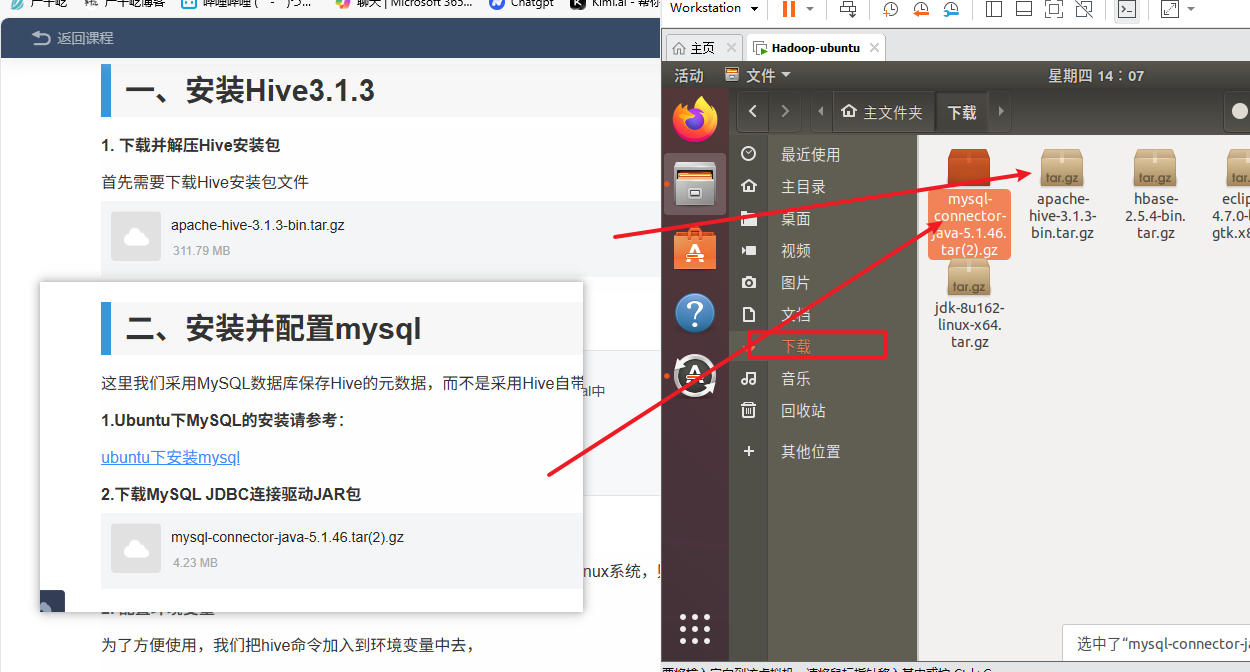

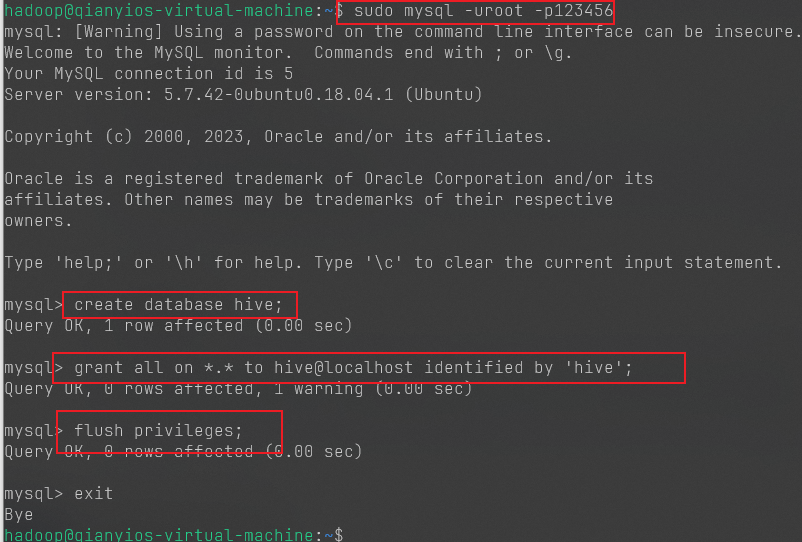
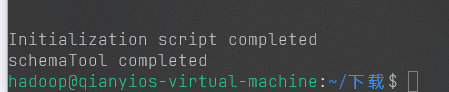
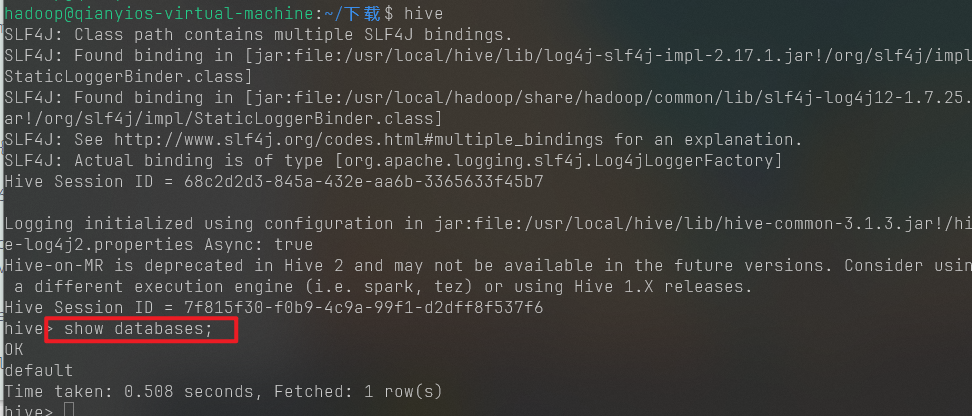
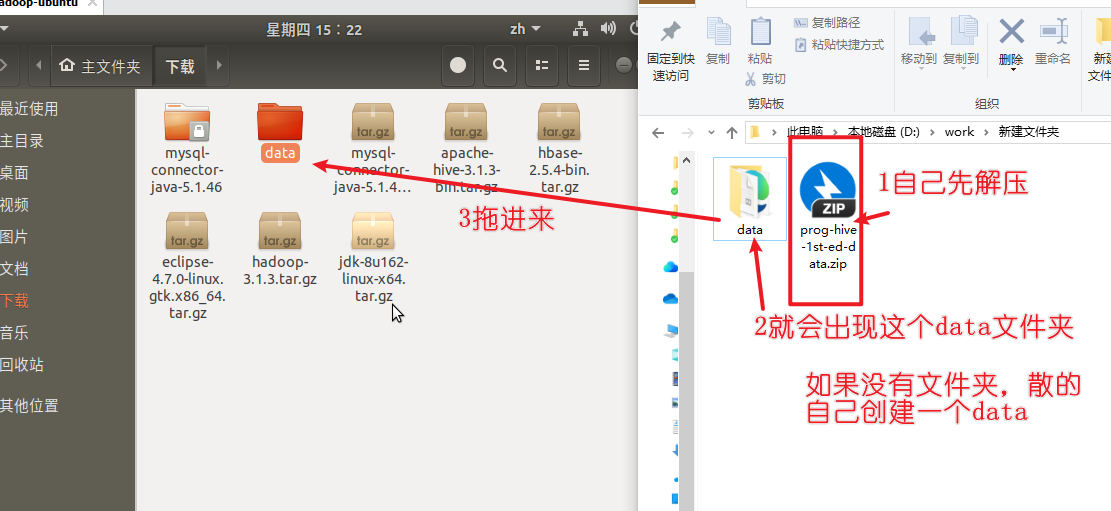


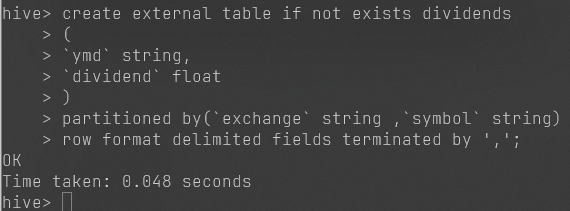

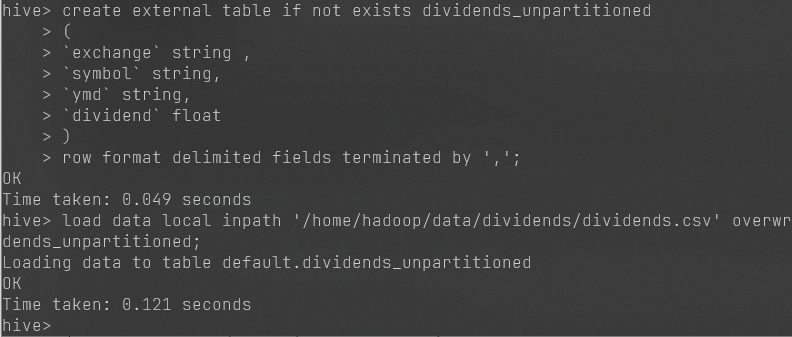
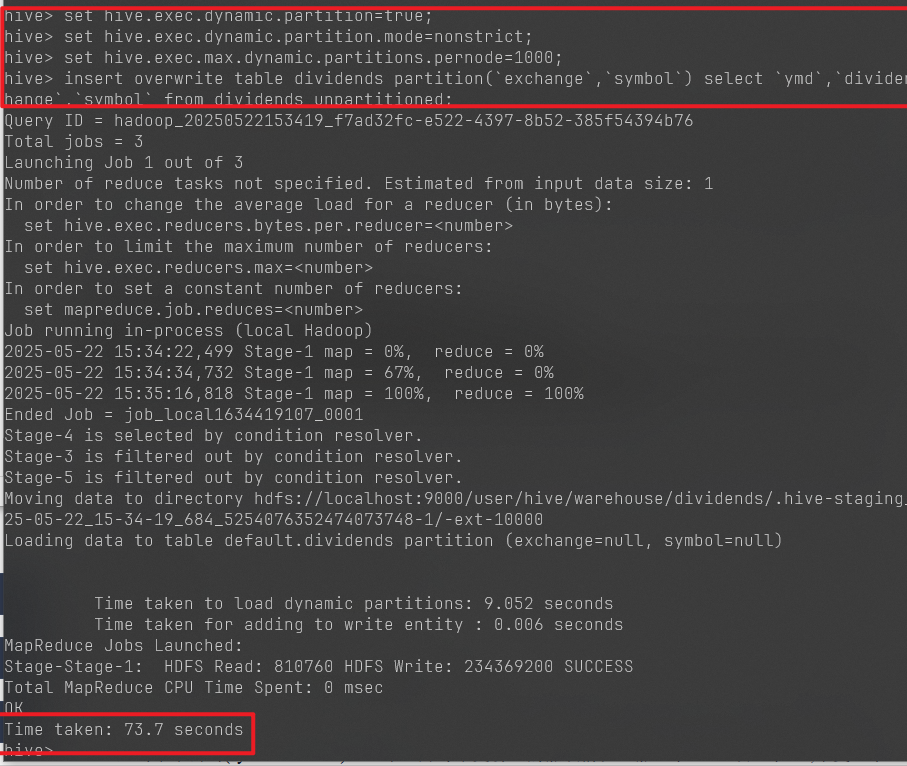
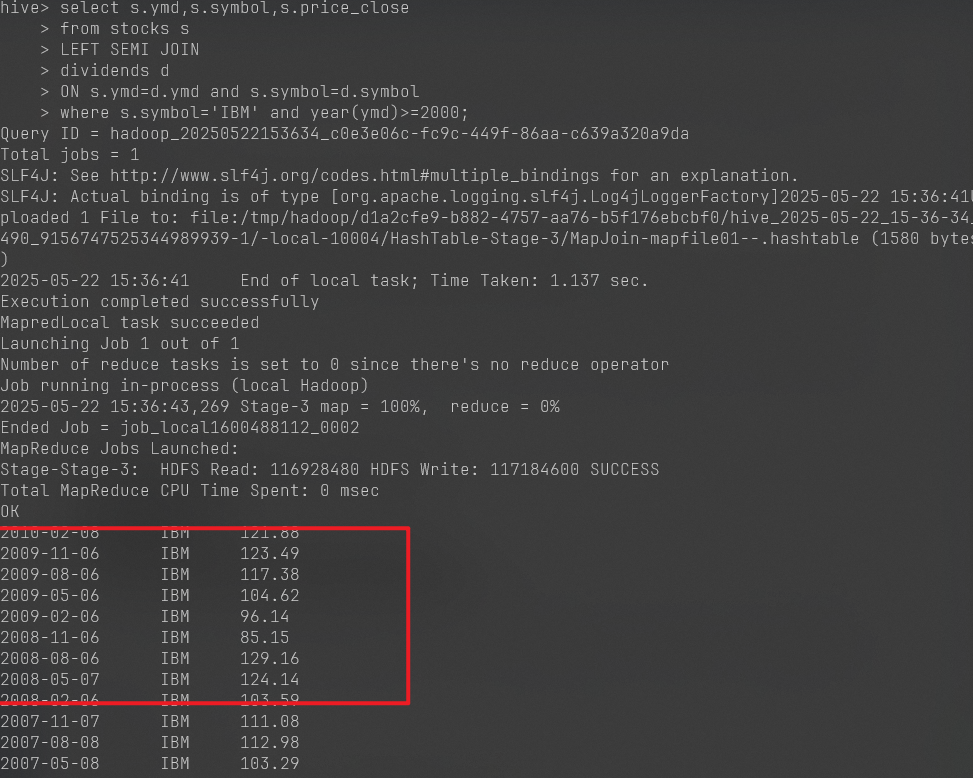

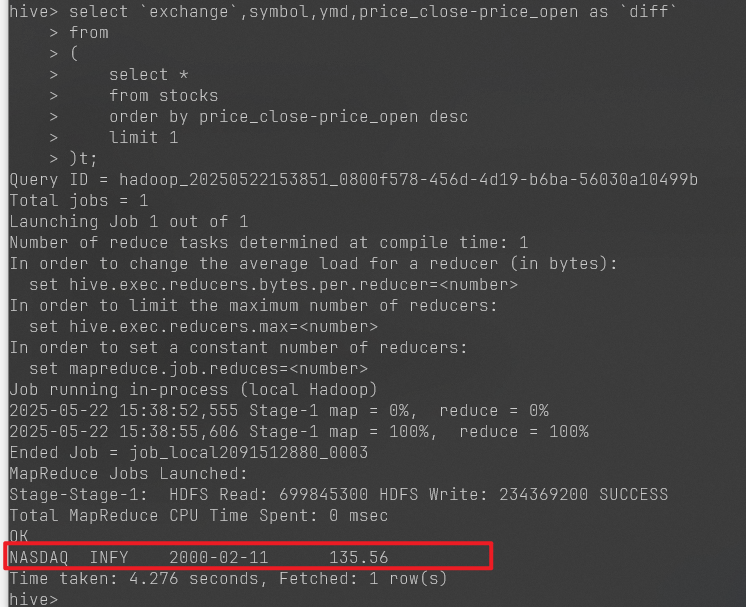
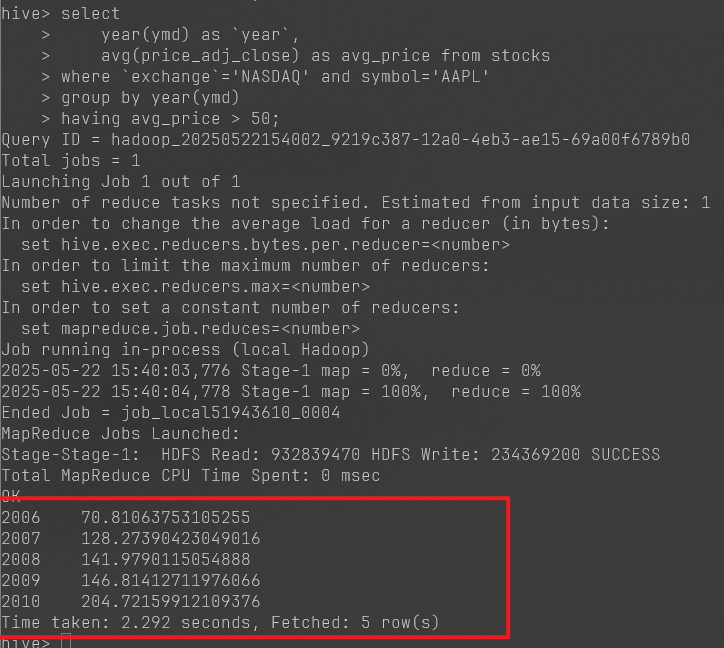
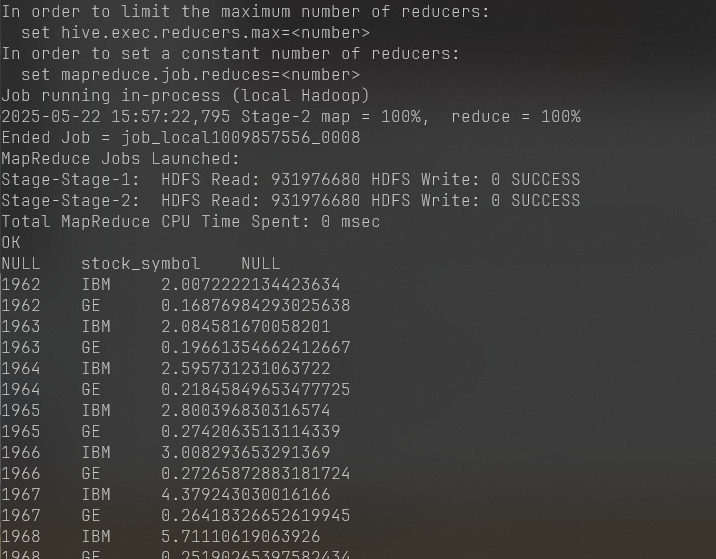
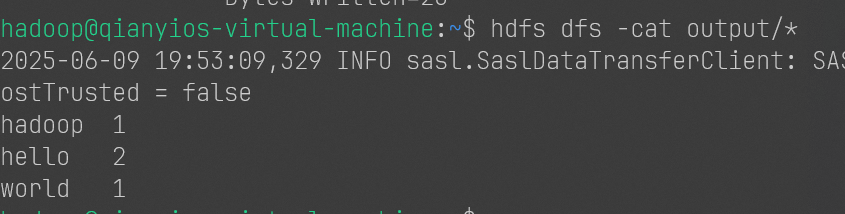
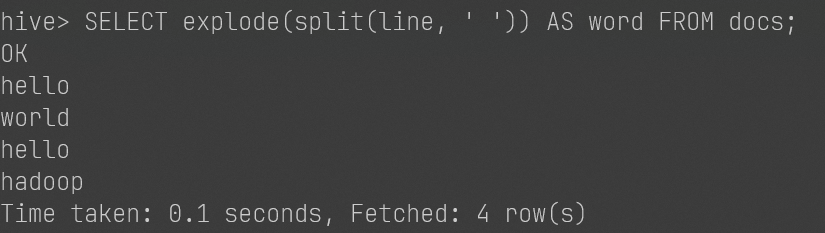

 微信
微信 支付宝
支付宝