
Nginx入门笔记
Nginx入门笔记
Nginx介绍
Nginx是一个高性能的HTTP、反向代理服务器
主要功能:
- 反向代理
- 实现集群和负载均衡
- 静态资源虚拟化
Nginx的版本:
-
Nginx开源版 http://nginx.org/en/
官方原始的Nginx版本
-
Nginx plus商业版
开箱即用,集成了大量功能
-
Open Resty https://openresty.org/cn/
OpenResty是一个基于Nginx与 Lua 的高性能 Web 平台,其内部集成了大量精良的 Lua 库、第三方模块以及大多数的依赖项。更适用于需要大量二次开发的场景,有极强的扩展性
-
Tengine https://tengine.taobao.org/
由淘宝网发起的Web服务器项目。它在Nginx的基础上,针对大访问量网站的需求,添加了很多高级功能和特性。Tengine的性能和稳定性已经在大型的网站如淘宝网,天猫商城等得到了很好的检验。相比于Open Resty,扩展性不够强,但是能够满足绝多数使用场景
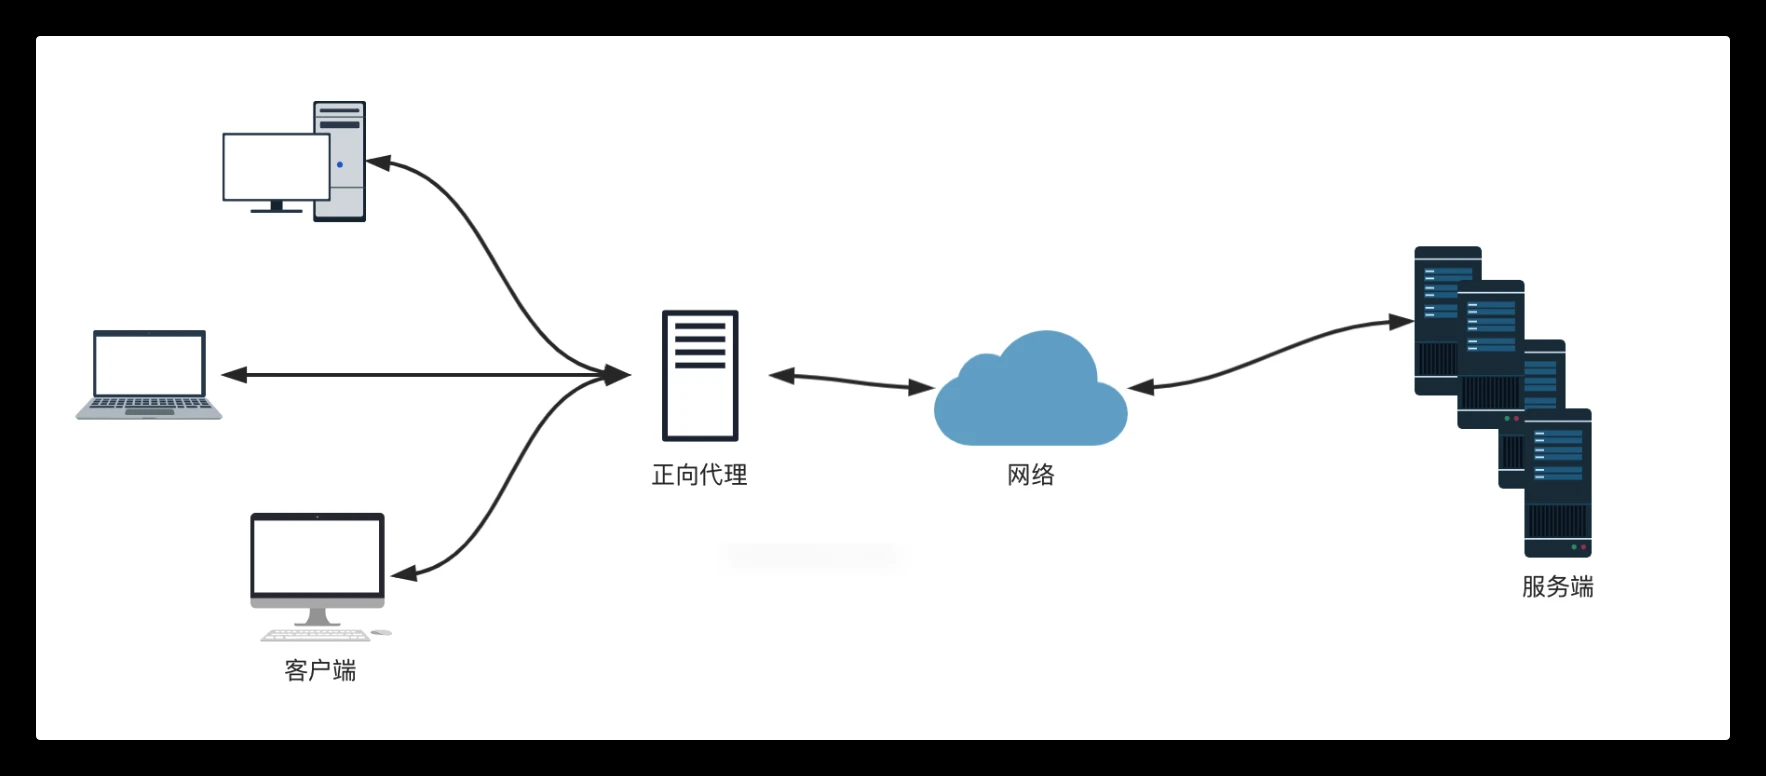
什么是代理
正向代理
正向代理可以理解为「客户端」的代理
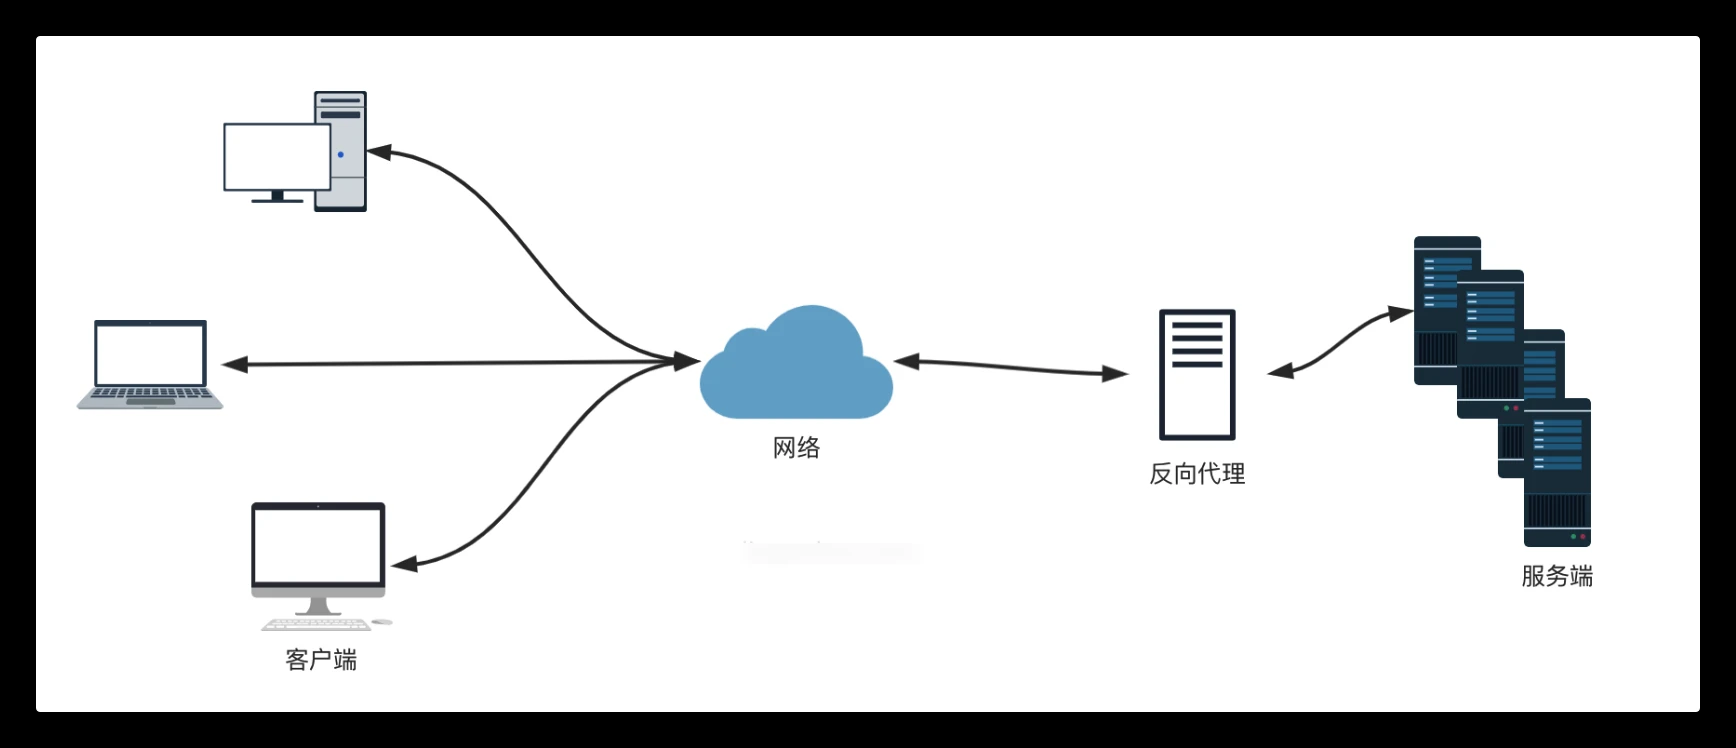
反向代理
反向代理可以理解为「服务器」的代理
Nginx安装
以下有两种方式,按需选择,编译会慢一点,但是可以离线安装,不需要从网络下载所需的包,Rpm安装全部安装都需要网络。两个都差不多(我接下来测试全部用编译安装)
编译安装
不限制;Linux系统
这里我就用OpenEuler22.03LTS做演示,命令都和CentOS差不多,不做过多解释
1.安装必要工具
1 | yum install -y tar gcc make pcre pcre-devel zlib zlib-devel openssl openssl-devel |
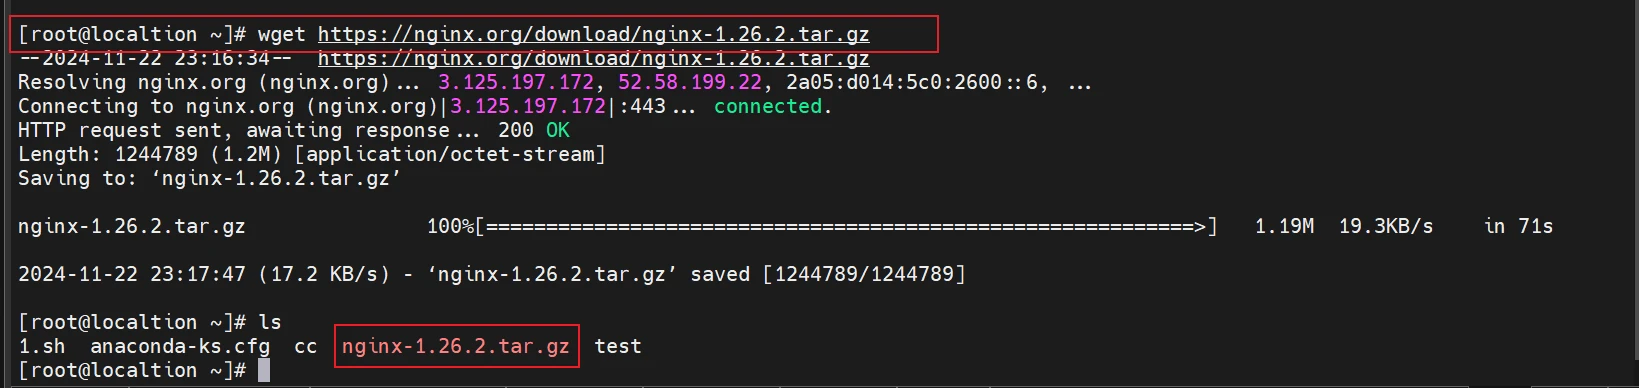
2.下载源码包

你可以右键复制链接在虚拟机下载
1 | wget https://nginx.org/download/nginx-1.26.2.tar.gz |
也可以直接点击红色框框的下载下来然后上传到虚拟机(root用户一般都上传到/root)去
3.创建nginx安装目录并解压安装包
1 | mkdir -p /etc/nginx/ |
4.设置守护进程实现自启动
1 | cat > /etc/systemd/system/nginx.service <<"EOF" |
5.访问测试页
访问你虚拟机的ip就行
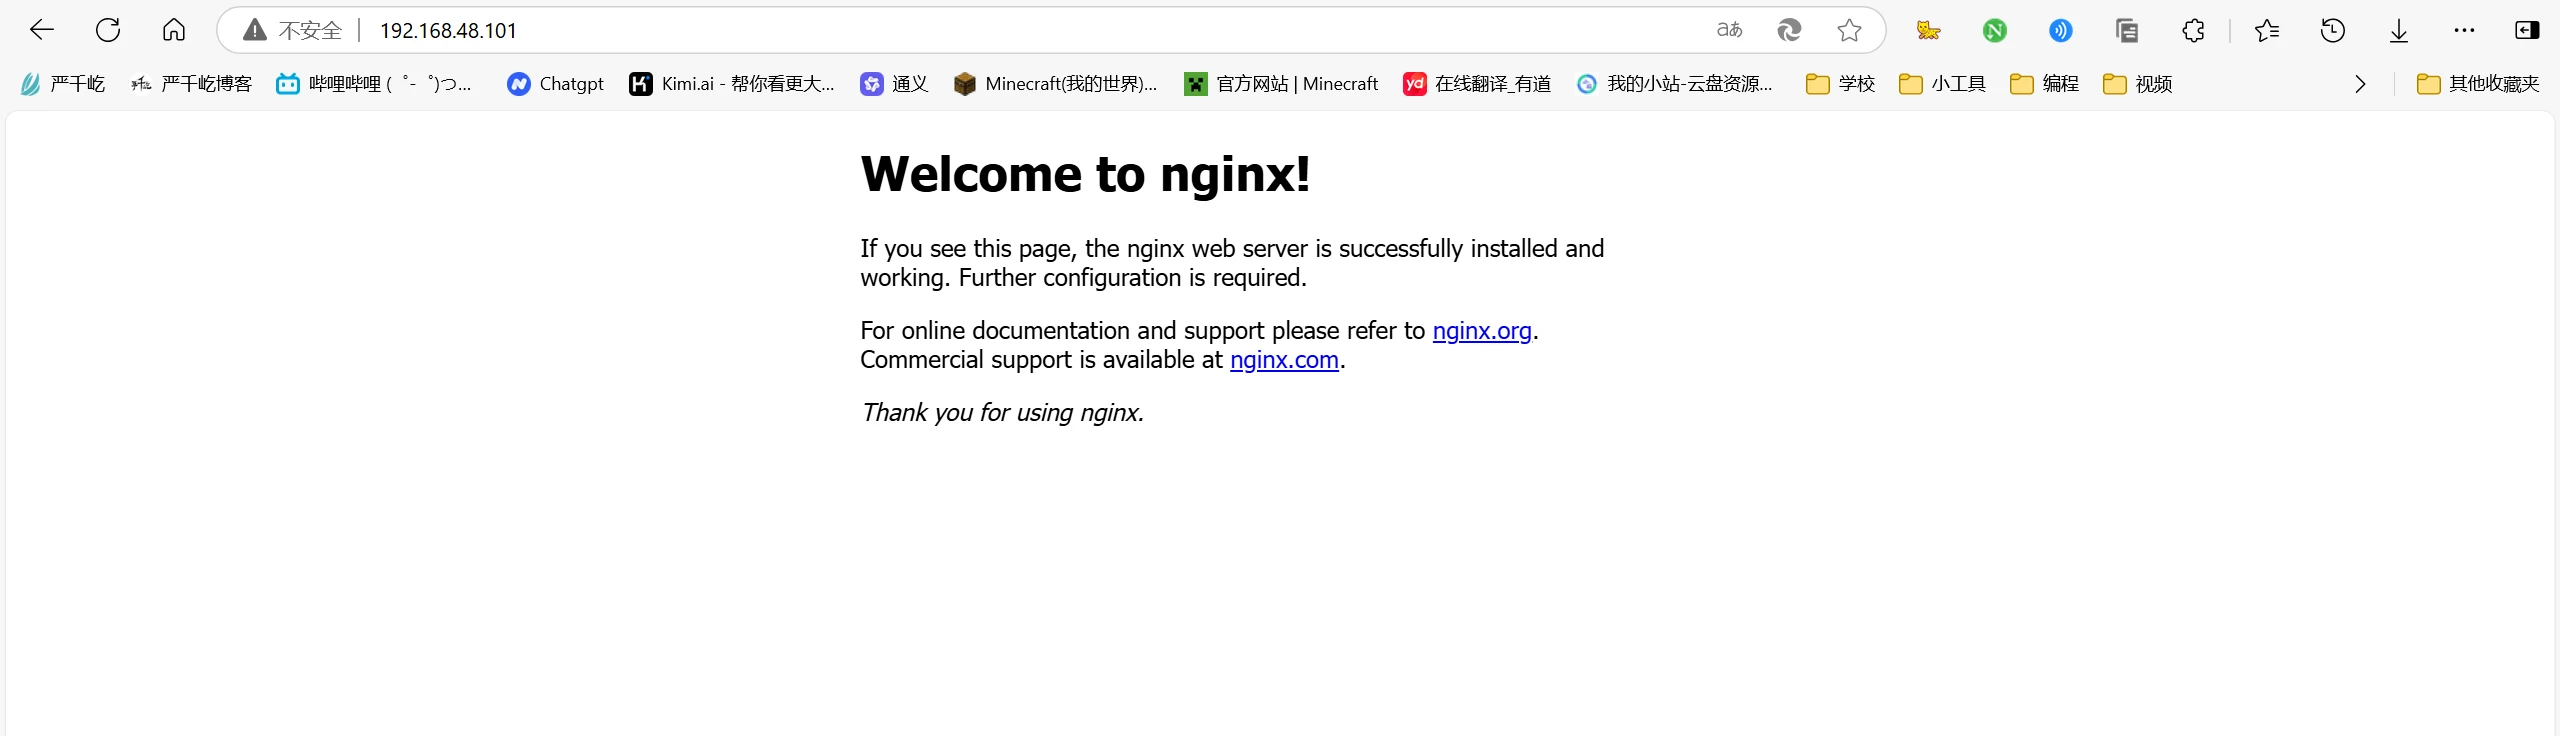
到这编译版nginx安装成功
普及一下nginx命令:
systemctl start nginx 启动nginx
nginx -s reload 重载nginx
RPM安装
有两个系统的教程,我下面有标注
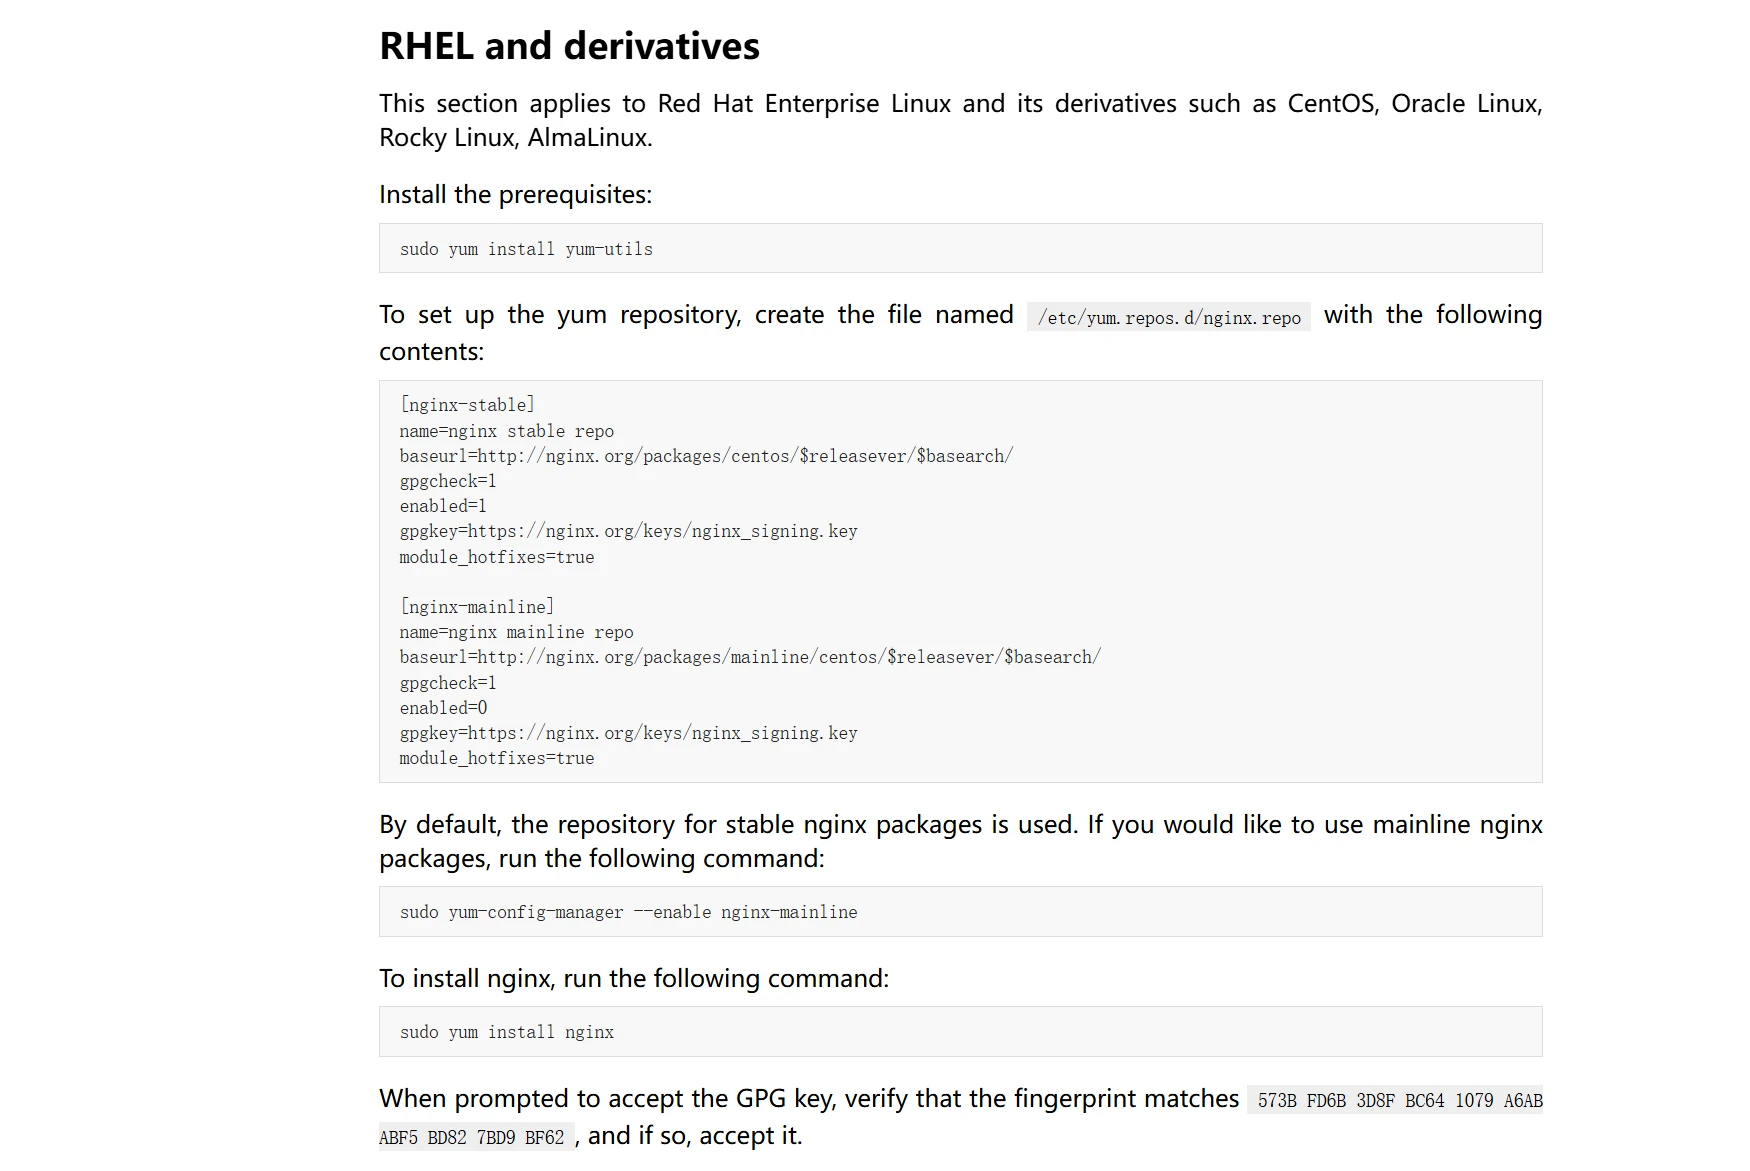
Centos7或Centos8
1 | yum install yum-utils -y |
OpenEuler系统
因为没有适配openeuler的版本,这里直接用centos8的来代替,兼容的没关系,你可以根据你的系统去自行替换
原本是$releasever的,但是没有openeuler的版本直接用8来代替也就是centos8,openeuler兼容centos
1 | cat >/etc/yum.repos.d/nginx.repo << "EOF" |
访问测试页
访问你虚拟机的ip就行
关闭防火墙
1 | systemctl disable firewalld &> /dev/null |
Nginx目录
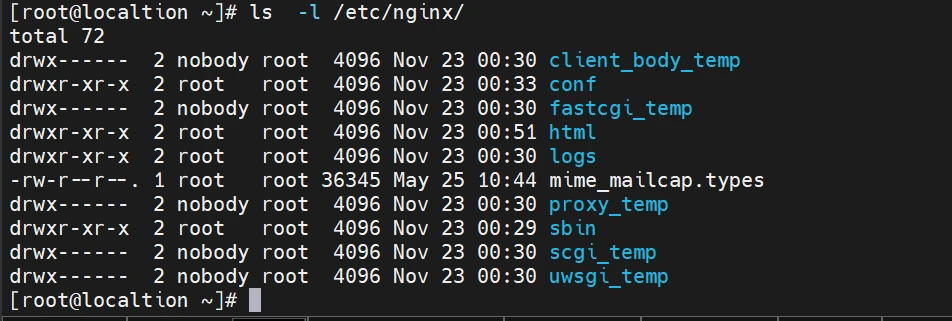
1 | conf #配置文件 |
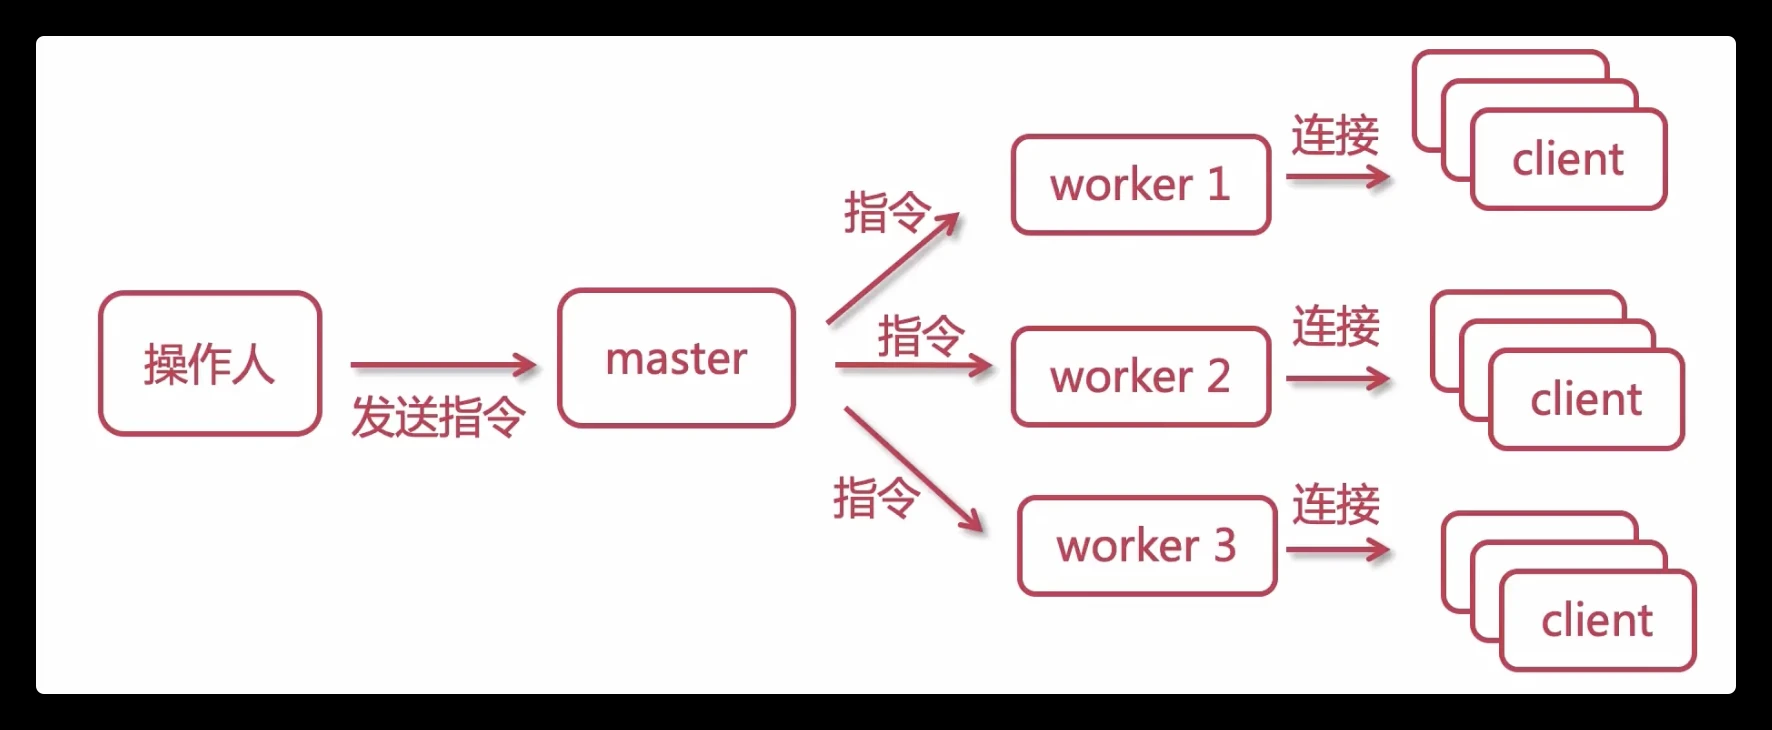
Nginx进程模型
一个Master:监听请求,并分配worker进程处理
默认一个worker进程(可以在配置文件中修改worker数量):处理客户端请求
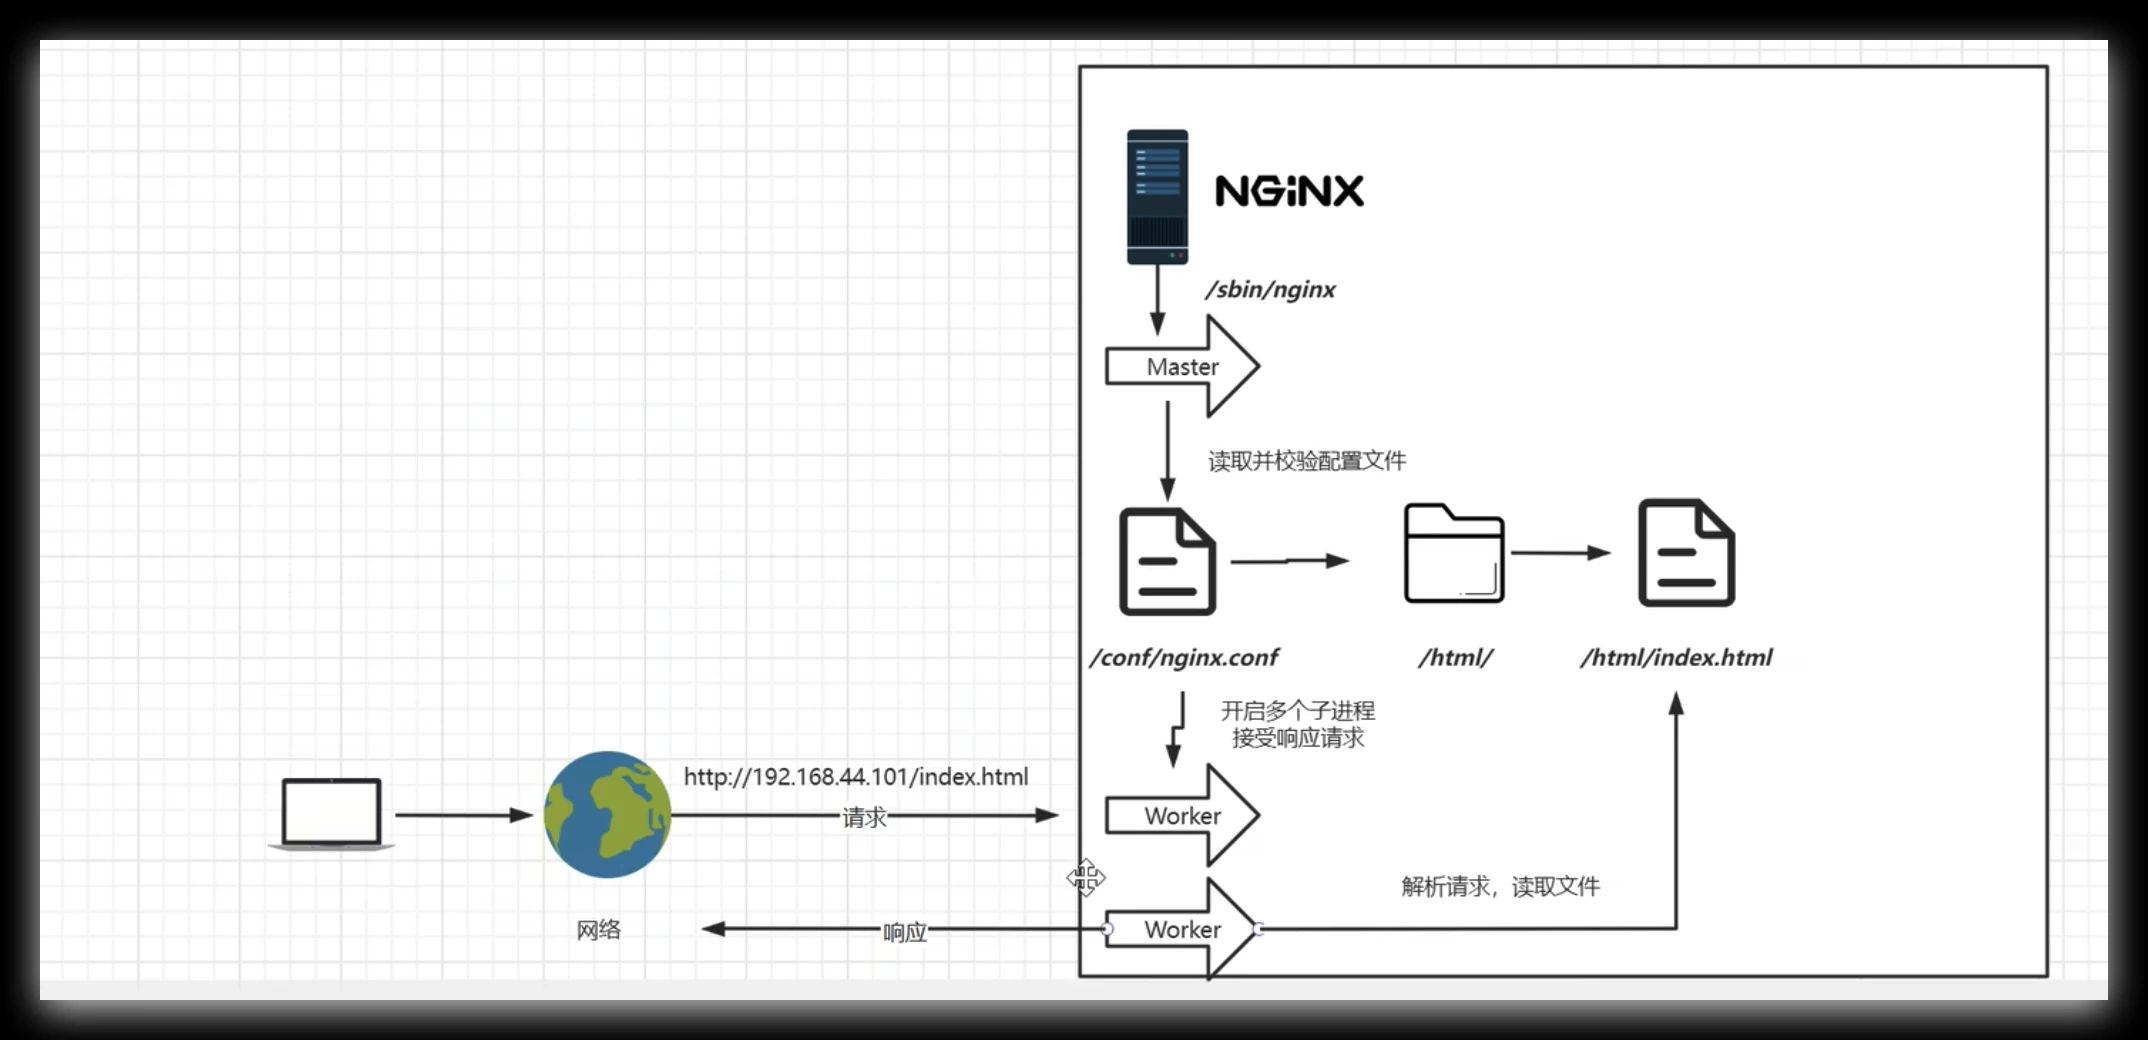
每个worker之间彼此独立,每一个worker处理多个请求
Nginx配置文件
nginx.conf默认配置文件
这是nginx默认的配置文件
展示部分核心配置,后续更多配置会在后面进行慢慢升华
1 | [root@localtion ~]# vim /etc/nginx/conf/nginx.conf |
刚刚访问安装成功后的测试页
测试有的index文件在/etc/nginx/html/index.html
一般所有的网页的文件都放在nginx安装目录下的html下
这里nginx的根目录/,监听的端口是80
2
3
4
5
6
7
8
root html; # 设置网站根目录
index index.html index.htm; # 默认首页文件
} # 根目录配置
location / {
root html; # 设置网站根目录
index index.html index.htm; # 默认首页文件
}
每次修改配置文件要重载配置
1 | nginx -s reload |
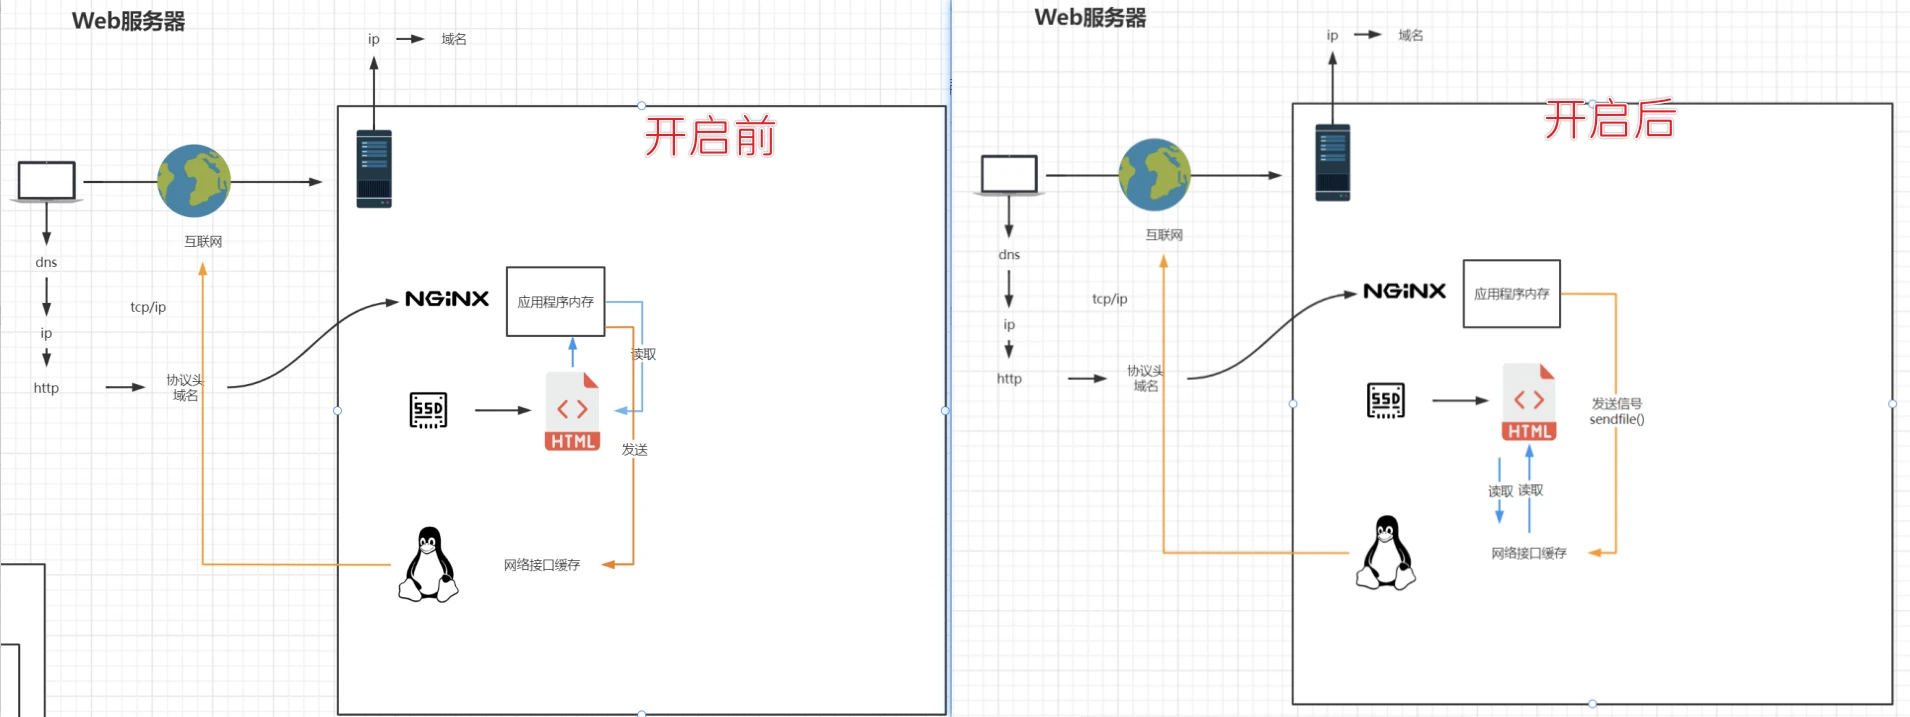
sendfile配置
在高负载情况下,启用Nginx的sendfile功能可以减少CPU和内存的使用,提高服务器性能,因为它允许数据直接从磁盘传输到网络,无需先加载到Nginx的内存中。这不仅降低了CPU使用率,还减少了内存占用,从而提高了I/O效率和服务器的吞吐量,并且降低了响应延迟。
1 | http{ |
gzip配置
1 | http{ |
nginx 中的 gzip 压缩分为动态压缩、静态压缩
-
动态压缩:服务器给客户端返回响应时,消耗自身的资源进行实时压缩,保证客户端拿到 gzip 格式的文件
gzip on开启的就是动态压缩,gzip_comp_level设置的级别高,可能会造成CPU占用过高(文章:简单一招竟把nginx服务器性能提升50倍)
-
静态压缩:直接将预先压缩过的 .gz 文件返回给客户端,不再实时压缩文件,如果找不到 .gz 文件,会使用对应的原始文件
该功能需要模块:
ngx_http_gzip_static_module(默认不会被构建)我们可以通过下面命令查看,当前安装的是否包含该模块
我们可以通过下面命令查看,当前安装的是否包含该模块
1 | nginx -V |

如若没有,则要重新编译:
1 | cd nginx-1.26.2/ |
启用以下配置
1 | http { |
记得重载配置
1 | nginx -s reload |
Server配置
虚拟主机配置(可以启用多个),多个server字段,会根据请求的域名+端口从前向后匹配
以下是例子:
如果是公网:qianyios.top这个域名要解析到这个这个服务器的公网ip
如果是内网:这个域名要在本机进行hosts匹配映射ip qianyios.top
1 | http { |
【例子1】当访问http://qianyios.top:80就会访问以下页面(也就是nginx欢迎页),这里只是例子,你可以根据你自己情况匹配
/ 这个路径很特殊,只要用户访问的地址qianyios.top:80后面没有加什么被其他location定位到的话都会来到这个
1 | http { |
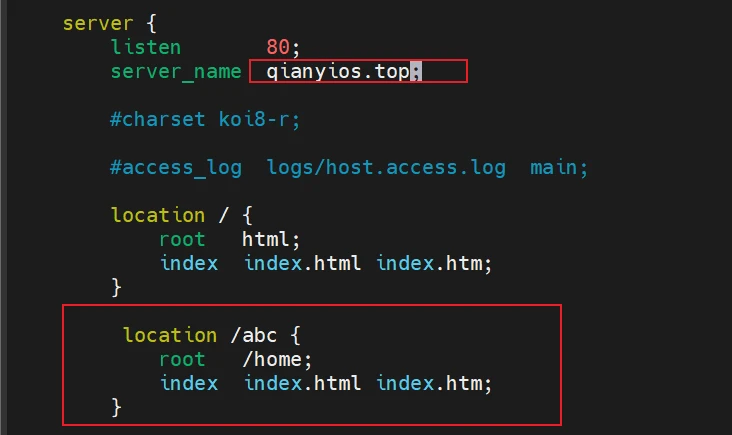
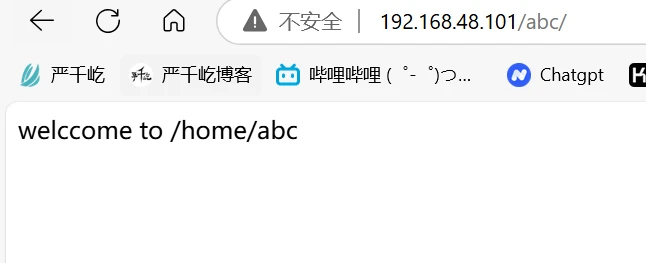
【例子2】当访问http://qianyios.top:80/abc/就会访问以下页面,一个server可以存在多个location,但是其定位的路径不要出现相同的位置。比如:有两个location /abc{内容}
注意有两个误区
①如果root是/home 这里实际访问路径是/home/abc/index.html
②如果root是/home/abc 这里实际访问路径是/home/abc/abc/index.html
其实root的功能就是将qianyios.top:80定义为root(网站根目录),然后访问地址后面的/abc就会加在实际访问路径里
1 | http { |
1 | mkdir /home/abc |
这里又会有两个报错
我们要去找index.html文件只有像以下输入命令才会能找得到
1 | [root@localtion ~]# ls /home/abc/ |
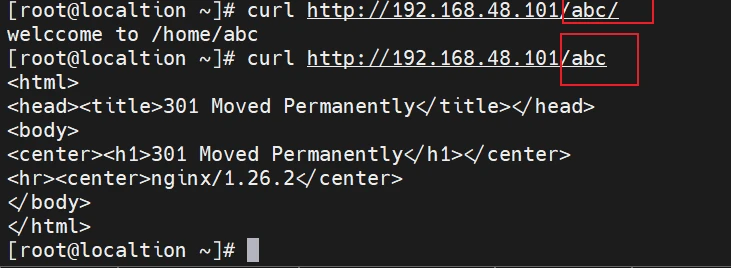
如果你只是访问http://qianyios.top:80/abc实际访问路径是/home/abc,但是我认为nginx会因为abc是个文件,我们本身的目的就是要去abc下去找index.html,所以最后要加个/
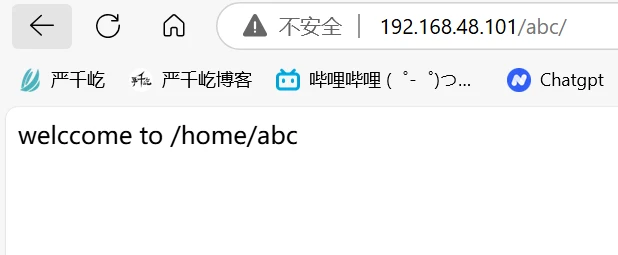
但是呢在宿主机的浏览器实际访问地址是http://192.168.48.101/abc(这里是我的宿主机,我没做hosts映射,我就用ip了,我只在虚拟机做了映射一样的。)注意,这里我最后没加斜杠它自动给我加上了。
总结:我搞不懂两者怎么回事,可能linux不会自动加上吧,浏览器会,就是说如果在虚拟机访问要加/。为了规范就是不管在哪都在配置文件加上末尾的斜杠
【例子3】
一般静态文件会用alias,比如说/var/www/images/下有个图片
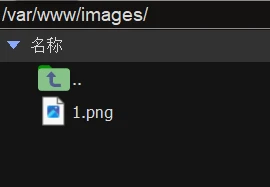
当我设置了以下配置
1 | location /images/ { |
重载配置之后
访问http://192.168.48.101/images/1.png

结论:
访问地址:192.168.48.101/images/1.png
实际访问地址:/var/www/images/1.png
同类型的案例再来一个
1 | location /abc/ { |
【例子4】
精确匹配(顾名思义不做过多解释了)
访问:http://qianyios.top/50x.html
1 | location = /50x.html { |
【例子5】
~:大小写敏感(正则表达式)=: 精确匹配(必须全部相等)~*:忽略大小写(正则表达式),这里要注意忽略大小写的意思是请求的字符大小写都可以, 但是不会进行大小转换,请求的大小写对应的文件必须存在。^~:只需匹配uri部分@:内部服务跳转
1 | #1.精确匹配 |
注意:如果配置了#5,那么所有url里请求 /images/ 下的图片会被上面#5的处理,因为 ^~ 指令匹配到了/image/,则不检查#4正则表达式。对比这两个location,可以设置不同目录,相同文件进行实验。
反向代理和正向代理
反向代理
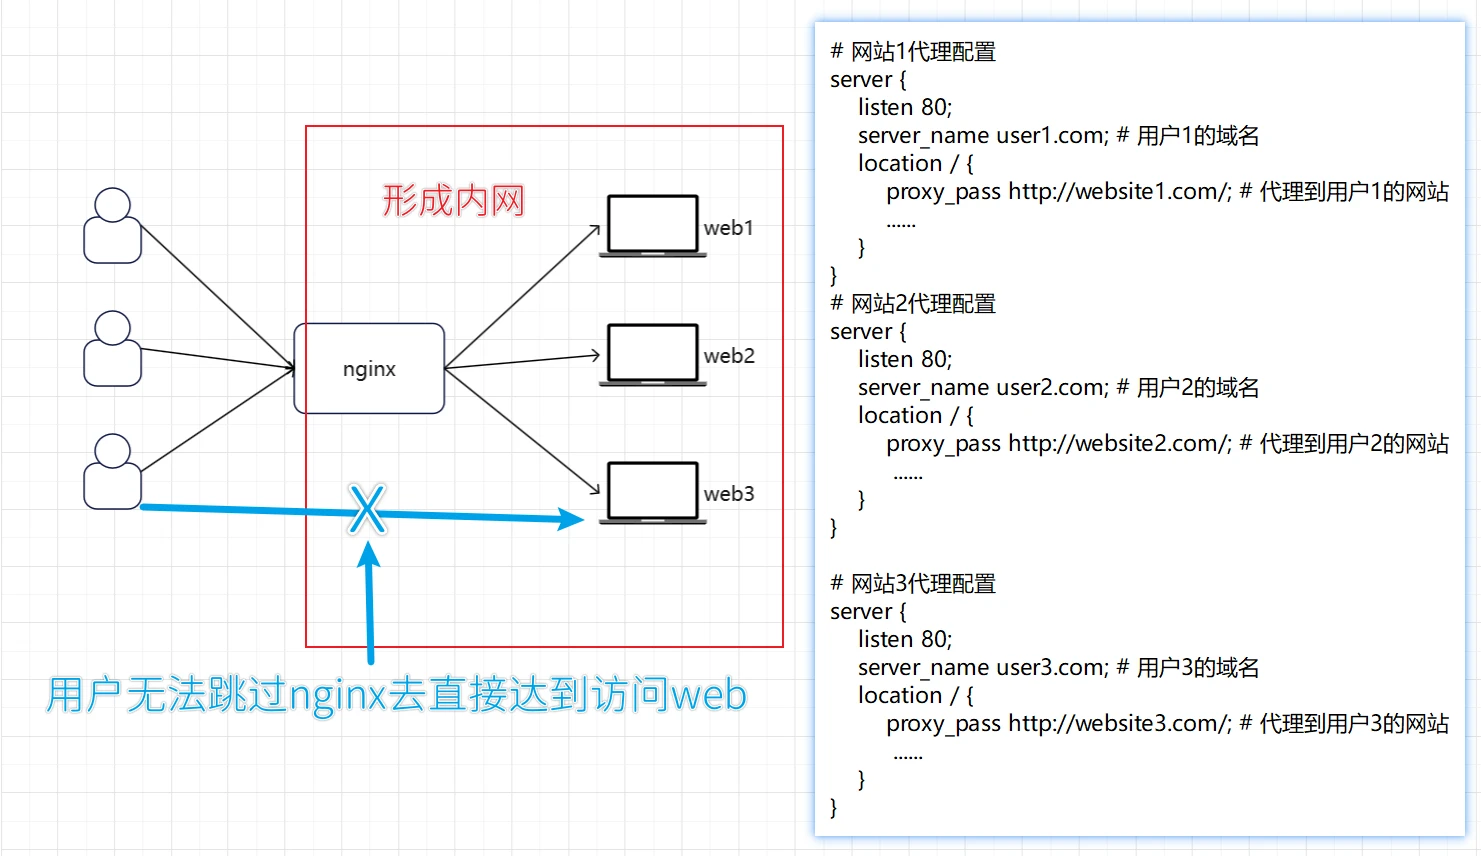
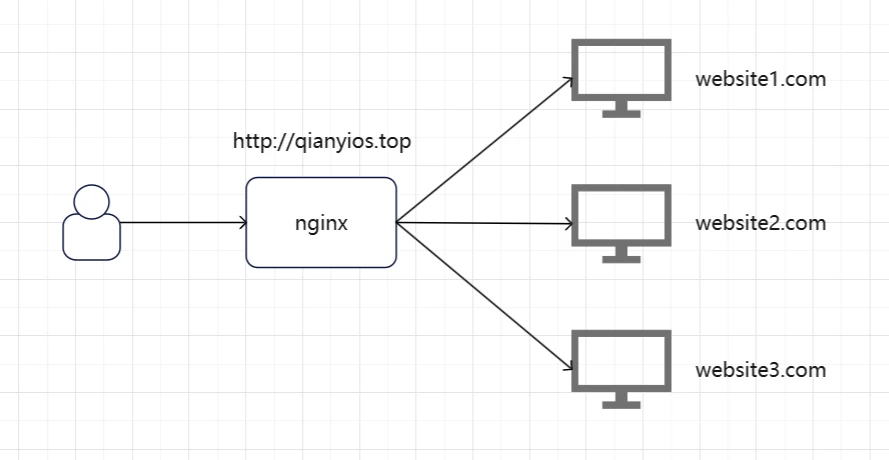
根据以上的代码可以知道,我们设置三个server,分别表示3个网站,他们都有对应的域名,然后通过配置反向代理(右边的配置文件)实现反向代理。即:当用户访问user1.com,nginx就会将请求转到发到https://website1.com上。对应的后端服务器web1接收到请求并返回响应给 Nginx,Nginx 接收到来自后端服务器的响应,并将其返回给用户。
- 对于
user1.com的请求,Nginx 将其转发到http://website1.com/。 - 对于
user2.com的请求,Nginx 将其转发到http://website2.com/。 - 对于
user3.com的请求,Nginx 将其转发到http://website3.com/。
图片中说的无法跳过nginx去直接访问后端服务器,说法太死了,只能说是个例,如果项目本身就不想让你知道后端的地址,只想让你通过nginx来进行访问,方便管理,举个例子,就好像baidu.com 总不能说baidu.com只绑定到一个机子上吧,他肯定会有一个庞大的负载均衡以及反向代理集群,去均衡负载分散流量等操作,如果只绑定到一个机子,也承受不住每天几百万的访问下面会讲到负载均衡。就好像上面的图片的例子,我的后端三个都是百度的网站,有三个不同的域名,但是不可能让用户去记住三个域名吧,所以有个nginx去做反向代理,然后设置一个baidu.com去代理这三个web也可以做到反向代理
正向代理
用户需要通过代理服务器去访问外网。这个代理服务器可以是其他工具不一定是nginx
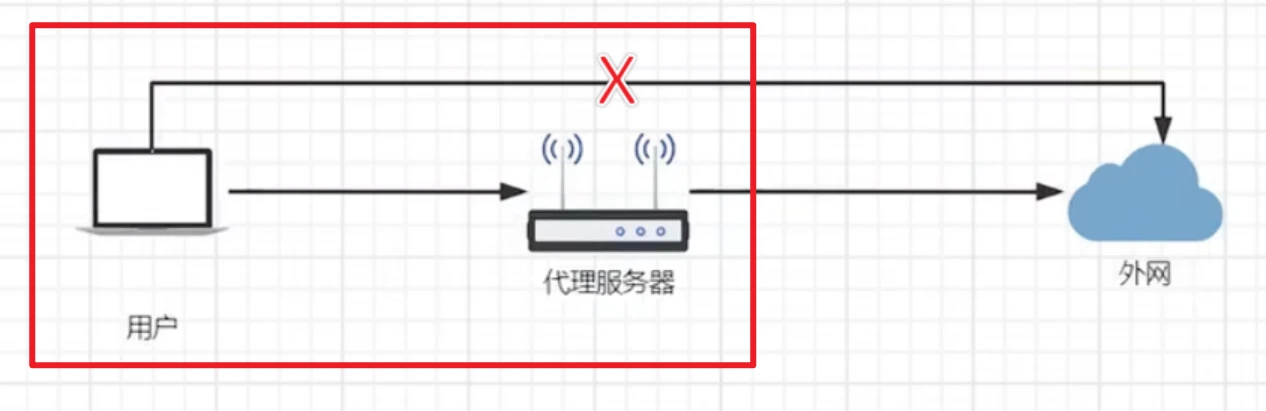
总结:简单来说局域网访问互联网就是正向代理,互联网访问局域网就是反向代理.这些都是隧道式代理,进出都要经过代理服务器
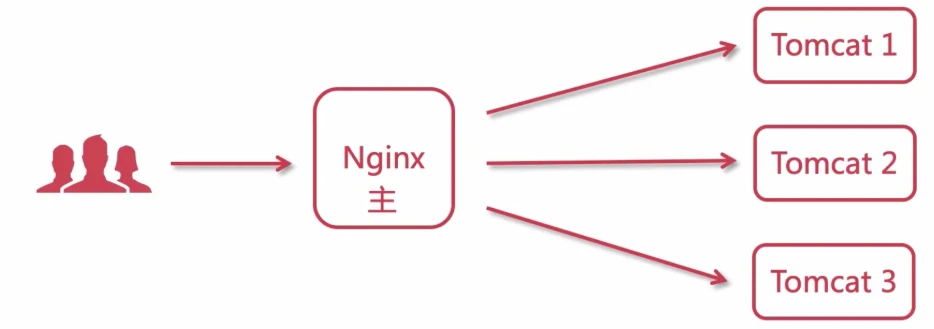
负载均衡
负载均衡策略
轮询
默认情况下使用轮询方式,逐一转发,这种方式适用于无状态请求。(在无参数情况下平均分配所有请求)
1 | http { |
down:表示当前的server暂时不参与负载
weight:默认为1.weight越大,负载的权重就越大。
backup: 其它所有的非backup机器down或者忙的时候,请求backup机器。
ip_hash
对用户的ip进行计算:Hash(IP)%upstream_node_count,返回要使用机器的索引
每一个用户会固定分配到一台机器,防止在A机器上创建Session的用户,后续被分配到其他机器,导致Session失效
开启ip_hash后,如果想要移除一台server,必须使用down配置。如果直接删除,会导致upstream_node_count变化,使得所有用户访问的访问的机器发生变化
缺点:
- 增加服务节点会导致upstream_node_count变化,进而导致所有用户访问的机器变化
- 某个用户短时间发起大量请求,会打到一台固定的机器,导致这台机器性能大幅下降,而其他机器可能还是空闲
1 | upstream test_server{ |
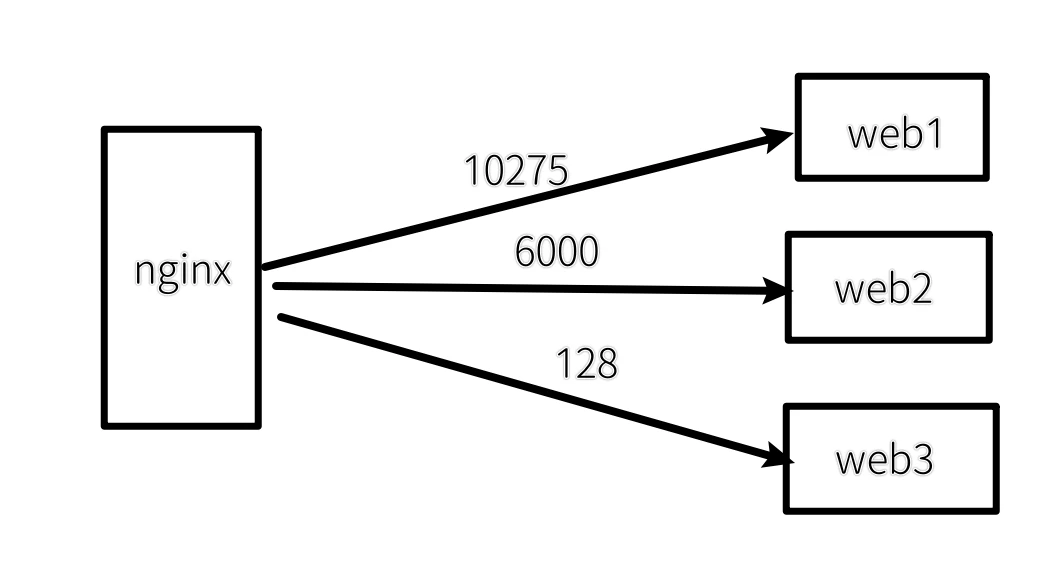
least_conn
尽可能将请求转发到当前连接数最少的后端服务器
1 | upstream test_server{ |
下面例子,开启least_conn,Nginx会优先转发到Tomcat3
url_hash
根据用户访问的url定向转发请求
fair
根据后端服务器响应时间转发请求
总结:当我们访问http://qianyios.top时在upstream无参数的情况下,这三个网页都会平均的访问,且地址栏里的qianyios.top不会变
其次有参数时,都会按照参数的性质,进行轮询访问
动静分离
-
静:前端项目(静态资源)
-
动:接口服务
-
域名A.com访问到A项目、B.com访问到B项目
Api.com访问接口服务
将3个域名都解析到Nginx所在机器
1 | # 前端 |
1 | location ~* /(js|css|img){ |
URL重写
return
把Http重定向为Https
1 | server { |
rewrite
1 | rewrite是URL重写的关键指令,根据regex(正则表达式)部分内容,重定向到replacement,结尼是flag标记。 |
把Http重定向为Https
1 | server { |
当你尝试访问http://www.qianyios.top/1.html时,由于上述rewrite指令的存在,你的浏览器实际上会被引导至https://www.qianyios.top.com/1.html
上述命令改成return会更高效
1 | return 301 https://www.qianyios.top.com$request_uri; |
实例:
1 | rewrite ^/([0-9]+).html$ /index.jsp?pageNum=$1 break; |
假设我们的真实地址是192.168.48.101/index.jsp?pageNum=12 但是我不想客户知道真实地址
配置了这个规则之后,他就会变成192.168.48.101/12.html
我们访问192.168.48.101/12.html(但是12.html是不存在的)之后,他会把流量转发到192.168.48.101/index.jsp?pageNum=12(真实地址)
Nginx网关服务器
企业中,无论是前端页面、静态资源、接口,都是通过Nginx进行访问(使用proxy_pass),这时候这台Nginx服务器就成为了网关服务器(承担入口的功能)

所以,我们启动web服务器的防火墙,设置其只能接受这台Nginx服务器的请求
1 | systemctl start firewalld |
添加rich规则
1 | #这里的192.168.48.101是网关服务器(nginx)地址 |
firewall-cmd:这是用来与firewalld进行交互的命令行工具。--permanent:表示这个更改会永久生效,即使系统重启后也会保留。不过请注意,为了使永久性规则立即生效,您需要重新加载防火墙配置。--add-rich-rule="规则":这是用来添加一条富规则到firewalld的参数。富规则允许更复杂的条件和操作。
在引号内的部分定义了具体的规则:
rule family="ipv4":指定这条规则适用于IPv4协议。source address="192.168.48.101":规则只适用于源地址为192.168.48.101的流量。port protocol="tcp" port="8080":这条规则针对的是TCP协议,并且仅限于端口号为8080的连接。accept:这表示如果所有上述条件都满足,则接受(允许)该网络流量。
配置完之后重启firewalld
1 | systemctl restart firewalld |
这时候,原本web开启了防火墙之后,不管访问web地址还是nginx服务器都无法访问到我们的web
且nginx配置proxy_pass http://192.168.48.105:8080反向代理到web
但是,我们在web端配置了防火墙规则之后,让web同意接收来自nginx的192.168.48.101的请求,且自身开放8080端口,这样我们访问192.168.48.101(这是nginx的地址反向代理到了web)就可以访问web了
移除rich规则
1 | #这里的192.168.48.101是网关服务器(nginx)地址 |
查看所有规则
1 | firewall-cmd --list-all #所有开启的规则 |
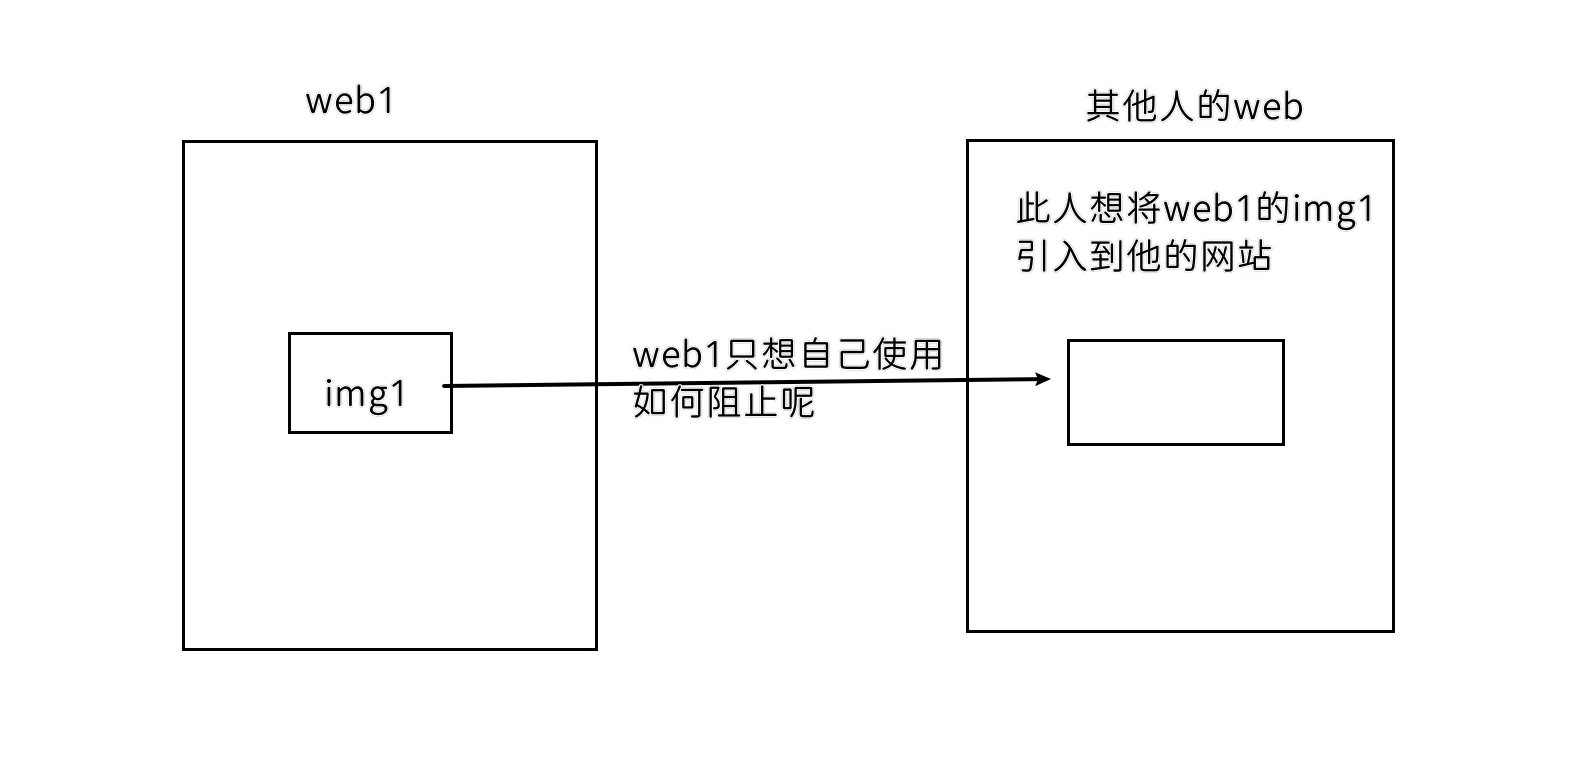
防盗链配置
当我们请求到一个页面后,这个页面一般会再去请求其中的静态资源,这时候请求头中,会有一个refer字段,表示当前这个请求的来源,我们可以限制指定来源的请求才返回,否则就不返回,这样可以节省资源
1 | valid_referers none|server_name |
设置有效的refer值
- none:不校验refer
- server_name:校验refer地址是否为server_name(server_name可以使用通配符)
注意: if ($invalid_referer)中if后有个空格,不写就会报错
1 | nginx: [emerg] unknown directive "if($invalid_referer)" in /usr/local/nginx/conf/nginx.conf:27 |
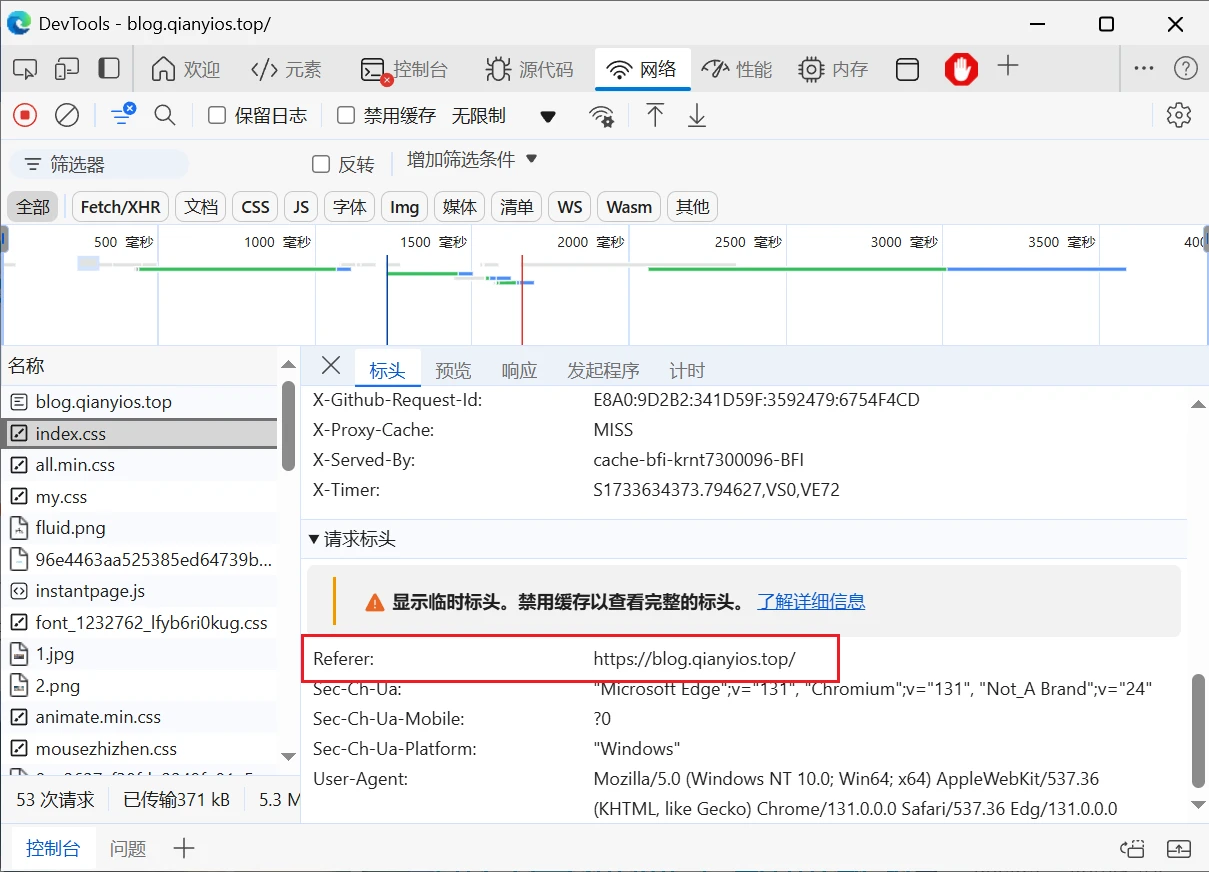
1.例子:这里设置nginx服务器中的img目录下的图片必须refer为https://blog.qianyios.top才能访问
1 | server { |
这样其他人,不管是引用图片到他自己web或者直接在地址栏输入直接访问都不行

如果可以开放直接在地址栏输入直接访问可以加none
1 | valid_referers none https://blog.qianyios.top/; |
2.直接跳转到自定义图片
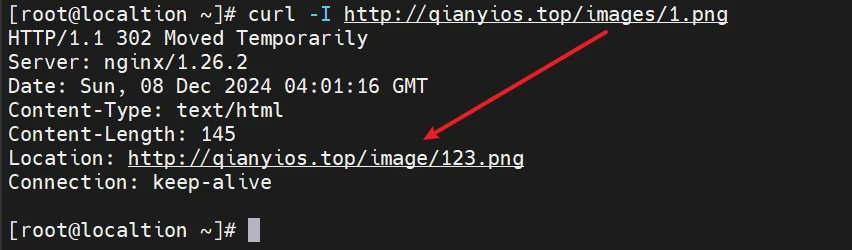
假设123.png是写有禁止盗取字样的图片
假设我的图片是http://qianyios.top/images/1.png
他会直接跳转到/var/www/image/123.png
1 | location ^~ /image/ { |
^/images/(.*)$ 匹配所有以 /images/ 开头的路径,并捕获后续部分(即 (.*))。
用curl工具进行访问
1 | http://qianyios.top/images/1.png |
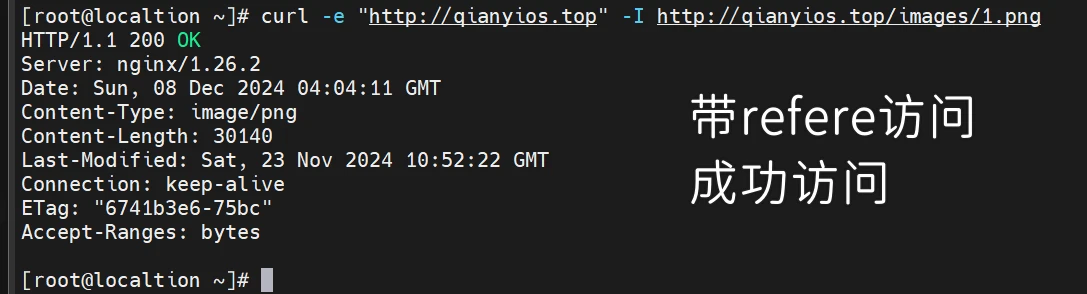
带引用的访问
1 | curl -e "http://qianyios.top" -I http://qianyios.top/images/1.png |
高可用配置
背景
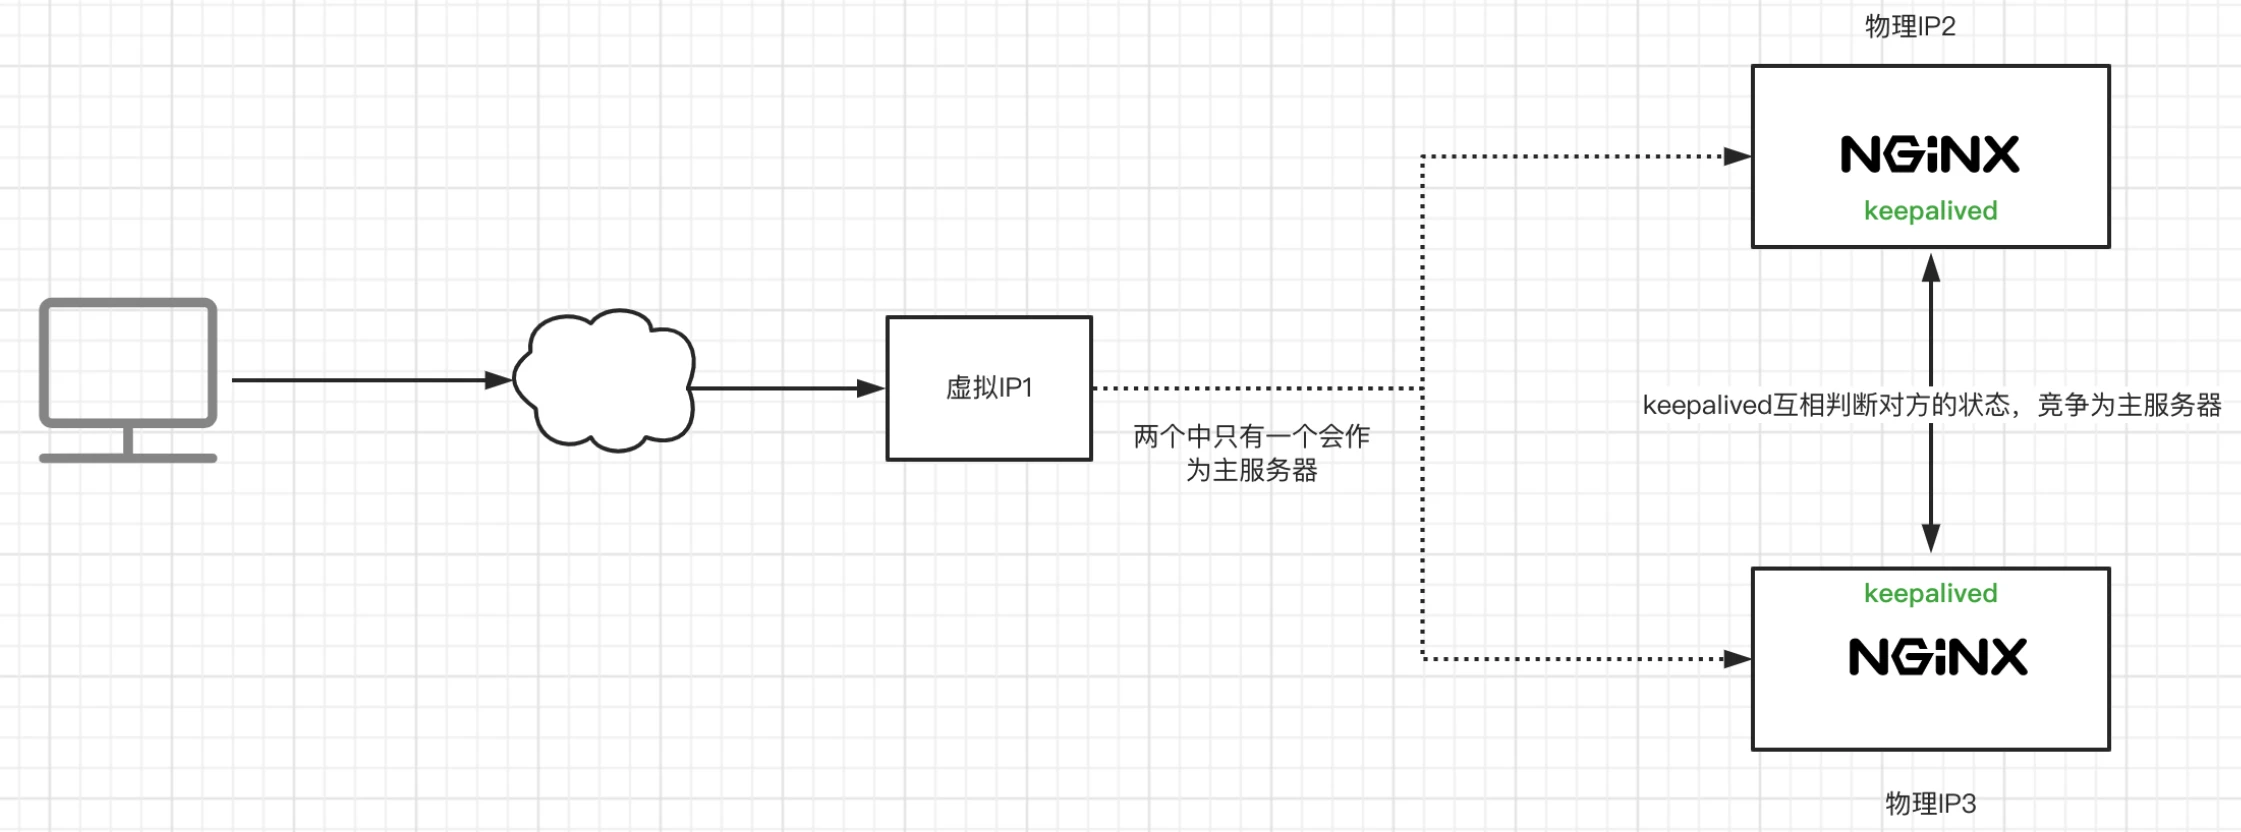
如下图,如果只有一个Nginx作为网关,一旦出现故障会导致全部服务不可用
高可用方案:
注意:Nginx主备机器配置要基本一致,如果配置相差较大,在切换时大量流量进入备用机,容易造成宕机
VRRP协议
keepalived是基于VRRP(Virtual Router Redundancy Protocol)协议的
VRRP可以将多个Nginx网关机器分为 master、backup两种类型,并生成一个VIP(虚拟IP:Virtual IP Address)
每台机器上的keepalived会相互通信,根据其他机器上的keepalived进程是否存在,判断服务器状态,如果默认的Master停止了,就会在剩下的Backup机器中,竞选出一台Nginx服务器作为Master
由Master服务器使用这个VIP,用户访问时,访问的是VIP
1 | yum install -y keepalived |
1 | #keepalived的配置文件 |
nginx1的配置
1 | ! Configuration File for keepalived |
authentication、virtual_router_id、virtual_ipaddress这几个一样的机器,才算是同一个组里。这个组才会选出一个作为Master机器
nginx2的配置
1 | ! Configuration File for keepalived |
配置完成后,重启keepalived就可以实现高可用
假设我访问192.168.48.200就会访问到竞争到master的服务器,然后master是个nginx网关,将流量负载到Tomcat,假设master节点挂了,vip就会跳转backup的ens160上,这样访问192.168.48.200就会访问到backup的服务器,当master恢复,那vip就会跳回到master。
这里有keepalived实验过程
可以看一下
难免会有出错的地方
如果细心的你发现了小失误,可以在下方评论区告诉我,或者私信我!
非常感谢大家的热烈支持!
 微信
微信 支付宝
支付宝