OpenStack-Train双节点部署
节点架构图(最小配置)
主机名
ip1(NAT)
ip2(仅主机)
硬盘
内存
controller-48
192.168.48.10
192.168.148.10
100G
8G
computer-48
192.168.48.20
192.168.148.20
100G
3G
双节点均采用CentOS-7-x86_64-DVD-2009.iso 英文最小化安装,安装过程不做解释
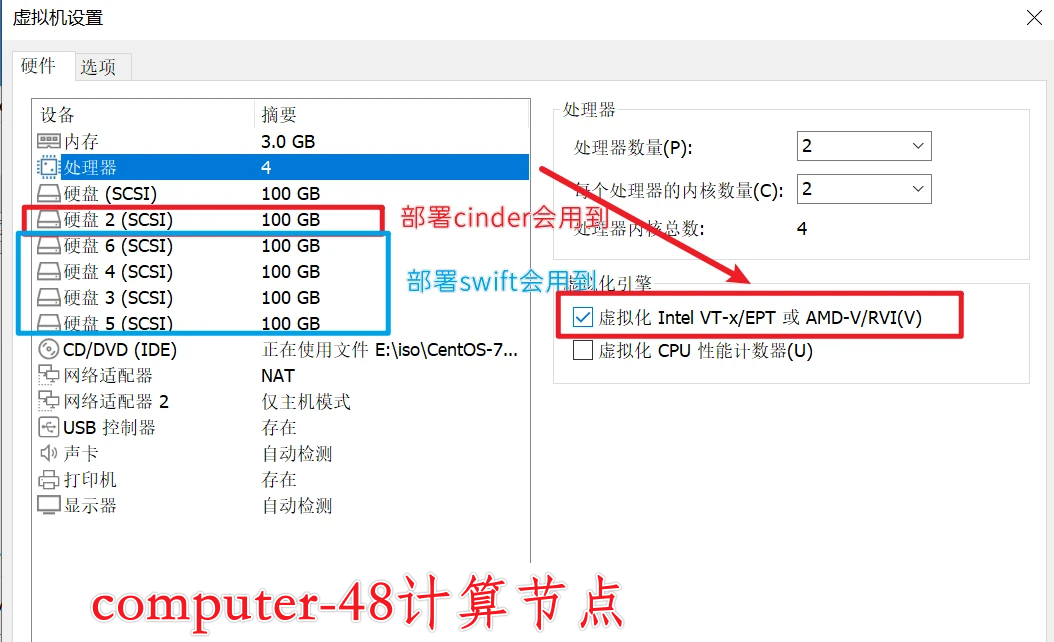
Computer-48需要特别注意加硬盘
computer-48需要勾选处理器虚拟化
网络设置
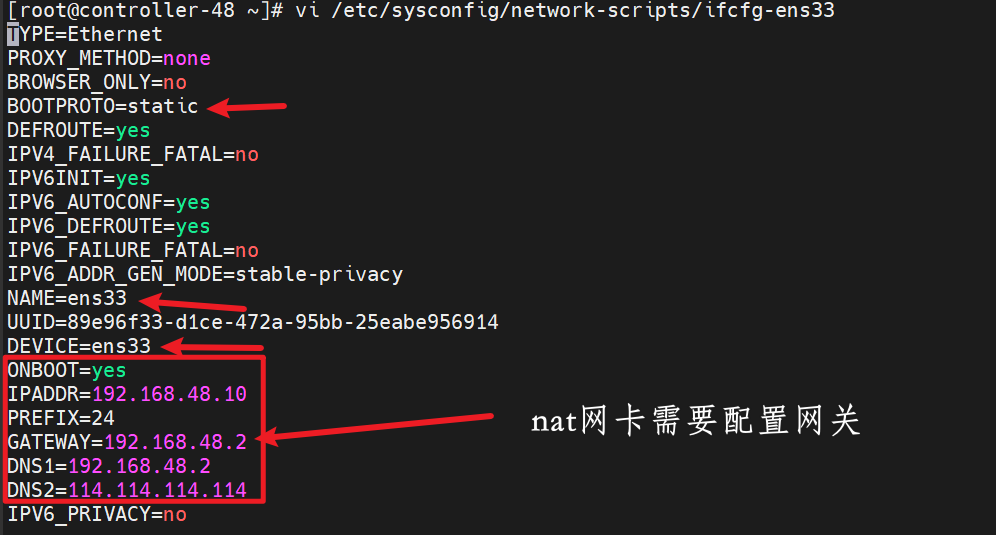
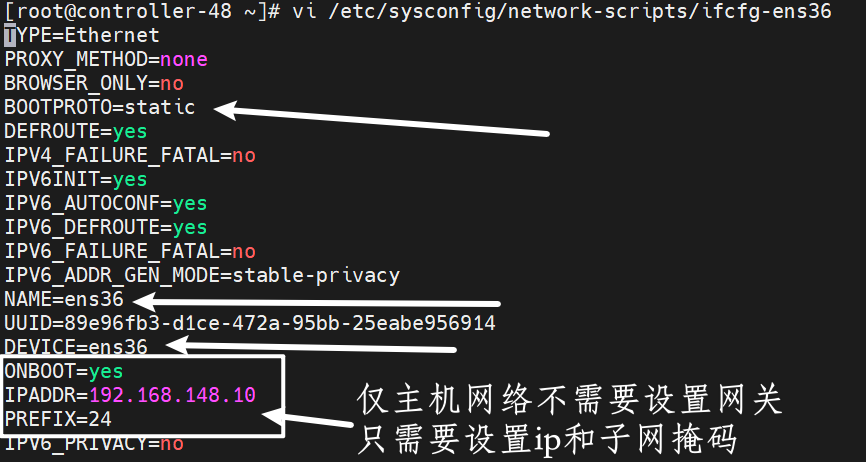
控制节点网络设置
ens33
ens36
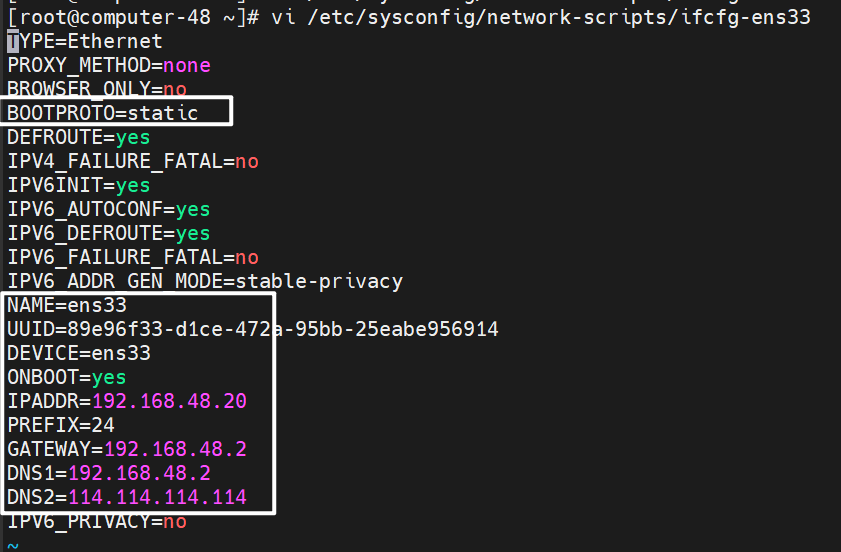
计算节点
原理和控制节点一样,第二张网卡不用设置网关
ens33
ens36
温馨提示(小贴士)
这里就说一下为什么第二张仅主机网卡不用设置网关,因为我们本意是通过NAT进行与外网做数据交换和获取外网资源可以连接互联网的,仅主机仅仅只是用于进行虚拟机内部资源的数据交换,不具备与外网连接的作用,是无法访问互联网的,如果两张网卡同时设置了网关,可能会造成无法访问openstack里创建的虚拟机无法访问互联网,或者本机无法访问互联网的情况,原因是默认路由可能会以仅主机网卡的网络进行与外网链接,但是没办法联网。所以请不要在第二块网卡设置网关
版本对照表
OpenStack 版本
CentOS 版本
Train 以及更早
7
Ussuri and Victoria
8
Wallaby 到 Yoga
Stream 8
安全性
基本用户信息
OpenStack 各组件都需要在控制节点数据库中注册专属账户以存放数据信息,故需要设置密码,强烈建议各组件的密码以及宿主机密码各不相同。
OpenStack 组件
密码
控制节点 root
123456
计算节点 root
123456
Metadata 元数据密钥
METADATA_SECRET
Mariadb root 账户
MARIADB_PASS
RabbitMQ 服务
RABBIT_PASS
OpenStack admin
ADMIN_PASS
Placement 服务
PLACEMENT_PASS
Keystone 数据库
KEYSTONE_DBPASS
Glance 服务
GLANCE_PASS
Glance 数据库
GLANCE_DBPASS
Nova 服务
NOVA_PASS
Nova 数据库
NOVA_DBPASS
Neutron 服务
NEUTRON_PASS
Neutron 数据库
NEUTRON_DBPASS
Cinder 服务
CINDER_PASS
Cinder 数据库
CINDER_DBPASS
Horizon 数据库
DASH_DBPASS
Swift服务
SWIFT_PASS
Heat服务
HEAT_PASS
Heat数据库服务
HEAT_DBPASS
heat_domain_admin用户
HEAT_DOMAIN_USER_PASS
身份验证
控制节点管理 OpenStack 服务时需要进行身份认证,可将认证信息导入到控制节点环境变量中,方便后续安装配置使用。admin-openrc.sh 文件需提前编写并放入控制节点中,后续安装将不再说明由来
1
2
3
4
5
6
7
8
9
10
11
12
13
14
15
16
17
18
19
20
21
22
23
24
25
26
27
28
29
30
31
cat >> admin-openrc.sh << EOF export OS_PROJECT_DOMAIN_NAME=Default export OS_USER_DOMAIN_NAME=Default export OS_PROJECT_NAME=admin export OS_USERNAME=admin export OS_PASSWORD=123456 export OS_AUTH_URL=http://controller-48:5000/v3 export OS_IDENTITY_API_VERSION=3 export OS_IMAGE_API_VERSION=2 EOF cat >> user_dog-openrc.sh << EOF export OS_USERNAME=user_dog export OS_PASSWORD=123456 export OS_PROJECT_NAME=Train export OS_USER_DOMAIN_NAME=RegionOne export OS_PROJECT_DOMAIN_NAME=RegionOne export OS_AUTH_URL=http://controller-48:5000/v3 export OS_IDENTITY_API_VERSION=3 export OS_IMAGE_API_VERSION=2 EOF # OS_USERNAME 登录 OpenStack 服务的用户名 # OS_PASSWORD 登录 OpenStack 服务的用户密码 # OS_PROJECT_NAME 登录时进入的项目名 # OS_USER_DOMAIN_NAME 登录时进入的域名 # OS_PROJECT_DOMAIN_NAME 登录时进入的项目域名 # OS_AUTH_URL 指定 Keystone(身份认证服务)的 URL # 如未部署 DNS 服务器,则需要在 hosts中指定 controller-48 映射,或将 controller-48 用控制节点 IP 替代 # OS_IDENTITY_API_VERSION 身份认证服务的 API 版本号 # OS_IMAGE_API_VERSION 镜像服务的 API 版本号
测试用户
用户
密码
admin
123456
use_dog
123456
物理节点关闭顺序
给每台机都加上两个脚本
1
2
3
4
5
6
7
8
9
10
11
12
13
14
15
16
17
18
19
20
21
22
23
24
25
26
27
28
29
30
31
32
33
34
35
36
37
38
39
40
41
42
43
44
45
46
47
48
49
50
51
52
53
54
55
56
57
58
59
60
61
62
63
64
65
66
67
68
69
70
71
72
73
74
75
76
77
78
79
80
81
82
83
84
85
86
87
88
89
90
91
cat >> stop.sh << EOF #!/bin/bash # 关闭所有 OpenStack 节点 # 依次关闭计算节点、网络节点、控制节点 for server in \$(openstack server list -f value -c ID); do openstack server stop \$server done # 关闭计算节点 echo "Stopping compute services..." systemctl stop openstack-nova-compute.service systemctl stop libvirtd.service # 关闭网络节点 echo "Stopping network services..." systemctl stop openvswitch.service systemctl stop neutron-server.service systemctl stop neutron-linuxbridge-agent.service systemctl stop neutron-dhcp-agent.service systemctl stop neutron-metadata-agent.service systemctl stop neutron-l3-agent.service # 关闭控制节点 echo "Stopping control services..." systemctl stop mariadb.service systemctl stop rabbitmq-server.service systemctl stop memcached.service systemctl stop httpd.service systemctl stop openstack-glance-api.service systemctl stop openstack-glance-registry.service systemctl stop openstack-cinder-api.service systemctl stop openstack-cinder-scheduler.service systemctl stop openstack-cinder-volume.service systemctl stop openstack-nova-api.service systemctl stop openstack-nova-scheduler.service systemctl stop openstack-nova-conductor.service systemctl stop openstack-nova-novncproxy.service systemctl stop openstack-nova-consoleauth.service systemctl stop openstack-keystone.service systemctl stop openstack-heat-api.service systemctl stop openstack-heat-api-cfn.service systemctl stop openstack-heat-engine.service systemctl stop openstack-swift-proxy.service systemctl stop openstack-swift-account.service systemctl stop openstack-swift-container.service systemctl stop openstack-swift-object.service echo "Stopping all services..." systemctl stop --all # 关闭电源 echo "Shutting down the system..." poweroff EOF cat >> start.sh << EOF #!/bin/bash # 重新启动 OpenStack 服务 # 依次启动控制节点、网络节点、计算节点 # 启动控制节点 echo "Starting control services..." systemctl start mariadb.service systemctl start rabbitmq-server.service systemctl start memcached.service systemctl start httpd.service systemctl start openstack-glance-api.service systemctl start openstack-glance-registry.service systemctl start openstack-cinder-api.service systemctl start openstack-cinder-scheduler.service systemctl start openstack-cinder-volume.service systemctl start openstack-nova-api.service systemctl start openstack-nova-scheduler.service systemctl start openstack-nova-conductor.service systemctl start openstack-nova-novncproxy.service systemctl start openstack-nova-consoleauth.service systemctl start openstack-keystone.service systemctl start openstack-heat-api.service systemctl start openstack-heat-api-cfn.service systemctl start openstack-heat-engine.service systemctl start openstack-swift-proxy.service systemctl start openstack-swift-account.service systemctl start openstack-swift-container.service systemctl start openstack-swift-object.service # 启动网络节点 echo "Starting network services..." systemctl start openvswitch.service systemctl start neutron-server.service systemctl start neutron-linuxbridge-agent.service systemctl start neutron-dhcp-agent.service systemctl start neutron-metadata-agent.service systemctl start neutron-l3-agent.service # 启动计算节点 echo "Starting compute services..." systemctl start libvirtd.service systemctl start openstack-nova-compute.service EOF
(先给两个计算节点执行-最后等计算节点完全关闭,再给控制节点执行)
1
2
3
关闭物理机的时候运行 sh stop.sh (运行的时候可能会提示你有些服务找不到,报错,这个没关系,一般情况下是没问题的
物理节点开启顺序
先给controller-48运行start.sh再给计算节点运行start.sh
sh start.sh
基础环境
修改主机名和防火墙
controller-48节点
1
2
3
4
5
6
7
8
hostnamectl set-hostname controller-48 && bash systemctl disable firewalld --now sed -i 's/SELINUX=enforcing/SELINUX=disabled/g' /etc/sysconfig/selinux sed -i 's/SELINUX=enforcing/SELINUX=disabled/g' /etc/selinux/config echo "192.168.48.10 controller-48" >> /etc/hosts echo "192.168.48.20 computer-48" >> /etc/hosts setenforce 0 reboot
computer-48节点
1
2
3
4
5
6
7
8
hostnamectl set-hostname computer-48 && bash systemctl disable firewalld --now sed -i 's/SELINUX=enforcing/SELINUX=disabled/g' /etc/sysconfig/selinux sed -i 's/SELINUX=enforcing/SELINUX=disabled/g' /etc/selinux/config echo "192.168.48.10 controller-48" >> /etc/hosts echo "192.168.48.20 computer-48" >> /etc/hosts setenforce 0 reboot
修改yum
controller-48和computer-48节点
1
2
3
4
5
6
7
8
9
10
11
12
rm -rf /etc/yum.repos.d/* curl -o /etc/yum.repos.d/epel.repo http://mirrors.aliyun.com/repo/epel-7.repo curl -o /etc/yum.repos.d/CentOS-Base.repo http://mirrors.aliyun.com/repo/Centos-7.repo cat >>/etc/yum.repos.d/openstack.repo<<EOF [openstack] name=openstack baseurl=https://mirrors.aliyun.com/centos/7/cloud/x86_64/openstack-train/ gpgcheck=0 enabled=1 EOF yum clean all && yum makecache yum update -y
SSH免密
1
2
3
4
5
6
7
8
9
10
11
12
13
14
15
16
17
18
19
20
21
22
23
#各节点 yum install -y sshpass cat > sshmianmi.sh << "EOF" #!/bin/bash # 目标主机列表 hosts=("controller-48" "computer-48") # 密码(注意修改) password="123456" # 生成 SSH 密钥对 ssh-keygen -t rsa -N "" -f ~/.ssh/id_rsa # 循环遍历目标主机 for host in "${hosts[@]}" do # 复制公钥到目标主机 sshpass -p "$password" ssh-copy-id -o StrictHostKeyChecking=no "$host" # 验证免密登录 sshpass -p "$password" ssh -o StrictHostKeyChecking=no "$host" "echo '免密登录成功'" done EOF sh sshmianmi.sh
安装OpenStack包
1
2
3
#各节点 yum -y install openstack-utils openstack-selinux python-openstackclient yum upgrade
依赖组件
四个组件安装在controller-48节点上
Mariadb数据库
1
2
3
4
5
6
7
8
9
10
11
12
13
14
15
16
17
18
19
20
21
yum install mariadb mariadb-server python2-PyMySQL -y cat >>/etc/my.cnf.d/openstack.cnf<<EOF [mysqld] bind-address =192.168.48.10 default-storage-engine = innodb innodb_file_per_table = on max_connections =4096 collation-server = utf8_general_ci character-set-server = utf8 EOF systemctl enable mariadb --now mysql_secure_installation Enter current password for root (enter for none): 回车 Set root password? [Y/n] y # 将要求输入数据库 root 账户密码 MARIADB_PASS Remove anonymous users? [Y/n] y Disallow root login remotely? [Y/n] n Remove test database and access to it? [Y/n] y Reload privilege tables now? [Y/n] y # 验证 mysql -u root -pMARIADB_PASS
Rabbitmq
1
2
3
4
5
yum install rabbitmq-server -y systemctl enable rabbitmq-server --now rabbitmqctl add_user openstack RABBIT_PASS # 注意将 RABBIT_PASS 修改为 Rabbitmq消息队列密码 rabbitmqctl set_permissions openstack ".*" ".*" ".*"
Memcached
1
2
3
yum install memcached python-memcached -y sed -i "s/OPTIONS=\"-l 127.0.0.1,::1\"/OPTIONS=\"-l 127.0.0.1,::1,controller-48\"/g" /etc/sysconfig/memcached systemctl enable memcached --now
注意这里的-l 127.0.0.1,::1,controller-48中controller-48是你的主机名,后续不做解释
etcd
1
2
3
4
5
6
7
8
9
10
11
12
13
14
15
16
17
yum install -y etcd mv /etc/etcd/etcd.conf{,.bak} cat >> /etc/etcd/etcd.conf << EOF #[Member] ETCD_DATA_DIR="/var/lib/etcd/default.etcd" ETCD_LISTEN_PEER_URLS="http://192.168.48.10:2380" ETCD_LISTEN_CLIENT_URLS="http://192.168.48.10:2379" ETCD_NAME="controller-48" #controller-48是你的主机名 #[Clustering] ETCD_INITIAL_ADVERTISE_PEER_URLS="http://192.168.48.10:2380" ETCD_ADVERTISE_CLIENT_URLS="http://192.168.48.10:2379" ETCD_INITIAL_CLUSTER="controller-48=http://192.168.48.10:2380" ETCD_INITIAL_CLUSTER_TOKEN="etcd-cluster-01" ETCD_INITIAL_CLUSTER_STATE="new" EOF systemctl enable etcd --now
Keystone(身份验证服务)
1
2
3
4
5
6
7
8
9
10
11
12
13
14
15
16
17
18
19
20
21
22
23
24
25
26
27
28
29
30
31
32
33
34
35
36
37
38
39
40
41
42
43
44
45
46
47
48
49
50
51
52
53
54
55
56
57
58
59
60
61
62
63
64
65
66
67
68
69
70
71
72
73
74
75
76
77
78
79
80
81
82
83
#controller-48节点 mysql -u root -pMARIADB_PASS CREATE DATABASE keystone; GRANT ALL PRIVILEGES ON keystone.* TO 'keystone'@'localhost' IDENTIFIED BY 'KEYSTONE_DBPASS'; GRANT ALL PRIVILEGES ON keystone.* TO 'keystone'@'%' IDENTIFIED BY 'KEYSTONE_DBPASS'; flush privileges; exit # KEYSTONE_DBPASS 为 Keystone 数据库密码 yum -y install yum-utils yum -y install qpid-proton-c-0.26.0-2.el7.x86_64 yum install -y openstack-keystone httpd mod_wsgi mv /etc/keystone/keystone.conf{,.bak} cat>> /etc/keystone/keystone.conf << EOF [database] connection = mysql+pymysql://keystone:KEYSTONE_DBPASS@controller-48/keystone [token] provider = fernet EOF #同步服务器 su -s /bin/sh -c "keystone-manage db_sync" keystone #查看是否成功 mysql -u keystone -p"KEYSTONE_DBPASS" use keystone; show tables; exit #有表就行 #配置 keystone-manage fernet_setup --keystone-user keystone --keystone-group keystone keystone-manage credential_setup --keystone-user keystone --keystone-group keystone keystone-manage bootstrap --bootstrap-password 123456 \ --bootstrap-admin-url http://controller-48:5000/v3/ \ --bootstrap-internal-url http://controller-48:5000/v3/ \ --bootstrap-public-url http://controller-48:5000/v3/ \ --bootstrap-region-id RegionOne # 123456 为 admin 账户密码 cp /etc/httpd/conf/httpd.conf{,.bak} sed -i "s/#ServerName www.example.com:80/ServerName controller-48/g" /etc/httpd/conf/httpd.conf ln -s /usr/share/keystone/wsgi-keystone.conf /etc/httpd/conf.d/ systemctl enable httpd --now #创建域、项目、用户、角色 source admin-openrc.sh # service 项目 创建在 default 用于 OpenStack 服务 openstack project create --domain default \ --description "Service Project" service # 创建一个 RegionOne 域名作为后续云实例创建域名 openstack domain create --description "RegionOne Domain" RegionOne # 在 RegionOne 域中创建一个 Train 项目 openstack project create --domain RegionOne \ --description "Train Project" Train # 在 RegionOne 域中创建普通用户 user_dog openstack user create --domain RegionOne \ --password 123456 user_dog # 创建普通用户 user_dog 的规则 user_dog_role openstack role create user_dog_role # 将规则与用户绑定 openstack role add --project Train --user user_dog user_dog_role # 注:可以重复上边步骤以创建更多项目、用户及规则 # 验证服务可用性 # 卸载 admin 用户的环境 unset OS_AUTH_URL OS_PASSWORD # 验证 admin 用户可用性 openstack --os-auth-url http://controller-48:5000/v3 \ --os-project-domain-name Default --os-user-domain-name Default --os-project-name admin --os-username admin token issue # 输入后将要求输入 管理员 admin 的密码 # 返回 token 信息则服务正常 # 验证 user_dog 用户可用性 openstack --os-auth-url http://controller-48:5000/v3 \ --os-project-domain-name RegionOne --os-user-domain-name RegionOne --os-project-name Train --os-username user_dog token issue source admin-openrc.sh # 列举当前所有域名 openstack domain list +----------------------------------+-----------+---------+--------------------+ | ID | Name | Enabled | Description | +----------------------------------+-----------+---------+--------------------+ | 7fcb64a8c47f40a48265a9db94f0c963 | RegionOne | True | RegionOne Domain | | default | Default | True | The default domain | +----------------------------------+-----------+---------+--------------------+
Glance(镜像服务)
1
2
3
4
5
6
7
8
9
10
11
12
13
14
15
16
17
18
19
20
21
22
23
24
25
26
27
28
29
30
31
32
33
34
35
36
37
38
39
40
41
42
43
44
45
46
47
48
49
50
51
52
53
54
55
56
57
58
59
60
61
62
63
64
65
66
67
68
69
70
71
72
73
74
75
76
77
78
79
80
81
82
#控制节点 mysql -u root -pMARIADB_PASS CREATE DATABASE glance; GRANT ALL PRIVILEGES ON glance.* TO 'glance'@'localhost' \ IDENTIFIED BY 'GLANCE_DBPASS'; GRANT ALL PRIVILEGES ON glance.* TO 'glance'@'%' \ IDENTIFIED BY 'GLANCE_DBPASS'; flush privileges; exit #将 GLANCE_DBPASS 替换为 glance数据库服务的密码 source admin-openrc.sh #创建用户服务和api端点 openstack user create --domain default --password GLANCE_PASS glance #GLANCE_PASS 为 glance 服务的密码 # 为 Glance 用户添加 admin 规则到系统项目 service openstack role add --project service --user glance admin # 没有输出内容 # 为 Glance 添加管理镜像的服务 openstack service create --name glance \ --description "OpenStack Image" image # 为 RegionOne 域名添加服务接口 openstack endpoint create --region RegionOne \ image public http://controller-48:9292 openstack endpoint create --region RegionOne \ image internal http://controller-48:9292 openstack endpoint create --region RegionOne \ image admin http://controller-48:9292 #安装glance服务 yum install openstack-glance -y mv /etc/glance/glance-api.conf{,.bak} cat >>/etc/glance/glance-api.conf << EOF [DEFAULT] use_keystone_quotas = True log_file = /var/log/glance/glance.log [database] connection = mysql+pymysql://glance:GLANCE_DBPASS@controller-48/glance # GLANCE_DBPASS 为 Glance 服务的数据库账户密码 [keystone_authtoken] www_authenticate_uri = http://controller-48:5000 auth_url = http://controller-48:5000 memcached_servers = controller-48:11211 auth_type = password project_domain_name = Default user_domain_name = Default project_name = service username = glance password = GLANCE_PASS service_token_roles_required = true # GLANCE_PASS 为 Glance 服务的数据库账户密码 [paste_deploy] flavor = keystone [glance_store] stores = file,http default_store = file default_backend = {'store_one': 'http', 'store_two': 'file'} filesystem_store_datadir = /var/lib/glance/images/ EOF # 同步 Glance 数据到数据库 su -s /bin/sh -c "glance-manage db_sync" glance systemctl enable openstack-glance-api --now # 验证服务可用性 source admin-openrc.sh wget https://download.cirros-cloud.net/0.3.3/cirros-0.3.3-x86_64-disk.img #可能会拉取失败,可以自行复制网址,去浏览器下载,然后上传到/root/目录下 glance image-create --name "cirros" \ --file cirros-0.3.3-x86_64-disk.img \ --disk-format qcow2 --container-format bare \ --visibility=public openstack image list # +--------------------------------------+--------+--------+ # | ID | Name | Status | # +--------------------------------------+--------+--------+ # | 4e022193-03c2-40c4-872f-0adb606f31e4 | cirros | active | # +--------------------------------------+--------+--------+
Placement(资源调度)
1
2
3
4
5
6
7
8
9
10
11
12
13
14
15
16
17
18
19
20
21
22
23
24
25
26
27
28
29
30
31
32
33
34
35
36
37
38
39
40
41
42
43
44
45
46
47
48
49
50
51
52
53
54
55
56
57
58
59
60
61
62
63
64
65
66
67
68
69
70
71
72
73
74
75
76
77
78
mysql -u root -pMARIADB_PASS CREATE DATABASE placement; GRANT ALL PRIVILEGES ON placement.* TO 'placement'@'localhost' IDENTIFIED BY 'PLACEMENT_DBPASS'; GRANT ALL PRIVILEGES ON placement.* TO 'placement'@'%' IDENTIFIED BY 'PLACEMENT_DBPASS'; flush privileges; exit #PLACEMENT_DBPASS 为 placement 服务的密码 source admin-openrc.sh openstack user create --domain default --password PLACEMENT_PASS placement openstack role add --project service --user placement admin openstack service create --name placement \ --description "Placement API" placement openstack endpoint create --region RegionOne \ placement public http://controller-48:8778 openstack endpoint create --region RegionOne \ placement internal http://controller-48:8778 openstack endpoint create --region RegionOne \ placement admin http://controller-48:8778 yum install openstack-placement-api -y mv /etc/placement/placement.conf{,.bak} cat >> /etc/placement/placement.conf << EOF [placement_database] connection = mysql+pymysql://placement:PLACEMENT_DBPASS@controller-48/placement # PLACEMENT_DBPASS 为 placement 服务的数据库账户密码 [api] auth_strategy = keystone [keystone_authtoken] auth_url = http://controller-48:5000/v3 memcached_servers = controller-48:11211 auth_type = password project_domain_name = Default user_domain_name = Default project_name = service username = placement password = PLACEMENT_PASS # PLACEMENT_PASS 为 placement 服务的密码 EOF #同步数据库 su -s /bin/sh -c "placement-manage db sync" placement cp /etc/httpd/conf.d/00-placement-api.conf{,.bak} cat >> /etc/httpd/conf.d/00-placement-api.conf << EOF #在#SSLCertificateKeyFile ...下添加 <Directory /usr/bin> <IfVersion >= 2.4> Require all granted </IfVersion> <IfVersion < 2.4> Order allow,deny Allow from all </IfVersion> </Directory> EOF systemctl restart httpd # 验证服务 source admin-openrc.sh placement-status upgrade check #安装pip osc组件验证资源 yum install python-pip -y pip install osc-placement==2.2.0 systemctl restart httpd # 验证 openstack --os-placement-api-version 1.2 resource class list --sort-column name # +----------------------------------------+ # | name | # +----------------------------------------+ # | DISK_GB | ...... openstack --os-placement-api-version 1.6 trait list --sort-column name # +---------------------------------------+ # | name | # +---------------------------------------+ # | computer-48_ACCELERATORS | # | computer-48_ARCH_AARCH64 | # ...
Nova(计算服务)
控制节点
1
2
3
4
5
6
7
8
9
10
11
12
13
14
15
16
17
18
19
20
21
22
23
24
25
26
27
28
29
30
31
32
33
34
35
36
37
38
39
40
41
42
43
44
45
46
47
48
49
50
51
52
53
54
55
56
57
58
59
60
61
62
63
64
65
66
67
68
69
70
71
72
73
74
75
76
77
78
79
80
81
82
83
84
85
86
87
88
89
90
91
92
93
94
95
96
97
98
99
100
101
102
103
104
105
106
107
108
109
#控制节点controller-48 mysql -u root -pMARIADB_PASS CREATE DATABASE nova_api; CREATE DATABASE nova; CREATE DATABASE nova_cell0; GRANT ALL PRIVILEGES ON nova_api.* TO 'nova'@'localhost' \ IDENTIFIED BY 'NOVA_DBPASS'; GRANT ALL PRIVILEGES ON nova_api.* TO 'nova'@'%' \ IDENTIFIED BY 'NOVA_DBPASS'; GRANT ALL PRIVILEGES ON nova.* TO 'nova'@'localhost' \ IDENTIFIED BY 'NOVA_DBPASS'; GRANT ALL PRIVILEGES ON nova.* TO 'nova'@'%' \ IDENTIFIED BY 'NOVA_DBPASS'; GRANT ALL PRIVILEGES ON nova_cell0.* TO 'nova'@'localhost' \ IDENTIFIED BY 'NOVA_DBPASS'; GRANT ALL PRIVILEGES ON nova_cell0.* TO 'nova'@'%' \ IDENTIFIED BY 'NOVA_DBPASS'; flush privileges; exit # NOVA_DBPASS 为 nova 服务的密码 source admin-openrc.sh openstack user create --domain default --password NOVA_PASS nova openstack role add --project service --user nova admin openstack service create --name nova \ --description "OpenStack Compute" compute openstack endpoint create --region RegionOne \ compute public http://controller-48:8774/v2.1 openstack endpoint create --region RegionOne \ compute internal http://controller-48:8774/v2.1 openstack endpoint create --region RegionOne \ compute admin http://controller-48:8774/v2.1 mv /etc/yum.repos.d/epel.repo{,.bak} yum install -y \ openstack-nova-api \ openstack-nova-scheduler \ openstack-nova-conductor \ openstack-nova-novncproxy mv /etc/yum.repos.d/epel.repo{.bak,} mv /etc/nova/nova.conf{,.bak} cat >> /etc/nova/nova.conf <<EOF [DEFAULT] enabled_apis = osapi_compute,metadata transport_url = rabbit://openstack:RABBIT_PASS@controller-48:5672/ # RABBIT_PASS为 rabbitmq 密码 my_ip = 192.168.48.10 # 控制节点控制网络的 IP log_file = /var/log/nova/nova-controller.log rootwrap_config = /etc/nova/rootwrap.conf [api_database] connection = mysql+pymysql://nova:NOVA_DBPASS@controller-48/nova_api # NOVA_DBPASS 为数据库 Nova 账户密码 [database] connection = mysql+pymysql://nova:NOVA_DBPASS@controller-48/nova # NOVA_DBPASS 为数据库 Nova 账户密码 [api] auth_strategy = keystone [keystone_authtoken] www_authenticate_uri = http://controller-48:5000/ auth_url = http://controller-48:5000/ memcached_servers = controller-48:11211 auth_type = password project_domain_name = Default user_domain_name = Default project_name = service username = nova password =NOVA_PASS # NOVA_PASS 为 Nova 服务的密码 [vnc] enabled = true server_listen = \$my_ip server_proxyclient_address = \$my_ip [glance] api_servers = http://controller-48:9292 [oslo_concurrency] lock_path = /var/run/nova [placement] region_name = RegionOne project_domain_name = Default project_name = service auth_type = password user_domain_name = Default auth_url = http://controller-48:5000/v3 username = placement password = PLACEMENT_PASS # PLACEMENT_PASS 为 placement 服务的密码 EOF su -s /bin/sh -c "nova-manage api_db sync" nova su -s /bin/sh -c "nova-manage cell_v2 map_cell0" nova su -s /bin/sh -c "nova-manage cell_v2 create_cell --name=cell1 --verbose" nova su -s /bin/sh -c "nova-manage db sync" nova # 验证 su -s /bin/sh -c "nova-manage cell_v2 list_cells" nova systemctl enable --now \ openstack-nova-api.service \ openstack-nova-scheduler.service \ openstack-nova-conductor.service \ openstack-nova-novncproxy.service systemctl status \ openstack-nova-api.service \ openstack-nova-scheduler.service \ openstack-nova-conductor.service \ openstack-nova-novncproxy.service
计算节点
1
2
3
4
5
6
7
8
9
10
11
12
13
14
15
16
17
18
19
20
21
22
23
24
25
26
27
28
29
30
31
32
33
34
35
36
37
38
39
40
41
42
43
44
45
46
47
48
49
50
51
52
53
54
55
56
57
58
59
60
61
62
63
64
65
66
67
68
69
70
71
72
73
74
75
76
77
##computer-48计算节点 cat >>/etc/yum.repos.d/CentOS-Base.repo<<EOF [Virt] name=CentOS-\$releasever - Base baseurl=http://mirrors.aliyun.com/centos/7.9.2009/virt/x86_64/kvm-common/ gpgcheck=0 gpgkey=file:///etc/pki/rpm-gpg/RPM-GPG-KEY-CentOS-7 EOF yum install qpid-proton-c-0.26.0-2.el7.x86_64 -y yum install openstack-nova-compute -y mv /etc/nova/nova.conf{,.bak} cat >> /etc/nova/nova.conf <<EOF [DEFAULT] enabled_apis = osapi_compute,metadata transport_url = rabbit://openstack:RABBIT_PASS@controller-48 my_ip = 192.168.48.20 compute_driver=libvirt.LibvirtDriver log_file = /var/log/nova/nova-compute.log # 192.168.48.20替换为 计算节点管理网络 IP 地址 [api] auth_strategy = keystone [keystone_authtoken] www_authenticate_uri = http://controller-48:5000/ auth_url = http://controller-48:5000/ memcached_servers = controller-48:11211 auth_type = password project_domain_name = Default user_domain_name = Default project_name = service username = nova password = NOVA_PASS #NOVA_PASS为nova服务密码 [vnc] enabled = true server_listen = 0.0.0.0 server_proxyclient_address = \$my_ip novncproxy_base_url = http://192.168.48.10:6080/vnc_auto.html # 将 192.168.48.10修改为控制节点管理网络 IP [glance] api_servers = http://controller-48:9292 [oslo_concurrency] lock_path = /var/lib/nova/tmp [placement] region_name = RegionOne project_domain_name = Default project_name = service auth_type = password user_domain_name = Default auth_url = http://controller-48:5000/v3 username = placement password = PLACEMENT_PASS #PLACEMENT_PASS 为 Placement 服务密码 [neutron] auth_url = http://controller-48:5000 auth_type = password project_domain_name = default user_domain_name = default region_name = RegionOne project_name = service username = neutron password = NEUTRON_PASS # NEUTRON_PASS 为 Neutron 服务密码 EOF egrep -c '(vmx|svm)' /proc/cpuinfo --------------------------------------------------------------------------------- # 如果返回值大于 1 则说明已经开启硬件虚拟化,无需配置 qemu # 如等于 0 ,则需要配置 qemu 以代替默认的 kvm vi /etc/nova/nova.conf [libvirt] # ... virt_type = qemu # 以上配置仅当 egrep -c '(vmx|svm)' /proc/cpuinfo 结果为 0 时才进行配置 --------------------------------------------------------------------------------- systemctl enable libvirtd.service openstack-nova-compute.service --now systemctl status libvirtd.service openstack-nova-compute.service
控制节点验证
1
2
3
4
5
6
7
8
9
10
11
12
13
14
15
16
17
18
19
20
21
22
23
24
25
26
27
28
29
30
31
32
33
34
35
36
37
38
39
40
41
42
43
44
45
46
47
48
49
50
51
52
53
54
55
56
57
58
59
60
61
62
63
64
65
66
67
68
69
70
71
72
73
74
75
76
77
78
79
80
81
82
83
84
85
86
87
88
89
90
91
92
93
94
95
96
97
98
99
100
101
102
103
104
105
106
107
108
# 在控制节点执行验证 source admin-openrc.sh openstack compute service list --service nova-compute +----+--------------+----------+------+---------+-------+----------------------------+ | ID | Binary | Host | Zone | Status | State | Updated At | +----+--------------+----------+------+---------+-------+----------------------------+ | 10 | nova-computer | computer-48 | nova | enabled | up | 2023-04-02T17:17:08.000000 | +----+--------------+----------+------+---------+-------+----------------------------+ # 在控制节点执行验证 su -s /bin/sh -c "nova-manage cell_v2 discover_hosts --verbose" nova #### Found 2 cell mappings. Skipping cell0 since it does not contain hosts. Getting computer-48s from cell 'cell1': 89e02b18-2a3c-437a-8dd5-15deb98676a4 Checking host mapping for computer-48 host 'computer-48r-48': e862bd61-8f56-4d3a-a2b2-21ab7db90ede Creating host mapping for computer-48 host 'computer-48r-48': e862bd61-8f56-4d3a-a2b2-21ab7db90ede Found 1 unmapped computer-48s in cell: 89e02b18-2a3c-437a-8dd5-15deb98676a4 openstack compute service list [root@controller-48 ~]# openstack compute service list +----+----------------+---------------+----------+---------+-------+----------------------------+ | ID | Binary | Host | Zone | Status | State | Updated At | +----+----------------+---------------+----------+---------+-------+----------------------------+ | 1 | nova-conductor | controller-48 | internal | enabled | up | 2023-05-27T17:44:38.000000 | | 4 | nova-scheduler | controller-48 | internal | enabled | up | 2023-05-27T17:44:40.000000 | | 5 | nova-compute | computer-48 | nova | enabled | up | 2023-05-27T17:44:43.000000 | +----+----------------+---------------+----------+---------+-------+----------------------------+ openstack catalog list +-----------+-----------+----------------------------------------------------------------------+ | Name | Type | Endpoints | +-----------+-----------+----------------------------------------------------------------------+ | placement | placement | RegionOne | | | | internal: http://controller-48:8778 | | | | RegionOne | | | | admin: http://controller-48:8778 | | | | RegionOne | | | | public: http://controller-48:8778 | | | | | | keystone | identity | RegionOne | | | | admin: http://controller-48:5000/v3/ | | | | RegionOne | | | | internal: http://controller-48:5000/v3/ | | | | RegionOne | | | | public: http://controller-48:5000/v3/ | | | | | | neutron | network | RegionOne | | | | public: http://controller-48:9696 | | | | RegionOne | | | | internal: http://controller-48:9696 | | | | RegionOne | | | | admin: http://controller-48:9696 | | | | | | glance | image | RegionOne | | | | admin: http://controller-48:9292 | | | | RegionOne | | | | internal: http://controller-48:9292 | | | | RegionOne | | | | public: http://controller-48:9292 | | | | | | nova | computer-48 | RegionOne | | | | admin: http://controller-48:8774/v2.1 | | | | RegionOne | | | | internal: http://controller-48:8774/v2.1 | | | | RegionOne | | | | public: http://controller-48:8774/v2.1 | | | | | | | | | +-----------+-----------+----------------------------------------------------------------------+ openstack image list +--------------------------------------+--------+--------+ | ID | Name | Status | +--------------------------------------+--------+--------+ | 4e022193-03c2-40c4-872f-0adb606f31e4 | cirros | active | +--------------------------------------+--------+--------+ nova-status upgrade check [root@controller-48 ~]# nova-status upgrade check +--------------------------------+ | Upgrade Check Results | +--------------------------------+ | Check: Cells v2 | | Result: Success | | Details: None | +--------------------------------+ | Check: Placement API | | Result: Success | | Details: None | +--------------------------------+ | Check: Ironic Flavor Migration | | Result: Success | | Details: None | +--------------------------------+ | Check: Cinder API | | Result: Success | | Details: None | +--------------------------------+ #在控制节点修改自动注册nova-computer-48节点 cat >> /etc/nova/nova.conf << EOF [scheduler] discover_hosts_in_cells_interval = 300 EOF
Neutron(网络服务)
控制节点
1
2
3
4
5
6
7
8
9
10
11
12
13
14
15
16
17
18
19
20
21
22
23
24
25
26
27
28
29
30
31
32
33
34
35
36
37
38
39
40
41
42
43
44
45
46
47
48
49
50
51
52
53
54
55
56
57
58
59
60
61
62
63
64
65
66
67
68
69
70
71
72
73
74
75
76
77
78
79
80
81
82
83
84
85
86
87
88
89
90
91
92
93
94
95
96
97
98
99
100
101
102
103
104
105
106
107
108
109
110
111
112
113
114
115
116
117
118
119
120
121
122
123
124
125
126
127
128
129
130
131
132
133
134
135
136
137
138
139
140
141
142
143
144
145
146
147
148
149
150
151
152
153
154
155
156
157
158
##控制节点controller-48 mysql -u root -pMARIADB_PASS CREATE DATABASE neutron; GRANT ALL PRIVILEGES ON neutron.* TO 'neutron'@'localhost' \ IDENTIFIED BY 'NEUTRON_DBPASS'; GRANT ALL PRIVILEGES ON neutron.* TO 'neutron'@'%' \ IDENTIFIED BY 'NEUTRON_DBPASS'; flush privileges; exit source admin-openrc.sh openstack user create --domain default --password NEUTRON_PASS neutron openstack role add --project service --user neutron admin openstack service create --name neutron \ --description "OpenStack Networking" network openstack endpoint create --region RegionOne \ network public http://controller-48:9696 openstack endpoint create --region RegionOne \ network internal http://controller-48:9696 openstack endpoint create --region RegionOne \ network admin http://controller-48:9696 # 选择安装 大二层 网络 yum install openstack-neutron openstack-neutron-ml2 \ openstack-neutron-linuxbridge ebtables -y mv /etc/neutron/neutron.conf{,.bak} cat >> /etc/neutron/neutron.conf <<EOF [database] connection = mysql+pymysql://neutron:NEUTRON_DBPASS@controller-48/neutron #NEUTRON_DBPASS为 数据库 neutron 账户密码 [DEFAULT] core_plugin = ml2 service_plugins = router allow_overlapping_ips = true transport_url = rabbit://openstack:RABBIT_PASS@controller-48 auth_strategy = keystone notify_nova_on_port_status_changes = true notify_nova_on_port_data_changes = true # RABBIT_PASS 为 消息队列密码 [keystone_authtoken] www_authenticate_uri = http://controller-48:5000 auth_url = http://controller-48:5000 memcached_servers = controller-48:11211 auth_type = password project_domain_name = default user_domain_name = default project_name = service username = neutron password = NEUTRON_PASS # NEUTRON_PASS为 neutron 服务密码 [nova] auth_url = http://controller-48:5000 auth_type = password project_domain_name = default user_domain_name = default region_name = RegionOne project_name = service username = nova password = NOVA_PASS # [nova] 没有则添加 # NOVA_PASS为 Nova 服务密码 [oslo_concurrency] EOF mv /etc/neutron/plugins/ml2/ml2_conf.ini{,.bak} cat >> /etc/neutron/plugins/ml2/ml2_conf.ini << EOF [ml2] type_drivers = flat,vlan,vxlan tenant_network_types = vxlan mechanism_drivers = linuxbridge,l2population extension_drivers = port_security [ml2_type_flat] flat_networks = provider [ml2_type_vxlan] vni_ranges = 1:1000 [securitygroup] enable_ipset = true EOF mv /etc/neutron/plugins/ml2/linuxbridge_agent.ini{,.bak} cat >> /etc/neutron/plugins/ml2/linuxbridge_agent.ini <<EOF [linux_bridge] physical_interface_mappings = provider:ens33 # ens33 为第一块网卡名称 [vxlan] enable_vxlan = true local_ip = 192.168.48.10 l2_population = true # 192.168.48.10 为管理网络 控制节点的 IP 即 controller-48 IP [securitygroup] enable_security_group = true firewall_driver = neutron.agent.linux.iptables_firewall.IptablesFirewallDriver EOF mv /etc/neutron/l3_agent.ini{,.bak} cat >> /etc/neutron/l3_agent.ini << EOF [DEFAULT] interface_driver = linuxbridge EOF mv /etc/neutron/dhcp_agent.ini{,.bak} cat >> /etc/neutron/dhcp_agent.ini << EOF [DEFAULT] interface_driver = linuxbridge dhcp_driver = neutron.agent.linux.dhcp.Dnsmasq enable_isolated_metadata = true EOF ---------------------- modprobe br_netfilter cat >>/etc/rc.sysinit<<EOF #!/bin/bash for file in /etc/sysconfig/modules/*.modules ; do [ -x $file ] && $file done EOF echo "modprobe br_netfilter" >/etc/sysconfig/modules/br_netfilter.modules chmod 755 /etc/sysconfig/modules/br_netfilter.modules sysctl -a | grep net.bridge.bridge-nf-call ---------------------- mv /etc/neutron/metadata_agent.ini{,.bak} cat >> /etc/neutron/metadata_agent.ini << EOF [DEFAULT] nova_metadata_host = controller-48 metadata_proxy_shared_secret = METADATA_SECRET # METADATA_SECRET 为 元数据 的密钥 EOF ------------------- cat >> /etc/nova/nova.conf << EOF #追加在末尾 [neutron] auth_url = http://controller-48:5000 auth_type = password project_domain_name = default user_domain_name = default region_name = RegionOne project_name = service username = neutron password = NEUTRON_PASS service_metadata_proxy = true metadata_proxy_shared_secret = METADATA_SECRET # NEUTRON_PASS 为 neutron 服务的密码 # METADATA_SECRET 为上边设置的元数据密钥 EOF ------------------- ln -s /etc/neutron/plugins/ml2/ml2_conf.ini /etc/neutron/plugin.ini su -s /bin/sh -c "neutron-db-manage --config-file /etc/neutron/neutron.conf --config-file /etc/neutron/plugins/ml2/ml2_conf.ini upgrade head" neutron sudo ip route del default sudo ip route add default via 192.168.48.2 dev ens33 #192.168.48.2为ens33网关 systemctl enable --now neutron-server.service neutron-linuxbridge-agent.service neutron-dhcp-agent.service neutron-metadata-agent.service neutron-l3-agent.service systemctl status neutron-server.service neutron-linuxbridge-agent.service neutron-dhcp-agent.service neutron-metadata-agent.service neutron-l3-agent.service
计算节点
1
2
3
4
5
6
7
8
9
10
11
12
13
14
15
16
17
18
19
20
21
22
23
24
25
26
27
28
29
30
31
32
33
34
35
36
37
38
39
40
41
42
43
44
45
46
47
48
49
50
51
52
53
54
55
###compute计算节点 yum install openstack-neutron-linuxbridge ebtables ipset -y mv /etc/neutron/neutron.conf{,.bak} cat >> /etc/neutron/neutron.conf << EOF [DEFAULT] transport_url = rabbit://openstack:RABBIT_PASS@controller-48 #RABBIT_PASS为 控制节点 消息队列 密码 auth_strategy = keystone [keystone_authtoken] www_authenticate_uri = http://controller-48:5000 auth_url = http://controller-48:5000 memcached_servers = controller-48:11211 auth_type = password project_domain_name = default user_domain_name = default project_name = service username = neutron password = NEUTRON_PASS # NEUTRON_PASS 为控制节点 neutron 服务密码 [oslo_concurrency] lock_path = /var/lib/neutron/tmp EOF mv /etc/neutron/plugins/ml2/linuxbridge_agent.ini{,.bak} cat >> /etc/neutron/plugins/ml2/linuxbridge_agent.ini <<EOF [linux_bridge] physical_interface_mappings = provider:ens36 # ens36 为 第二块网卡名字 [vxlan] enable_vxlan = true local_ip = 192.168.48.20 l2_population = true # 192.168.48.20 为 计算节点 管理网络的 IP 地址 [securitygroup] enable_security_group = true firewall_driver = neutron.agent.linux.iptables_firewall.IptablesFirewallDriver EOF ------------------- modprobe br_netfilter cat >>/etc/rc.sysinit<<EOF #!/bin/bash for file in /etc/sysconfig/modules/*.modules ; do [ -x $file ] && $file done EOF echo "modprobe br_netfilter" >/etc/sysconfig/modules/br_netfilter.modules chmod 755 /etc/sysconfig/modules/br_netfilter.modules sysctl -a | grep net.bridge.bridrge-nf-call ------------------- systemctl enable neutron-linuxbridge-agent.service --now systemctl restart openstack-nova-compute.service neutron-linuxbridge-agent.service systemctl status neutron-linuxbridge-agent.service
控制节点验证
1
2
3
4
5
6
7
8
9
10
11
12
13
14
15
16
17
18
# 验证 # 控制节点执行 source admin-openrc.sh openstack network agent list ###等几分钟 [root@controller-48 ~]# openstack network agent list +--------------------------------------+--------------------+---------------+-------------------+-------+-------+---------------------------+ | ID | Agent Type | Host | Availability Zone | Alive | State | Binary | +--------------------------------------+--------------------+---------------+-------------------+-------+-------+---------------------------+ | 201870b9-aac0-4830-9788-03da13b125c7 | Metadata agent | controller-48 | None | :-) | UP | neutron-metadata-agent | | 55ae2391-4cd6-4cd1-bf4f-4465f1b561a1 | L3 agent | controller-48 | nova | :-) | UP | neutron-l3-agent | | bae3fe77-a005-4cdf-aee6-8cfe3cf918ba | Linux bridge agent | controller-48 | None | :-) | UP | neutron-linuxbridge-agent | | f0bd6fbc-2889-4558-80fa-8f2a08989b74 | Linux bridge agent | computer-48 | None | :-) | UP | neutron-linuxbridge-agent | | f5546196-9950-4c5a-b709-060a1bba5944 | DHCP agent | controller-48 | nova | :-) | UP | neutron-dhcp-agent | +--------------------------------------+--------------------+---------------+-------------------+-------+-------+---------------------------+ # 确保以上五个 Agent 都为 :-) 及 UP
Horizon(Web管理页面)
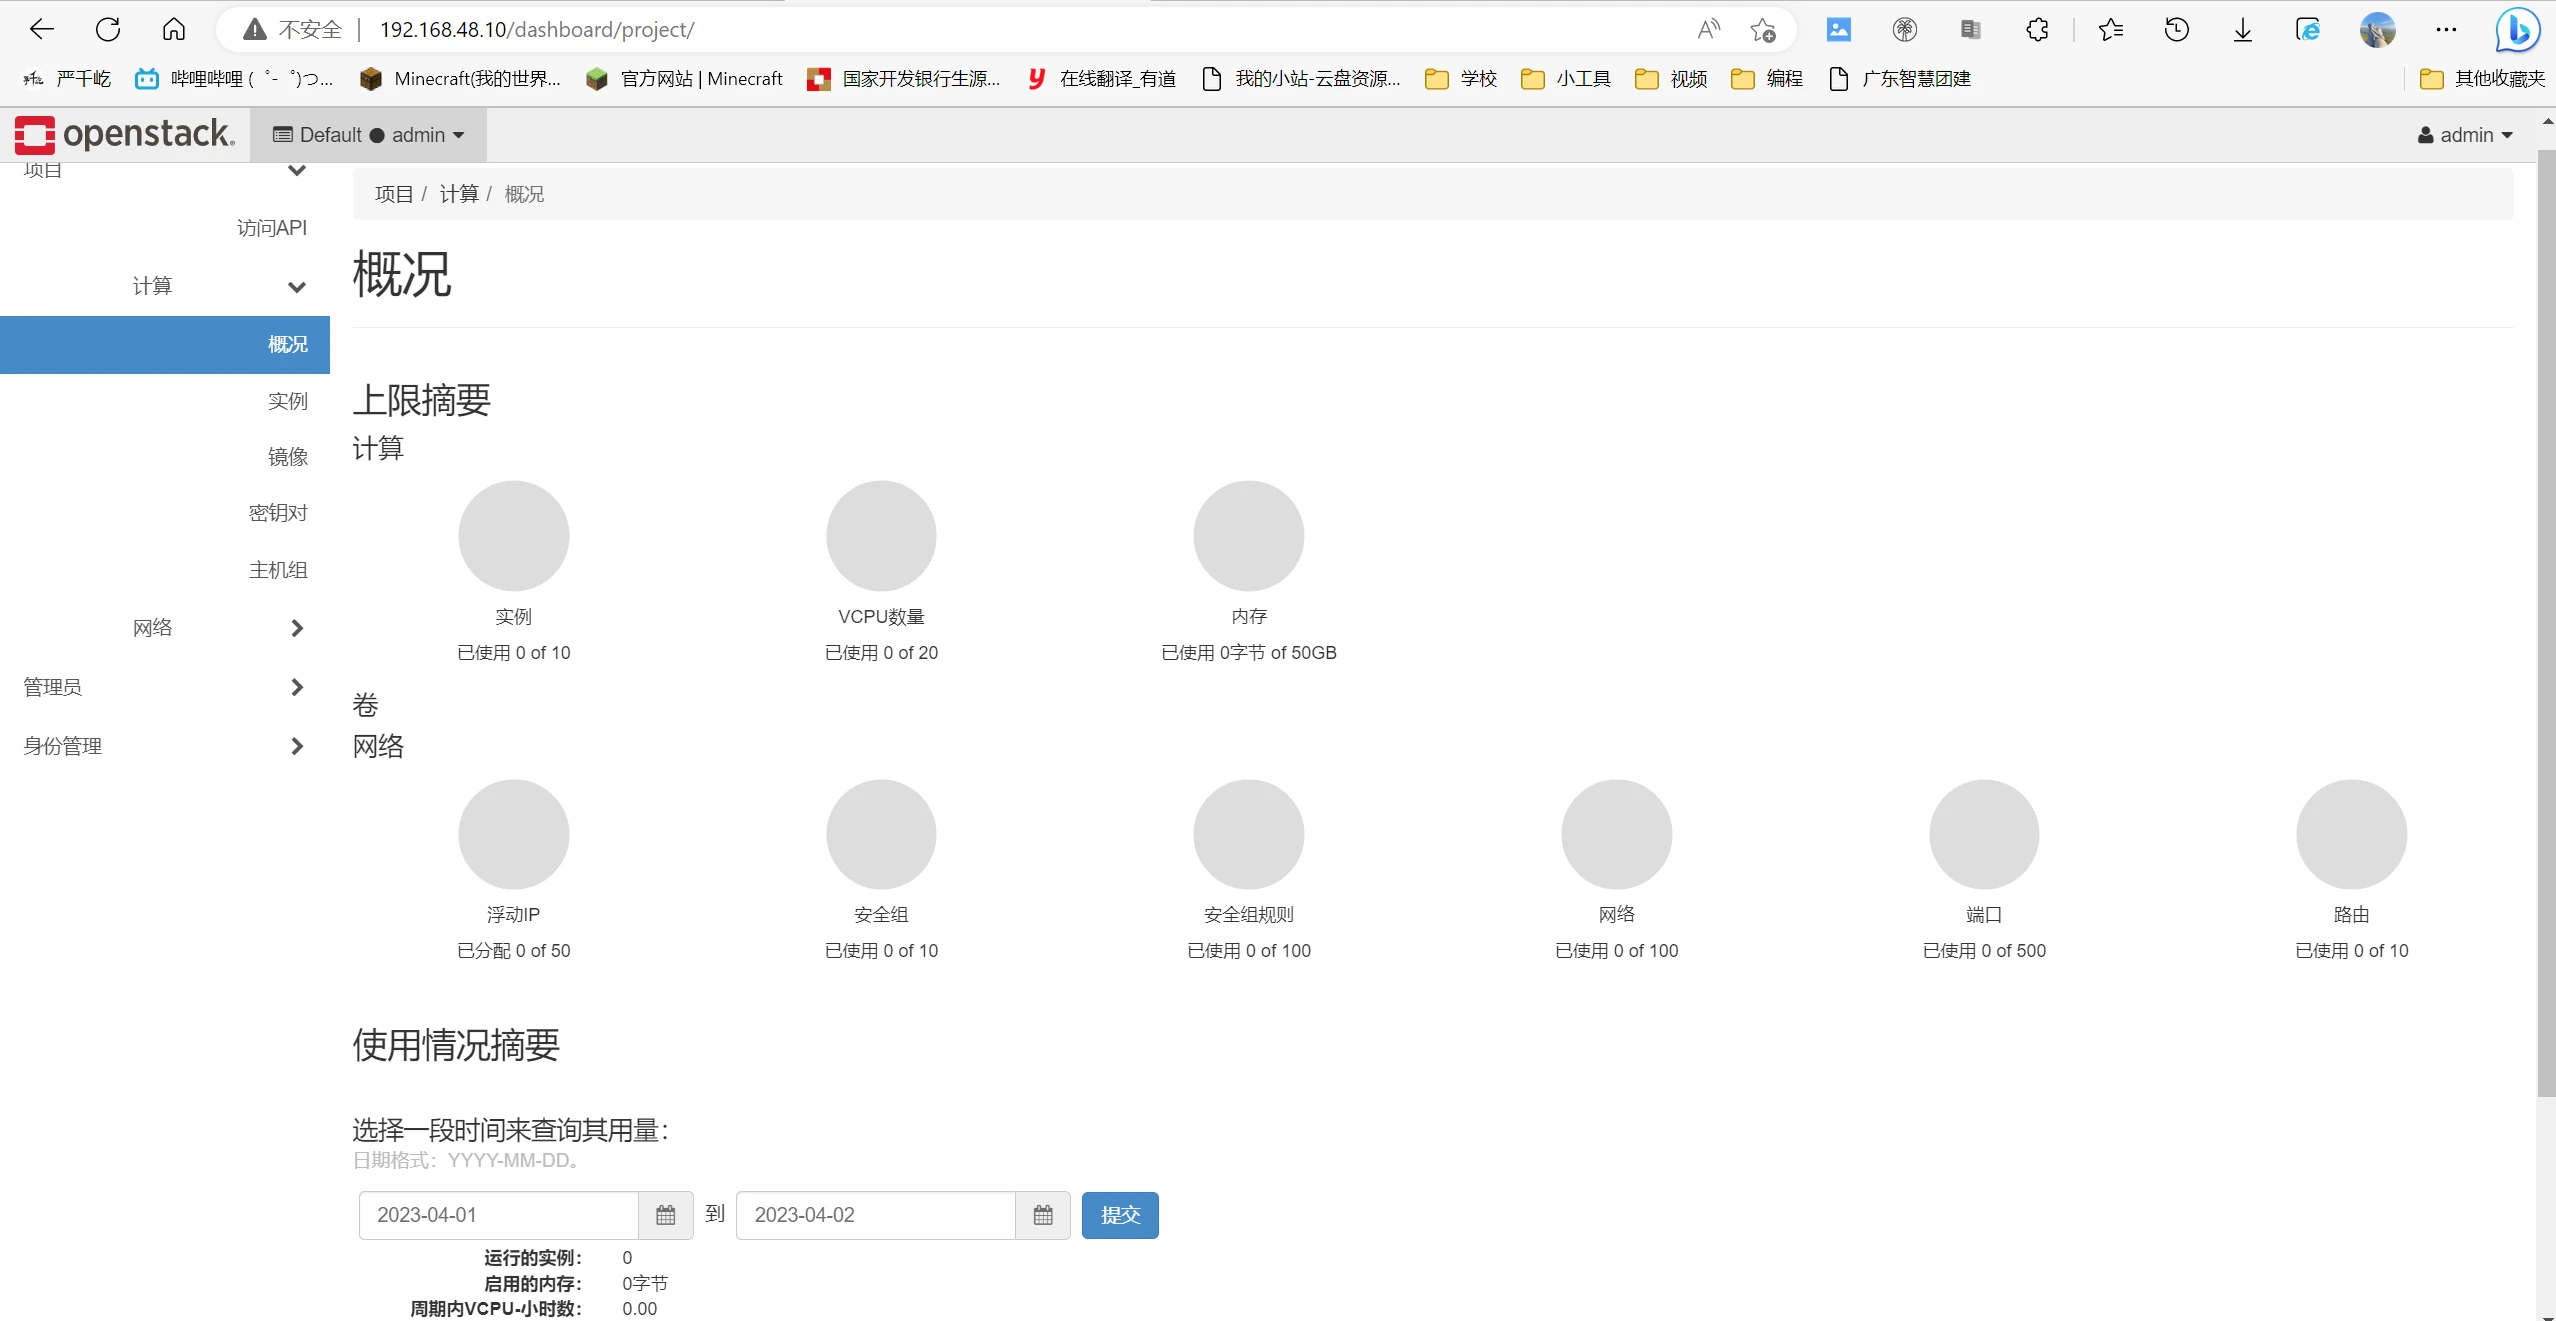
1
2
3
4
5
6
7
8
9
10
11
12
13
14
15
16
17
18
19
20
21
22
23
24
25
26
27
28
29
30
31
32
33
34
35
36
37
38
39
40
41
42
43
44
45
46
47
48
49
50
51
52
53
54
55
56
57
58
59
systemctl restart neutron* openstack-nova* ###控制节点 yum install openstack-dashboard -y cp /etc/openstack-dashboard/local_settings{,.bak} #注释以下信息 sed -i 's/^ALLOWED_HOSTS/#&/' /etc/openstack-dashboard/local_settings sed -i 's/^OPENSTACK_HOST/#&/' /etc/openstack-dashboard/local_settings sed -i 's/^OPENSTACK_KEYSTONE_URL/#&/' /etc/openstack-dashboard/local_settings sed -i 's/^TIME_ZONE/#&/' /etc/openstack-dashboard/local_settings 追加内容 cat >> /etc/openstack-dashboard/local_settings <<EOF ALLOWED_HOSTS = ['*'] SESSION_ENGINE = 'django.contrib.sessions.backends.cache' CACHES = { 'default': { 'BACKEND': 'django.core.cache.backends.memcached.MemcachedCache', 'LOCATION': 'controller-48:11211', } } OPENSTACK_HOST = "controller-48" OPENSTACK_KEYSTONE_URL = "http://%s:5000/identity/v3" % OPENSTACK_HOST OPENSTACK_KEYSTONE_MULTIDOMAIN_SUPPORT = True OPENSTACK_API_VERSIONS = { "identity": 3, "image": 2, "volume": 3, } OPENSTACK_KEYSTONE_DEFAULT_DOMAIN = "Default" OPENSTACK_KEYSTONE_DEFAULT_ROLE = "user" TIME_ZONE = "Asia/Shanghai" # 有则修改没有则添加 EOF cp /etc/httpd/conf.d/openstack-dashboard.conf{,.bak} cat >> /etc/httpd/conf.d/openstack-dashboard.conf << EOF WSGIApplicationGroup %{GLOBAL} EOF ------------------------------------------------------------------------------------ #把下面所有文件里面有WEBROOT = '/' 中的 / 改成 /dashboard sed -i.bak "s#WEBROOT\s*=.*#WEBROOT = '/dashboard'#" /usr/share/openstack-dashboard/openstack_dashboard/defaults.py sed -i.bak "s#WEBROOT\s*=.*#WEBROOT = '/dashboard'#" /usr/share/openstack-dashboard/openstack_dashboard/test/settings.py sed -i.bak 's|WEBROOT\s*=.*|WEBROOT = "/dashboard"|' /usr/share/openstack-dashboard/static/dashboard/js/1453ede06e9f.js #如果第三条不行,注意一下1453ede06e9f.js是否存在,若不存在,则看下面三个文件中有WEBROOT = '/'替换文件名即可 [root@controller-48 ~]# cd /usr/share/openstack-dashboard/static/dashboard/js/ [root@controller-48 js]# ll total 2472 #以下几个文件也要改 ,我这里就一个文件有 -rw-r--r-- 1 root root 606959 May 17 2021 1453ede06e9f.js -rw-r--r-- 1 root root 1659039 May 17 2021 b5e88d434bd1.js -rw-r--r-- 1 root root 254022 May 17 2021 eb687af7228a.js ------------------------------------------------------------------------------------ systemctl restart httpd memcached systemctl status httpd memcached # 验证 # 访问 http://192.168.48.10/dashboard (控制节点ip) # 登录用户密码 可使用 admin 或 user_dog # 域名 使用 Default
cinder(块存储服务)
控制节点
1
2
3
4
5
6
7
8
9
10
11
12
13
14
15
16
17
18
19
20
21
22
23
24
25
26
27
28
29
30
31
32
33
34
35
36
37
38
39
40
41
42
43
44
45
46
47
48
49
50
51
52
53
54
55
56
57
58
59
###控制节点 mysql -u root -pMARIADB_PASS CREATE DATABASE cinder; GRANT ALL PRIVILEGES ON cinder.* TO 'cinder'@'localhost' \ IDENTIFIED BY 'CINDER_DBPASS'; GRANT ALL PRIVILEGES ON cinder.* TO 'cinder'@'%' \ IDENTIFIED BY 'CINDER_DBPASS'; exit # CINDER_DBPASS 为 cinder 数据库账户密码 source admin-openrc.sh openstack user create --domain default --password CINDER_PASS cinder openstack role add --project service --user cinder admin openstack service create --name cinderv3 \ --description "OpenStack Block Storage" volumev3 openstack endpoint create --region RegionOne \ volumev3 public http://controller-48:8776/v3/%\(project_id\)s openstack endpoint create --region RegionOne \ volumev3 internal http://controller-48:8776/v3/%\(project_id\)s openstack endpoint create --region RegionOne \ volumev3 admin http://controller-48:8776/v3/%\(project_id\)s yum install openstack-cinder -y mv /etc/cinder/cinder.conf{,.bak} cat >> /etc/cinder/cinder.conf << EOF [DEFAULT] transport_url = rabbit://openstack:RABBIT_PASS@controller-48 auth_strategy = keystone my_ip = 192.168.48.10 # 控制节点管理网络 IP [database] connection = mysql+pymysql://cinder:CINDER_DBPASS@controller-48/cinder # CINDER_DBPASS 为数据库 Cinder 账户密码 [keystone_authtoken] www_authenticate_uri = http://controller-48:5000 auth_url = http://controller-48:5000 memcached_servers = controller-48:11211 auth_type = password project_domain_name = default user_domain_name = default project_name = service username = cinder password = CINDER_PASS # CINDER_PASS 为 Cinder 服务密码 [oslo_concurrency] lock_path = /var/lib/cinder/tmp EOF su -s /bin/sh -c "cinder-manage db sync" cinder cat >> /etc/nova/nova.conf << EOF [cinder] os_region_name = RegionOne EOF systemctl restart openstack-nova-api.service systemctl status openstack-nova-api.service systemctl enable --now openstack-cinder-api.service openstack-cinder-scheduler.service systemctl status openstack-cinder-api.service openstack-cinder-scheduler.service
计算节点
1
2
3
4
5
6
7
8
9
10
11
12
13
14
15
16
17
18
19
20
21
22
23
24
25
26
27
28
29
30
31
32
33
34
35
36
37
38
39
40
41
42
43
44
45
46
47
48
49
50
51
52
53
54
55
56
57
58
59
60
61
62
63
64
65
66
67
68
69
70
71
###computer-48节点 添加一块物理磁盘 [root@computer-48 ~]# lsblk NAME MAJ:MIN RM SIZE RO TYPE MOUNTPOINT sda 8:0 0 100G 0 disk ├─sda1 8:1 0 1G 0 part /boot └─sda2 8:2 0 99G 0 part ├─centos-root 253:0 0 50G 0 lvm / ├─centos-swap 253:1 0 3.6G 0 lvm [SWAP] └─centos-home 253:2 0 45.4G 0 lvm /home sdb 8:16 0 100G 0 disk sr0 11:0 1 1024M 0 rom yum install lvm2 device-mapper-persistent-data -y systemctl enable lvm2-lvmetad.service --now # 如显示不存在则说明系统默认安装了 lvm 以上步骤可忽略 #创建/dev/sdb卷组 pvcreate /dev/sdb # Physical volume "/dev/sdb" successfully created. vgcreate cinder-volumes /dev/sdb # Volume group "cinder-volumes" successfully created # sdb 为划分给块存储使用的磁盘 # 如有多个磁盘,则需重复以上两个命令 cp /etc/lvm/lvm.conf{,.bak} sed -i '130 a\filter = [ "a/sdb/","r/.*/"]' /etc/lvm/lvm.conf #sdb是上面添加的新的物理磁盘 # 如有多个磁盘,则将磁盘编号以固定格式添加到过滤设备中,例如有两个磁盘 sdb sdc ,则为 filter = [ "a/sdb/", "a/sdc/","r/.*/"] yum install openstack-cinder targetcli python-keystone -y mv /etc/cinder/cinder.conf{,.bak} cat >> /etc/cinder/cinder.conf << EOF [DEFAULT] transport_url = rabbit://openstack:RABBIT_PASS@controller-48 auth_strategy = keystone my_ip = 192.168.48.20 enabled_backends = lvm glance_api_servers = http://controller-48:9292 # 192.168.48.20 为块存储节点 computer-48管理网络 的接口IP [database] connection = mysql+pymysql://cinder:CINDER_DBPASS@controller-48/cinder # CINDER_DBPASS 为数据库 Cinder 账户密码 [keystone_authtoken] www_authenticate_uri = http://controller-48:5000 auth_url = http://controller-48:5000 memcached_servers = controller-48:11211 auth_type = password project_domain_name = default user_domain_name = default project_name = service username = cinder password = CINDER_PASS # CINDER_PASS 为 cinder 数据库账户密码 [lvm] volume_driver = cinder.volume.drivers.lvm.LVMVolumeDriver volume_group = cinder-volumes target_protocol = iscsi target_helper = lioadm # [lvm] 没有则新建 [oslo_concurrency] lock_path = /var/lib/cinder/tmp EOF systemctl enable openstack-cinder-volume.service target.service --now systemctl status openstack-cinder-volume.service target.service
控制节点验证
1
2
3
4
5
6
7
8
9
10
11
12
13
# 验证 # 控制节点执行 source admin-openrc.sh openstack volume service list systemctl restart httpd memcached [root@controller-48 ~]# openstack volume service list +------------------+-------------+------+---------+-------+----------------------------+ | Binary | Host | Zone | Status | State | Updated At | +------------------+-------------+------+---------+-------+----------------------------+ | cinder-scheduler | controller-48 | nova | enabled | up | 2023-05-24T08:24:18.000000 | | cinder-volume | computer-48@lvm | nova | enabled | up | 2023-05-24T08:24:17.000000 | +------------------+-------------+------+---------+-------+----------------------------+
Swift(对象存储)
控制节点
1
2
3
4
5
6
7
8
9
10
11
12
13
14
15
16
17
18
19
20
21
22
23
24
25
26
27
28
29
30
31
32
33
34
35
36
37
38
39
40
41
42
43
44
45
46
47
48
49
50
51
52
53
54
55
56
57
58
59
60
61
62
63
64
65
66
67
68
69
70
71
72
73
74
75
76
77
78
79
80
81
82
83
84
85
86
87
88
89
90
91
92
93
94
95
###控制节点 source admin-openrc.sh openstack user create --domain default --password SWIFT_PASS swift openstack role add --project service --user swift admin #创建swift服务实体: openstack service create --name swift \ --description "OpenStack Object Storage" object-store #创建swift服务实体: openstack endpoint create --region RegionOne \ object-store public http://controller-48:8080/v1/AUTH_%\(project_id\)s openstack endpoint create --region RegionOne \ object-store internal http://controller-48:8080/v1/AUTH_%\(project_id\)s openstack endpoint create --region RegionOne \ object-store admin http://controller-48:8080/v1 #安装swift组件 yum install -y openstack-swift-proxy python-swiftclient \ python-keystoneclient python-keystonemiddleware \ Memcached mv /etc/swift/proxy-server.conf{,.bak} cat> /etc/swift/proxy-server.conf<<EOF [DEFAULT] bind_ip = 0.0.0.0 bind_port = 8080 user = swift [pipeline:main] pipeline = catch_errors gatekeeper healthcheck proxy-logging cache container_sync bulk ratelimit authtoken keystoneauth container-quotas account-quotas slo dlo versioned_writes proxy-logging proxy-server [app:proxy-server] use = egg:swift#proxy allow_account_management = true account_autocreate = true #Keystone auth info [filter:authtoken] paste.filter_factory = keystonemiddleware.auth_token:filter_factory www_authenticate_uri = http://controller-48:5000 auth_url = http://controller-48:5000/v3 memcached_servers = controller-48:11211 auth_type = password project_domain_name = default user_domain_name = default project_name = service username = swift password = SWIFT_PASS delay_auth_decision = true service_token_roles_required = True [filter:keystoneauth] use = egg:swift#keystoneauth operator_roles = admin,user [filter:healthcheck] use = egg:swift#healthcheck [filter:cache] use = egg:swift#memcache memcache_servers = controller-48:11211 [filter:ratelimit] use = egg:swift#ratelimit [filter:domain_remap] use = egg:swift#domain_remap [filter:catch_errors] use = egg:swift#catch_errors [filter:cname_lookup] use = egg:swift#cname_lookup [filter:staticweb] use = egg:swift#staticweb [filter:tempurl] use = egg:swift#tempurl [filter:formpost] use = egg:swift#formpost [filter:name_check] use = egg:swift#name_check [filter:list-endpoints] use = egg:swift#list_endpoints [filter:proxy-logging] use = egg:swift#proxy_logging [filter:bulk] use = egg:swift#bulk [filter:slo] use = egg:swift#slo [filter:dlo] use = egg:swift#dlo [filter:container-quotas] use = egg:swift#container_quotas [filter:account-quotas] use = egg:swift#account_quotas [filter:gatekeeper] use = egg:swift#gatekeeper [filter:container_sync] use = egg:swift#container_sync [filter:xprofile] use = egg:swift#xprofile [filter:versioned_writes] use = egg:swift#versioned_writes EOF
computer-48
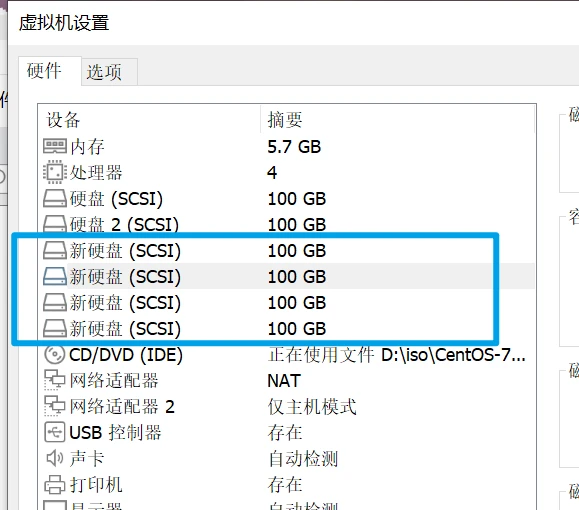
添加4张硬盘
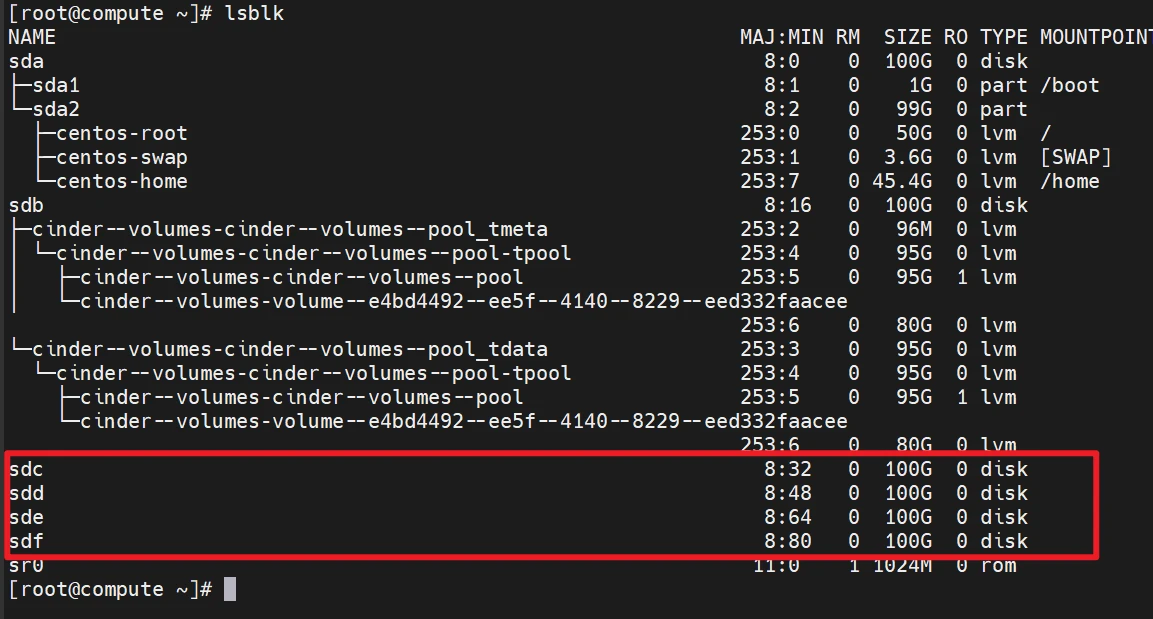
1
2
3
4
5
6
7
8
9
10
11
12
13
14
15
16
17
18
19
20
21
22
23
24
25
26
27
28
29
30
31
32
33
34
35
36
37
38
39
40
41
42
43
44
45
46
47
48
49
50
51
52
53
54
55
56
57
58
59
60
61
62
63
64
65
66
67
68
69
70
71
72
73
74
75
76
77
78
79
80
81
82
83
84
85
86
87
88
89
90
91
92
93
94
95
96
97
98
99
100
101
102
103
104
105
106
107
108
109
110
111
112
113
114
115
116
117
118
119
120
121
122
123
124
125
126
127
128
129
130
131
132
133
134
135
136
137
138
139
140
141
142
143
144
145
146
147
148
149
150
151
152
153
154
155
156
157
158
#conpute节点 yum install xfsprogs rsync -y lsblk #将/dev/sdb和/dev/sdc设备格式化为XFS: mkfs.xfs /dev/sdc mkfs.xfs /dev/sdd mkfs.xfs /dev/sde mkfs.xfs /dev/sdf #创建安装点目录结构: mkdir -p /srv/node/sdc mkdir -p /srv/node/sdd mkdir -p /srv/node/sde mkdir -p /srv/node/sdf cat >> /etc/fstab << EOF /dev/sdc /srv/node/sdc xfs noatime,nodiratime,nobarrier,logbufs=8 0 2 /dev/sdd /srv/node/sdd xfs noatime,nodiratime,nobarrier,logbufs=8 0 2 /dev/sde /srv/node/sde xfs noatime,nodiratime,nobarrier,logbufs=8 0 2 /dev/sdf /srv/node/sdf xfs noatime,nodiratime,nobarrier,logbufs=8 0 2 EOF #安装设备 mount /srv/node/sdc mount /srv/node/sdd mount /srv/node/sde mount /srv/node/sdf cat>/etc/rsyncd.conf<<EOF uid = swift gid = swift log file = /var/log/rsyncd.log pid file = /var/run/rsyncd.pid address = 192.168.148.20 [account] max connections = 2 path = /srv/node/ read only = False lock file = /var/lock/account.lock [container] max connections = 2 path = /srv/node/ read only = False lock file = /var/lock/container.lock [object] max connections = 2 path = /srv/node/ read only = False lock file = /var/lock/object.lock EOF #重启服务 systemctl enable rsyncd.service systemctl start rsyncd.service #安装swift组件 yum install -y openstack-swift-account openstack-swift-container \ openstack-swift-object mv /etc/swift/account-server.conf{,.bak} cat> /etc/swift/account-server.conf<<EOF [DEFAULT] bind_ip = 192.168.148.20 bind_port = 6202 user = swift swift_dir = /etc/swift devices = /srv/node mount_check = true [pipeline:main] pipeline = healthcheck recon account-server [app:account-server] use = egg:swift#account [filter:healthcheck] use = egg:swift#healthcheck [filter:recon] use = egg:swift#recon recon_cache_path = /var/cache/swift [account-replicator] [account-auditor] [account-reaper] [filter:xprofile] use = egg:swift#xprofile EOF mv /etc/swift/container-server.conf{,.bak} cat> /etc/swift/container-server.conf<<EOF [DEFAULT] bind_ip = 192.168.148.20 bind_port = 6201 user = swift swift_dir = /etc/swift devices = /srv/node mount_check = true [pipeline:main] pipeline = healthcheck recon container-server [app:container-server] use = egg:swift#container [filter:healthcheck] use = egg:swift#healthcheck [filter:recon] use = egg:swift#recon [container-replicator] [container-updater] [container-auditor] [container-sync] [filter:xprofile] use = egg:swift#xprofile [container-sharder] EOF mv /etc/swift/object-server.conf{,.bak} cat> /etc/swift/object-server.conf<<EOF [DEFAULT] bind_ip = 0.0.0.0 bind_port = 6200 user = swift swift_dir = /etc/swift devices = /srv/node mount_check = true [pipeline:main] pipeline = healthcheck recon object-server [app:object-server] use = egg:swift#object recon_cache_path = /var/cache/swift recon_lock_path = /var/lock [filter:healthcheck] use = egg:swift#healthcheck [filter:recon] use = egg:swift#recon [object-replicator] [object-reconstructor] [object-updater] [object-expirer] [filter:xprofile] use = egg:swift#xprofile [object-relinker] [object-auditor] log_name = object-auditor log_facility = LOG_LOCAL0 log_level = INFO log_address=/dev/log EOF #确保对安装点目录结构拥有适当的所有权: chown -R swift:swift /srv/node #创建recon目录并确保对其拥有适当的所有权: mkdir -p /var/cache/swift chown -R root:swift /var/cache/swift chmod -R 775 /var/cache/swift # 在防火墙中启用必要的访问(实验忽略) firewall-cmd --permanent --add-port=6200/tcp firewall-cmd --permanent --add-port=6201/tcp firewall-cmd --permanent --add-port=6202/tcp
创建和分发初始环 controller-48
1
2
3
4
5
6
7
8
9
10
11
12
13
14
15
16
17
18
19
20
21
22
23
24
25
26
27
28
29
30
31
32
33
34
35
36
37
38
39
40
41
42
43
44
45
46
47
48
49
50
51
52
53
54
55
56
57
58
59
60
61
62
63
64
65
66
67
68
69
70
71
72
#控制节点 转到/etc/swift目录。(所以操作在此目录,执行) 创建用户环account.builder文件: cd /etc/swift ##第一部分(6202)创建用户环 swift-ring-builder account.builder create 10 3 1 swift-ring-builder account.builder add \ --region 1 --zone 1 --ip 192.168.148.20 --port 6202 --device sdc --weight 100 swift-ring-builder account.builder add \ --region 1 --zone 1 --ip 192.168.148.20 --port 6202 --device sdd --weight 100 swift-ring-builder account.builder add \ --region 1 --zone 2 --ip 192.168.148.20 --port 6202 --device sde --weight 100 swift-ring-builder account.builder add \ --region 1 --zone 2 --ip 192.168.148.20 --port 6202 --device sdf --weight 100 swift-ring-builder account.builder ##重新平衡环且验证 swift-ring-builder account.builder rebalance swift-ring-builder account.builder ##第二部分(6201)创建容器环 swift-ring-builder container.builder create 10 3 1 swift-ring-builder container.builder add \ --region 1 --zone 1 --ip 192.168.148.20 --port 6201 --device sdc --weight 100 swift-ring-builder container.builder add \ --region 1 --zone 1 --ip 192.168.148.20 --port 6201 --device sdd --weight 100 swift-ring-builder container.builder add \ --region 1 --zone 2 --ip 192.168.148.20 --port 6201 --device sde --weight 100 swift-ring-builder container.builder add \ --region 1 --zone 2 --ip 192.168.148.20 --port 6201 --device sdf --weight 100 swift-ring-builder container.builder swift-ring-builder container.builder rebalance ##第三部分(6200)创建对象环 swift-ring-builder object.builder create 10 3 1 swift-ring-builder object.builder add \ --region 1 --zone 1 --ip 192.168.148.20 --port 6200 --device sdc --weight 100 swift-ring-builder object.builder add \ --region 1 --zone 1 --ip 192.168.148.20 --port 6200 --device sdd --weight 100 swift-ring-builder object.builder add \ --region 1 --zone 2 --ip 192.168.148.20 --port 6200 --device sde --weight 100 swift-ring-builder object.builder add \ --region 1 --zone 2 --ip 192.168.148.20 --port 6200 --device sdf --weight 100 swift-ring-builder object.builder swift-ring-builder object.builder rebalance 将swift目录下生成三个.gz文件复制到存储节点的swift目录下 scp account.ring.gz container.ring.gz object.ring.gz 192.168.148.20:/etc/swift ##完成安装 controller-48 mv /etc/swift/swift.conf{,.bak} cat> /etc/swift/swift.conf<<EOF [swift-hash] swift_hash_path_suffix = swift swift_hash_path_prefix = swift [storage-policy:0] name = Policy-0 default = yes EOF #复制到存储节点 scp swift.conf 192.168.148.20:/etc/swift swift_hash_path_suffix和swift_hash_path_prefix作为哈希算法的一部分用于确定数据在集群中的位置。 这些值应该保持机密,并且在部署集群之后不能更改丢失。可自定义 在所有节点确保对配置目录拥有适当的所有权: ####存储节点与控制节点同时执行(注意!!!!两个节点同时执行) chown -R root:swift /etc/swift 在控制器节点和任何其他运行代理服务的节点上,启动对象存储代理服务及其相关性,并将它们配置为在系统启动时启动(存储节点无代理服务) #重启服务 systemctl enable openstack-swift-proxy.service memcached.service --now systemctl restart openstack-swift-proxy.service memcached.service
计算节点
1
2
3
4
5
6
7
8
9
10
11
12
13
14
15
在存储节点启动所有服务 systemctl enable openstack-swift-account.service openstack-swift-account-auditor.service \ openstack-swift-account-reaper.service openstack-swift-account-replicator.service systemctl start openstack-swift-account.service openstack-swift-account-auditor.service \ openstack-swift-account-reaper.service openstack-swift-account-replicator.service systemctl enable openstack-swift-container.service \ openstack-swift-container-auditor.service openstack-swift-container-replicator.service \ openstack-swift-container-updater.service systemctl start openstack-swift-container.service \ openstack-swift-container-auditor.service openstack-swift-container-replicator.service \ openstack-swift-container-updater.service systemctl enable openstack-swift-object.service openstack-swift-object-auditor.service \ openstack-swift-object-replicator.service openstack-swift-object-updater.service systemctl start openstack-swift-object.service openstack-swift-object-auditor.service \ openstack-swift-object-replicator.service openstack-swift-object-updater.service
验证
1
2
3
4
5
6
7
8
9
10
11
12
13
14
15
16
17
[root@controller-48 swift]# swift stat Account: AUTH_07a1ce96dca54f1bb0d3b968f1343617 Containers: 0 Objects: 0 Bytes: 0 X-Put-Timestamp: 1684919814.32783 X-Timestamp: 1684919814.32783 X-Trans-Id: txd6f3affa0140455b935ff-00646dd605 Content-Type: text/plain; charset=utf-8 X-Openstack-Request-Id: txd6f3affa0140455b935ff-00646dd605 [root@controller-48 swift]# cd [root@controller-48 ~]# swift upload demo cirros-0.5.2-x86_64-disk.img --object-name image image ##重启nova服务 sudo systemctl restart openstack-nova*
Heat(编排)
控制节点
1
2
3
4
5
6
7
8
9
10
11
12
13
14
15
16
17
18
19
20
21
22
23
24
25
26
27
28
29
30
31
32
33
#创建heat数据库和用户 mysql -u root -pMARIADB_PASS CREATE DATABASE heat; GRANT ALL PRIVILEGES ON heat.* TO 'heat'@'localhost' \ IDENTIFIED BY 'HEAT_DBPASS'; GRANT ALL PRIVILEGES ON heat.* TO 'heat'@'%' \ IDENTIFIED BY 'HEAT_DBPASS'; flush privileges; exit source admin-openrc.sh openstack user create --domain default --password HEAT_PASS heat #添加 admin 角色到 heat 用户上 openstack role add --project service --user heat admin ##创建heat和 heat-cfn 服务实体 openstack service create --name heat \ --description "Orchestration" orchestration openstack service create --name heat-cfn \ --description "Orchestration" cloudformation ##创建 Orchestration 服务的 API 端点 openstack endpoint create --region RegionOne \ orchestration public http://controller-48:8004/v1/%\(tenant_id\)s openstack endpoint create --region RegionOne \ orchestration internal http://controller-48:8004/v1/%\(tenant_id\)s openstack endpoint create --region RegionOne \ orchestration admin http://controller-48:8004/v1/%\(tenant_id\)s openstack endpoint create --region RegionOne \ cloudformation public http://controller-48:8000/v1 openstack endpoint create --region RegionOne \ cloudformation internal http://controller-48:8000/v1 openstack endpoint create --region RegionOne \ cloudformation admin http://controller-48:8000/v1
为了管理栈,在认证服务中Orchestration需要更多信息
1
2
3
4
5
6
7
8
9
10
11
12
13
14
15
16
17
18
19
20
#控制节点 #为栈创建 heat 包含项目和用户的域 openstack domain create --description "Stack projects and users" heat #在 heat 域中创建管理项目和用户的heat_domain_admin用户: openstack user create --domain heat --password=HEAT_DOMAIN_USER_PASS heat_domain_admin #)添加admin角色到 heat 域 中的heat_domain_admin用户,启用heat_domain_admin用户#管理栈的管理权限 openstack role add --domain heat --user-domain heat --user heat_domain_admin admin #为栈创建 heat 包含项目和用户的域 openstack role create heat_stack_owner #添加heat_stack_owner 角色到demo 项目和用户,启用demo 用户管理栈。 openstack role add --project demo --user demo heat_stack_owner #必须添加 heat_stack_owner 角色到每个管理栈的用户。 #heat_stack_user 角色 openstack role create heat_stack_user
安装并配置Heat组件相关软件
1
2
3
4
5
6
7
8
9
10
11
12
13
14
15
16
17
18
19
20
21
22
23
24
25
26
27
28
29
30
31
32
33
34
35
36
37
38
39
40
41
42
43
44
45
46
47
48
49
50
51
52
53
54
#控制节点 yum install openstack-heat-api openstack-heat-api-cfn \ openstack-heat-engine -y mv /etc/heat/heat.conf{,.bak} cat >> /etc/heat/heat.conf << EOF [database] connection = mysql+pymysql://heat:HEAT_DBPASS@controller-48/heat #HEAT_DBPASS是HEAT数据库密码 [DEFAULT] transport_url = rabbit://openstack:RABBIT_PASS@controller-48 #RABBIT_PASS为Rabbitmq服务密码 用户名是openstack [keystone_authtoken] www_authenticate_uri = http://controller-48:5000 auth_url = http://controller-48:5000 memcached_servers = controller-48:11211 auth_type = password project_domain_name = default user_domain_name = default project_name = service username = heat password = HEAT_PASS #HEAT_PASS是heat用户密码 [trustee] auth_type = password auth_url = http://controller-48:5000 username = heat password = HEAT_PASS #HEAT_PASS是heat用户密码 user_domain_name = default [clients_keystone] auth_uri = http://controller-48:5000 [DEFAULT] heat_metadata_server_url = http://controller-48:8000 heat_waitcondition_server_url = http://controller-48:8000/v1/waitcondition [DEFAULT] stack_domain_admin = heat_domain_admin stack_domain_admin_password = HEAT_DOMAIN_USER_PASS stack_user_domain_name = heat EOF su -s /bin/sh -c "heat-manage db_sync" heat ##启动 Orchestration 编排服务heat组件并将其设置为随系统启动 systemctl enable openstack-heat-api.service \ openstack-heat-api-cfn.service openstack-heat-engine.service systemctl restart openstack-heat-api.service \ openstack-heat-api-cfn.service openstack-heat-engine.service [root@controller-48 ~]# systemctl list-unit-files |grep openstack-heat* openstack-heat-api-cfn.service enabled openstack-heat-api.service enabled openstack-heat-engine.service enabled
验证
1
2
3
4
5
6
7
8
9
10
11
12
13
14
15
16
cd source admin-openrc.sh openstack service list openstack orchestration service list 该输出显示表明在控制节点上有应该四个heat-engine组件。 [root@controller-48 ~]# openstack orchestration service list +------------+-------------+--------------------------------------+------------+--------+----------------------------+--------+ | Hostname | Binary | Engine ID | Host | Topic | Updated At | Status | +------------+-------------+--------------------------------------+------------+--------+----------------------------+--------+ | controller-48 | heat-engine | 230ae8e8-3c9f-4b82-b0ca-caef3d5497f1 | controller-48 | engine | 2023-05-27T14:42:52.000000 | up | | controller-48 | heat-engine | 626e74a4-918b-46b8-8993-d6db92eb861e | controller-48 | engine | 2023-05-27T14:42:52.000000 | up | | controller-48 | heat-engine | f648e766-cdb9-4e06-b190-a713baf33df8 | controller-48 | engine | 2023-05-27T14:42:52.000000 | up | | controller-48 | heat-engine | 2cb3dfd3-0636-432c-8d59-f22d850510d5 | controller-48 | engine | 2023-05-27T14:42:52.000000 | up | +------------+-------------+--------------------------------------+------------+--------+----------------------------+--------+
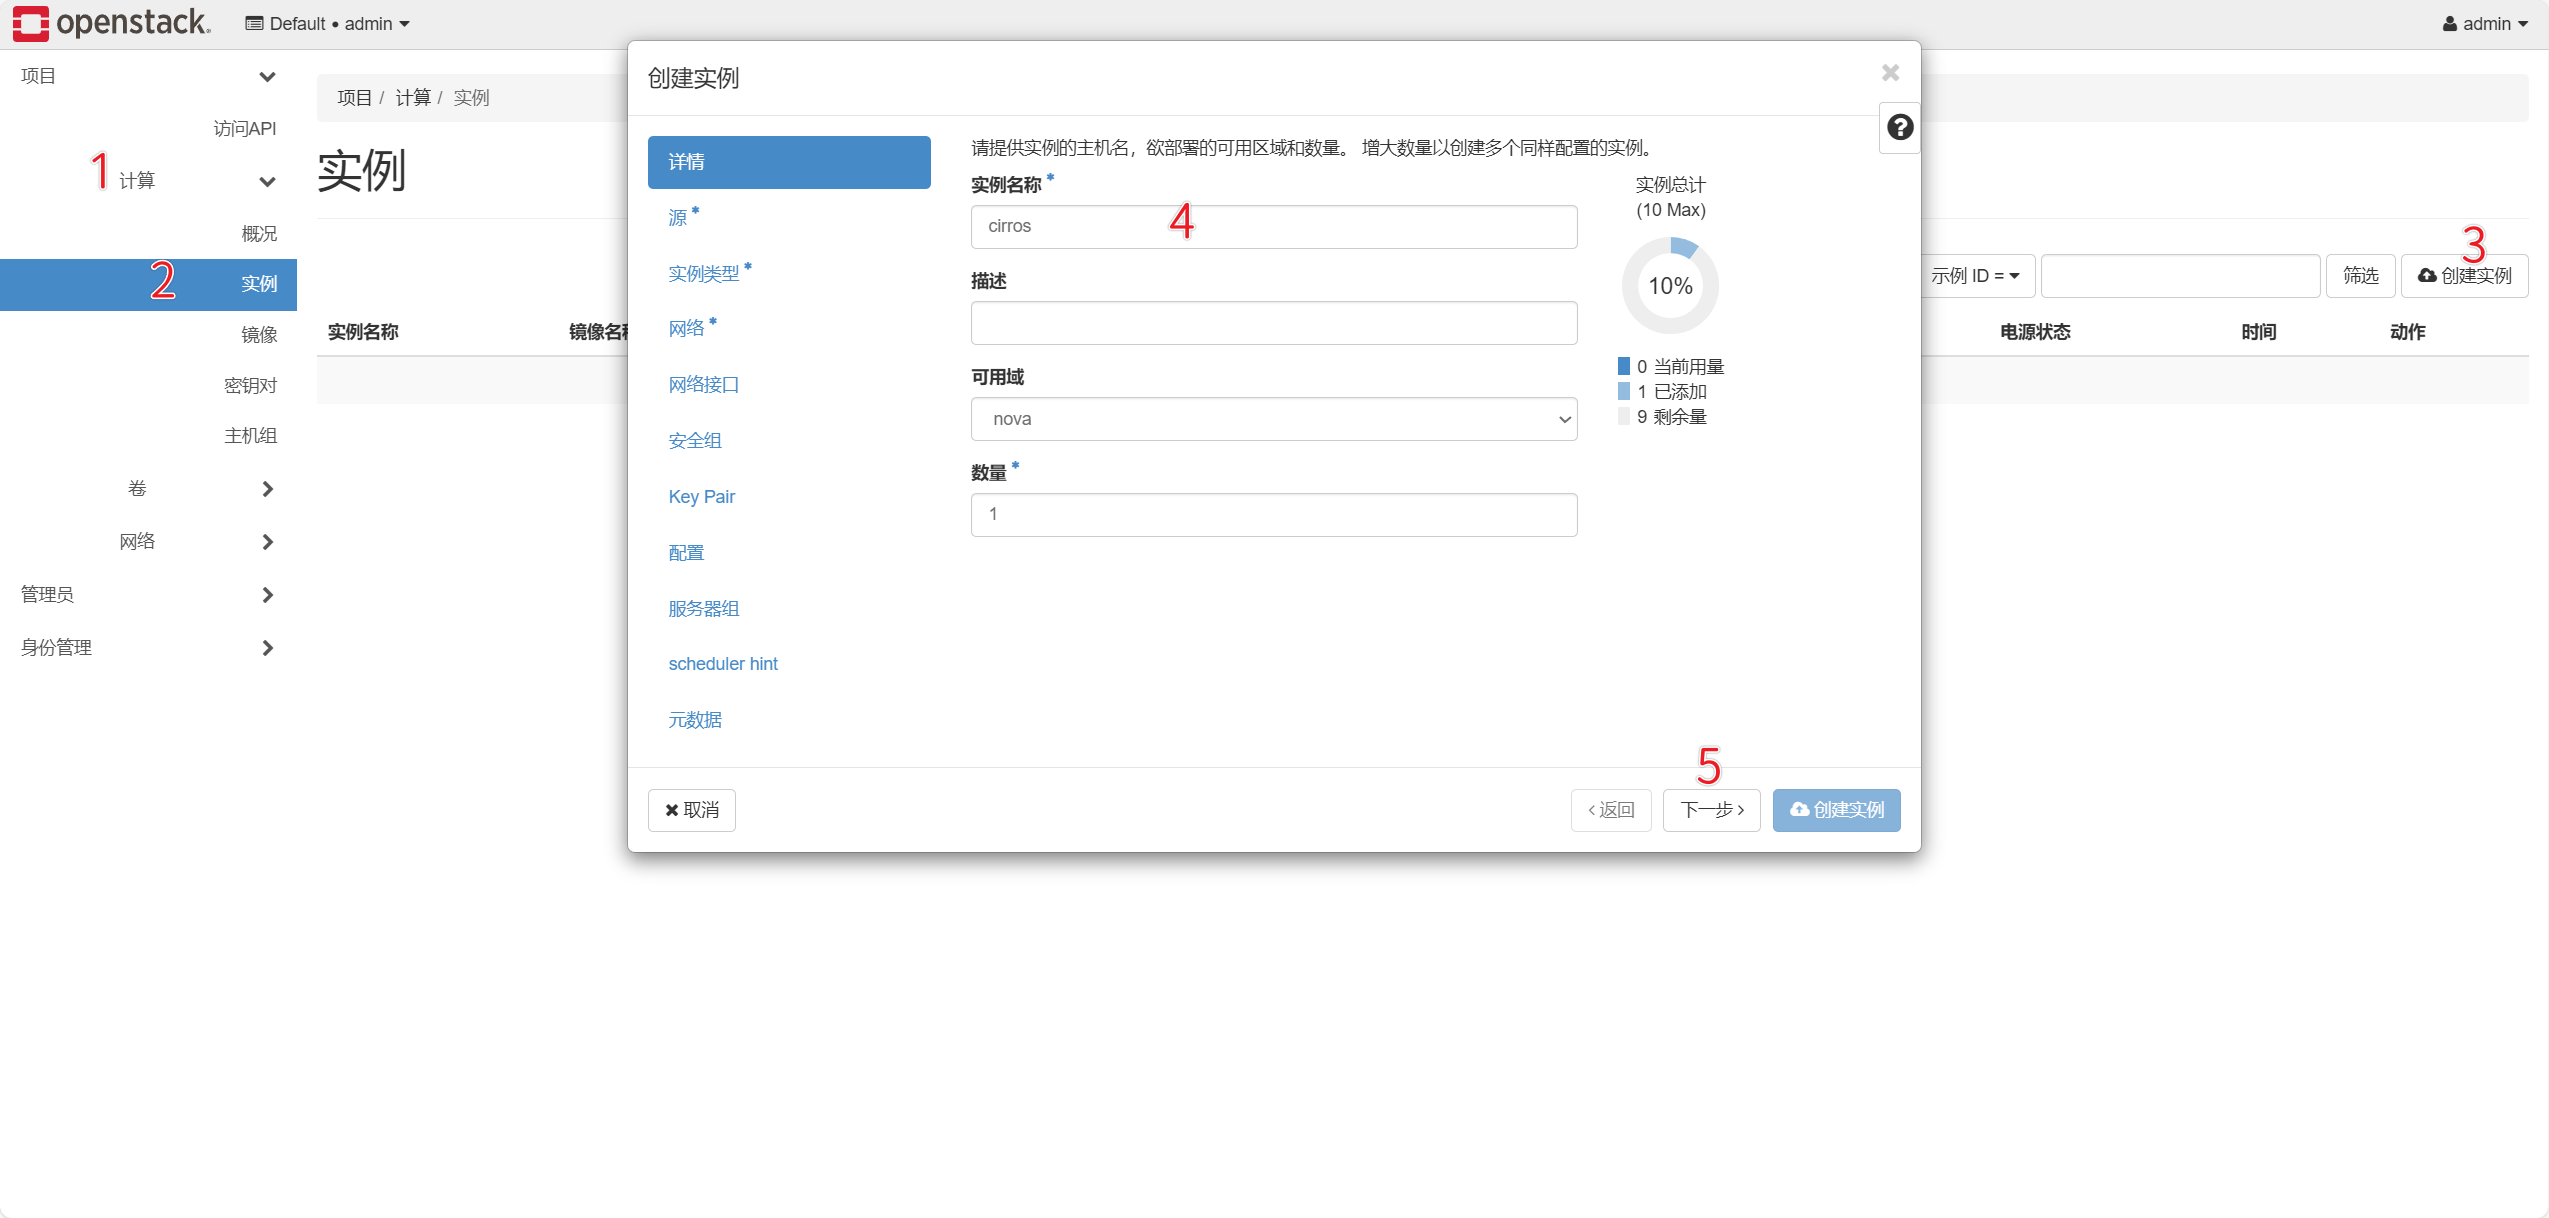
创建实例
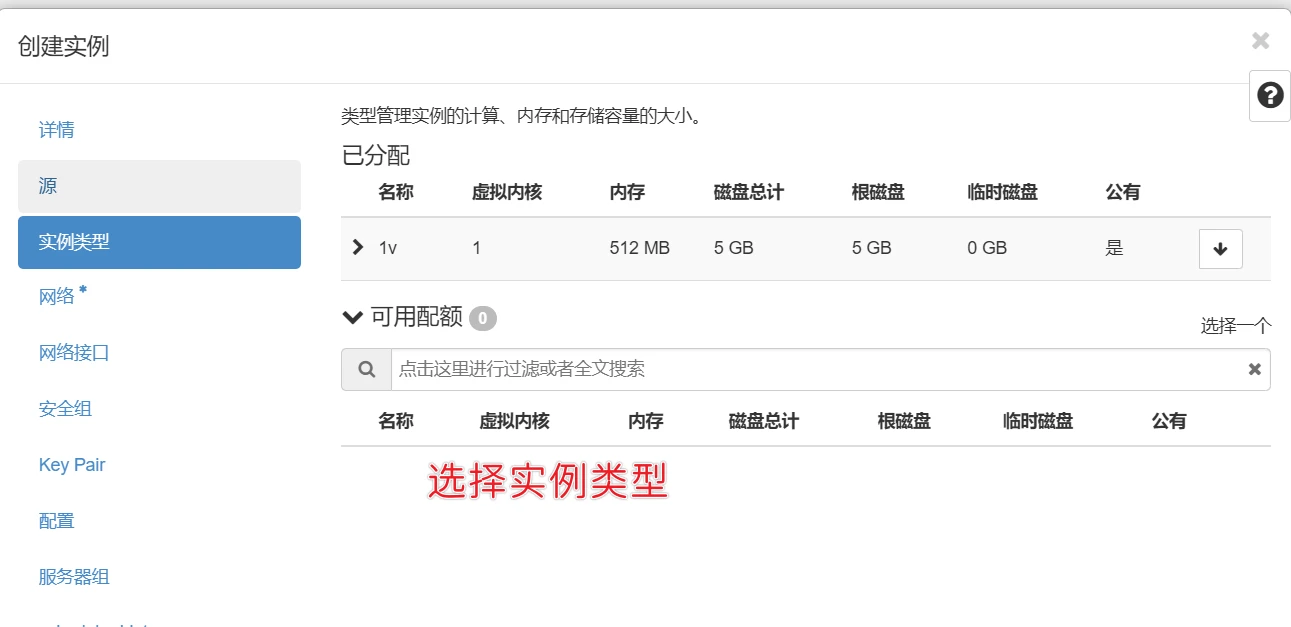
创建实例类型
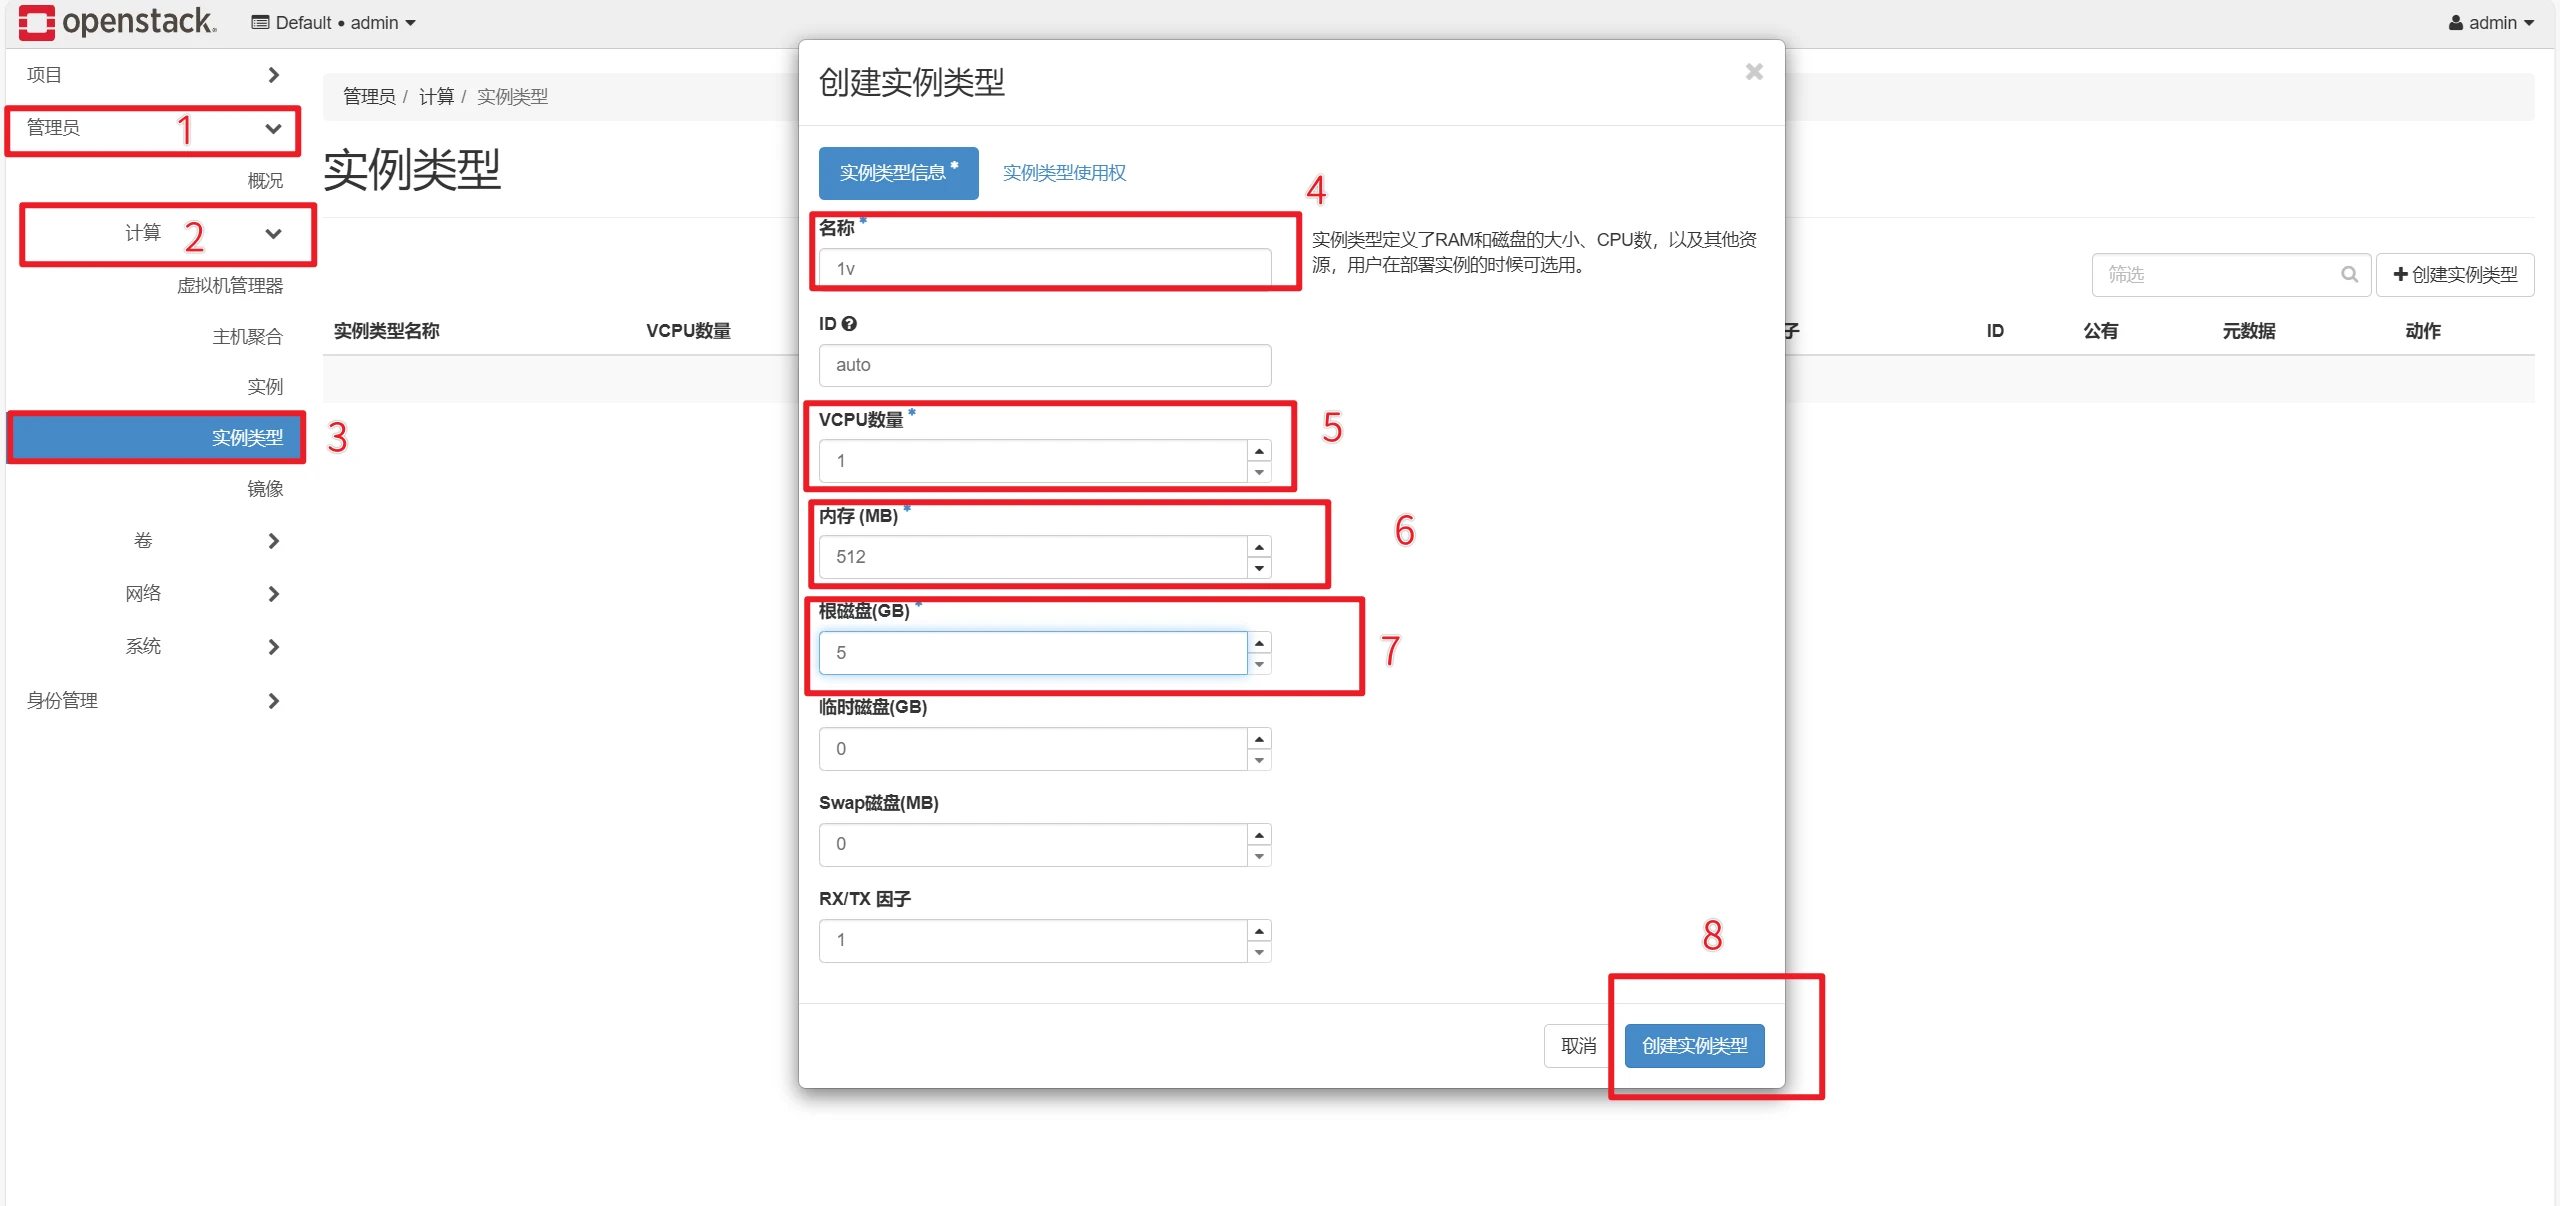
左侧选择管理员,点击计算,点击实例类型,右侧点击创建实例类型。
根据以上图片步骤依次填入:实例名称、VCPU数量、内存大小、根磁盘大小,确认无误后点击创建实例类型。
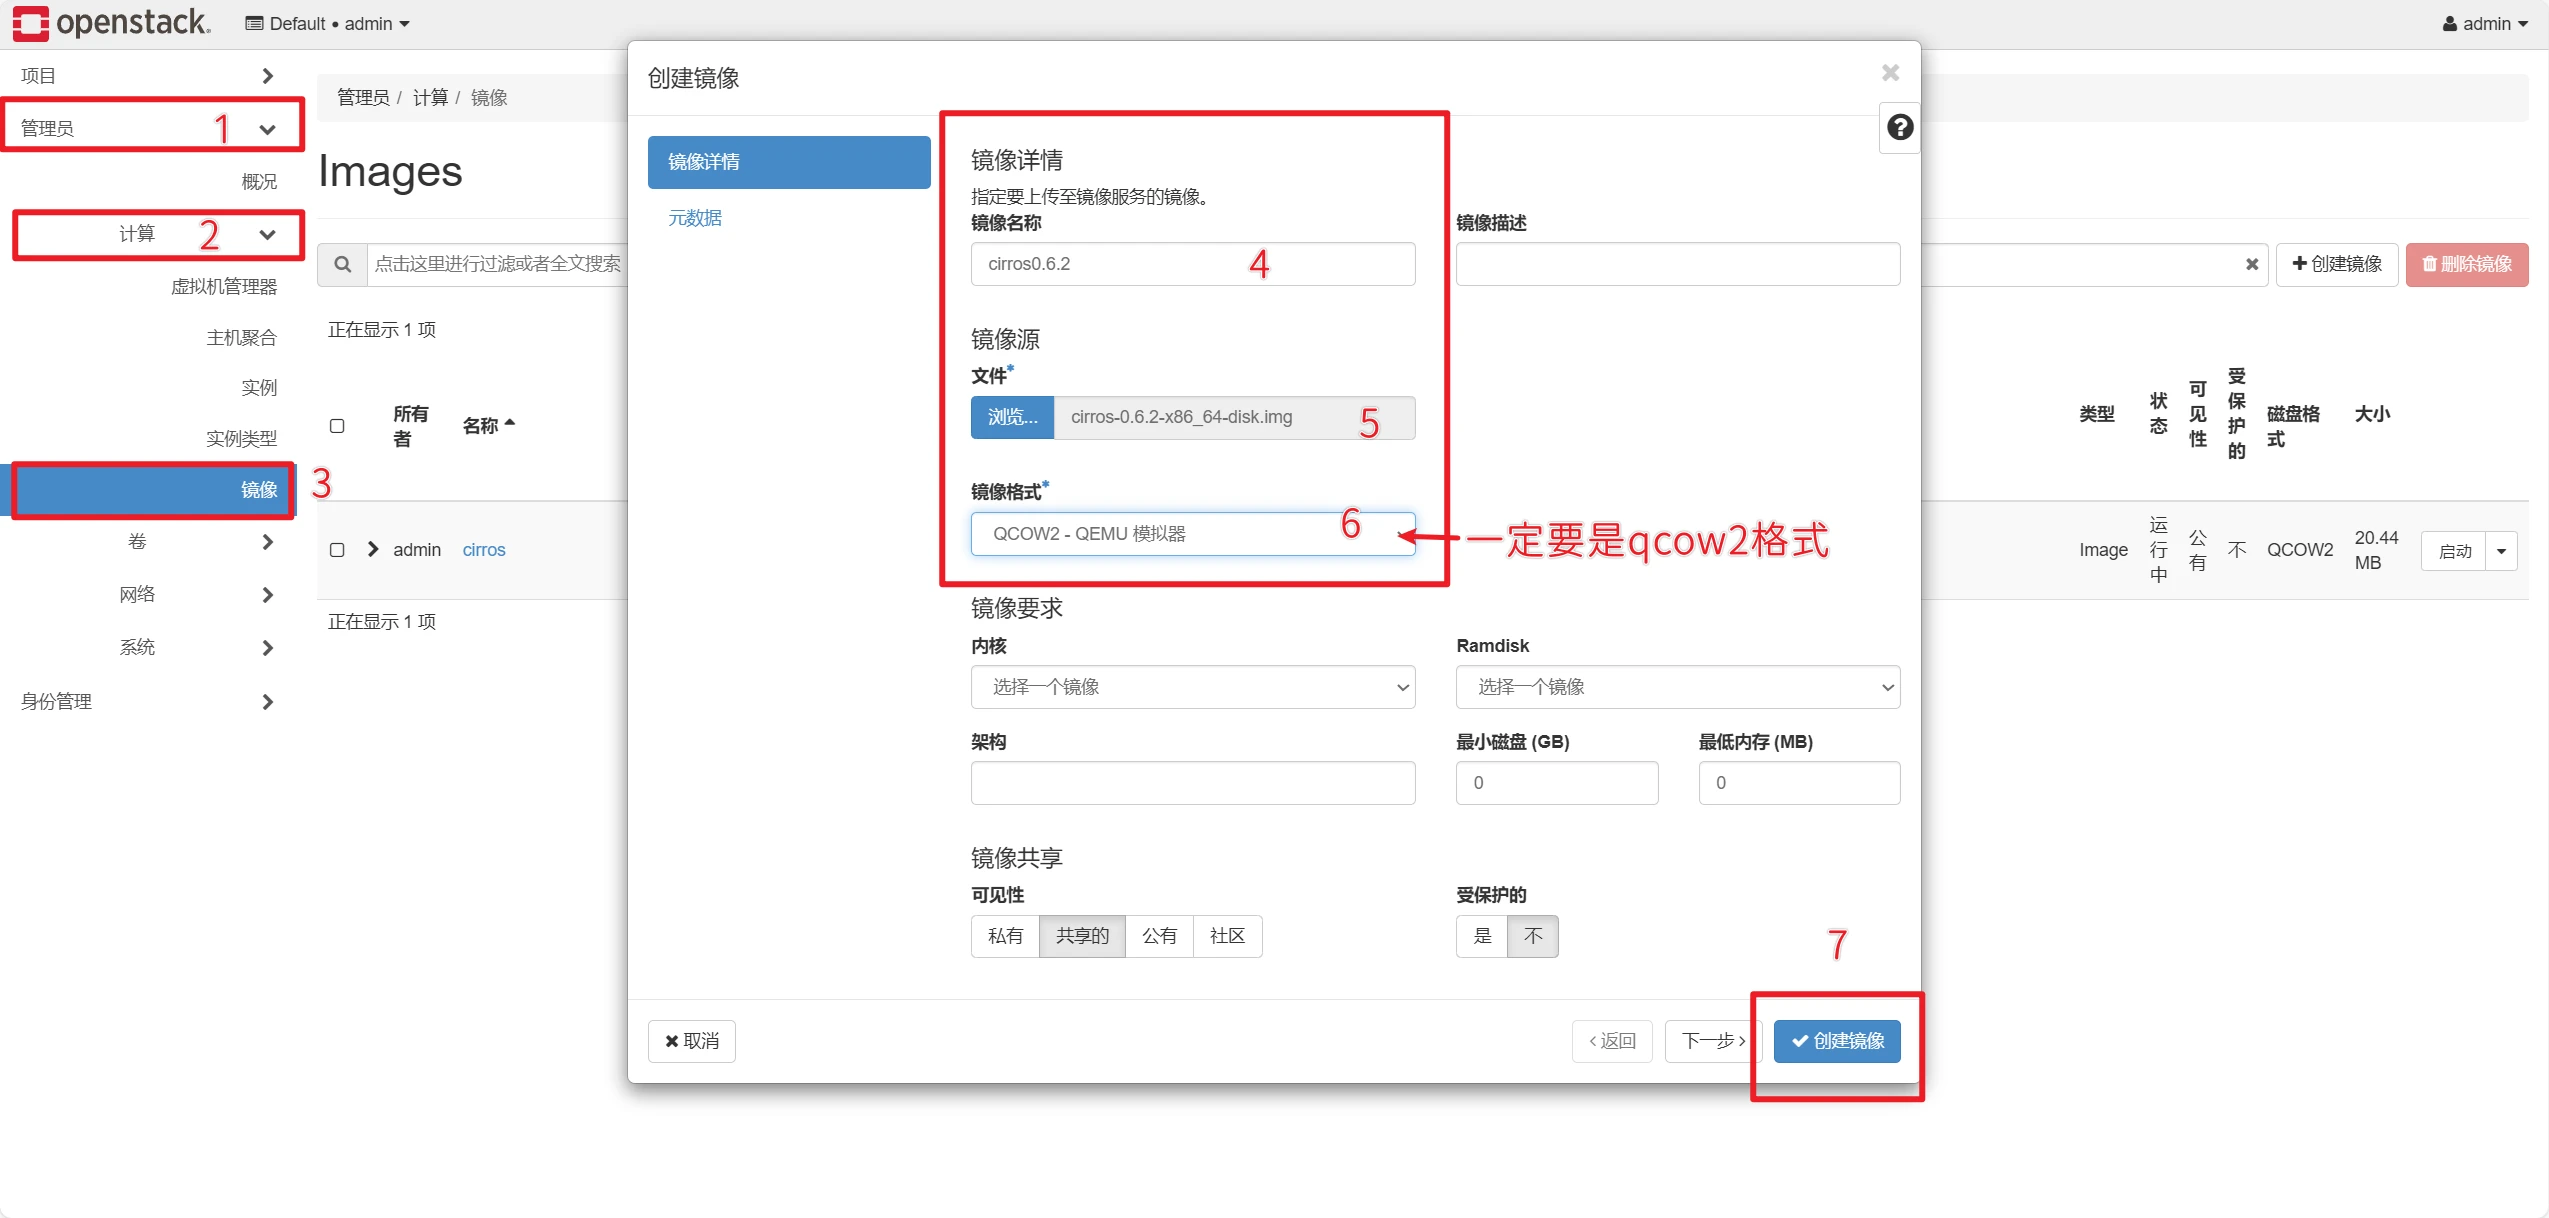
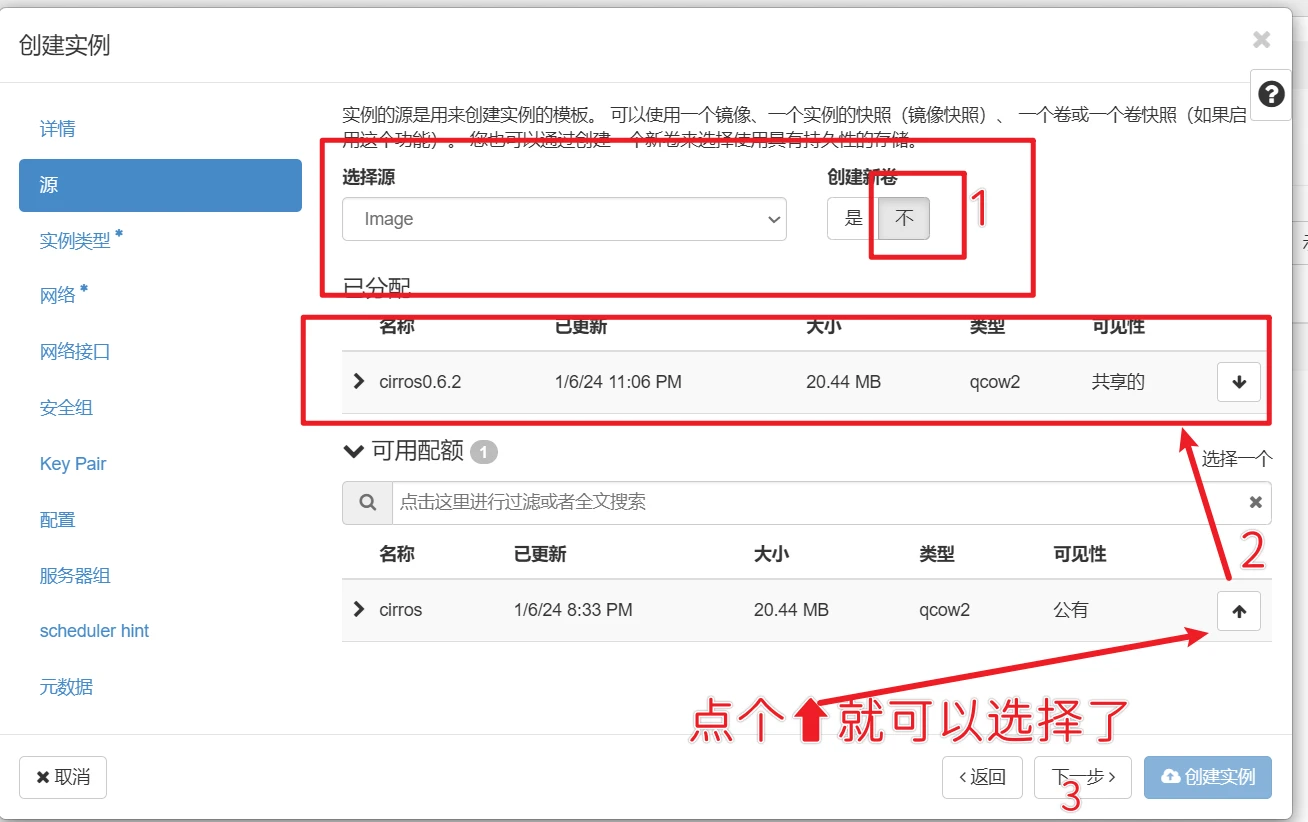
创建镜像
测试镜像:https://download.cirros-cloud.net/0.6.2/cirros-0.6.2-x86_64-disk.img
有两种上传方式(二选一)!!!
1.Windows上传镜像方式
左侧选择管理员,点击计算,点击镜像,右侧点击创建镜像。
Windows下载到本地即可
根据以上图片步骤依次填入:镜像名称、选择文件、镜像格式,确认无误后点击创建镜像。注 :演示上传的 img 镜像格式需选用 QCOW2 - QEMU模拟器 才可正常加载。
2.Linux上传镜像方式
1
2
3
4
5
6
7
8
9
10
11
12
13
14
15
16
17
source admin-openrc wget https://download.cirros-cloud.net/0.6.2/cirros-0.6.2-x86_64-disk.img #可能会下载不到,可以复制链接到浏览器下载,然后移到/root/目录下 glance image-create --name "cirros" \ --file cirros-0.6.2-x86_64-disk.img \ --disk-format qcow2 --container-format bare \ --visibility=public openstack image list [root@controller-1 ~]# openstack image list +--------------------------------------+--------+--------+ | ID | Name | Status | +--------------------------------------+--------+--------+ | 627761da-7f8c-4780-842a-e50e62f5c464 | cirros | active | +--------------------------------------+--------+--------+
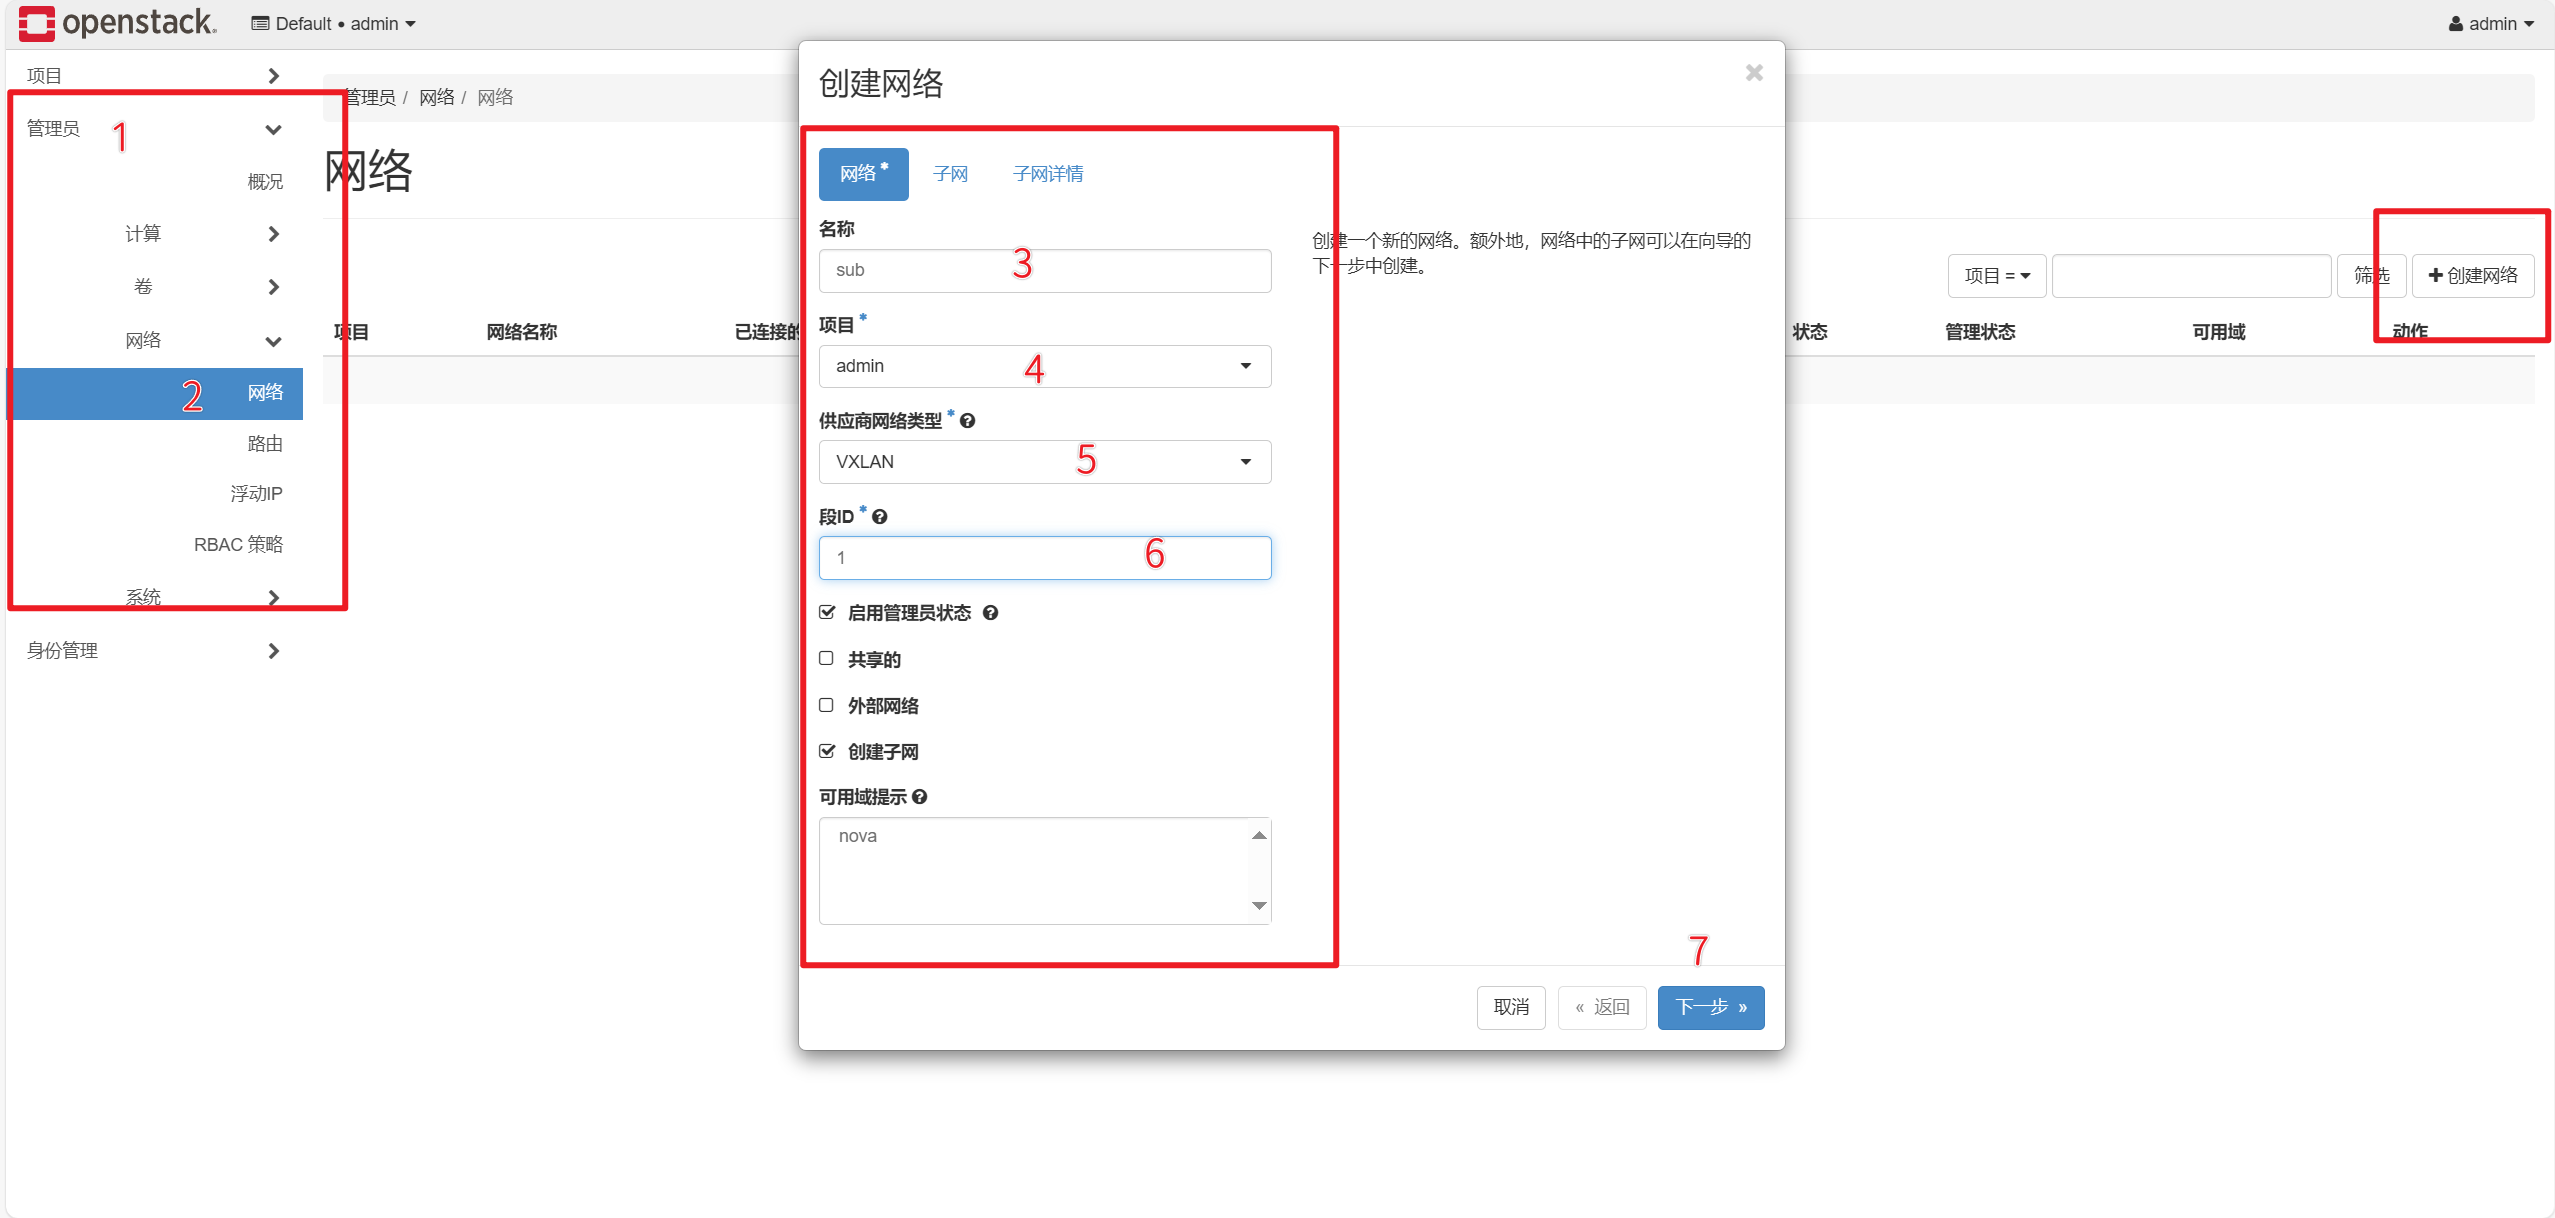
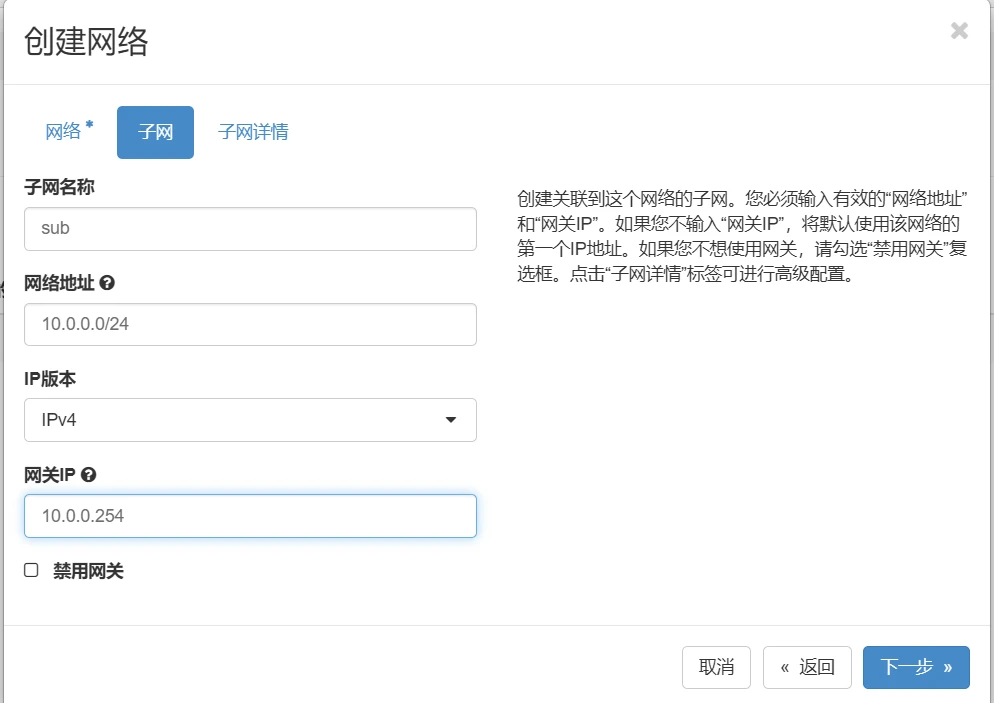
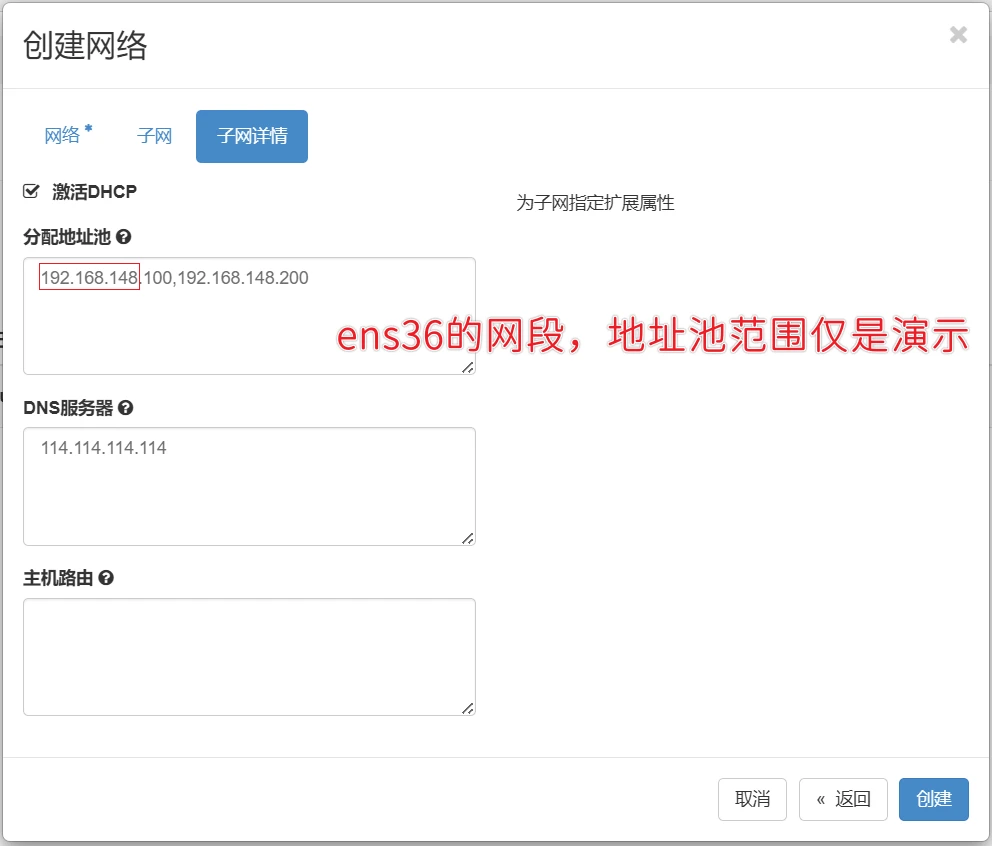
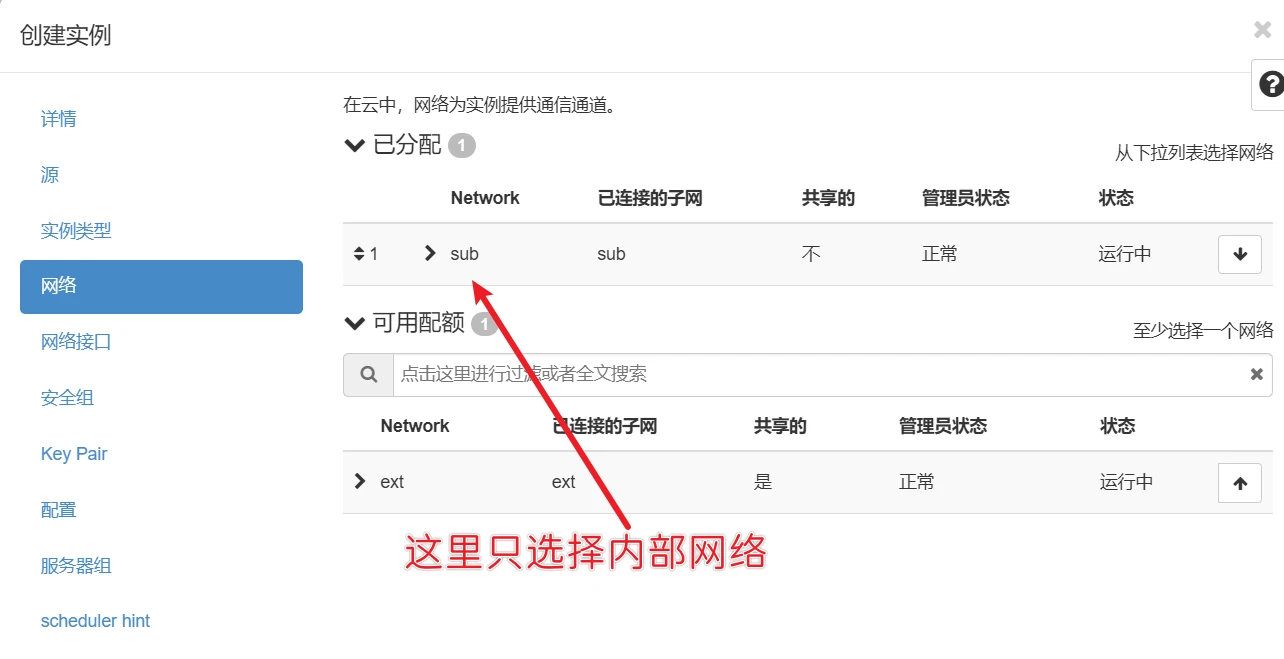
创建内部网络
左侧选择管理员,点击网络,点击网络,右侧点击创建网络。
创建外部网络
左侧选择管理员,点击网络,点击网络,右侧点击创建网络。
如果你是按照本文档搭建的,就填provider
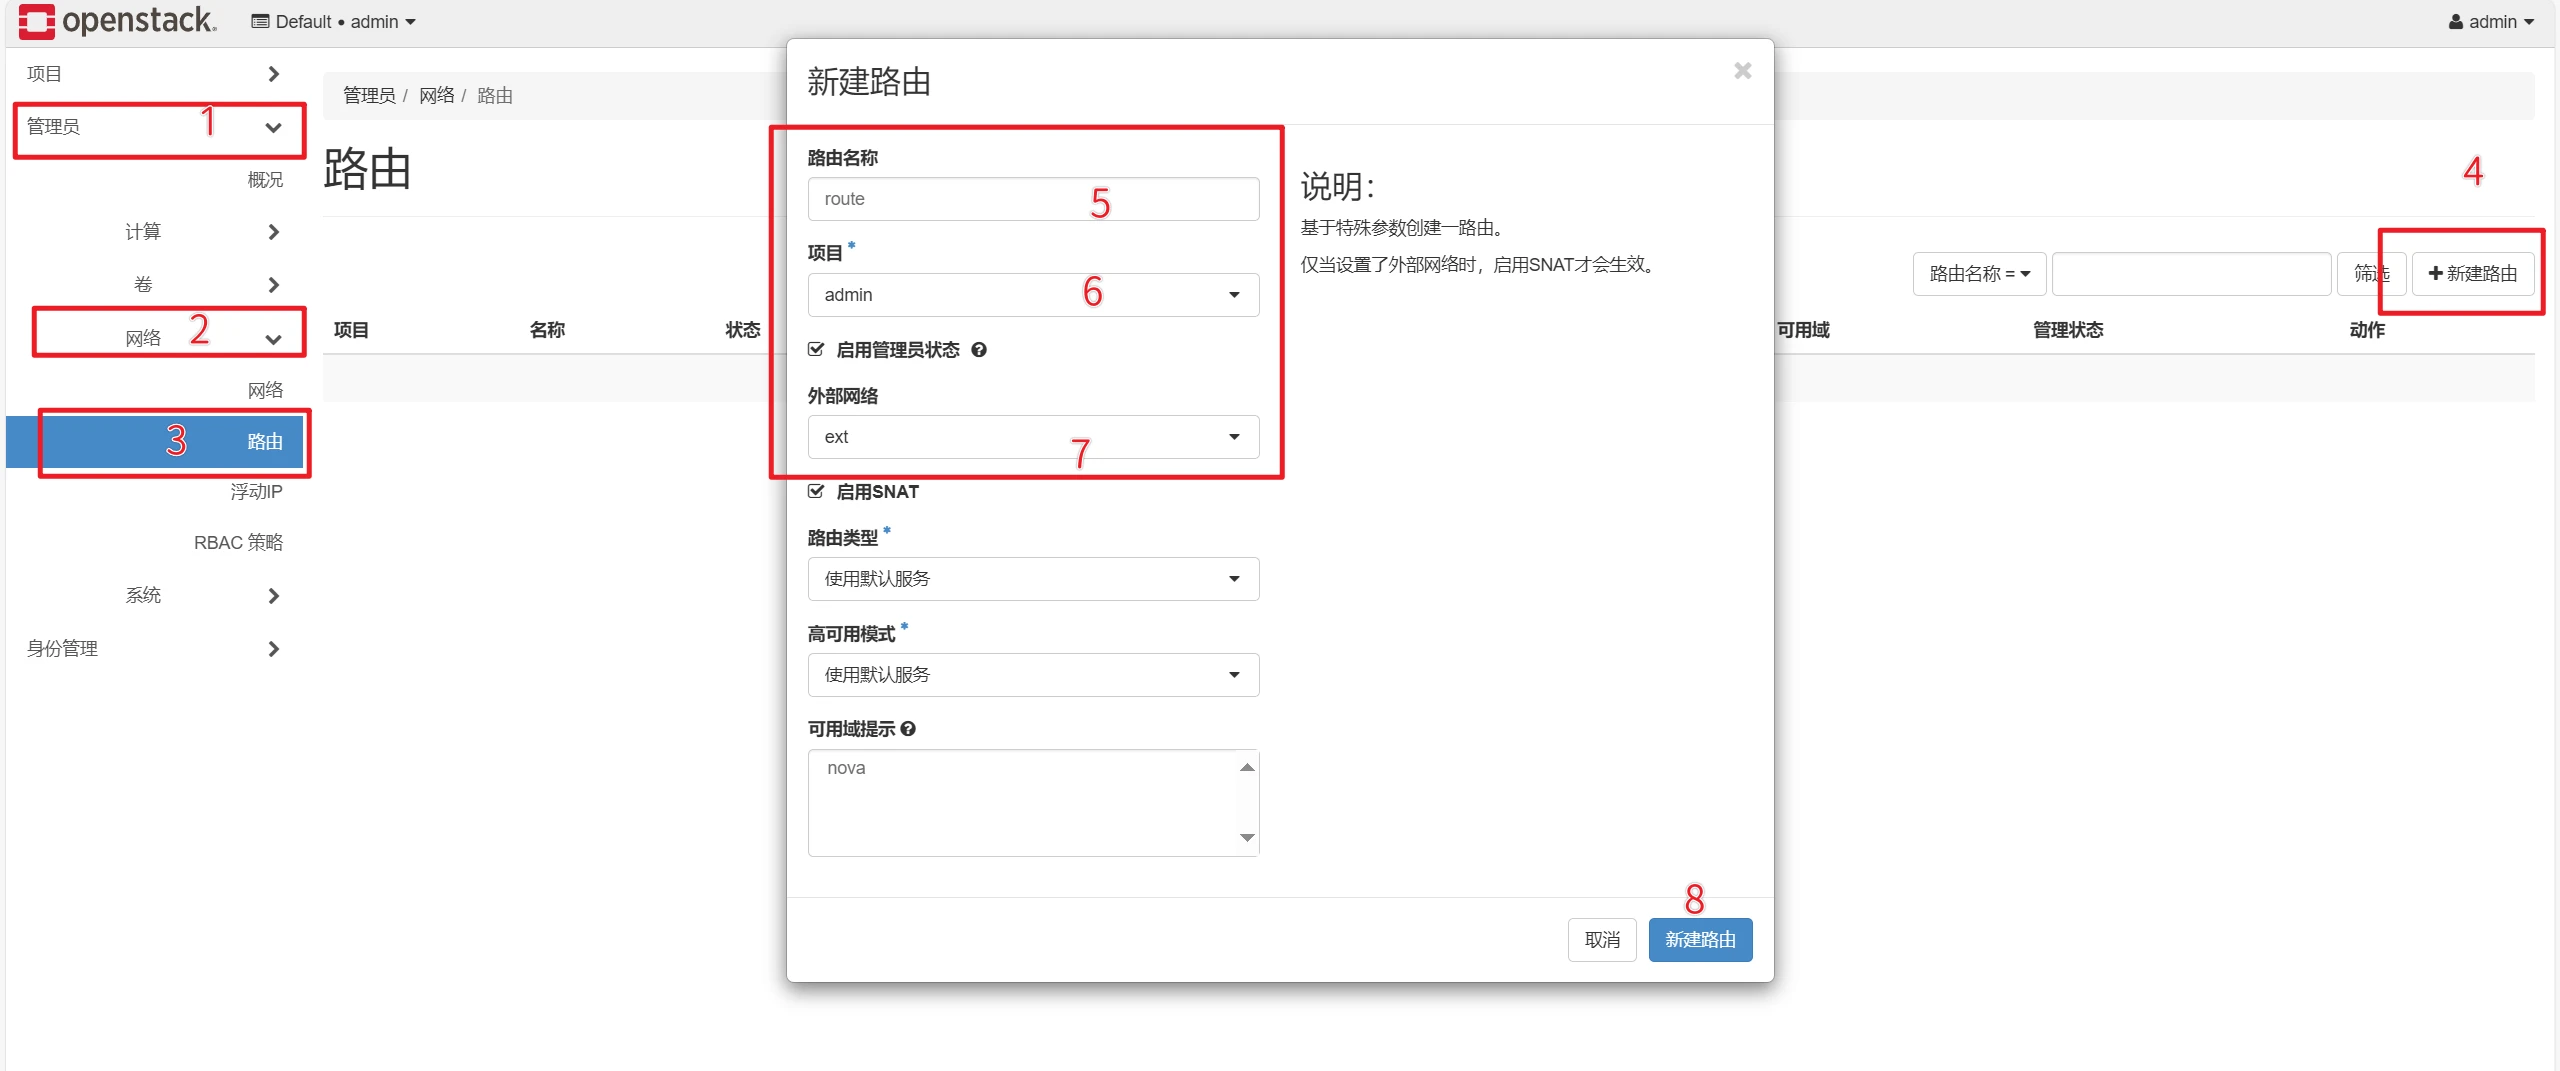
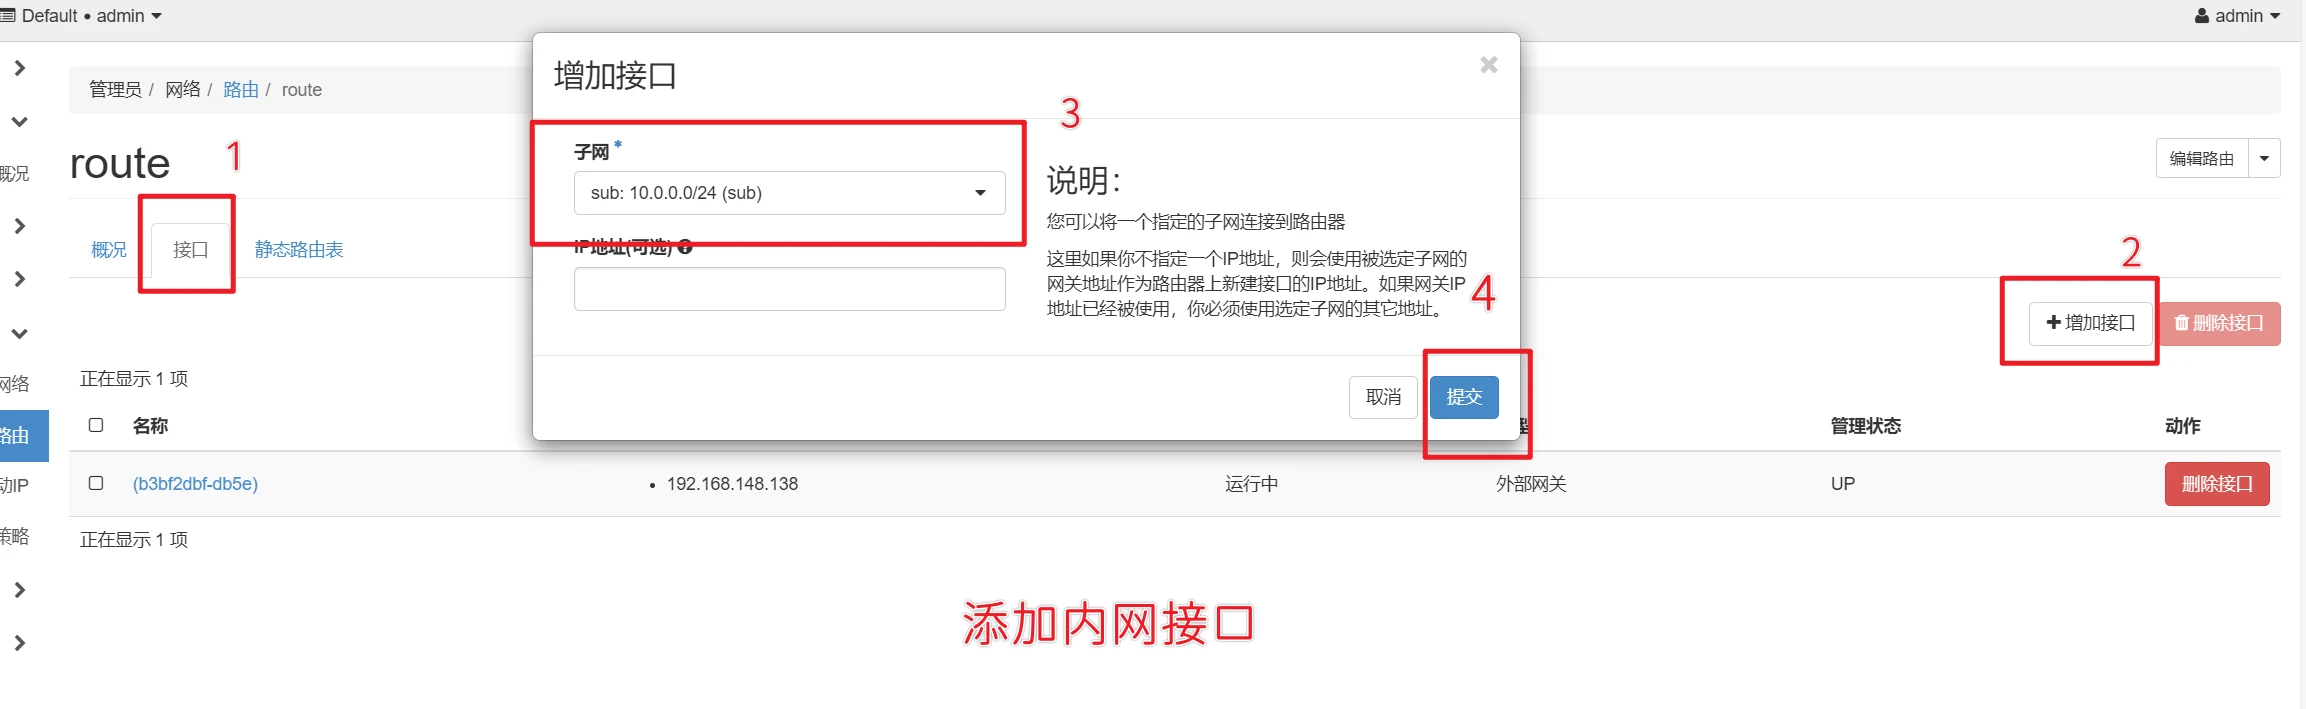
创建路由
左侧选择管理员,点击网络,点击路由,右侧点击创建路由。
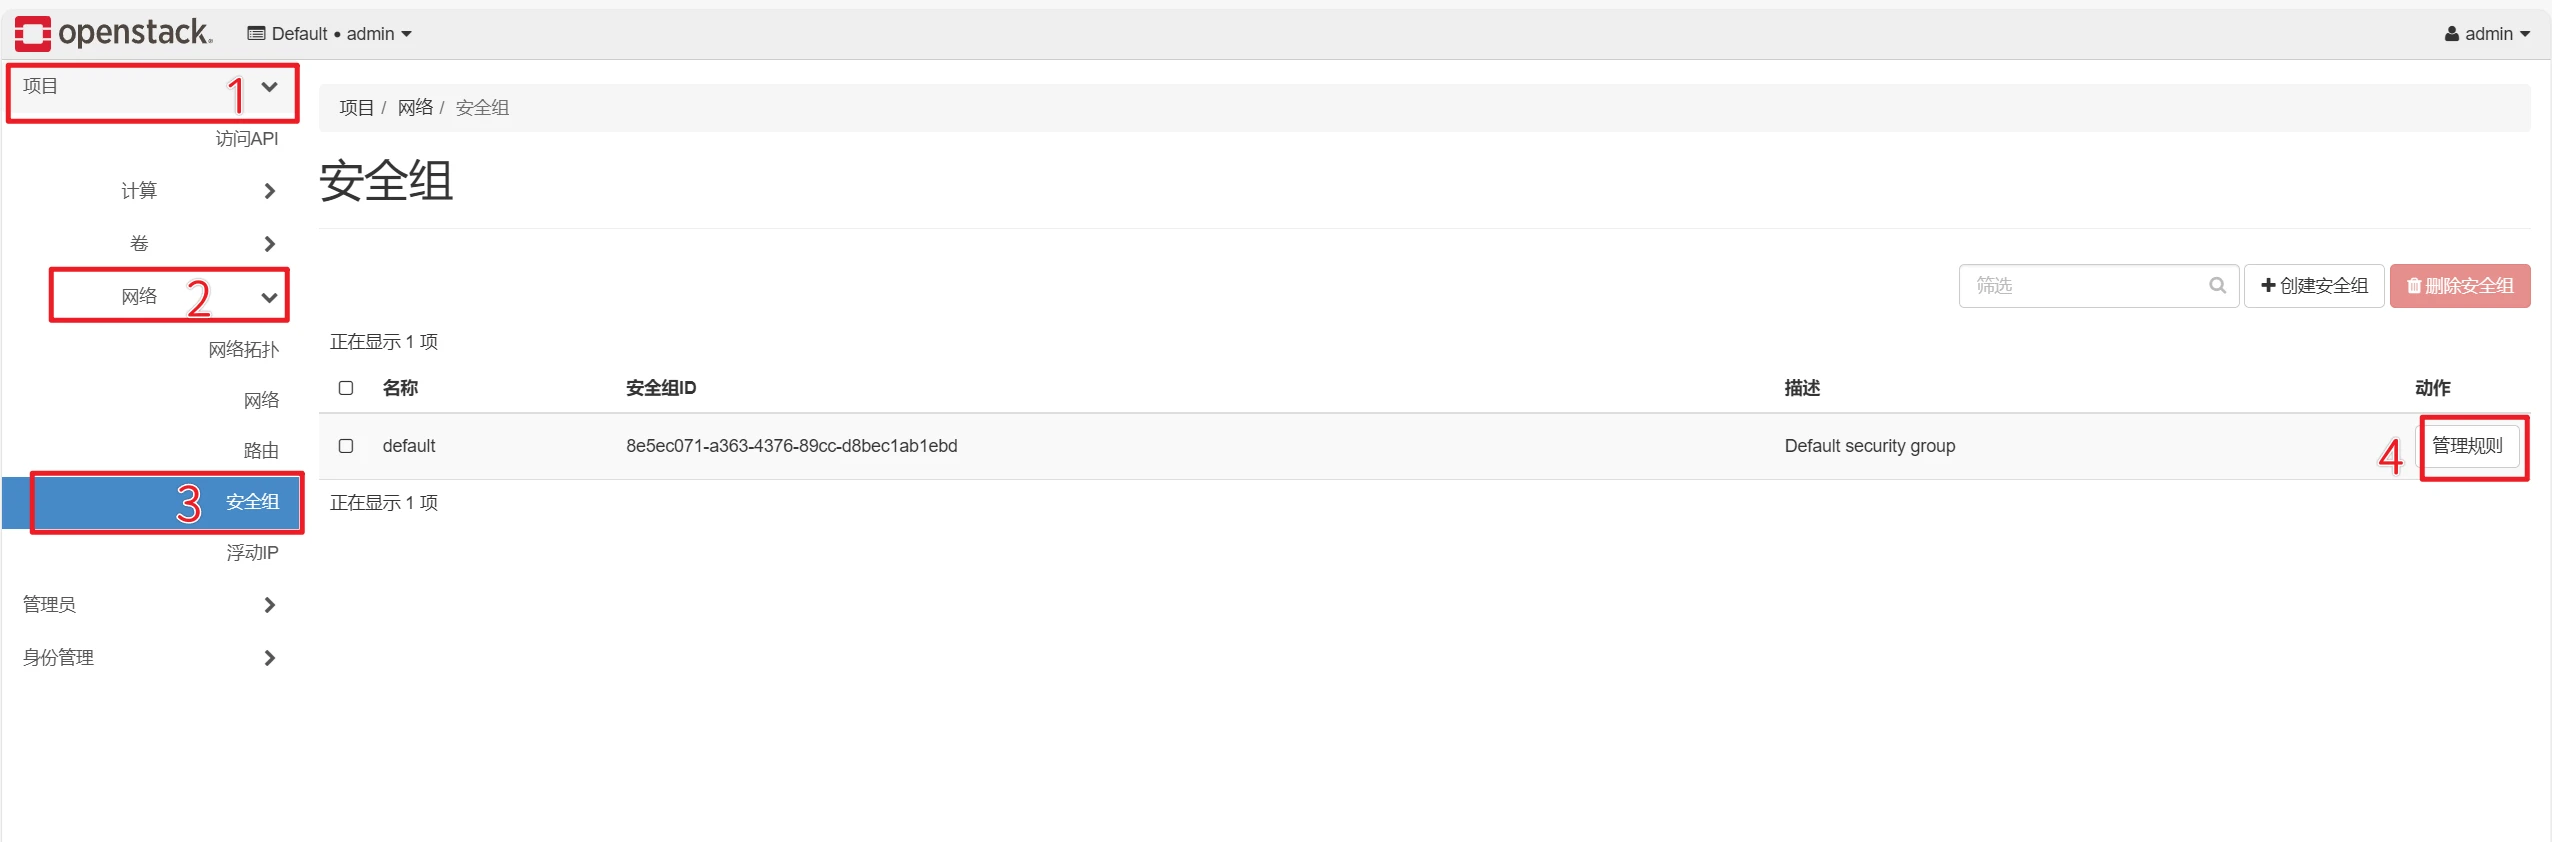
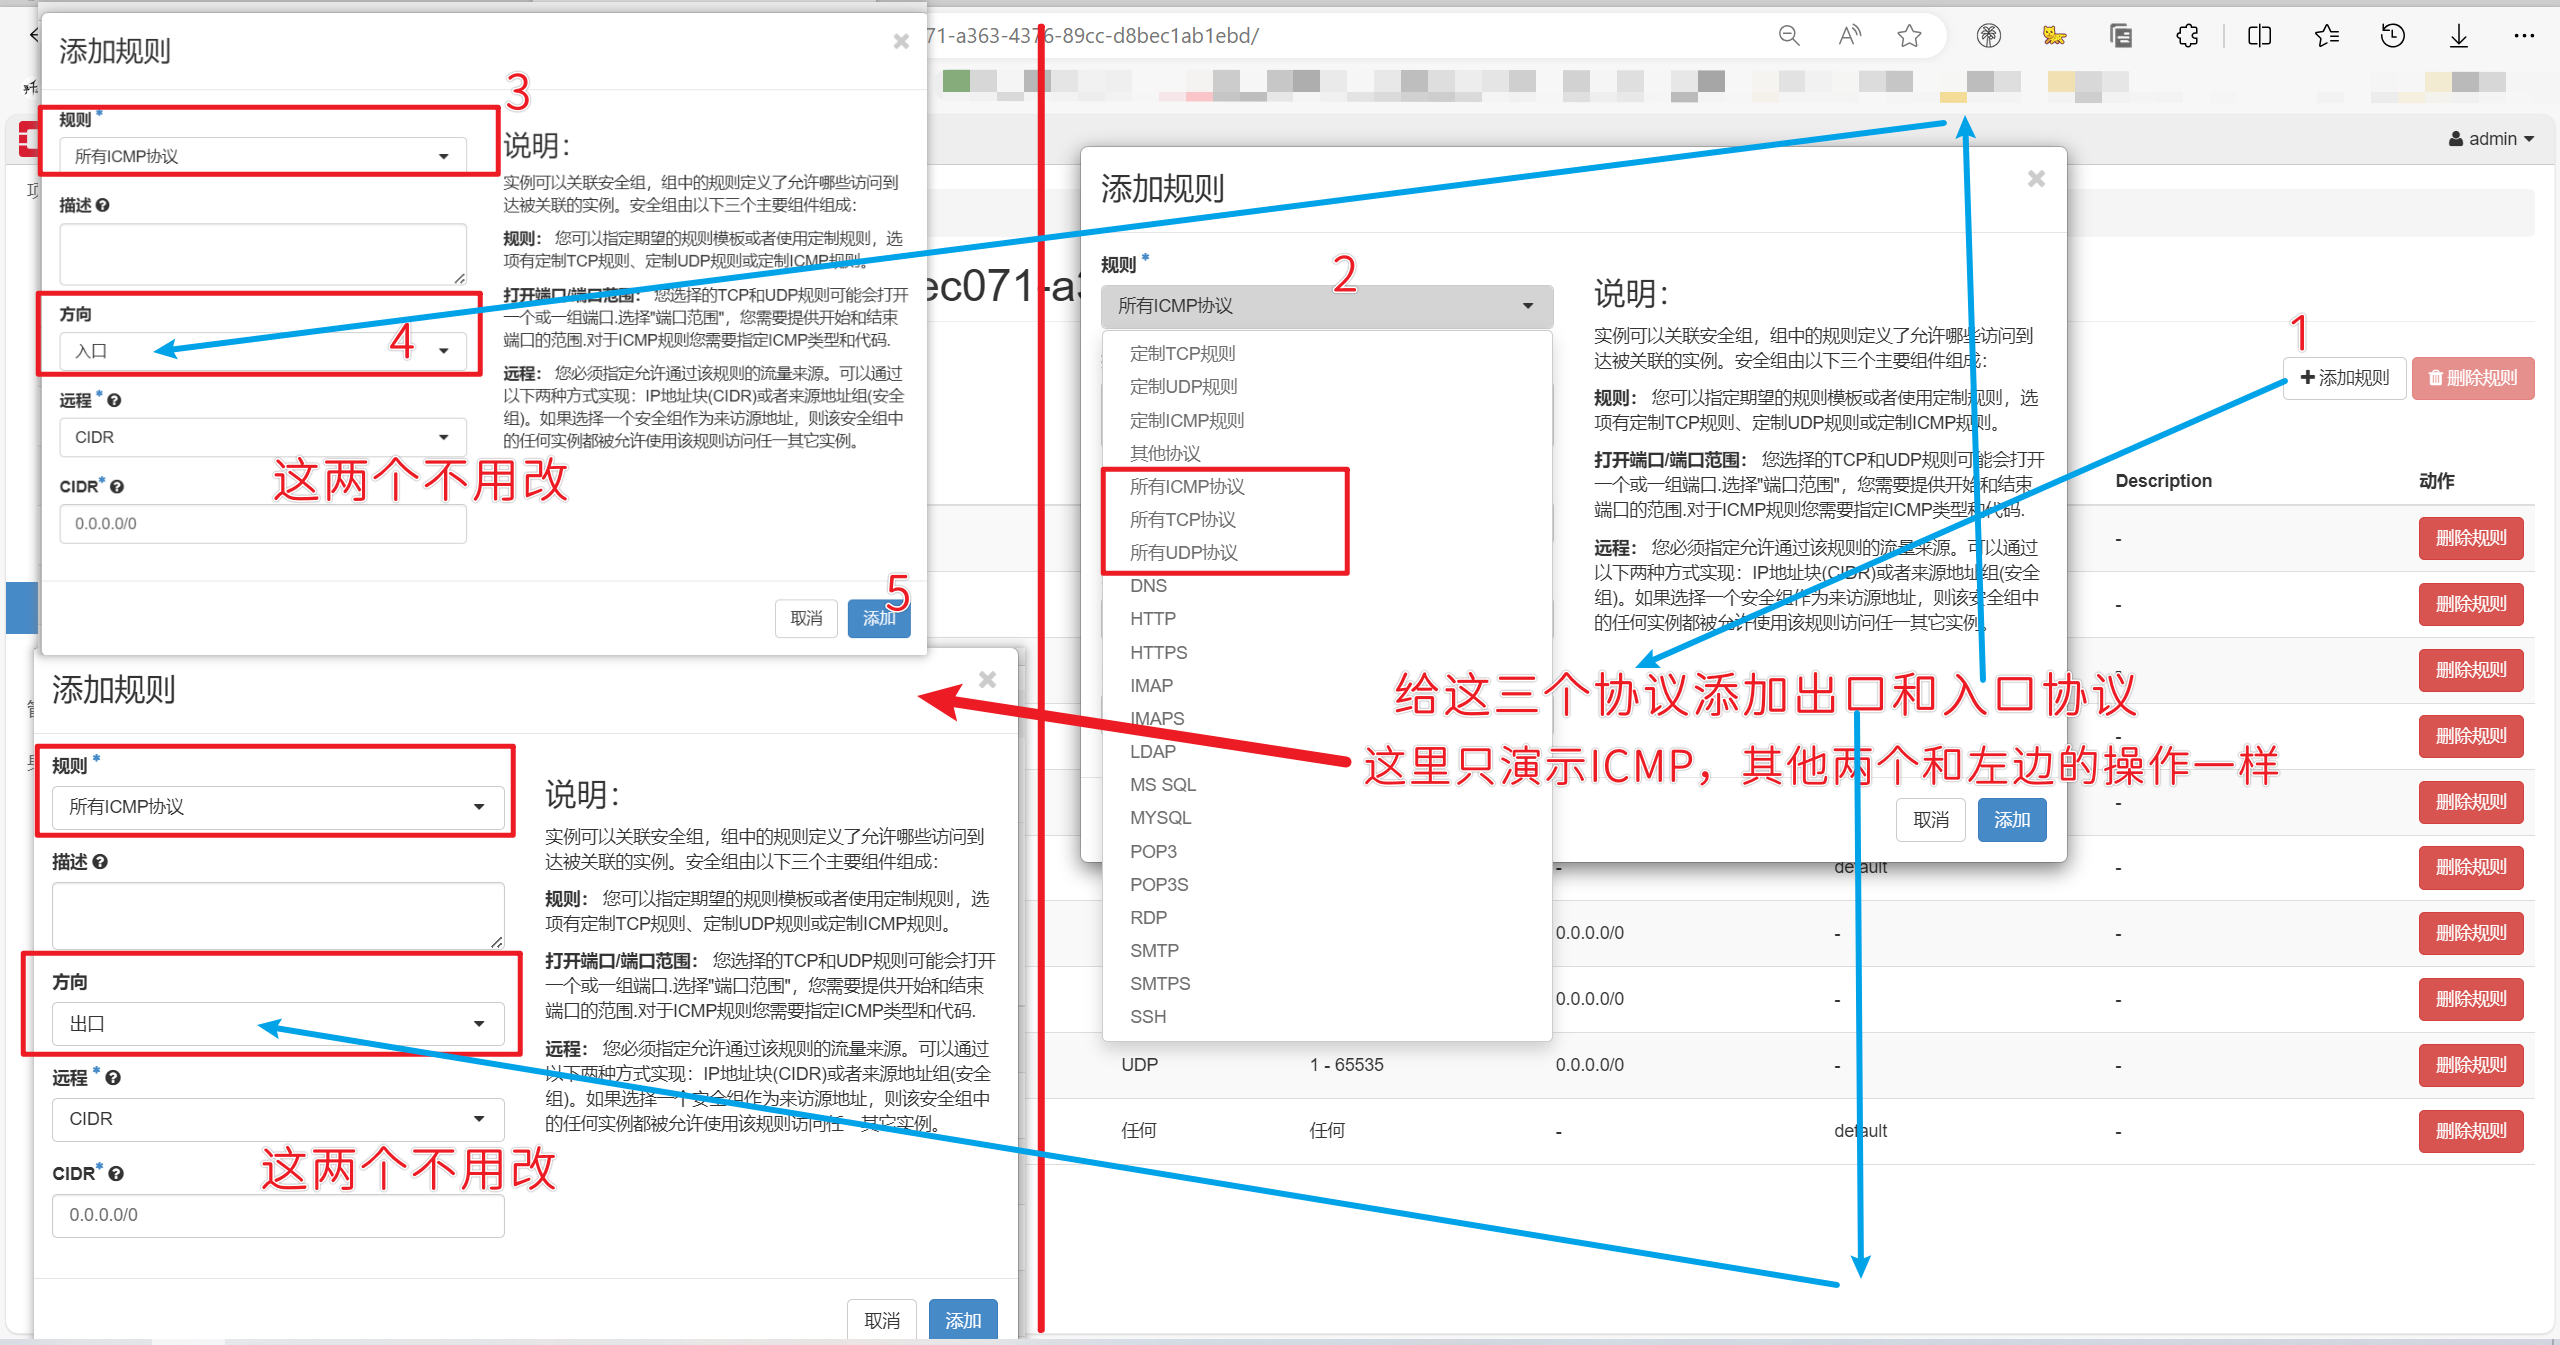
添加安全组规则
最后效果长这样
创建实例
然后点击创建实例
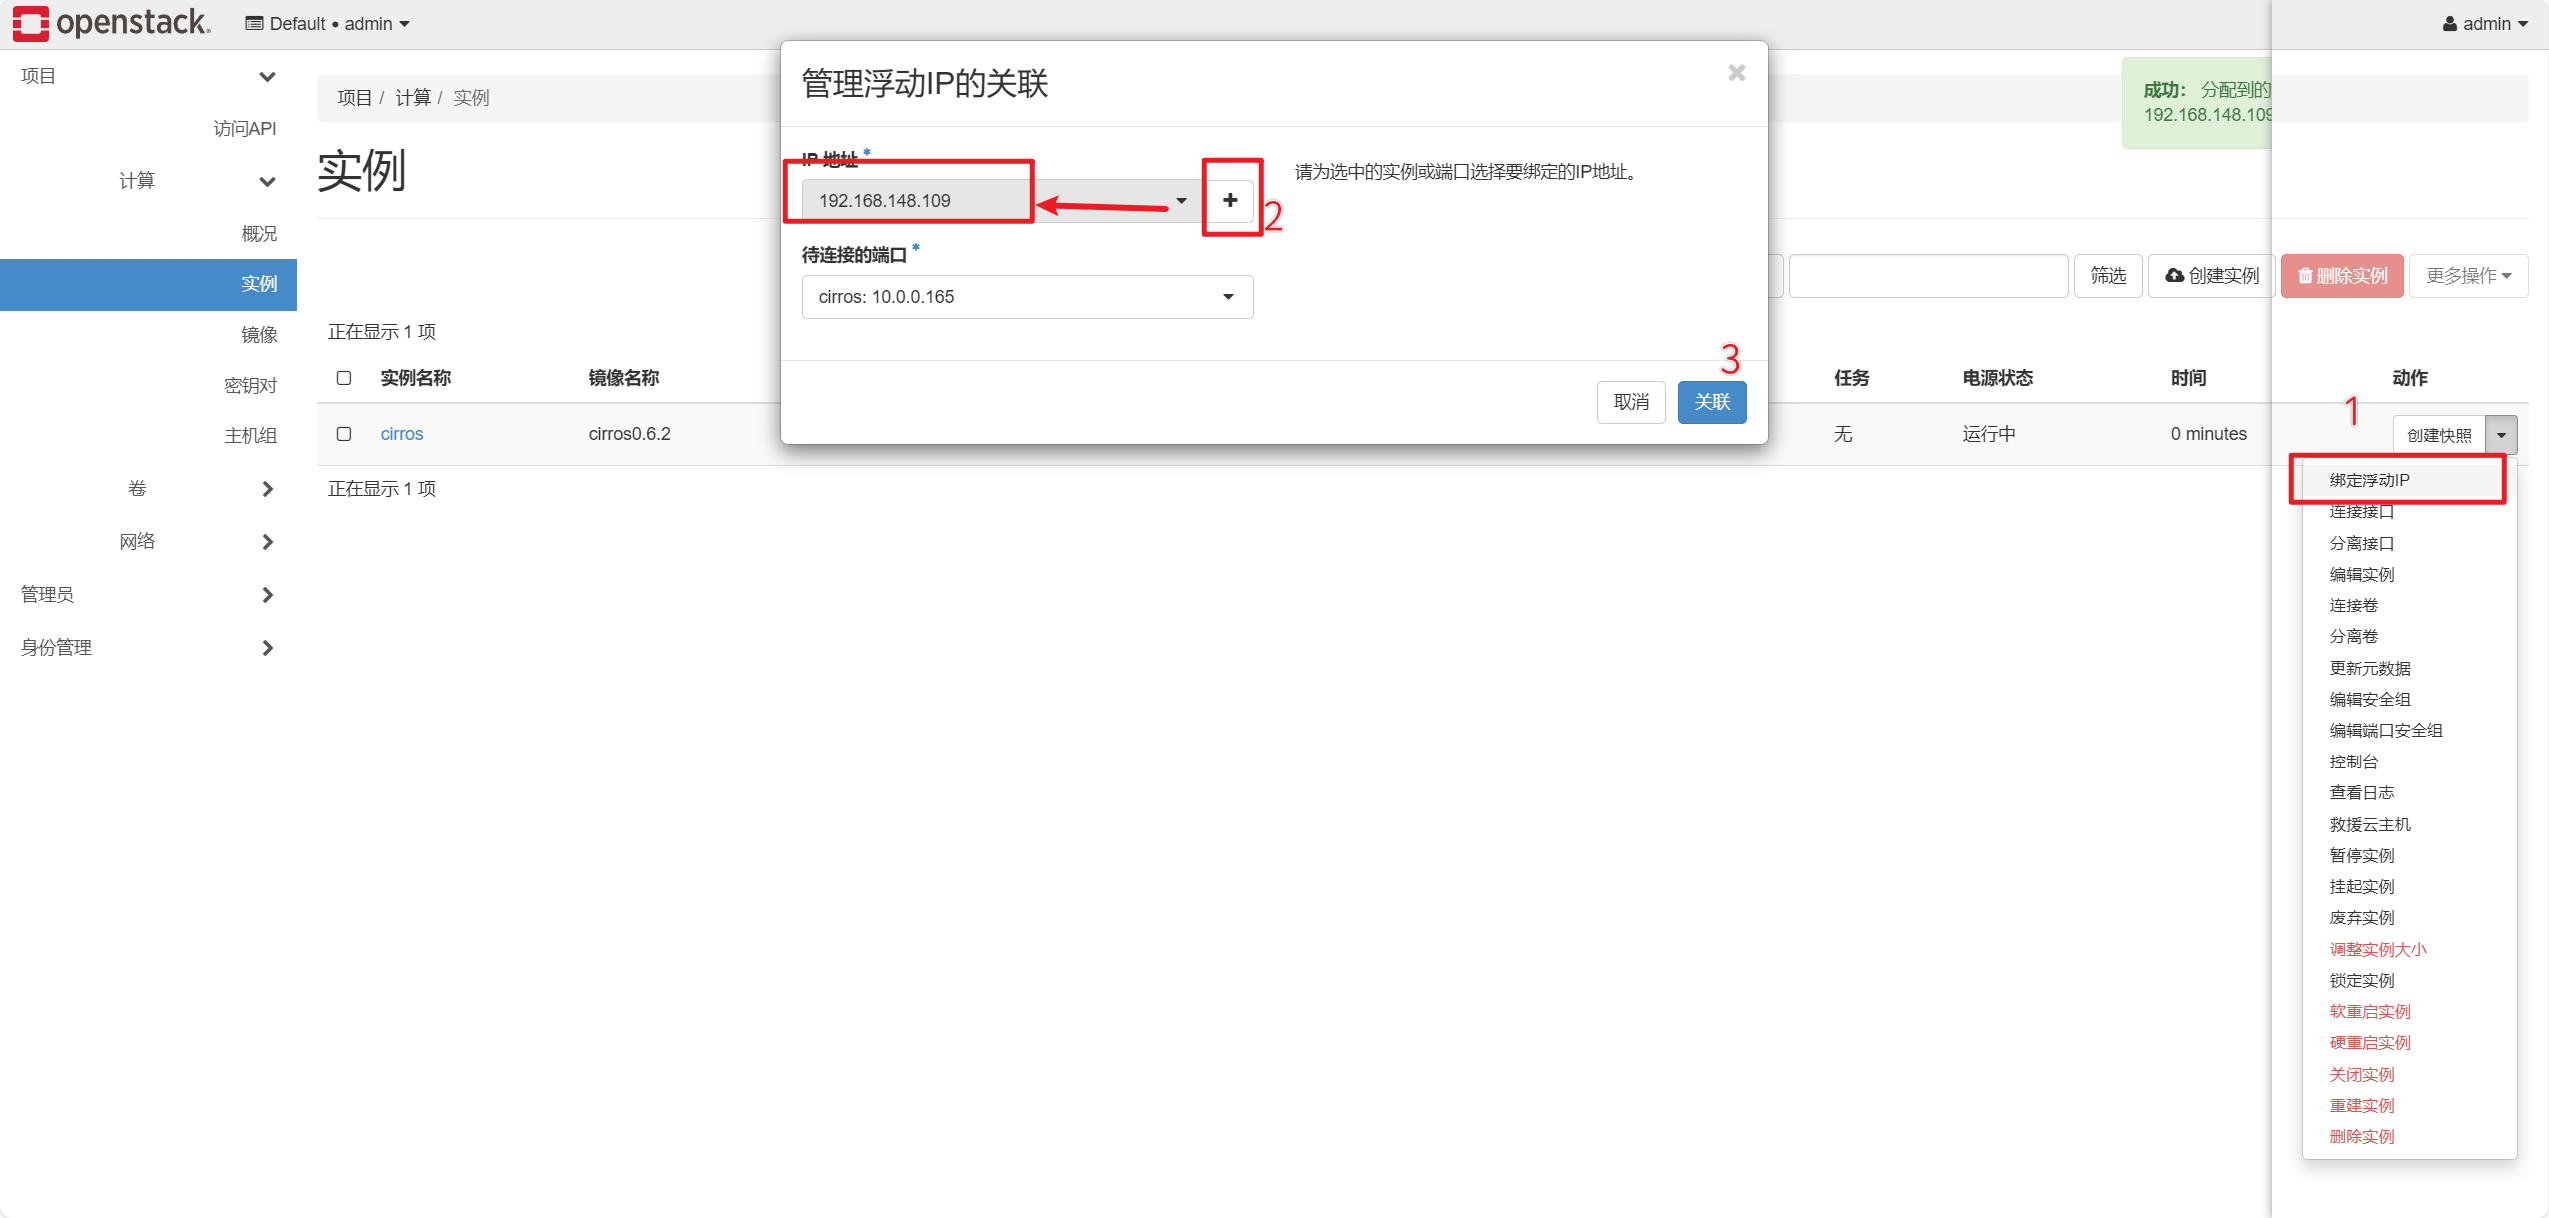
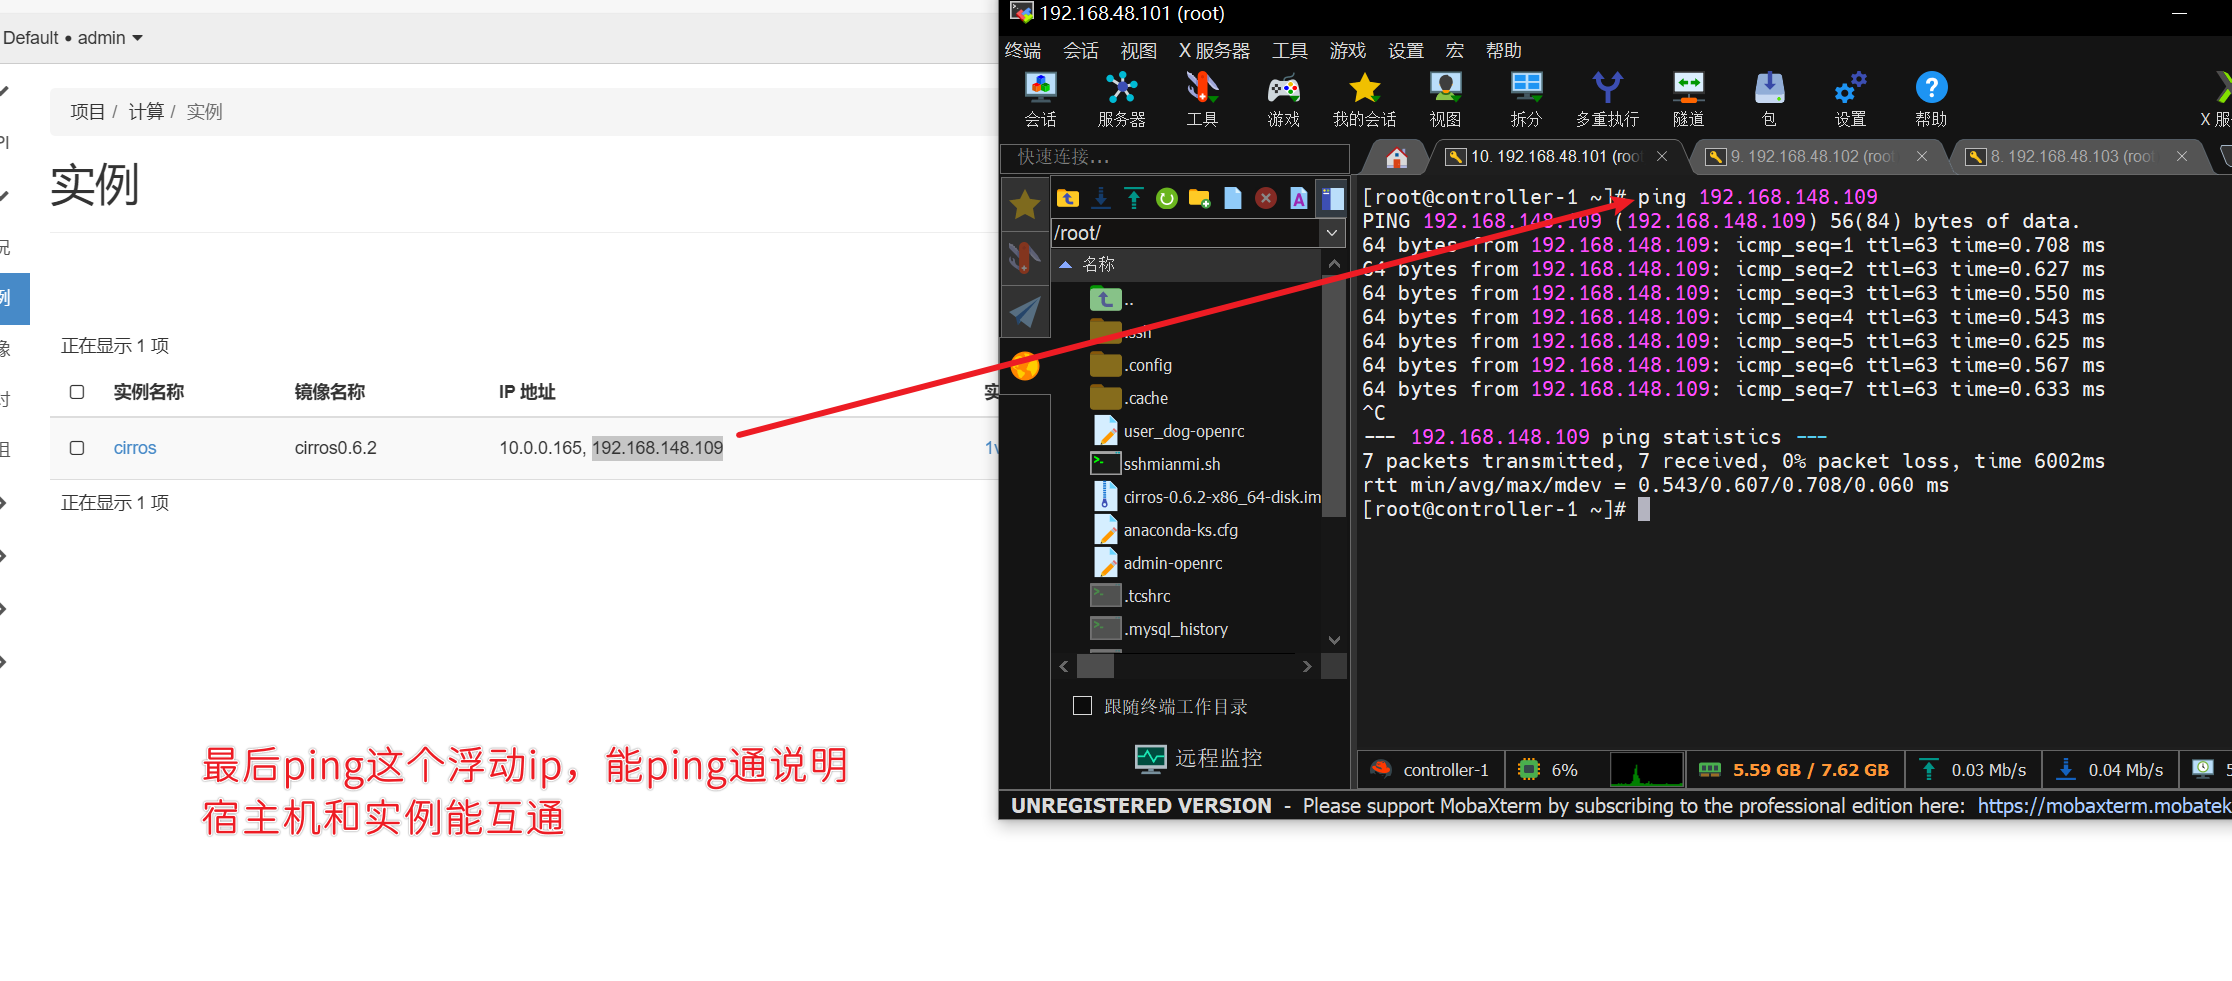
分配浮动ip
结论:创建实例成功
千屹博客旗下的所有文章,是通过本人课堂学习和课外自学所精心整理的知识巨著


 微信
微信 支付宝
支付宝