Ansible-总手册
Ansible三机部署 Ansible配置及相关指令 用户级ansible环境构建(小练习) Ansible-常用模块 Ansible-playblock Ansible-templates Ansible-Roles 实验任务:安装httpd服务
Ansible三机部署
关于
ansible是新出现的自动化运维工具,基于Python开发,集合了众多运维工具(puppet、chef、func、fabric)的优点,实现了批量系统配置、批量程序部署、批量运行命令等功能。
主机分布
主机名
ip
系统
内存
硬盘
controller
192.168.48.100
Centos7.9
4G
100G
node01
192.168.48.101
Centos7.9
4G
100G
node02
192.168.48.102
Centos7.9
4G
100G
修改主机名
controlle
1 hostnamectl set-hostname controller && bash
node01
1 hostnamectl set-hostname node01 && bash
node02
1 hostnamectl set-hostname node02 && bash
三台机加入hosts
1
2
3
4
5
cat >> /etc/hosts << EOF 192.168.48.100 controller 192.168.48.101 node01 192.168.48.102 node02 EOF
设置阿里yum
1
2
3
4
5
6
7
8
mkdir repo.bak mv /etc/yum.repos.d/* repo.bak/ wget -O /etc/yum.repos.d/CentOSBase.repo https://mirrors.aliyun.com/repo/Centos-7.repo yum clean all && yum makecache systemctl disable firewalld --now sed -i 's/SELINUX=enforcing/SELINUX=disabled/g' /etc/sysconfig/selinux sed -i 's/SELINUX=enforcing/SELINUX=disabled/g' /etc/selinux/config yum update -y
安装python
已安装可以忽略。
确保python版本>=2.6
1
2
3
sudo yum install epel-release sudo yum install https://centos7.iuscommunity.org/ius-release.rpm sudo yum install python27
1
2
3
[root@controller ~]# python --version Python 2.7.5 #有显示说明python安装成功
安装Ansible
1
2
3
4
5
6
7
8
9
10
sudo yum install epel-release ansible openssh [root@controller ~]# ansible --version ansible 2.9.27 config file = /etc/ansible/ansible.cfg configured module search path = [u'/root/.ansible/plugins/modules', u'/usr/share/ansible/plugins/modules'] ansible python module location = /usr/lib/python2.7/site-packages/ansible executable location = /usr/bin/ansible python version = 2.7.5 (default, Oct 14 2020, 14:45:30) [GCC 4.8.5 20150623 (Red Hat 4.8.5-44)]
测试
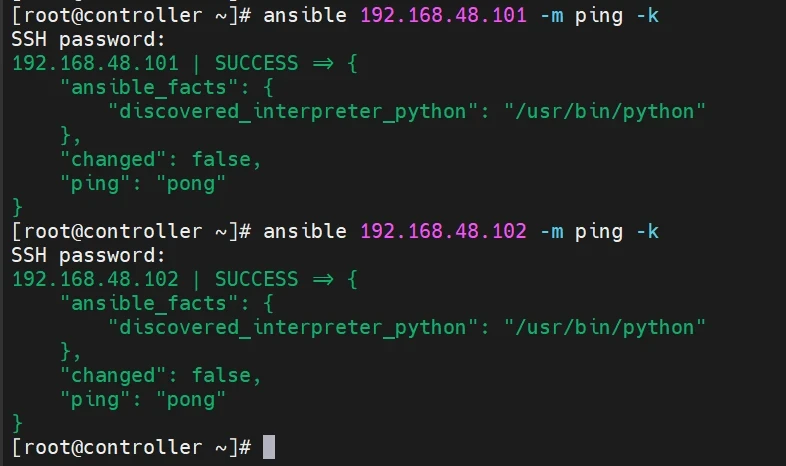
测试主机是否存活
1
2
3
4
5
6
vim /etc/ansible/hosts #在末尾添加ip 192.168.48.101 192.168.48.102 -----------------------
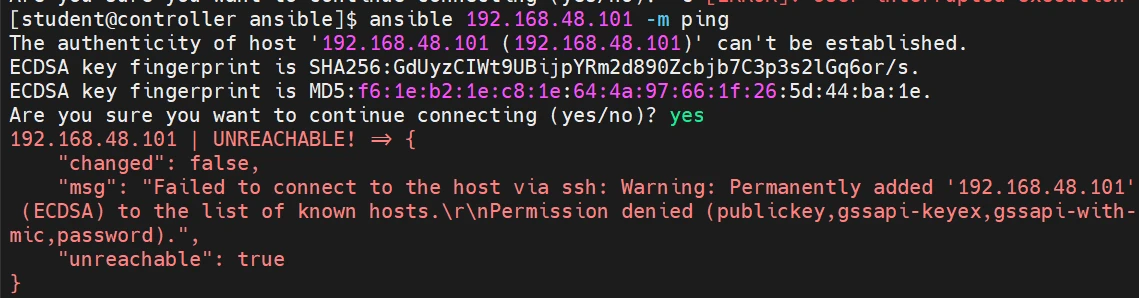
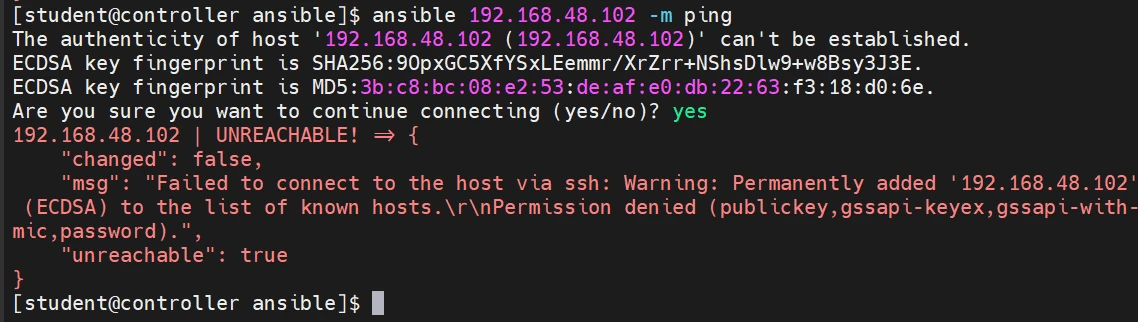
1
2
ansible 192.168.48.101 -m ping -k ansible 192.168.48.102 -m ping -k
如果controller没有首次进行ssh至node01-02节点,则ansible会出错,如下图:
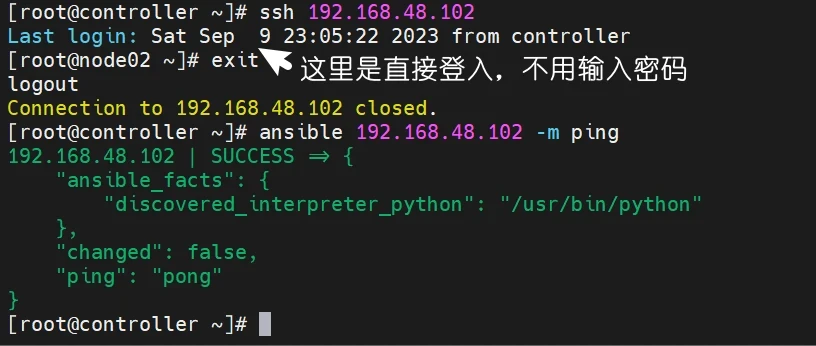
所以我们必须先ssh至各节点,让其生成缓存信息
1
2
3
4
5
6
7
8
9
10
[root@controller ~]# ssh 192.168.48.101 ##输入密码 [root@node01 ~]# exit [root@controller ~]# ssh 192.168.48.102 ##输入密码 [root@node02 ~]# exit
这时我们在进行测试
SSH免密配置
1
2
3
4
5
6
7
8
9
10
11
12
13
14
15
ssh-keygen (一路回车,三次) [root@controller ~]# ls -al ~/.ssh total 12 drwx------ 2 root root 57 Sep 6 00:43 . dr-xr-x---. 8 root root 236 Sep 9 23:05 .. -rw------- 1 root root 1675 Sep 6 00:42 id_rsa -rw-r--r-- 1 root root 397 Sep 6 00:42 id_rsa.pub -rw-r--r-- 1 root root 352 Sep 6 00:35 known_hosts #有密钥文件了 #将密钥文件复制到node01-02节点,实现ssh免密登入 (先yes 然后输入密码即可) ssh-copy-id root@192.168.48.101 ssh-copy-id root@192.168.48.102
最后我们在进行测试
Ansible配置及相关指令
ansible 程序结构
安装目录如下(yum安装):
ansible配置文件查找顺序
ansible与我们其他的服务在这一点上有很大不同,这里的配置文件查找是从多个地方找的,顺序如下:
检查环境变量ANSIBLE_CONFIG指向的路径文件
~/.ansible.cfg,检查当前目录下的ansible.cfg配置文件;
/etc/ansible.cfg检查etc目录的配置文件。
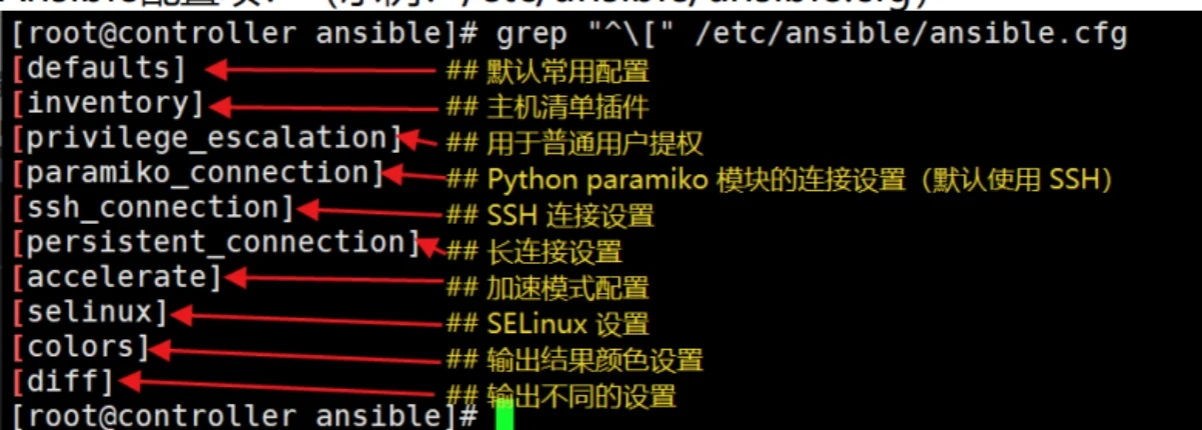
ansible配置文件
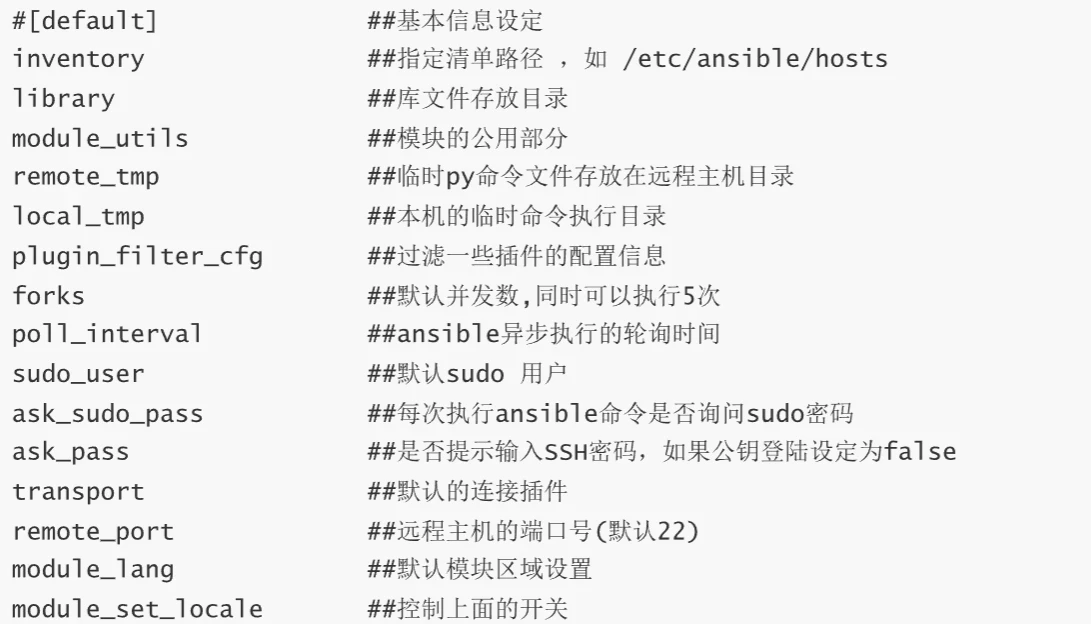
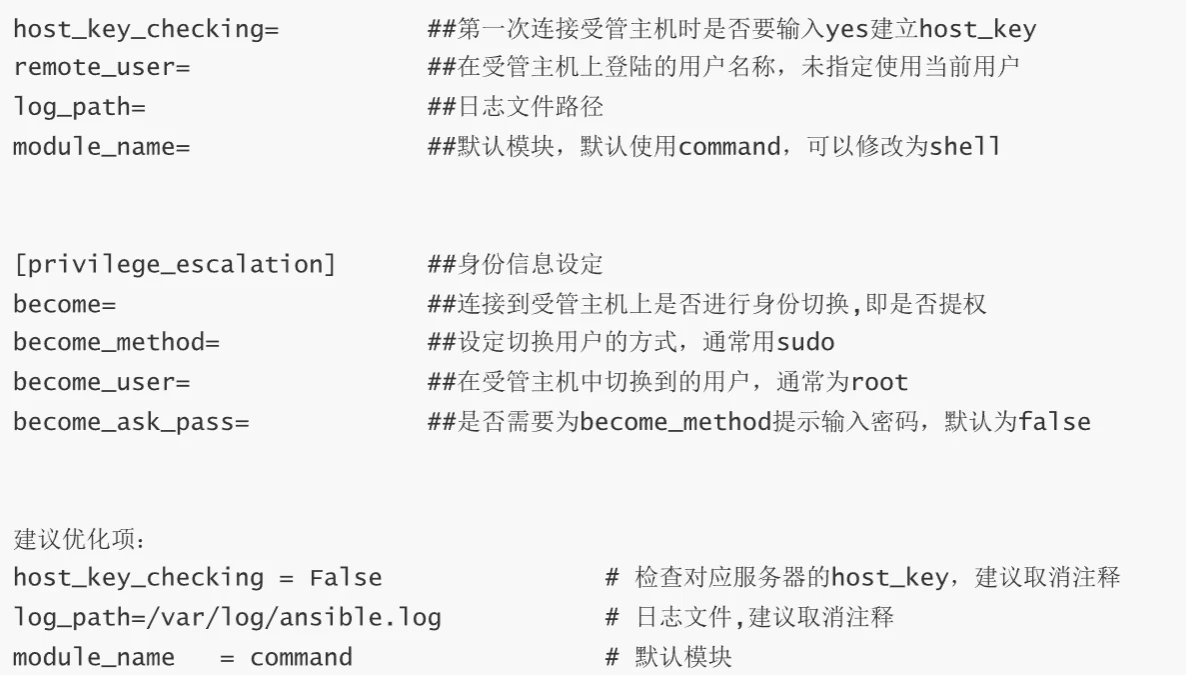
ansible 的配置文件为/etc/ansible/ansible.cfg,ansible 有许多参数,下面我们列出一些常见的参数:
1
2
3
4
5
6
7
8
9
10
11
12
13
14
15
16
17
18
19
20
21
22
23
24
25
26
[defaults] #inventory = /etc/ansible/hosts //定义Inventory #library = /usr/share/my_modules/ //自定义lib库存放目录 #remote_tmp = ~/.ansible/tmp //零时文件远程主机存放目录 #local_tmp = ~/.ansible/tmp //零时文件本地存放目录 #forks = 5 //默认开启的并发数 #poll_interval = 15 //默认轮询时间间隔 #sudo_user = root //默认sudo用户 #ask_sudo_pass = True //是否需要sudo密码 #ask_pass = True //是否需要密码 #host_key_checking = False //首次连接是否检查key认证 #roles_path = /etc/ansible/roles //默认下载的Roles存放的目录 #log_path = /var/log/ansible.log //执行日志存放目录 #module_name = command //默认执行的模块 #action_plugins = /usr/share/ansible/plugins/action //action插件存放目录 #callback_plugins = /usr/share/ansible/plugins/callback //callback插件存放目录 #connection_plugins = /usr/share/ansible/plugins/connection //connection插件存放目录 #lookup_plugins = /usr/share/ansible/plugins/lookup //lookup插件存放目录 #vars_plugins = /usr/share/ansible/plugins/vars //vars插件存放目录 #filter_plugins = /usr/share/ansible/plugins/filter //filter插件存放目录 #test_plugins = /usr/share/ansible/plugins/test //test插件存放目录 #strategy_plugins = /usr/share/ansible/plugins/strategy //strategy插件存放目录 #fact_caching = memory //getfact缓存的主机信息存放方式 #retry_files_enabled = False #retry_files_save_path = ~/.ansible-retry //错误重启文件存放目录
配置文件的分类与优先级
Ansible只有一个配置文件ansible.cfg,但配置文件可以存在不同的位置,并且只有一个可用 (数字代表优先级,数字越小代表优先级越高) :
配置文件选项
官网配置参考网址
Ansible Configuration Settings — Ansible Documentation
ansuble主机清单
1
2
3
4
5
6
7
8
9
10
1、 定义单独主机: ## green.example.com# # blue.example.com# # 192.168.100.1 # 192.168.100.10 2、 定义一个主机组[组名]把地址或主机名加进去 [mysql_test] 192.168.253.159 192.168.253.160 192.168.253.153
需要注意的是,这里的组成员可以使用通配符来匹配,这样对于一些标准化的管理来说就很轻松方便了。
1
2
3
4
[root@server ~]# vim /etc/ansible/hosts [web] 192.168.37.122 192.168.37.133
1
2
3
4
5
6
3、 定义嵌套组 [web-mysql] mysql_test web 4、 定义范围化ip 172.16.[0:4].[2:254]
ansible 常用命令
/usr/bin/ansible Ansibe AD-Hoc 临时命令执行工具,常用于临时命令的执行/usr/bin/ansible-doc Ansible 模块功能查看工具/usr/bin/ansible-galaxy 下载/上传优秀代码或Roles模块 的官网平台,基于网络的/usr/bin/ansible-playbook Ansible 定制自动化的任务集编排工具/usr/bin/ansible-pull Ansible远程执行命令的工具,拉取配置而非推送配置(使用较少,海量机器时使用,对运维的架构能力要求较高)/usr/bin/ansible-vault Ansible 文件加密工具/usr/bin/ansible-console Ansible基于Linux Consoble界面可与用户交互的命令执行工具
其中,我们比较常用的是/usr/bin/ansible和/usr/bin/ansible-playbook。
ansible 命令详解
命令的具体格式如下:
1 ansible <host-pattern > [-f forks] [-m module_name] [-a args]
也可以通过ansible -h来查看帮助,下面我们列出一些比较常用的选项,并解释其含义:
-a MODULE_ARGS #模块的参数,如果执行默认COMMAND的模块,即是命令参数,如: “date”,“pwd”等等-k,--ask-pass #ask for SSH password。登录密码,提示输入SSH密码而不是假设基于密钥的验证--ask-su-pass #ask for su password。su切换密码-K,--ask-sudo-pass #ask for sudo password。提示密码使用sudo,sudo表示提权操作--ask-vault-pass #ask for vault password。假设我们设定了加密的密码,则用该选项进行访问-B SECONDS #后台运行超时时间-C #模拟运行环境并进行预运行,可以进行查错测试-c CONNECTION #连接类型使用-f FORKS #并行任务数,默认为5-i INVENTORY #指定主机清单的路径,默认为/etc/ansible/hosts--list-hosts #查看有哪些主机组-m MODULE_NAME #执行模块的名字,默认使用 command 模块,所以如果是只执行单一命令可以不用 -m参数-o #压缩输出,尝试将所有结果在一行输出,一般针对收集工具使用-S #用 su 命令-R SU_USER #指定 su 的用户,默认为 root 用户-s #用 sudo 命令-U SUDO_USER #指定 sudo 到哪个用户,默认为 root 用户-T TIMEOUT #指定 ssh 默认超时时间,默认为10s,也可在配置文件中修改-u REMOTE_USER #远程用户,默认为 root 用户-v #查看详细信息,同时支持-vvv,-vvvv可查看更详细信息
ansible 配置公私钥
上面我们已经提到过 ansible 是基于 ssh 协议实现的,所以其配置公私钥的方式与 ssh 协议的方式相同,具体操作步骤如下:
1
2
3
4
5
#1.生成私钥 [root@server ~ ]# ssh-keygen #2.向主机分发私钥 [root@server ~ ]# ssh-copy-id root@192.168.48.101 [root@server ~ ]# ssh-copy-id root@192.168.48.102
192.168.48.101为node01的ip地址
这样的话,就可以实现无密码登录,我们的实验过程也会顺畅很多。
1 -bash: ssh-copy -id : command not found
那么就证明我们需要安装一个包:
把包安装上即可。
注意:先ssh 192.168.48.101和ssh 192.168.48.102各节点,生成缓存信息,才能进行主机连通性测试
ansible ping模块
主机连通性测试
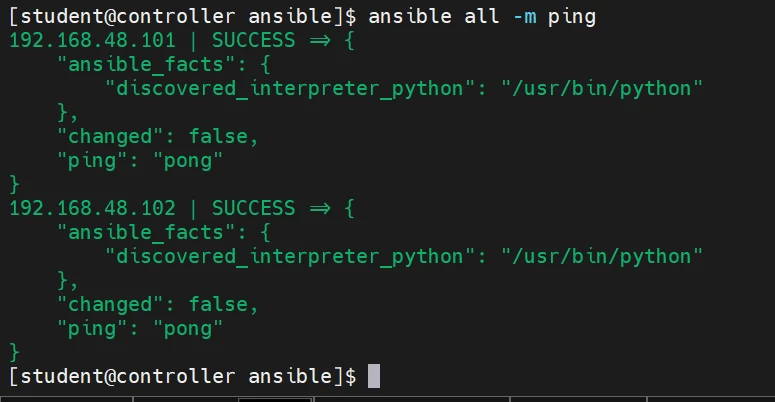
我们使用ansible web -m ping命令来进行主机连通性测试,效果如下:
1 2 3 4 5 6 7 8 9 [root@server ~] 192.168.48.101 | SUCCESS => { "changed" : false , "ping" : "pong" } 192.168.48.102 | SUCCESS => { "changed" : false , "ping" : "pong" }
这样就说明我们的主机是连通状态的。接下来的操作才可以正常进行。
用户级ansible环境构建
主机分布
主机名
ip
系统
内存
硬盘
controller
192.168.48.100
Centos7.9
4G
100G
node01
192.168.48.101
Centos7.9
4G
100G
node02
192.168.48.102
Centos7.9
4G
100G
创建student用户
三台机创建student用户
1
2
3
4
#创建student用户 useradd student passwd student 123456
controller创建student用户工作目录
1
2
3
4
5
6
7
8
9
10
#切换student用户,创建工作目录,新建ansible.cfg配置文件,验证配置文件生效。 su student cd #创建资产清单 mkdir ansible cat >> /home/student/ansible/inventory <<EOF [servers] 192.168.48.101 192.168.48.102 EOF
controller编辑配置文件ansible.cfg
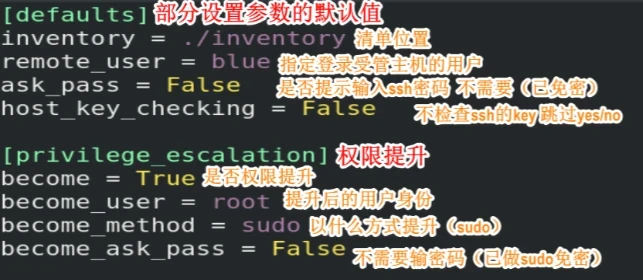
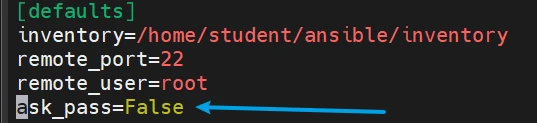
1
2
3
4
5
6
7
8
9
cd ansible cat >> /home/student/ansible/ansible.cfg <<EOF [defaults] inventory=/home/student/ansible/inventory remote_port=22 remote_user=root #指定远程用户为root ask_pass=True EOF
验证清单主机存活(指定root)
验证清单主机存活 ,执行命令进行测试,可以看到在每次执行ansible时都会询问连接用户的密码(相 当于-K参数)
1
2
3
4
5
6
7
8
9
ansible all --list [student@controller ansible]$ ansible all --list SSH password: hosts (2): 192.168.48.101 192.168.48.102 [student@controller ansible]$ #成功
如果不想输入密码,那需要修改配置文件:
1
2
3
vi /home/student/ansible/ansible.cfg ······ ask_pass=False
1
2
3
4
5
6
[student@controller ansible]$ ansible all --list hosts (2): 192.168.48.101 192.168.48.102 [student@controller ansible]$ #无输入密码选项
实例(指定student)
远程用户指定为普通用户(student)
1
2
3
4
5
6
7
[student@controller ansible]$ vim ansible.cfg [defaults] inventory=/home/student/ansible/inventory remote_port=22 remote_user=student #指定远程用户为student ask_pass=False
这时候执行ping会报错
这时候我们要配置免密登入(这里的密钥是student用户的,和root不一样,不会覆盖root用户的,这是在student用户下执行的命令)
1
2
3
4
5
6
7
[student@controller ansible]$ ssh-keygen #回车三次 [student@controller ansible]$ ssh-copy-id student@192.168.48.101 #输入yes和node1的root密码 [student@controller ansible]$ ssh-copy-id student@192.168.48.102 #输入yes和node2的root密码
这是执行ping命令
测试提取文件
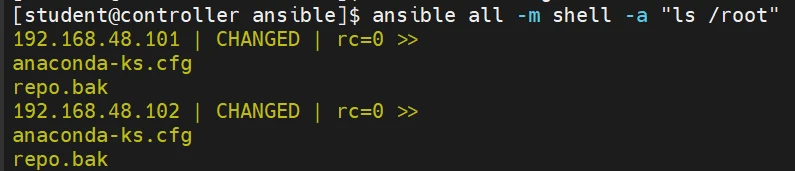
这个普通用户(student)并不能执行所有的操作,比如ansible以student身份登录,执行(ls /root)发普通用户没有权限,
1 ansible all -m shell -a "ls /root"
解决这个问题就需要提权:sudo 提权
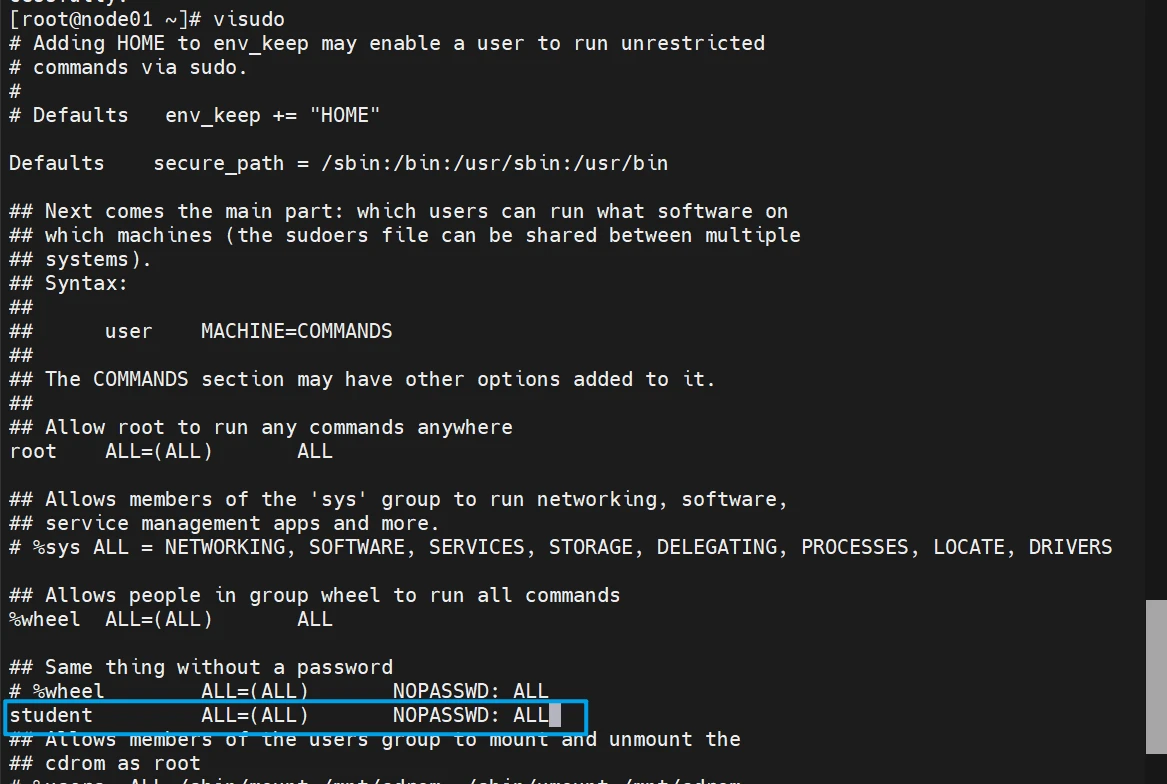
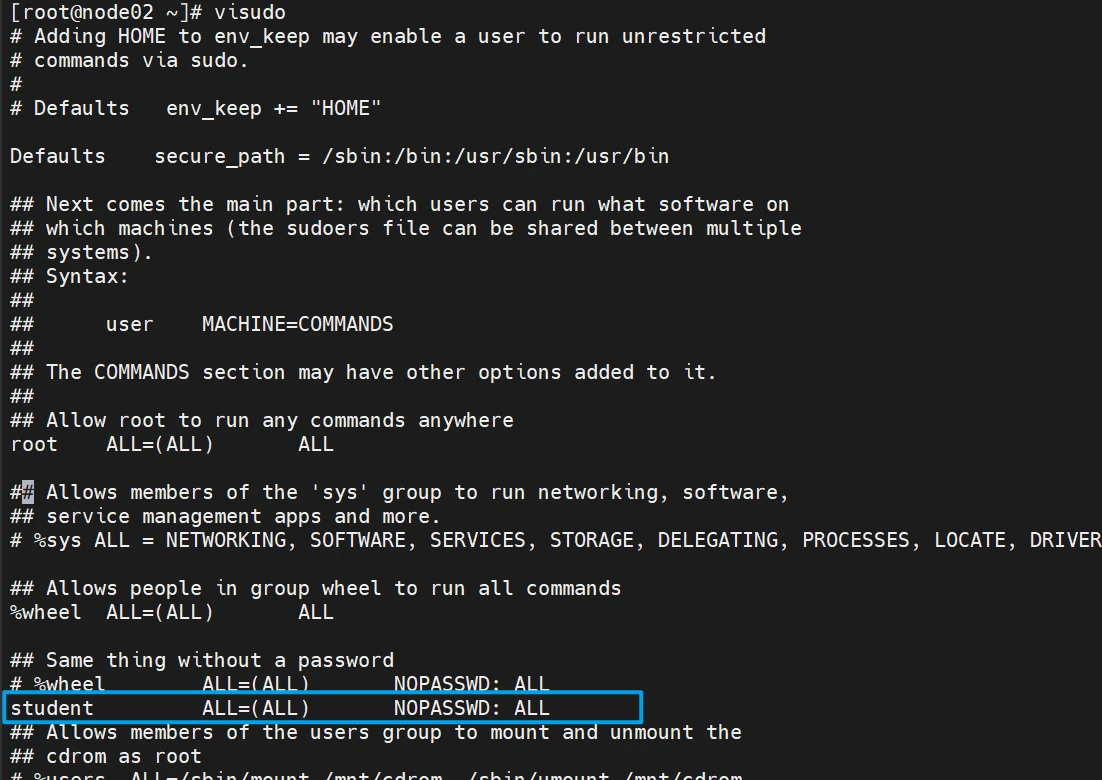
在受控主机(node01、node02 )上执行visudo(配置 /etc/sudoers)
node01机子
node02机子
或者(node01和node02执行以下指令 )
1
2
3
cat >>/etc/sudoers.d/student << EOF student ALL=(ALL) NOPASSWD: ALL EOF
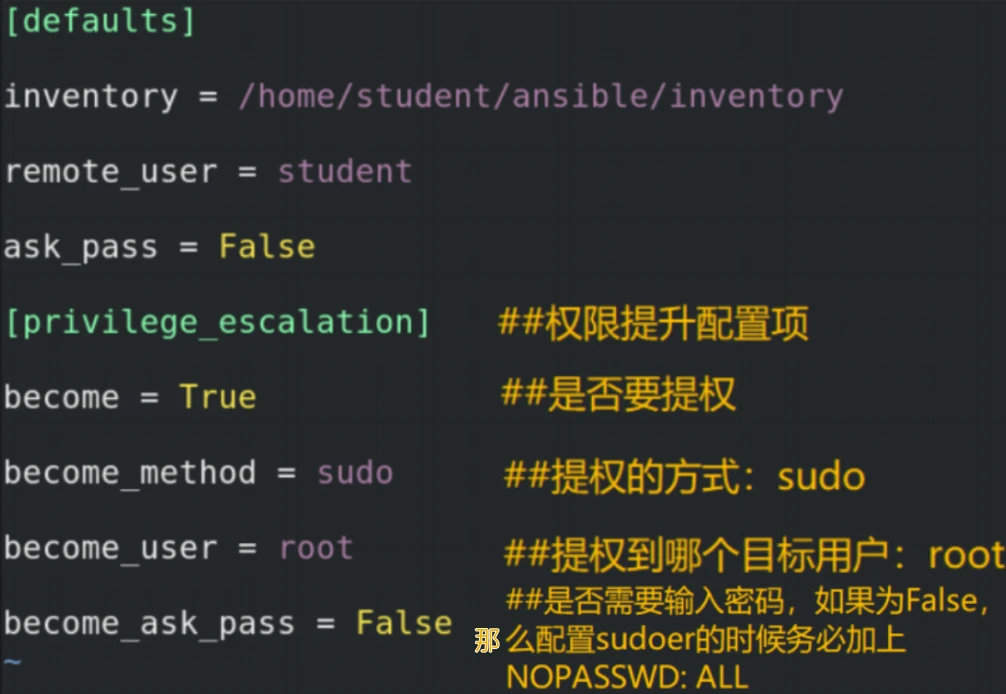
在控制主机(controller) 上(student用户 )修改ansible.cfg配置文件提权
1
2
3
4
5
6
7
8
9
10
11
[student@controller ansible]$ vim ansible.cfg [defaults] inventory=/home/student/ansible/inventory remote_port=22 remote_user=student ask_pass=False [privilege_escalation] become=True become_method=sudo become_user=root become_ask_pass=False
验证
1 ansible all -m shell -a "ls /root"
#在控制节点的student经过sudo提权之后可以读取/root目录了
Ansible-常用模块
command模块
linux命令,不支持管道、重定向等,不建议使用
1
2
3
4
ansible all -m command -a "pwd" ansible all -m command -a "ls" ansible all -m command -a "cat /etc/passwd |grep student" #这个不能正常使用 ansible all -m command -a "echo bb >>/tmp/testansible" ansible all -m command -a "cat /tmp/testansible"
#重定向也无法正常使用
课堂练习:
使用command命令查询各主机磁盘状态、查询内存状态
1
2
ansible all -m command -a "df -h" ansible all -m command -a "free -m"
shell模块
支持管道、重定向等,常用模块
1
2
3
ansible all -m shell -a "cat /etc/passwd | grep student" #支持管道 ansible all -m shell -a "echo bb >>/tmp/testansible" ansible all -m shell -a "cat /tmp/testansible"
#支持重定向
课堂练习:
使用shell模块查看selinux状态
1 ansible all -m shell -a "getenforce"
通过shell模块批量关闭selinux
1
2
3
4
5
6
7
8
9
10
临时关闭: ansible all -m shell -a "setenforce 0" 永久关闭: ansible all -m shell -a "sed -ri 's/SELINUX=enforcing/SELINUX=disabled/g' /etc/selinux/config" ansible all -m shell -a "reboot"
文件模块
copy模块
从主控端复制文件到远程主机
常用参数
src :source源路径文件/目录。即要复制到远程主机的文件在本地的地址,可以是绝对路径,也可以是 相对路径。如果路径是一个目录,它将递归复制。在这种情况下,如果路径使用"/“来结尾,则只复制目录里的内容,如果没有使用”/"来结尾,则包含目录在内的整个内容全部复制。
dest :destnation受管主机上的一个目标路径,即要将源文件复制到的远程主机的绝对路径,如果源文件是一个目录,那么该路径也必须是个目录(必须)
content :代替src,将本机指定内容传至远程主机并生成目标文件,相当于 echo 重定向内容到文件
mode :文件权限(chmod)
linux权限回顾
owner:文件属主(chown)
使用案例
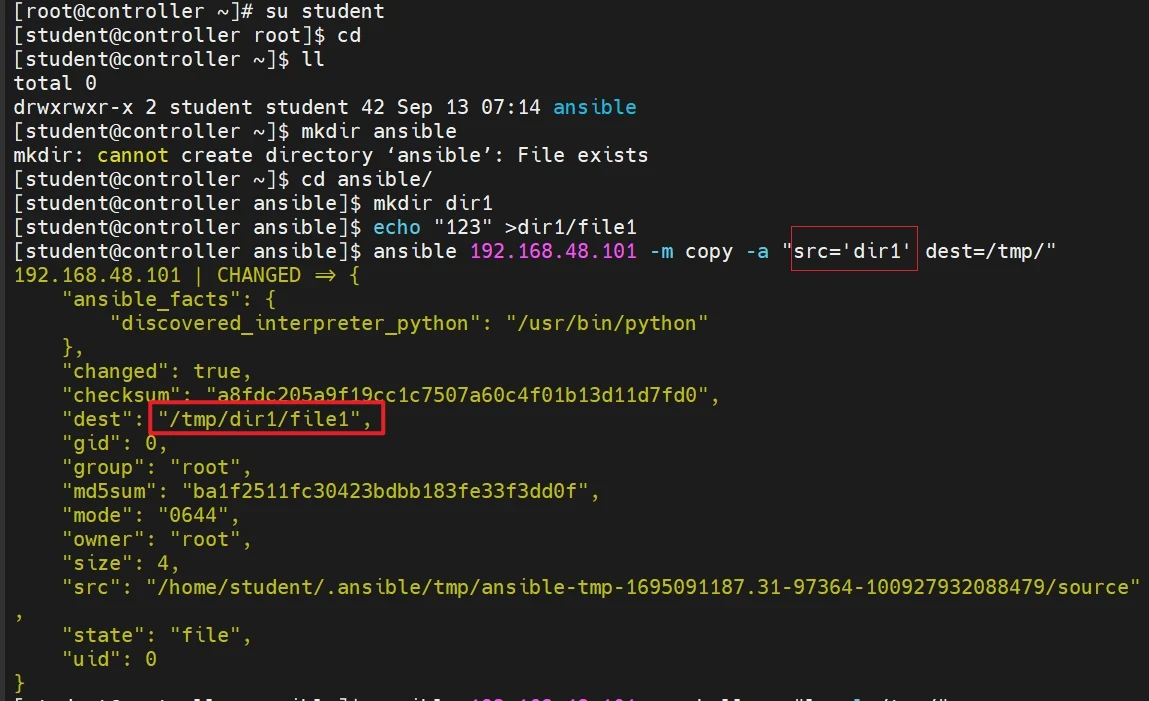
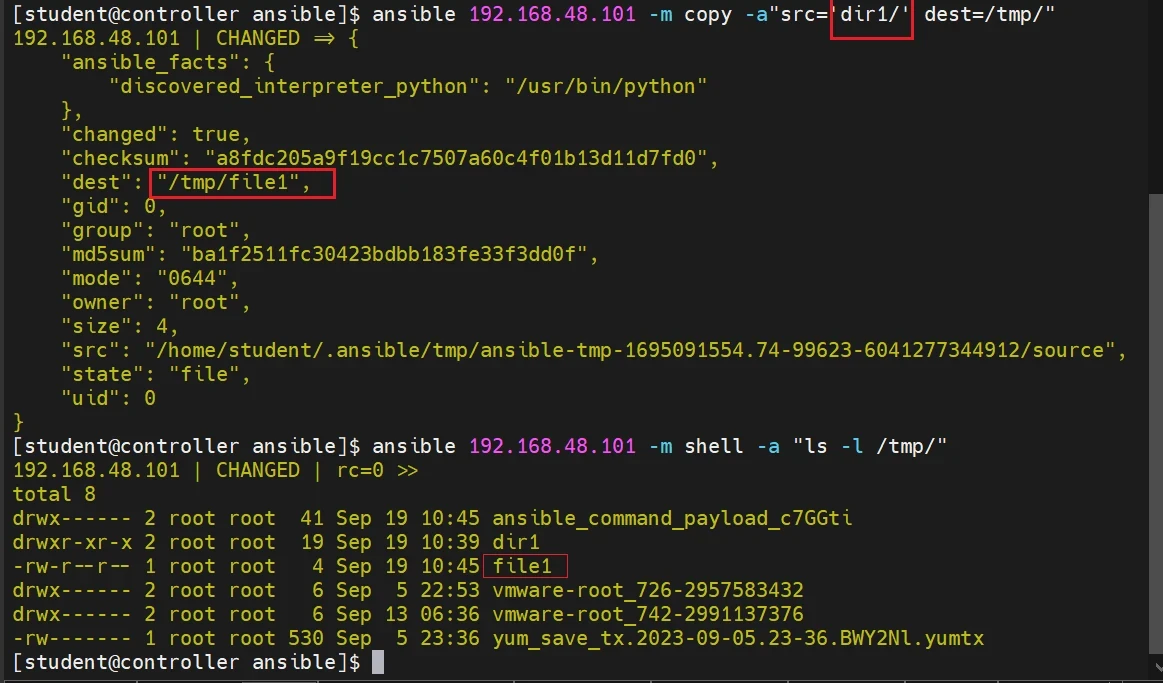
复制dir1目录及其文件到受控主机/tmp/下(无斜杠-操作整个目录)
注:关于src目录加不加/的演示
1
2
3
4
5
6
7
8
9
#复制dir1目录及其文件到受控主机/tmp/下 su student cd ~ ll mkdir ansible cd ansible/ mkdir dir1 echo "123" >dir1/file1 ansible 192.168.48.101 -m copy -a "src='dir1' dest=/tmp/"
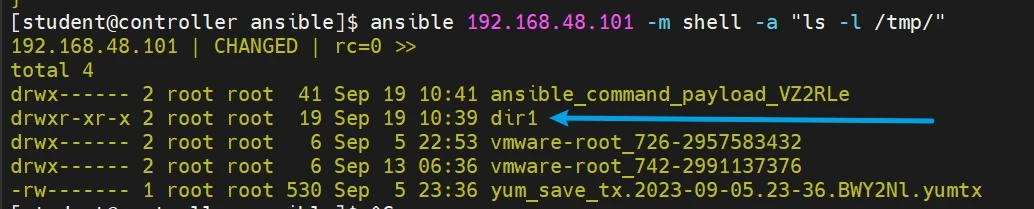
查看受控主机是否复制成功
成功
2.仅复制dir1目录下的文件(有斜杠-操作目录下的文件,不复制目录)
1 ansible 192.168.48.101 -m copy -a"src='dir1/' dest=/tmp/"
练习
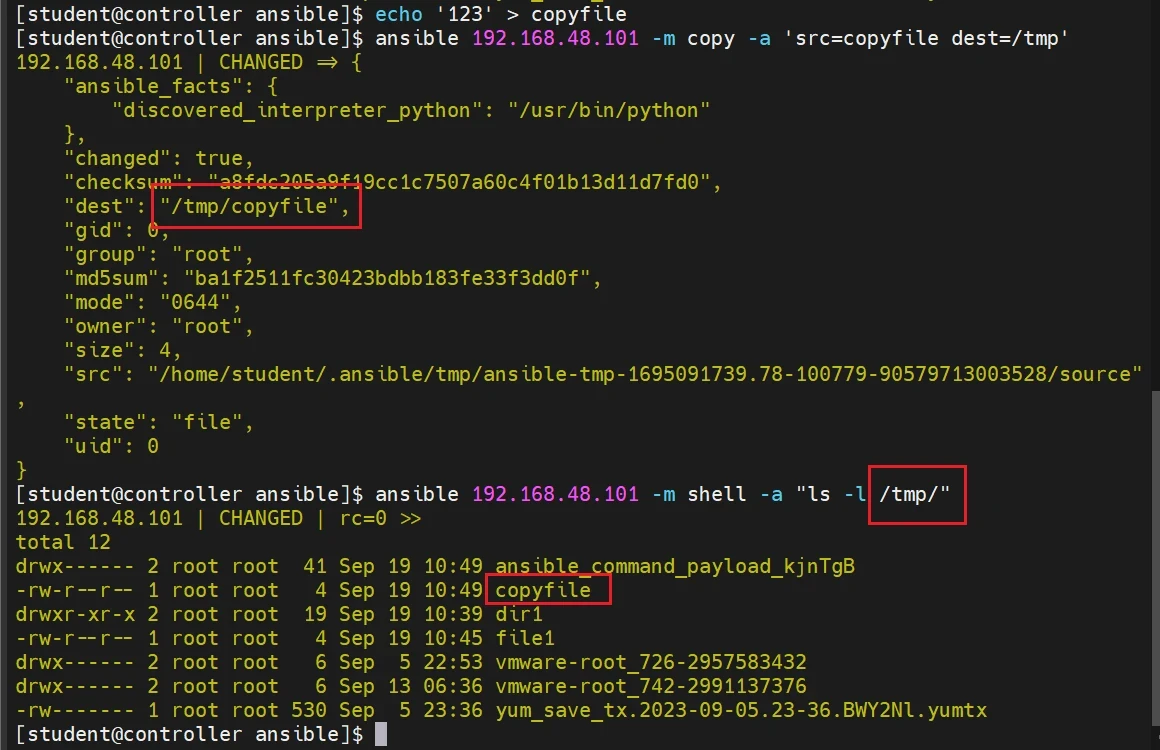
将控制主机的copyfile文件 复制到受管主机的 /tmp 目录
1
2
echo '123' > copyfile ansible 192.168.48.101 -m copy -a 'src=copyfile dest=/tmp'
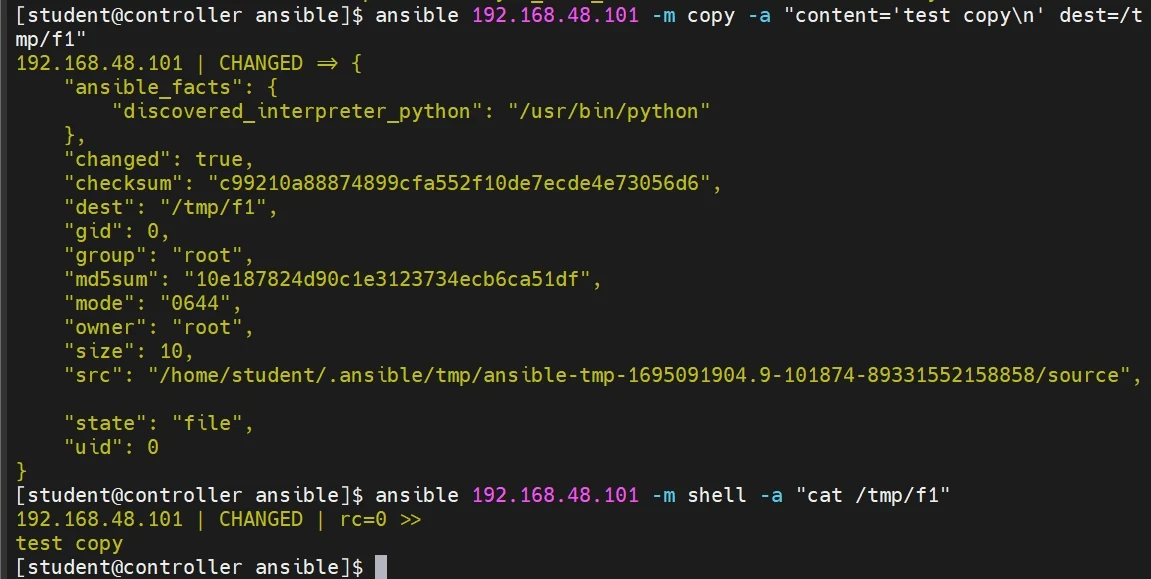
直接在受管主机上生成一个指定内容的文件文件
1 ansible 192.168.48.101 -m copy -a "content='test copy\n' dest=/tmp/f1"
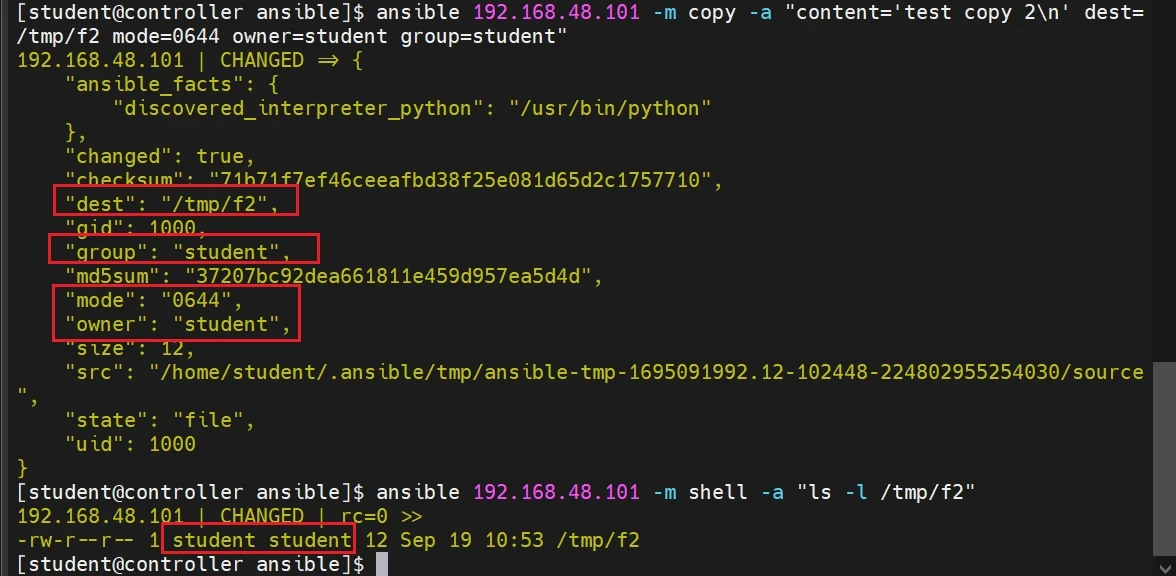
在受管主机上生成指定属性和内容的文件
1 ansible 192.168.48.101 -m copy -a "content='test copy 2\n' dest=/tmp/f2 mode=0644 owner=student group=student"
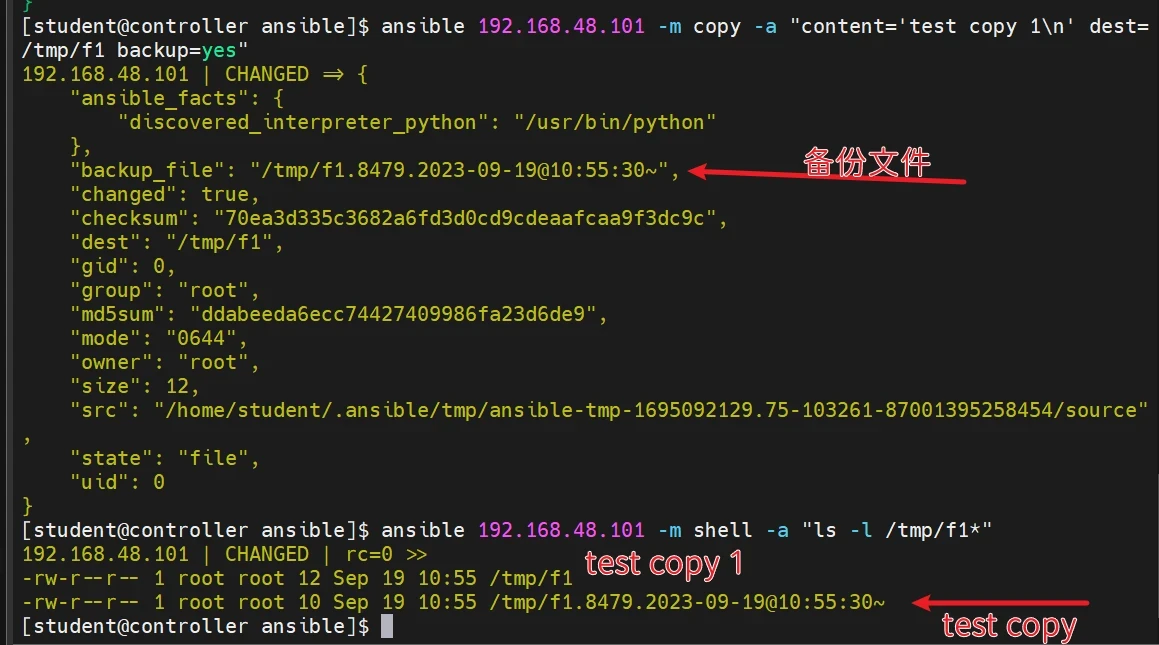
在文件覆盖前生成备份文件
1
2
3
ansible 192.168.48.101 -m copy -a "content='test copy 1\n' dest=/tmp/f1 backup=yes" ansible 192.168.48.101 -m shell -a "ls -l /tmp/f1*"
script模块
在远程主机上运行ansible服务器上的脚本,优点是不需手动传送脚本至每个服务器。
其实是ansible自动传到远程主机、执行然后再删除脚本:copy+shell+delete
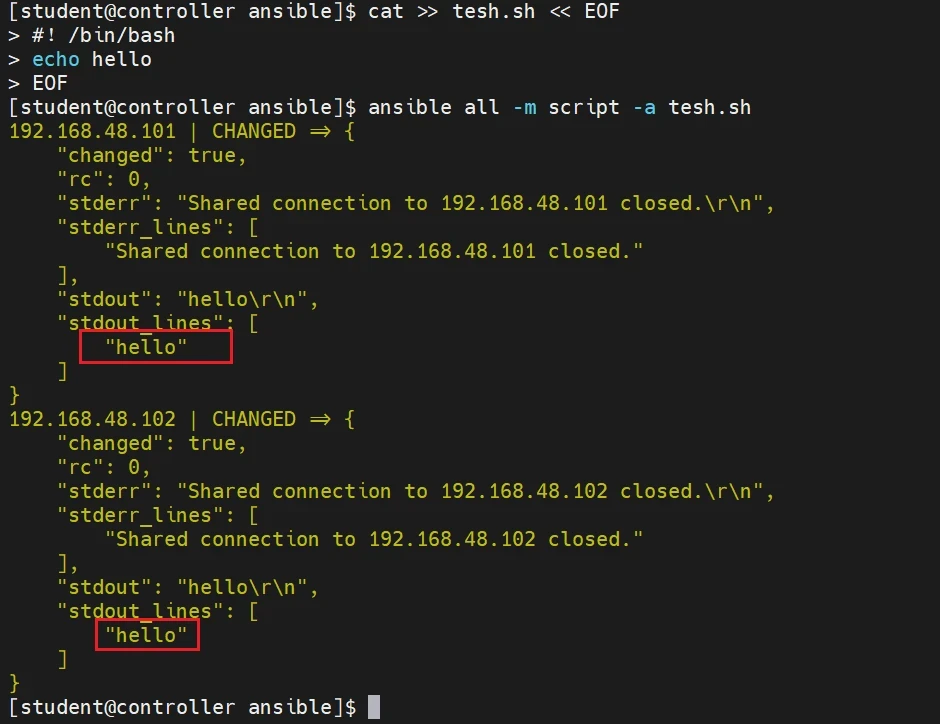
1
2
3
4
5
cat >> tesh.sh << EOF #!/bin/bash echo hello EOF ansible all -m script -a tesh.sh
执行结果显示了每台主机的执行情况。
CHANGED 表示执行过程中发生了变化,即脚本被成功执行。
rc 字段显示返回码为 0,表示执行成功。
stderr 字段显示了标准错误输出,其中包含了连接关闭的信息。
stdout 字段显示了标准输出,其中包含了脚本执行的结果,即 “hello”。
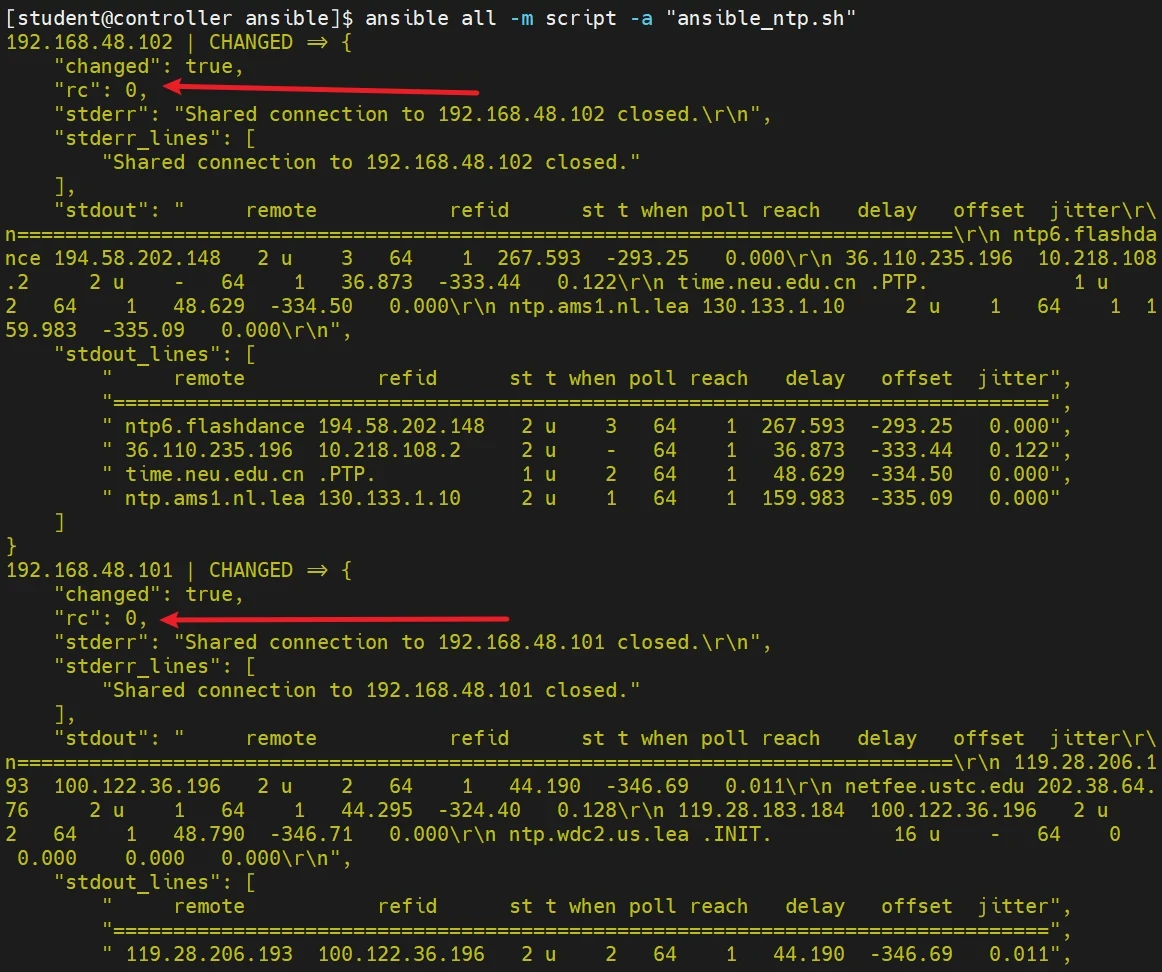
1
2
3
4
5
6
7
8
9
10
11
12
13
14
15
16
17
18
19
20
21
22
23
24
cat >> ansible_ntp.sh << EOF #!/bin/bash systemctl status ntpd >/dev/null 2>&1 if [ \$? == 0 ]; then echo "ntp service has been installed" exit fi yum install -y ntp >/dev/null 2>&1 if [ \$? == 0 ]; then systemctl start ntpd systemctl enabled ntpd >/dev/null 2>&1 sleep 5 ntpq -p else echo "ntp service install failed,check network or yum" fi EOF 这条命令的意思就是在后台执行这个程序,并将错误输出2重定向到标准输出1,然后将标准输出1全部放 到/dev/null文件,也就是清空. 所以可以看出" >/dev/null 2>&1 "常用来避免shell命令或者程序等运行中有内容输出。 chmod 777 ansible_ntp.sh ansible all -m script -a "ansible_ntp.sh"
fetch模块
从受管主机上,拉取文件到控制节点(目前不支持目录,可以先打包,再提取文件)
常见参数
dest :控制节点的保存路径
src :受管节点要拉取文件的路径(必须是文件,不能是目录)
flat :直接保存到目标指定位置,而不是在受管主机名下的文件路径中。
使用案例
从受管主机拉取指定文件
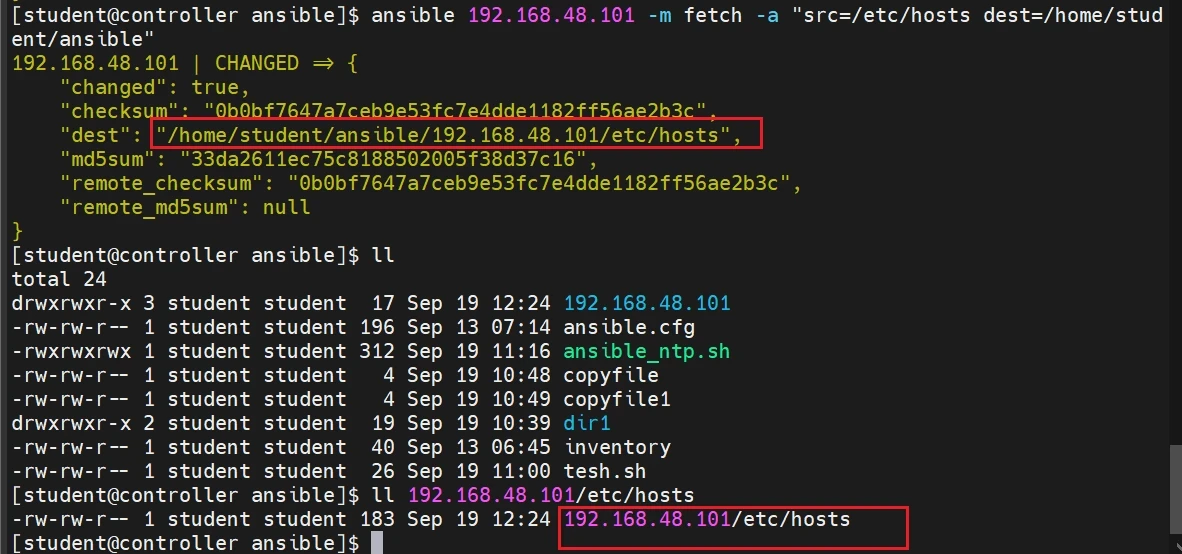
1 ansible 192.168.48.101 -m fetch -a "src=/etc/hosts dest=/home/student/ansible"
索取到本地目录下的文件会自动生成与目标主机的域名或IP地址的目录 存放索取的文件
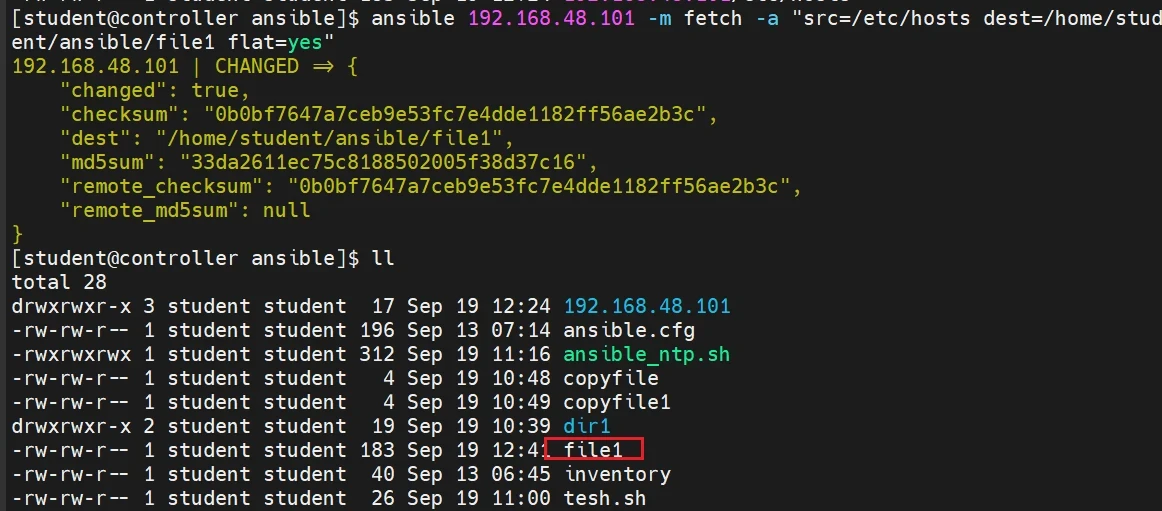
直接拉取受管主机文件到控制节点指定位置
flat :直接保存到目标指定位置,而不是在受管主机名下的文件路径中。
1 ansible 192.168.48.101 -m fetch -a "src=/etc/hosts dest=/home/student/ansible/file1 flat=yes"
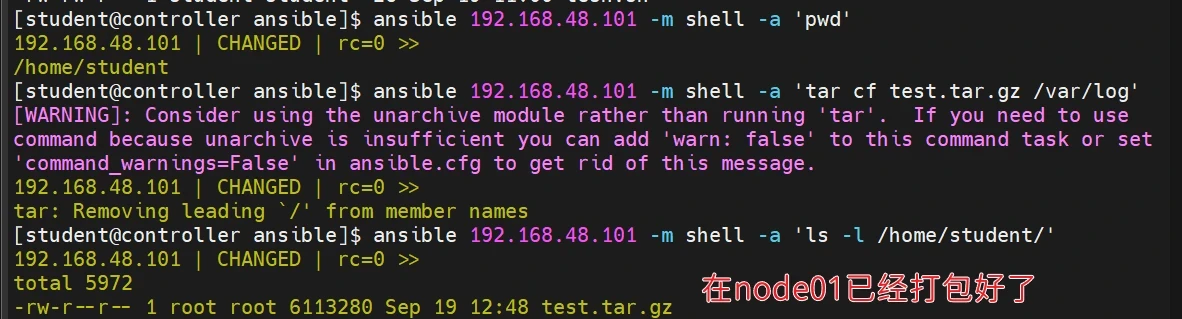
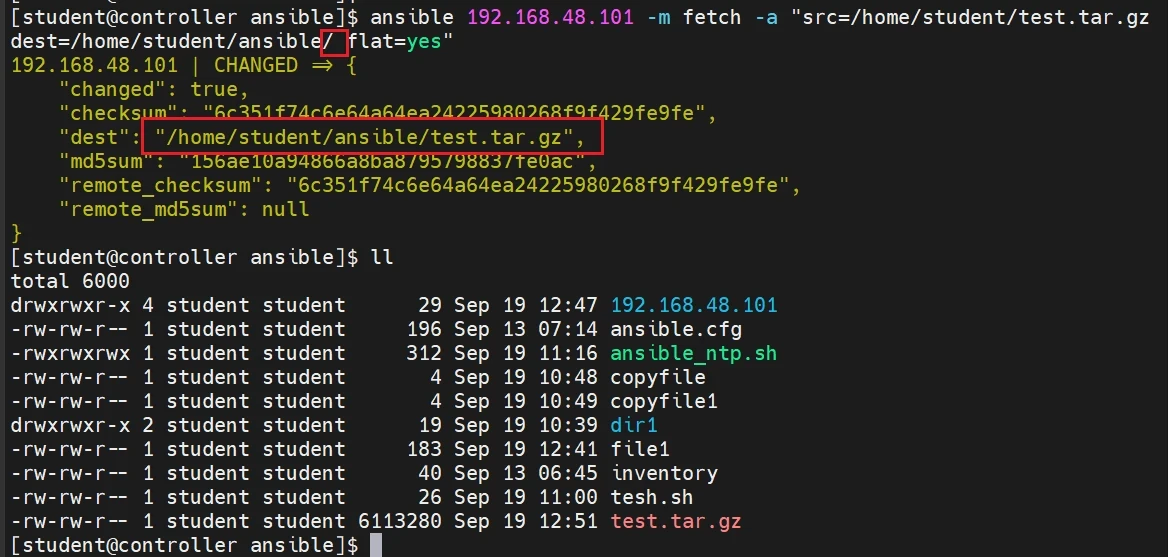
打包目录并所有内容到控制节点指定位置
1
2
3
4
5
ansible 192.168.48.101 -m shell -a 'pwd' ansible 192.168.48.101 -m shell -a 'tar cf test.tar.gz /var/log' ansible 192.168.48.101 -m shell -a 'ls -l /home/student/' ansible 192.168.48.101 -m fetch -a "src=/home/student/test.tar.gz dest=/home/student/ansible/ flat=yes"
file模块
file 模块可以帮助我们完成一些对文件的基本操作。比如,创建文件或目录、删除文件或目录、修改文 件权限等。
常用参数
mode : 定义文件/目录的权限,比如,如果想要将文件权限设置为"rw-r-x—",则可以使用mode=650进行 设置,或者使用mode=0650,效果也是相同的。owner : 定义文件/目录的所有者,属主对应的用户必须在远程主机中存在,否则会报错。group : 定义文件/目录的属组,属组对应的组必须在远程主机中存在,否则会报错。path : 必选项,定义受管主机的文件/目录的路径recurse : 递归地设置文件的属性,只对目录有效src : 要被链接的源文件的路径,只应用于state=hard/link的情况dest : 被链接到的路径,只应用于state=hard/link的情况。state : 操作方法directory :如果目录不存在,创建目录file :即使文件不存在,也不会被创建(只能指定已存在的文件)touch :如果文件不存在,则会创建一个新的文件,如果文件或目录已存在,则更新其最后修改时间link :创建软链接hard :创建硬链接absent :删除目录、文件或者取消链接文件,相当于rm -rfforce : 只应用于state=hard/link的情况,若需要在两种情况下强制创建软链接 ,一种是源文件不存在但 之后会建立的情况下;另一种是目标软链接已存在,需要先取消之前的软链,然后创建新的软链,有两个选 项:yes|no
使用案例
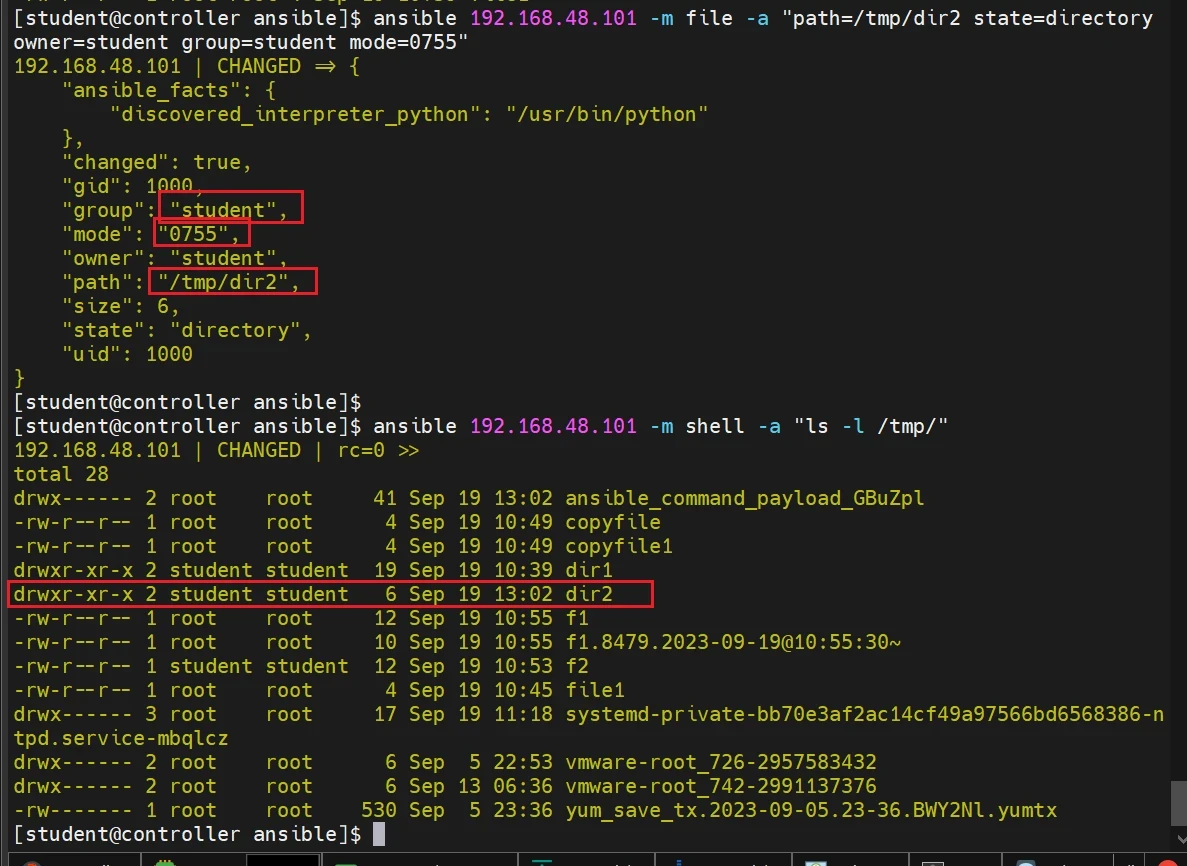
创建指定文件属性的空目录
1
2
3
ansible 192.168.48.101 -m file -a "path=/tmp/dir2 state=directory owner=student group=student mode=0755" ansible 192.168.48.101 -m shell -a "ls -l /tmp/"
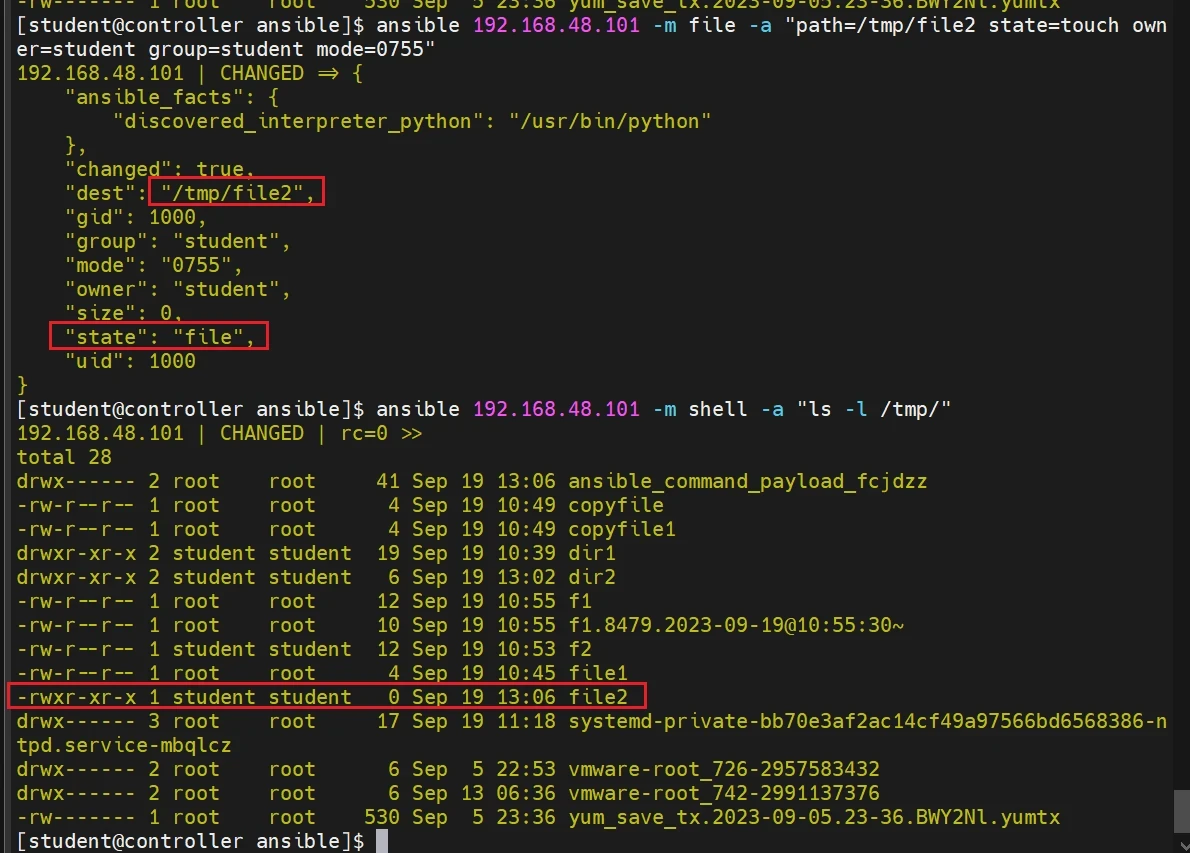
创建指定文件属性的空文件
1
2
ansible 192.168.48.101 -m file -a "path=/tmp/file2 state=touch owner=student group=student mode=0755" ansible 192.168.48.101 -m shell -a "ls -l /tmp/"
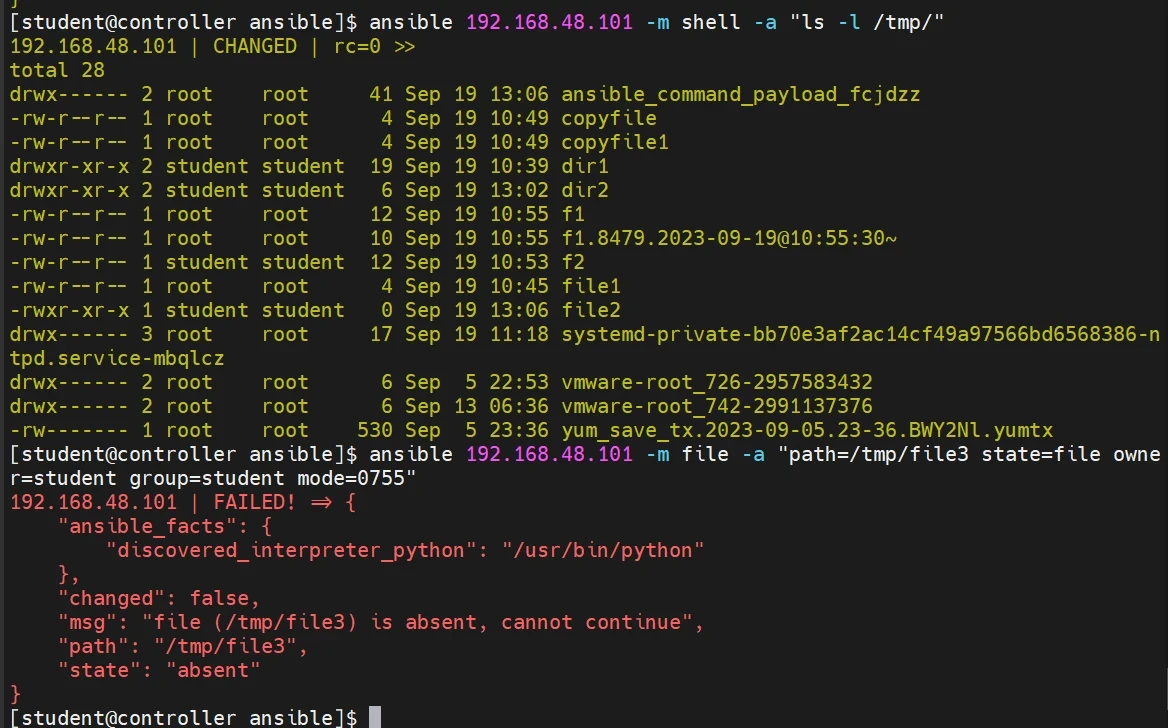
注意:为何不能用state=file
file :即使文件不存在,也不会被创建(只能指定已存在的文件)
file3不存在
1 ansible 192.168.48.101 -m file -a "path=/tmp/file3 state=file owner=student group=student mode=0755"
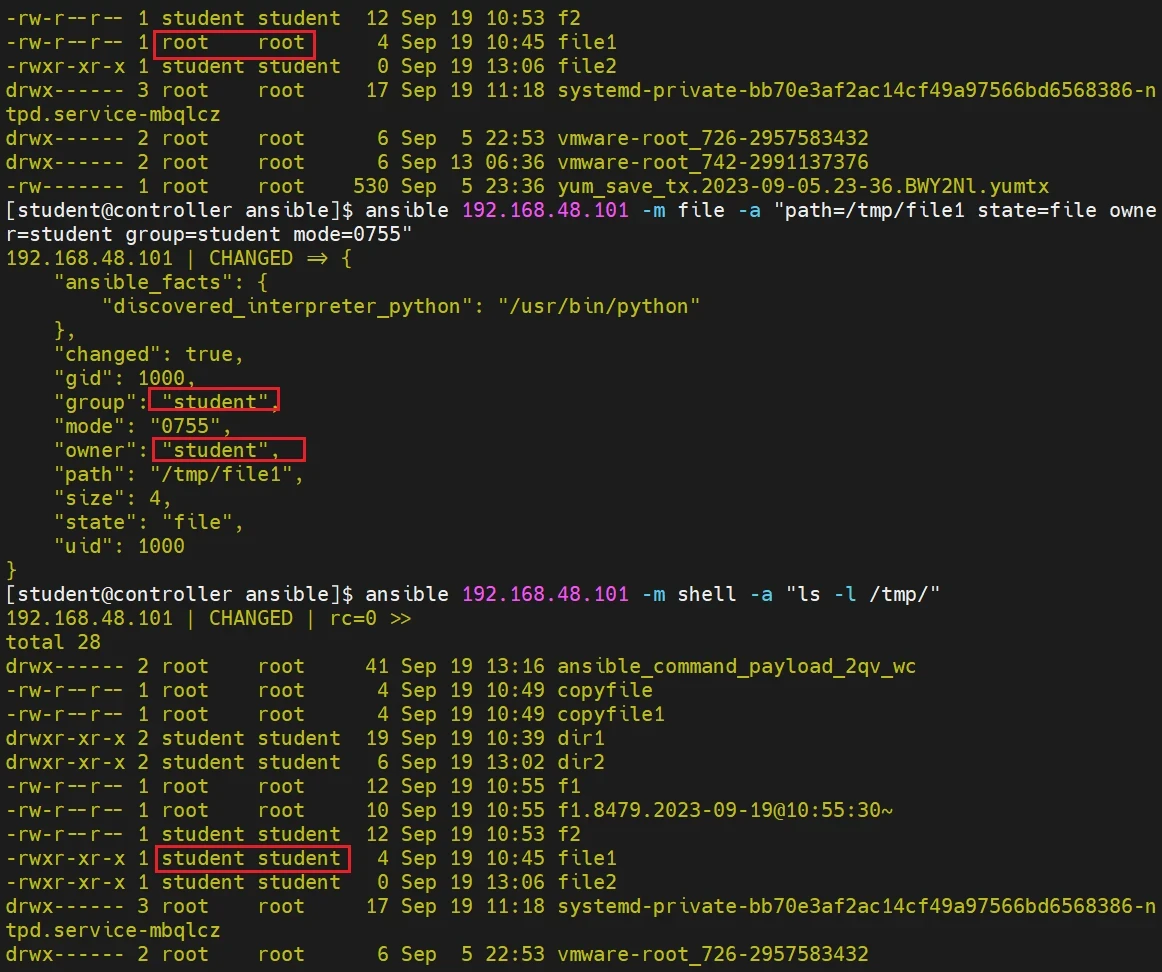
如果指定file1(已存在)呢(将root用户属组改成student)
1 ansible 192.168.48.101 -m file -a "path=/tmp/file1 state=file owner=student group=student mode=0755"
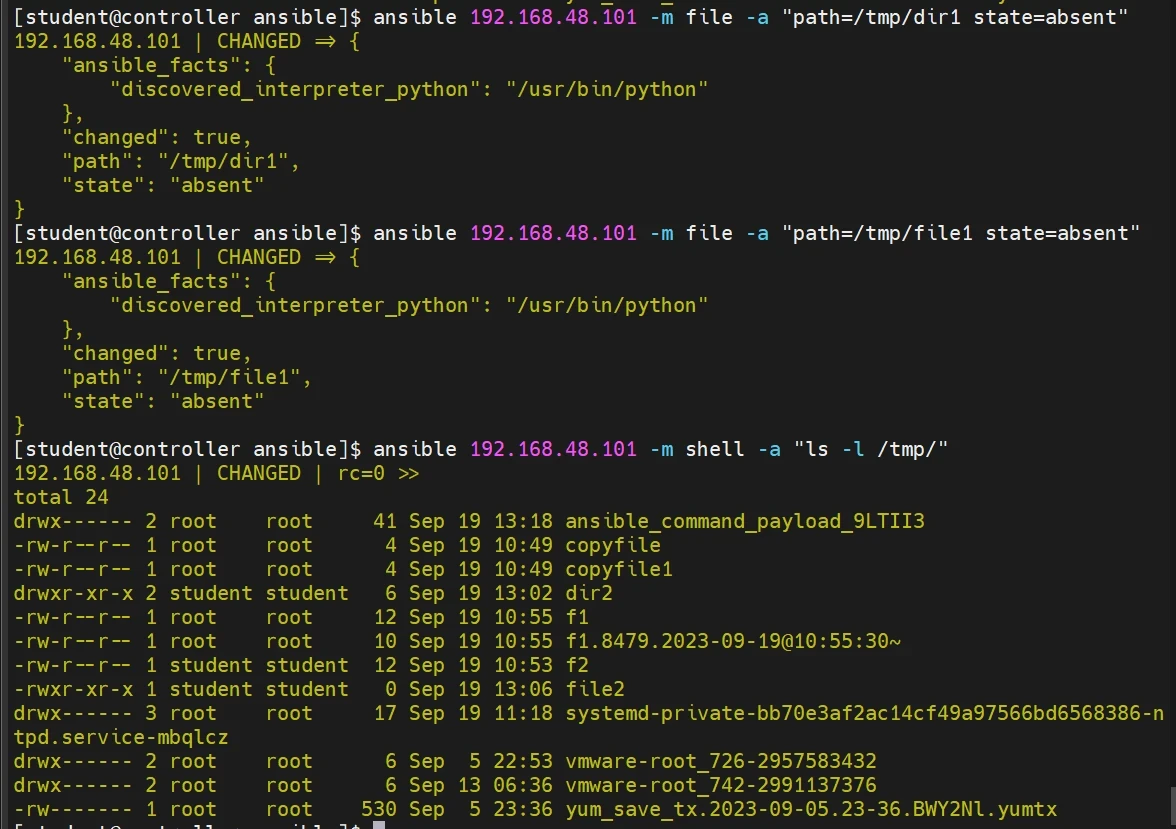
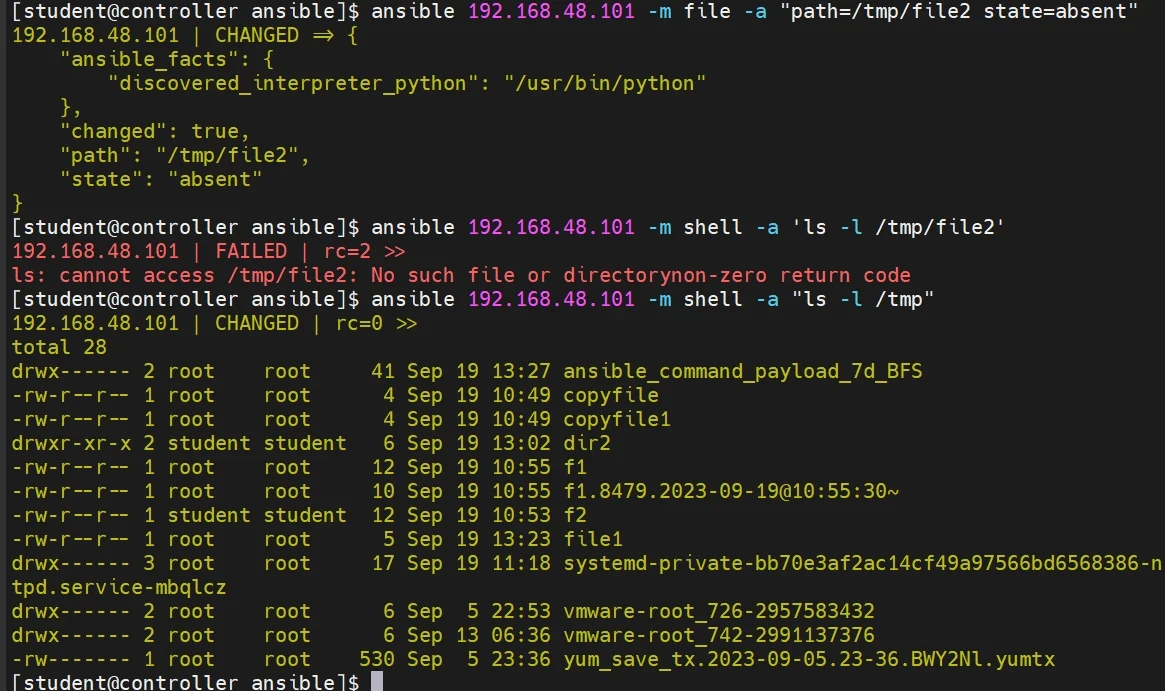
删除目录、删除文件
1
2
3
ansible 192.168.48.101 -m file -a "path=/tmp/dir1 state=absent" ansible 192.168.48.101 -m file -a "path=/tmp/file1 state=absent" ansible 192.168.48.101 -m shell -a "ls -l /tmp/"
创建链接文件
软链接:快捷方式
生成file1(如果已存在就忽略这步 )
1 ansible 192.168.48.101 -m copy -a "content='123 \n' dest=/tmp/file1"
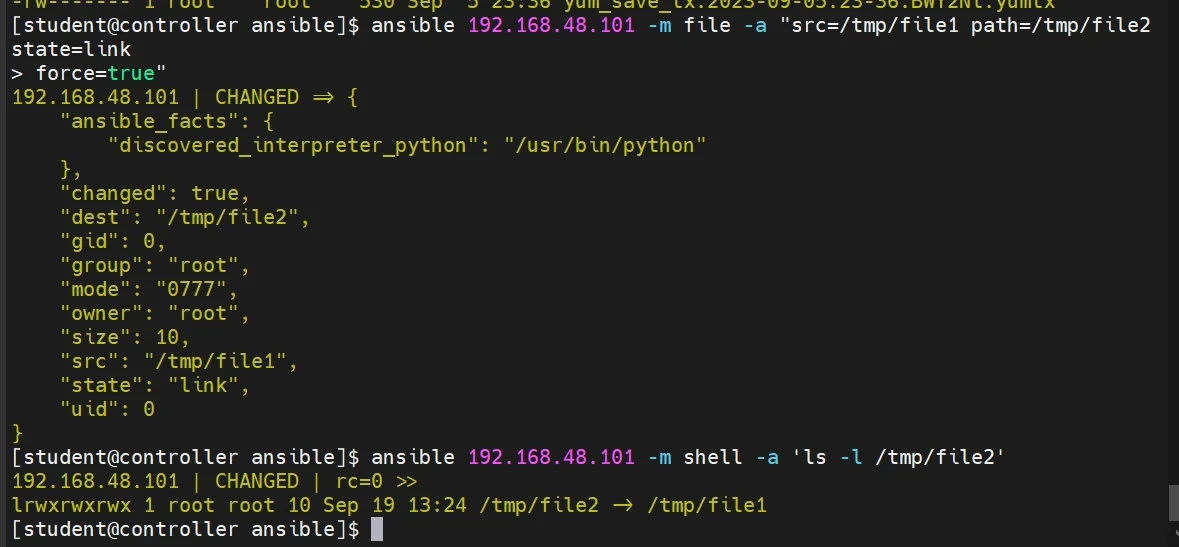
生成软链接
1 ansible 192.168.48.101 -m file -a "src=/tmp/file1 path=/tmp/file2 state=link force=true"
取消软连接
1 ansible 192.168.48.101 -m file -a "path=/tmp/file2 state=absent"
硬链接:指向同一个inode
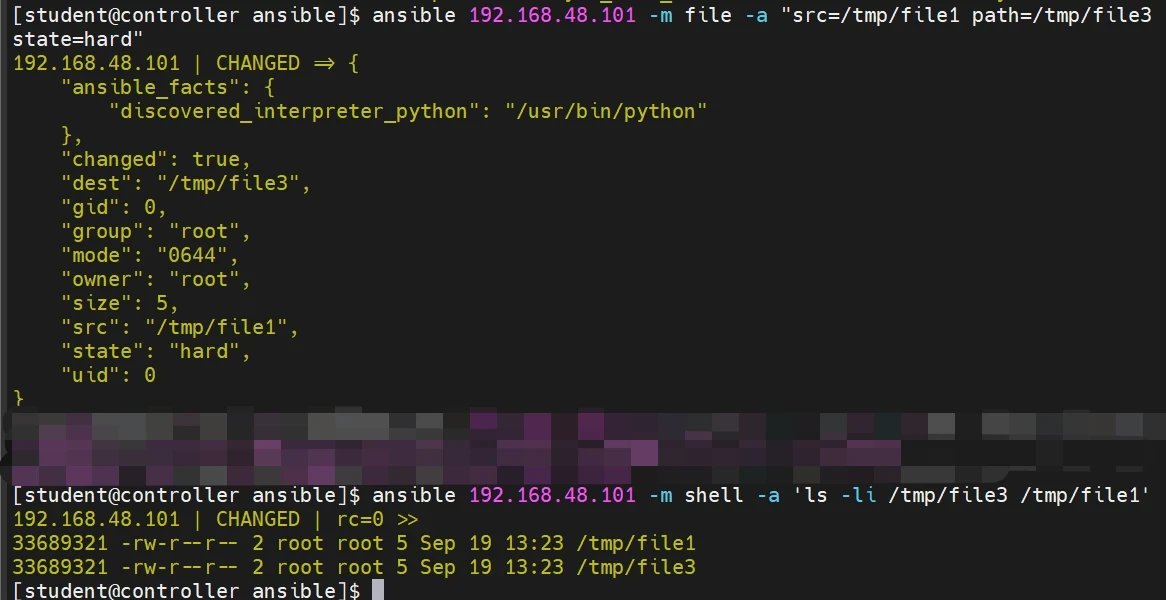
file3→file1(hard)
file3不存在
1 ansible 192.168.48.101 -m file -a "src=/tmp/file1 path=/tmp/file3 state=hard"
课堂练习
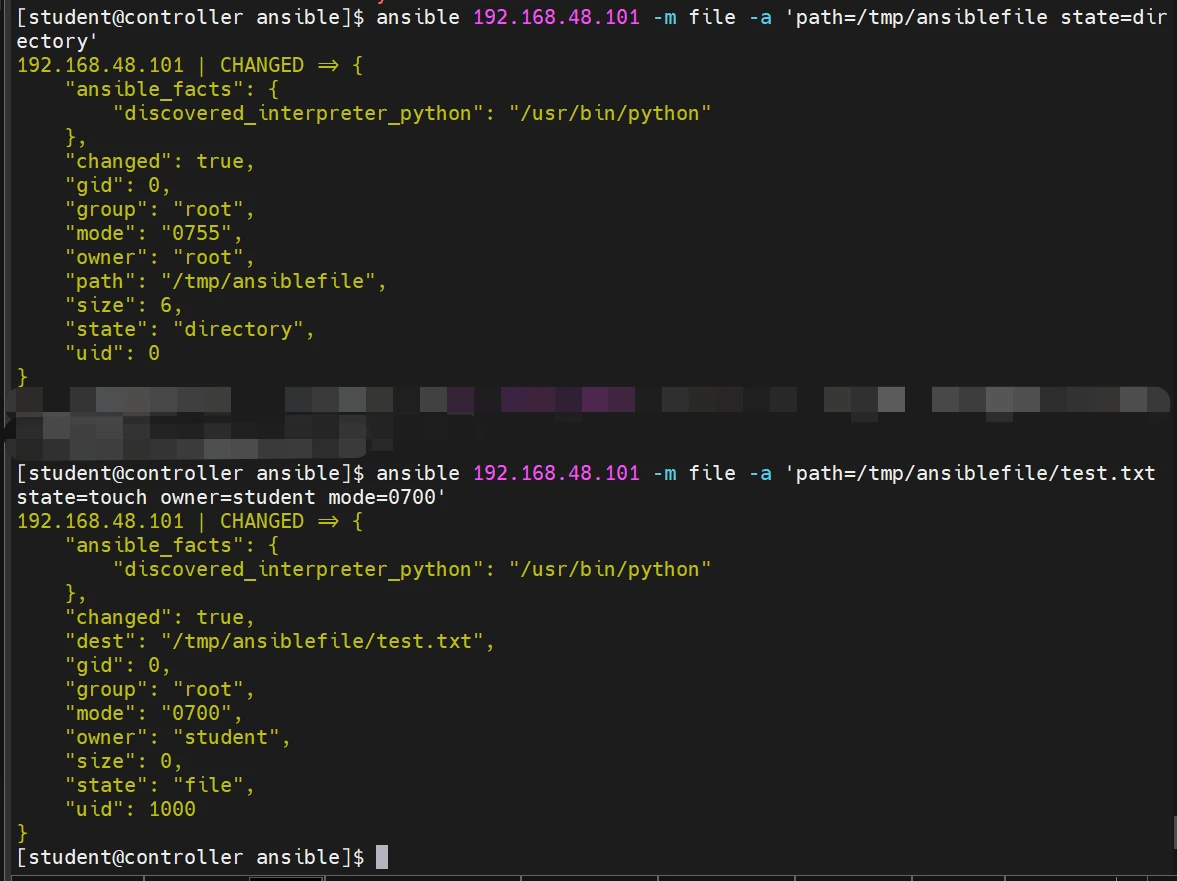
1、在/tmp/下创建目录ansiblefile,并在该文件夹下创建test.txt文件,指定属主student,赋予权限0700
1
2
3
ansible all -m shell -a "useradd student" #创建一个用户与组 ansible 192.168.48.101 -m file -a 'path=/tmp/ansiblefile state=directory' ansible 192.168.48.101 -m file -a 'path=/tmp/ansiblefile/test.txt state=touch owner=student mode=0700'
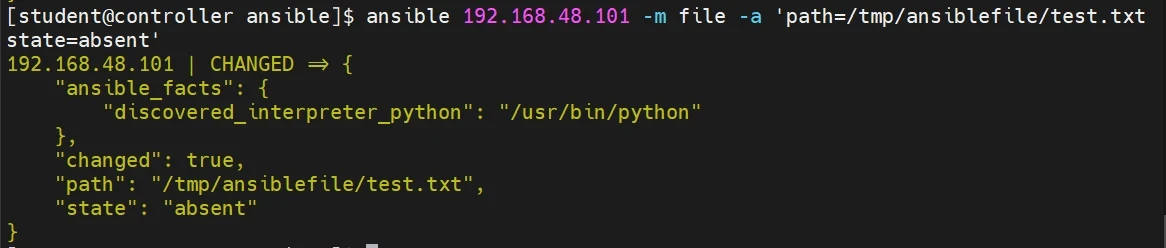
2、删除远程机器上的指定文件或目录(删除远程主机上的文件:/tmp/ansiblefile/test.txt
1 ansible 192.168.48.101 -m file -a 'path=/tmp/ansiblefile/test.txt state=absent'
lineinfile模块
增加或修改文件内容(以行为单位做流式处理),该模块在自动化运维中非常重要,他可以通过正则表达 式替换指定文本;例如开启一些配置选项等可以新加一行文本,或者是删除指定的行,本命令一定认真掌握 下来.
*常见参数*
path :必须参数,远端文件路径
line :必须参数,修改后的内容(按行写入),追加
regexp :(定位)匹配正则语句,与要过滤的关键字
state :文件修改状态(present 添加生效 / absent 删除)
replace :替换文件内容
create :当文件不存在时,是否创建对应文件
backup :若文件更新时创建备份副本
insertafter :在指定位置的下一行插入(定位)
insertbefore :在指定位置的上一行插入(定位)
使用案例
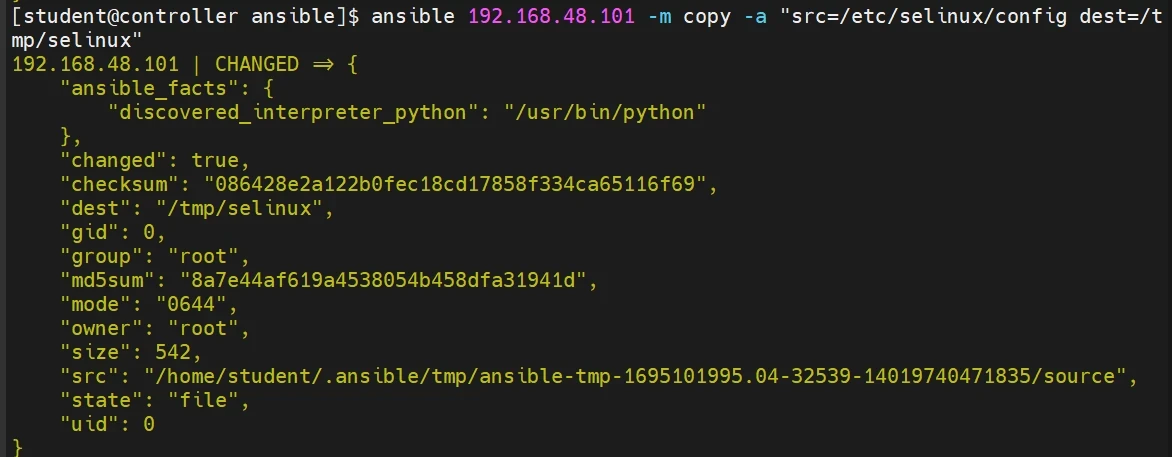
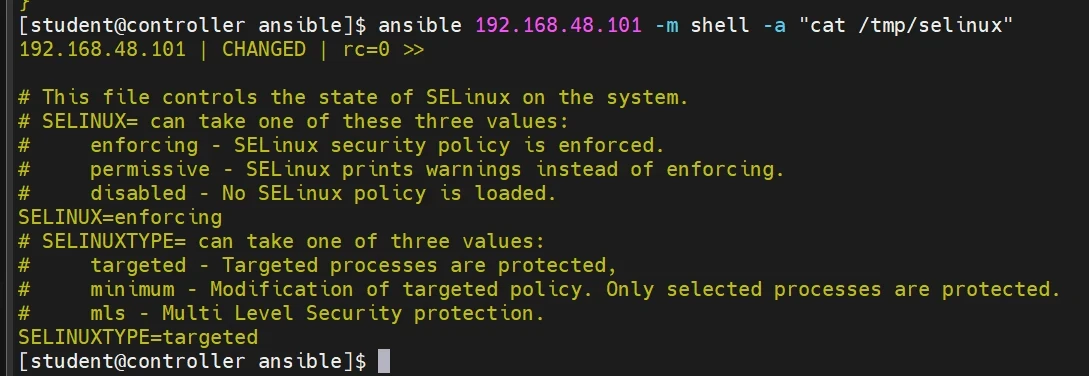
假设前提:将控制节点的/etc/selinux/config文件复制到受管主机192.168.48.101,另存为/tmp/selinux文件
1
2
ansible 192.168.48.101 -m copy -a "src=/etc/selinux/config dest=/tmp/selinux" ansible 192.168.48.101 -m shell -a "cat /tmp/selinux"
修改文件内容:考虑两个问题,修改哪个部分,修改成什么内容
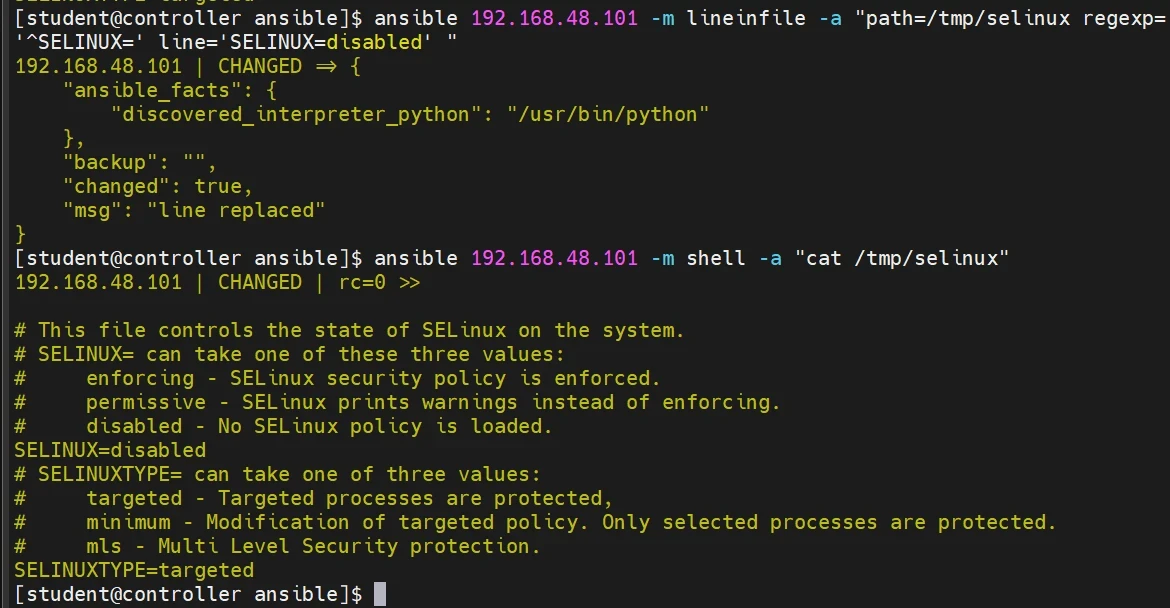
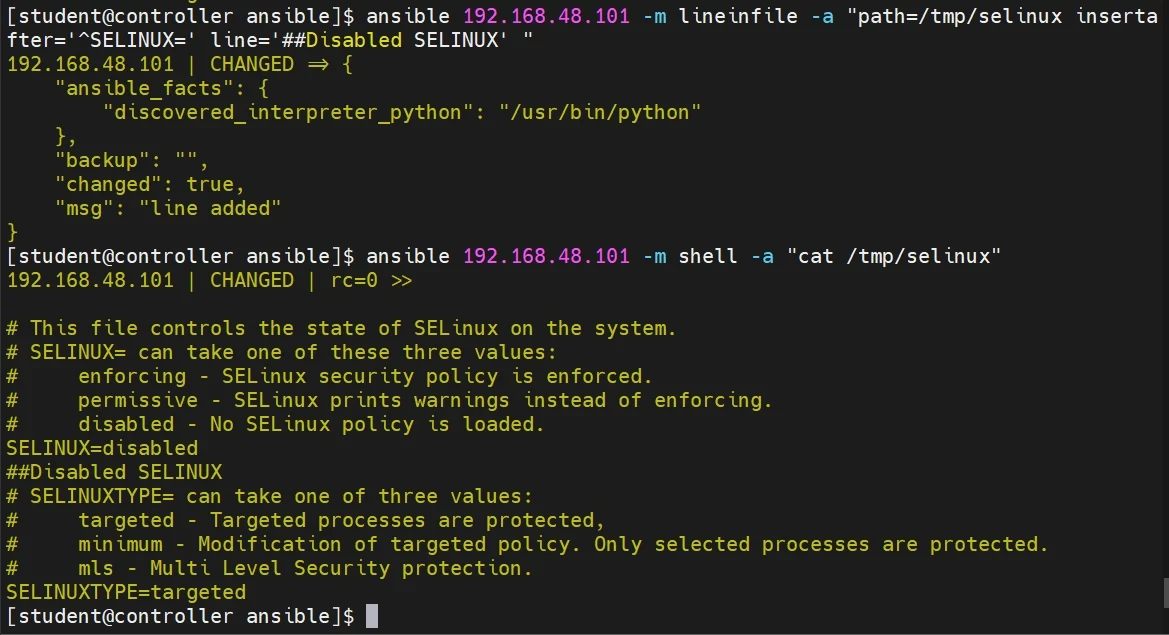
修改SELINUX开头的行,更新内容为:SELINUX=disabled
1
2
ansible 192.168.48.101 -m lineinfile -a "path=/tmp/selinux regexp='^SELINUX=' line='SELINUX=disabled' " ansible 192.168.48.101 -m shell -a "cat /tmp/selinux"
2.增加文件内容:考虑两个问题,增加什么内容,增加在哪个位置(上一行或下一行)
在SELINUX开头的行,在下一行加个注释,并且应用生效
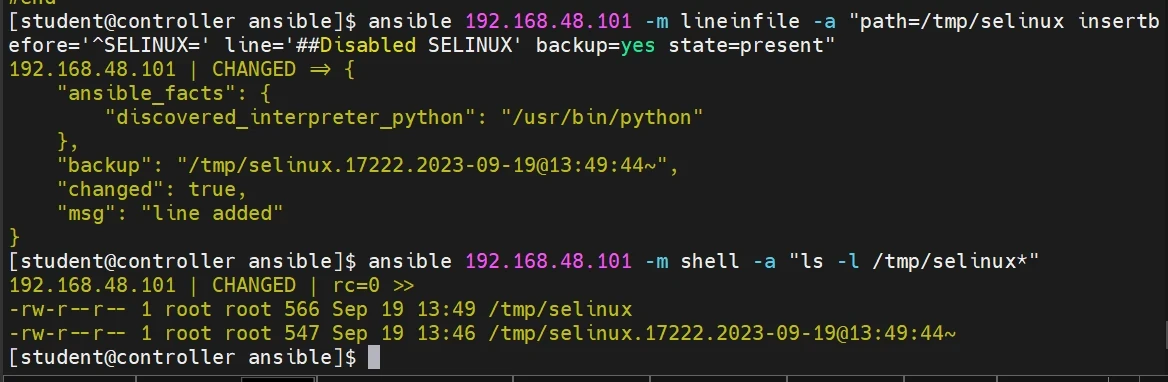
1 ansible 192.168.48.101 -m lineinfile -a "path=/tmp/selinux insertafter='^SELINUX=' line='##Disabled SELINUX' "
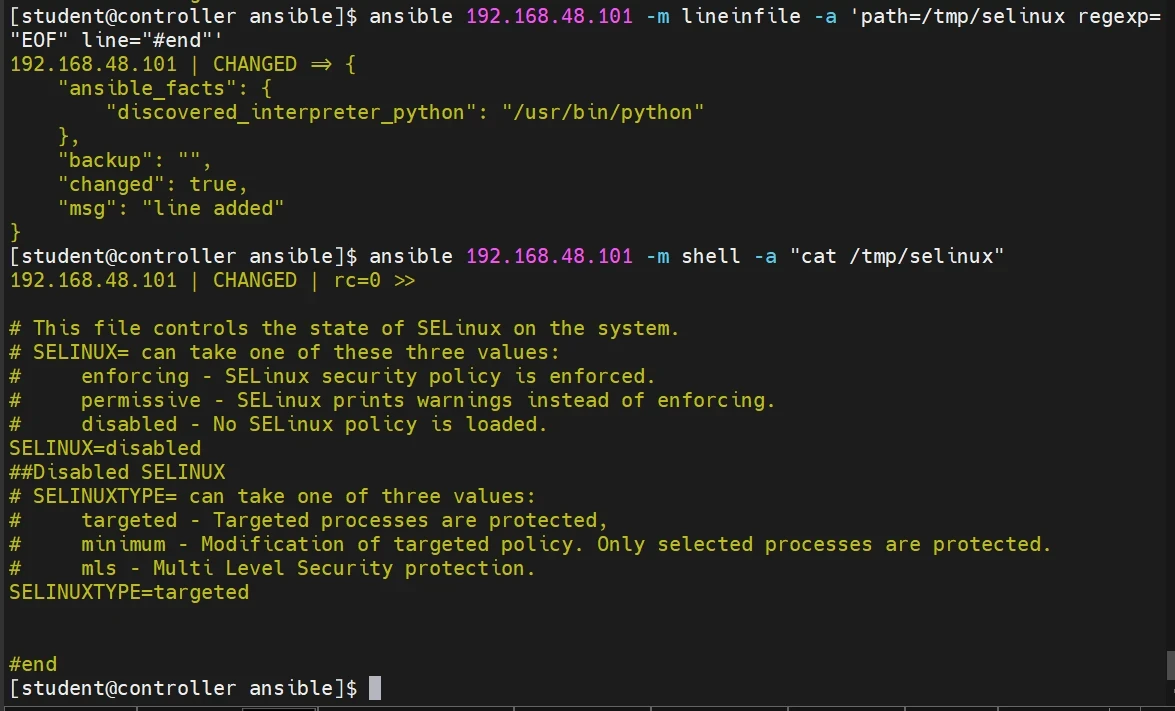
通过正则匹配查找/tmp/selinux文本,并在文本末尾插入一行##end
1 ansible 192.168.48.101 -m lineinfile -a 'path=/tmp/selinux regexp="EOF" line="#end"'
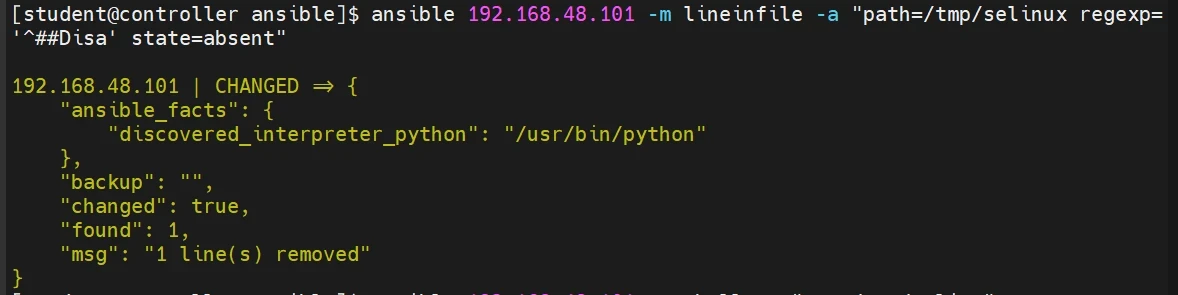
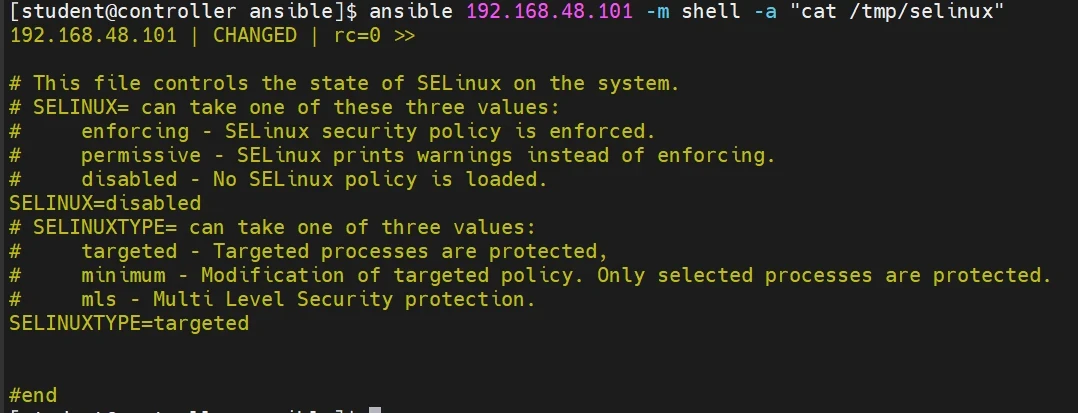
3.删除文件内容:把刚才添加的“##disabled selinux ”注释去掉(删除所在行)
1
2
ansible 192.168.48.101 -m lineinfile -a "path=/tmp/selinux regexp='^##Disa' state=absent" ansible 192.168.48.101 -m shell -a "cat /tmp/selinux"
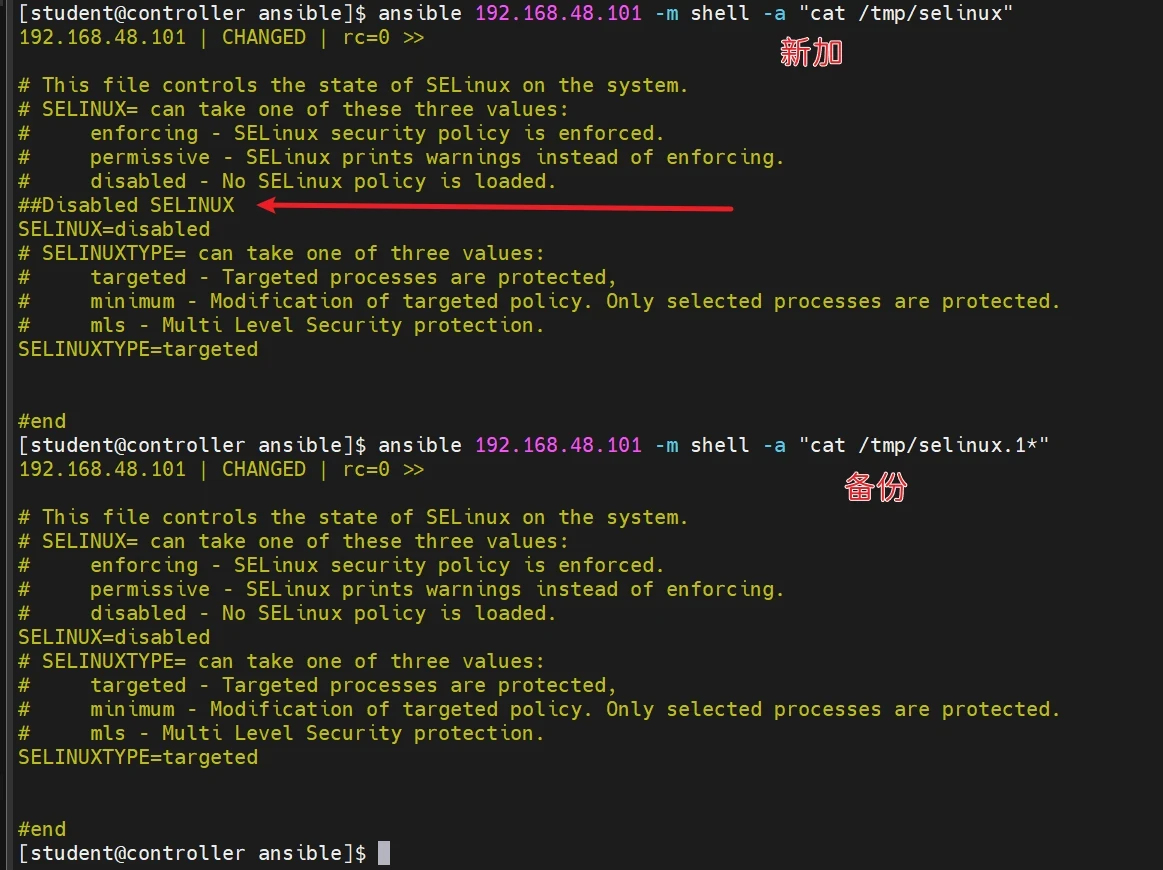
备份文件:在SELINUX开头的行,前一行加个注释,并且生效,生成备份文件
1
2
ansible 192.168.48.101 -m lineinfile -a "path=/tmp/selinux insertbefore='^SELINUX=' line='##Disabled SELINUX' backup=yes state=present" ansible 192.168.48.101 -m shell -a "ls -l /tmp/selinux*"
课堂练习:
修改192.168.48.101主机的/etc/hosts文件,
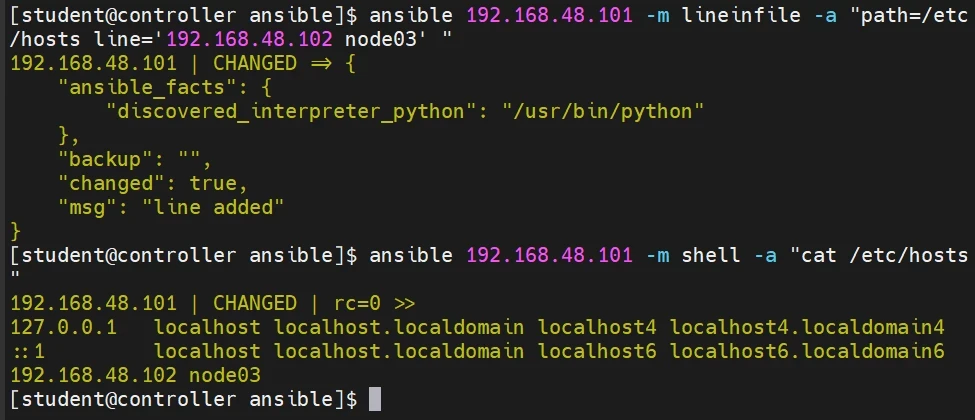
1、增加内容192.168.48.102 node03,验证增加成功
1
2
ansible 192.168.48.101 -m lineinfile -a "path=/etc/hosts line='192.168.48.102 node03' " ansible 192.168.48.101 -m shell -a "cat /etc/hosts"
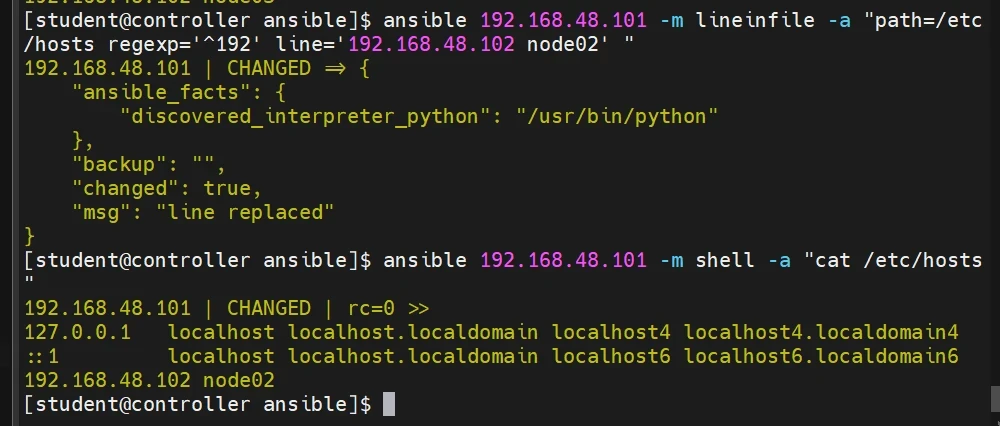
2、匹配以192开头的行,修改192.168.48.102 对应的 域名为node02,验证增加成功
1 ansible 192.168.48.101 -m lineinfile -a "path=/etc/hosts regexp='^192' line='192.168.48.102 node02' "
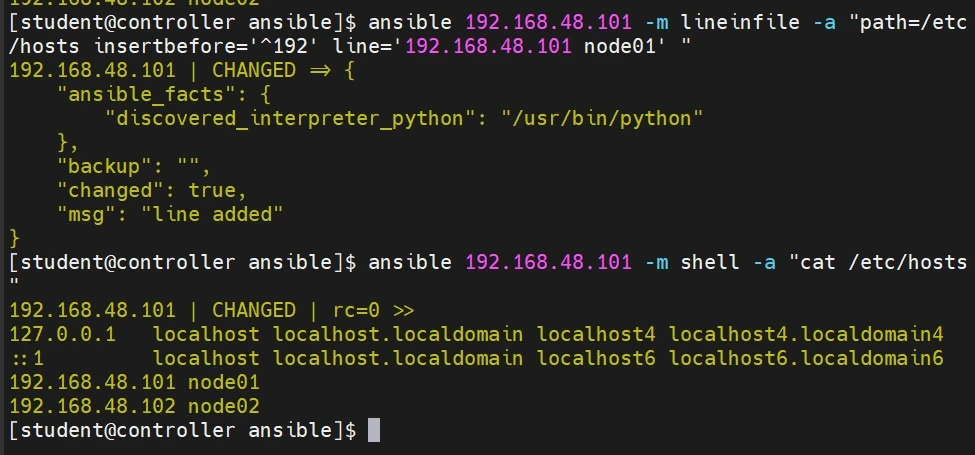
3、匹配以192开头的行之前增加 192.168.48.101 node01 ,验证增加成功
1 ansible 192.168.48.101 -m lineinfile -a "path=/etc/hosts insertbefore='^192' line='192.168.48.101 node01' "
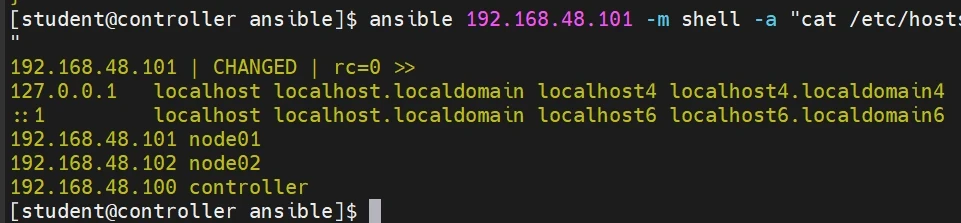
4、在文档结尾增加 192.168.48.100 controller
1 ansible 192.168.48.101 -m lineinfile -a 'path=/etc/hosts regexp="EOF" line="192.168.48.100 controller"'
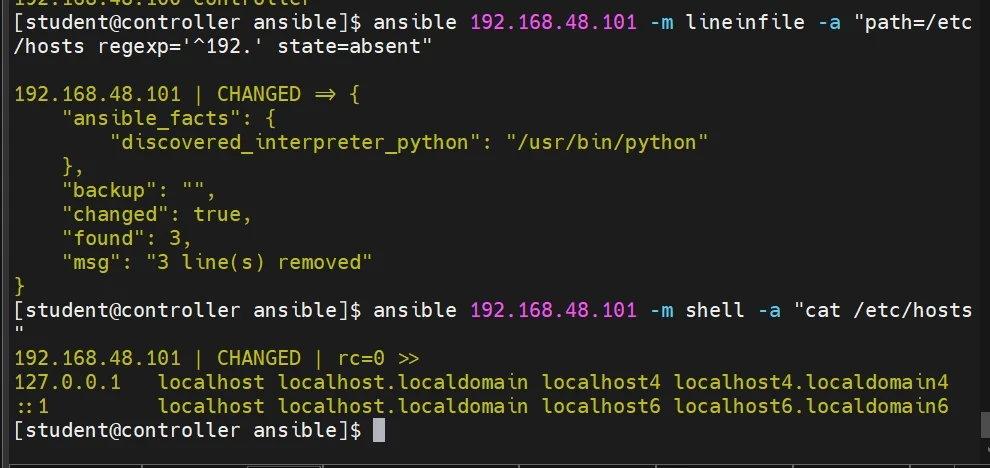
5、删除步骤1-3加入的内容
1
2
ansible 192.168.48.101 -m lineinfile -a "path=/etc/hosts regexp='^192.' state=absent" ansible 192.168.48.101 -m shell -a "cat /etc/hosts"
软件包模块
yum模块
*常用参数*
name:软件包名称(必填)
state:
latest(更新到最新)
present(安装)
version(版本)
absent(卸载)
查看是否安装了某个服务 rpm -qa|grep httpd
*使用案例*
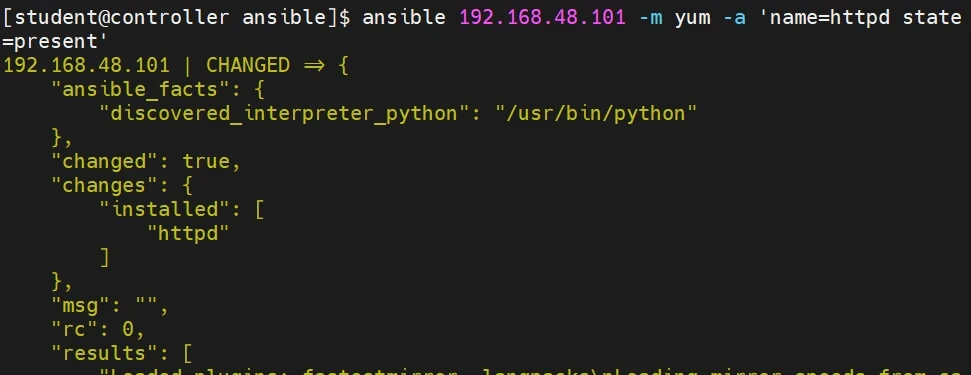
给node01安装httpd服务
1 ansible 192.168.48.101 -m yum -a 'name=httpd state=present'
验证安装
1 ansible 192.168.48.101 -m shell -a 'rpm -qa|grep httpd'
卸载 state=absent
1 ansible 192.168.48.101 -m yum -a 'name=httpd state=absent'
更新软件state=latest
1 ansible 192.168.48.101 -m yum -a 'name='httpd' state=latest'
系统模块
user模块
常用参数
1
2
3
4
5
6
7
8
comment:注释信息 group:主要组 groups:附加组 state:present/absent generate_ssh_key:生成SSH验证密钥 name:用户名 shell:Shell类型 uid:UID
使用案例
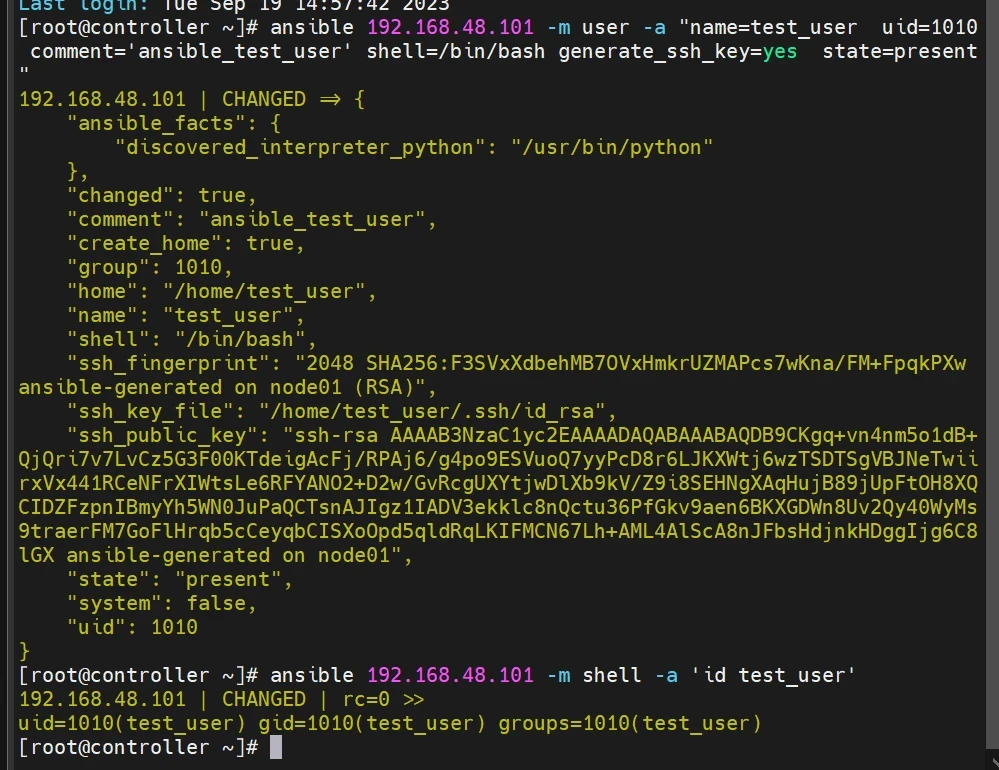
1、在node1上创建用户 test_user UID=1010
1 ansible 192.168.48.101 -m user -a "name=test_user uid=1010 comment='ansible_test_user' shell=/bin/bash generate_ssh_key=yes state=present"
1 ansible 192.168.48.101 -m shell -a 'id test_user'
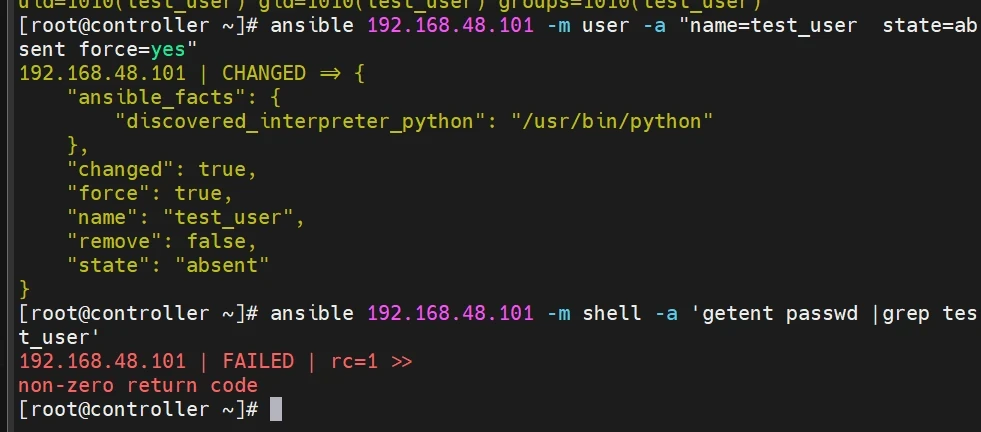
2、删除用户test_user(userdel test_user)
1
2
ansible 192.168.48.101 -m user -a "name=test_user state=absent force=yes" ansible 192.168.48.101 -m shell -a 'getent passwd |grep test_user'
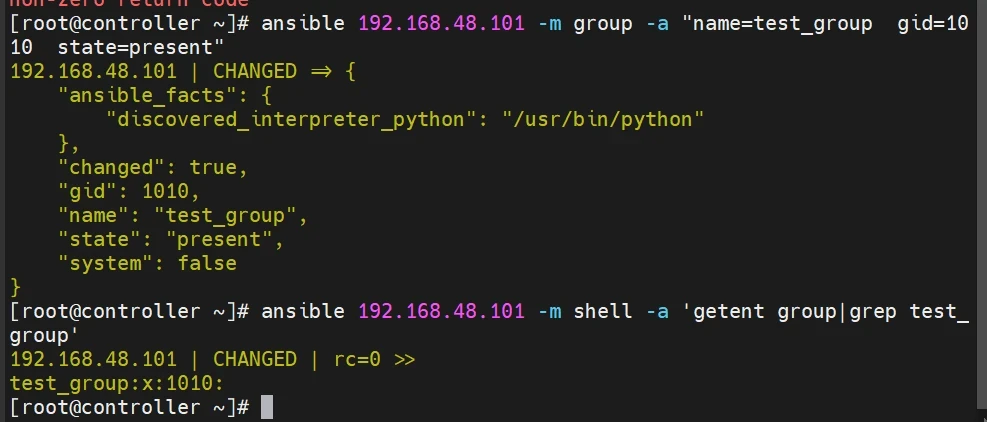
group组模块
1、创建组test_group (groupadd -g 1010 test_group)
1
2
ansible 192.168.48.101 -m group -a "name=test_group gid=1010 state=present" ansible 192.168.48.101 -m shell -a 'getent group|grep test_group'
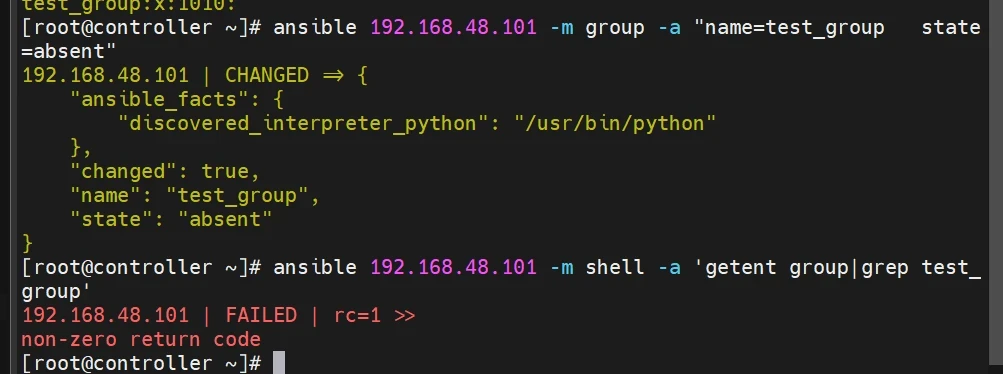
2、删除组test_group (groupdel test_group)
1
2
ansible 192.168.48.101 -m group -a "name=test_group state=absent" ansible 192.168.48.101 -m shell -a 'getent group|grep test_group'
service模块
启用/启动/停止指定的服务
常用参数
1
2
3
4
name:服务名(确定服务存在)(必选项) state:服务目标状态 (state=started/stopped/restarted/...)(必选项) enabled:是否开机启动(yes/no)
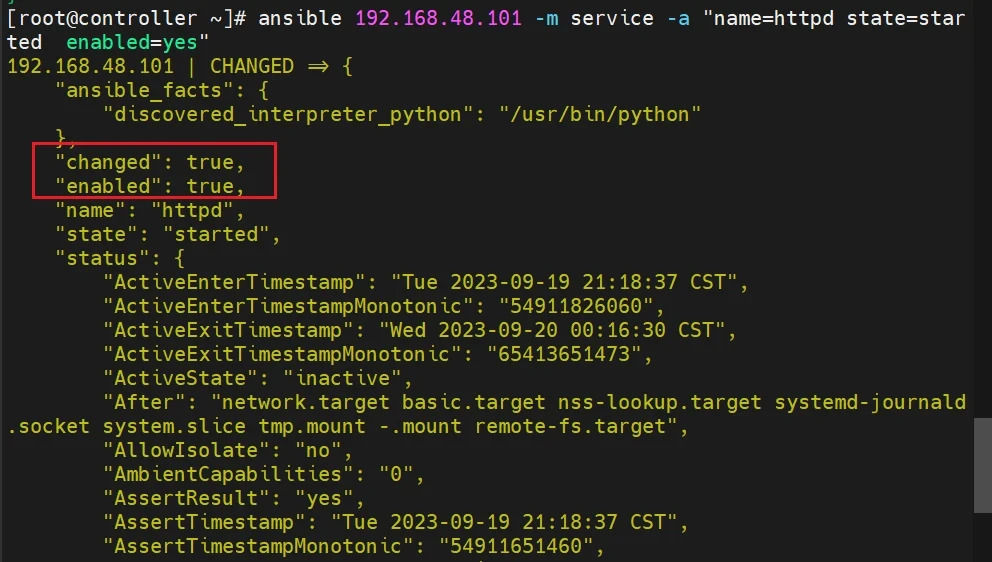
1、在node01上安装和启用httpd服务(相当于systemctl enable --now httpd)
安装
1 ansible 192.168.48.101 -m yum -a 'name=httpd state=present'
启用
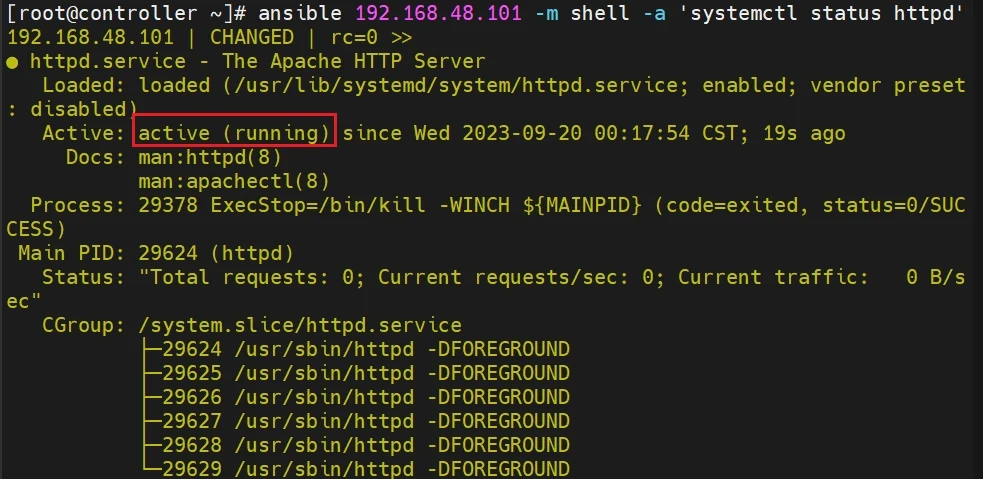
1 ansible 192.168.48.101 -m service -a "name=httpd state=started enabled=yes"
1 ansible 192.168.48.101 -m shell -a 'systemctl status httpd'
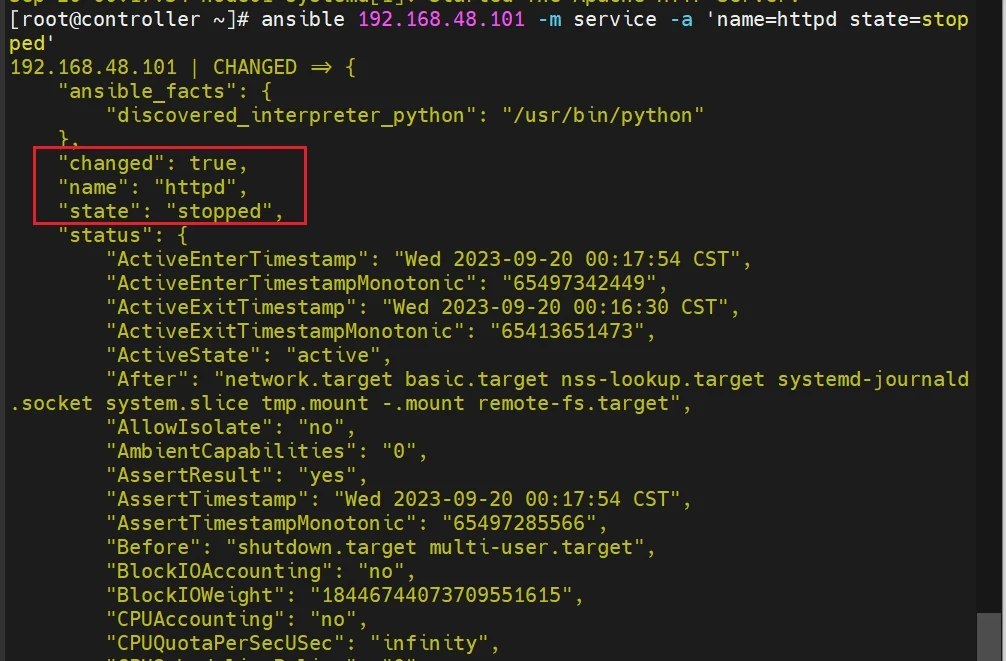
2、停止服务
1 ansible 192.168.48.101 -m service -a 'name=httpd state=stopped'
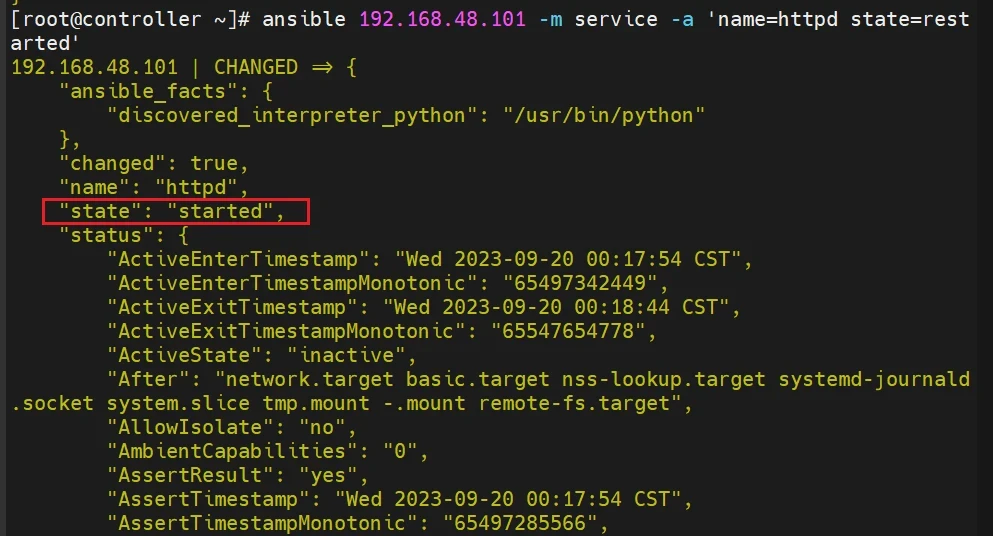
3、重启服务
1 ansible 192.168.48.101 -m service -a 'name=httpd state=restarted'
firewalld模块
常见参数
1
2
3
4
5
6
7
8
source:数据源(相当于--add-source) interface:端口(相当于--add-port) service:服务(相当于--add-service) zone:关联区域(相当于--zone) permanent:永久生效(相当于--permanent) immediate:立即生效(相当于执行了firewall-cmd --reload) state:防火墙规则状态(enabled | disabled)(必填项) rich_rule:富规则(相当于--add-rich-rule='')
使用案例
1、添加基本规则
在node1中将http服务进行放行,并关联到public区域中,立即生效且永久生效
1 ansible 192.168.48.101 -m firewalld -a 'zone=public service=http permanent=yes immediate=yes state=enabled'
综合练习
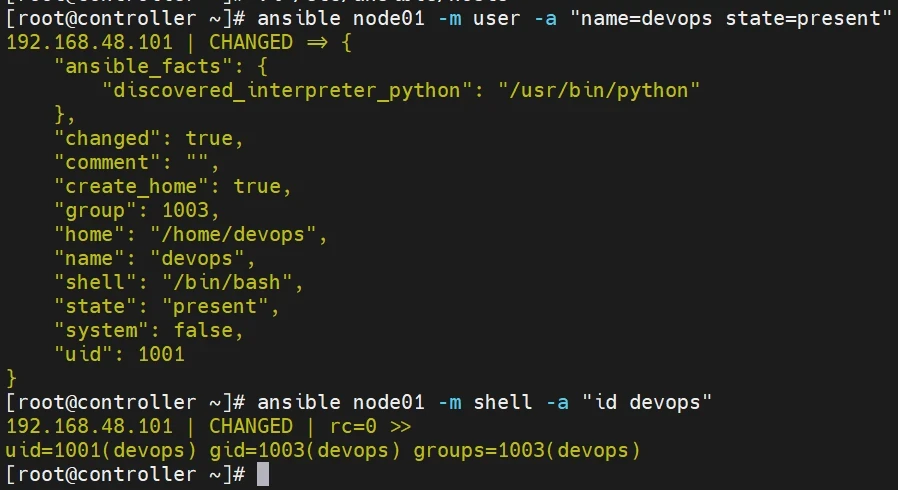
(1)在node01上创建一个用户devops:
1 ansible node01 -m user -a "name=devops state=present"
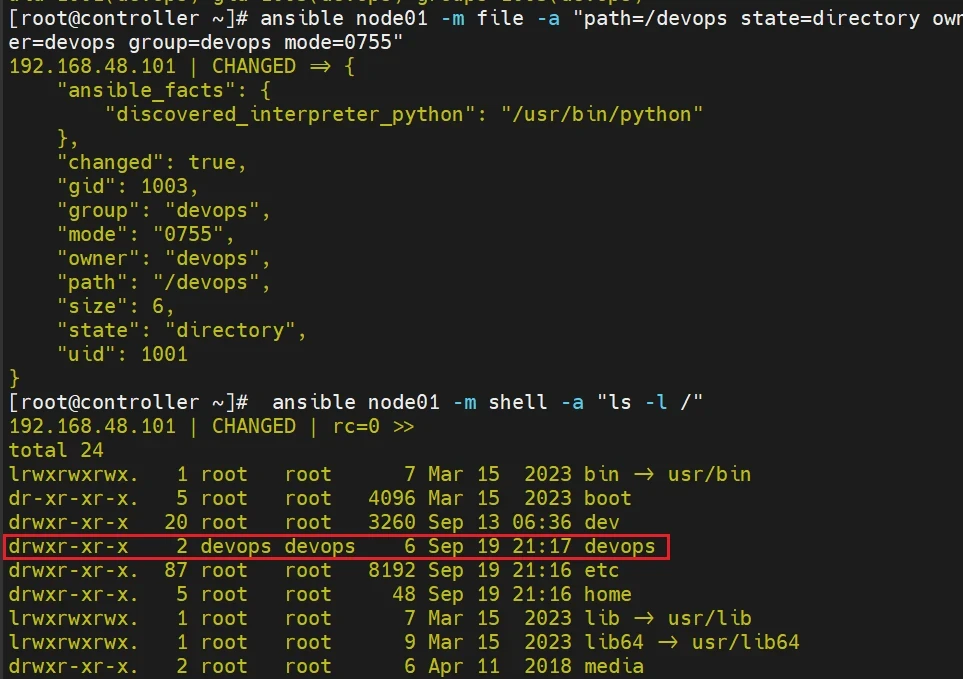
(2)在node01上创建一个目录 /devops,设置所属组、权限:
1
2
ansible node01 -m file -a "path=/devops state=directory owner=devops group=devops mode=0755" ansible node01 -m shell -a "ls -l /"
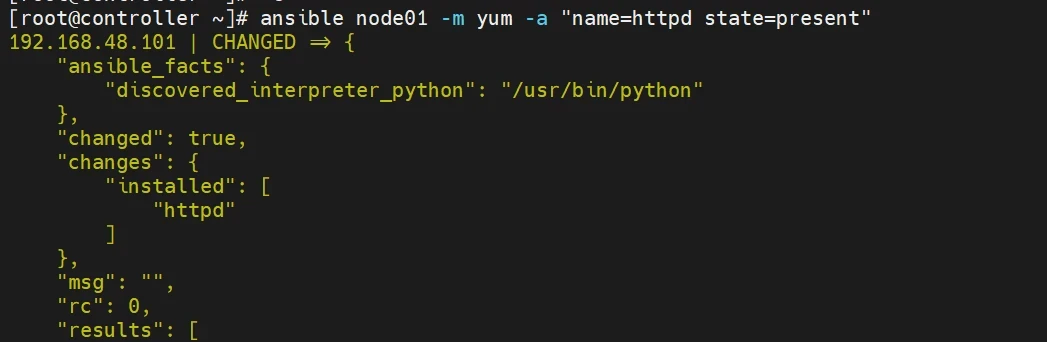
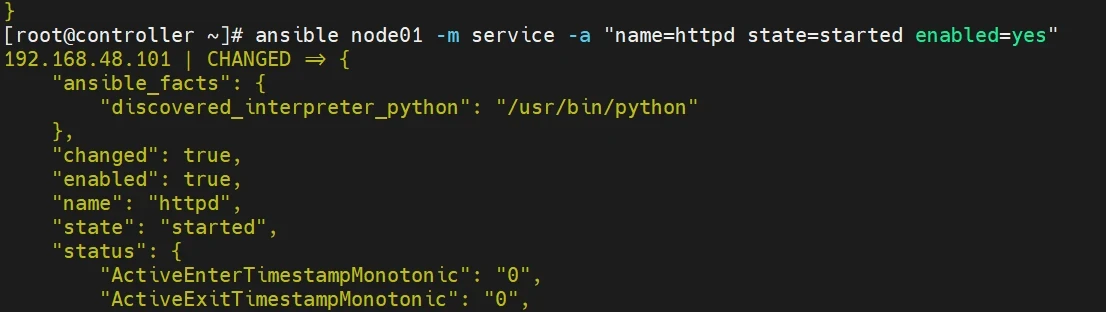
(3)安装httpd服务,设定开机自启动,验证服务状态为启动:
1
2
ansible node01 -m yum -a "name=httpd state=present" ansible node01 -m service -a "name=httpd state=started enabled=yes"
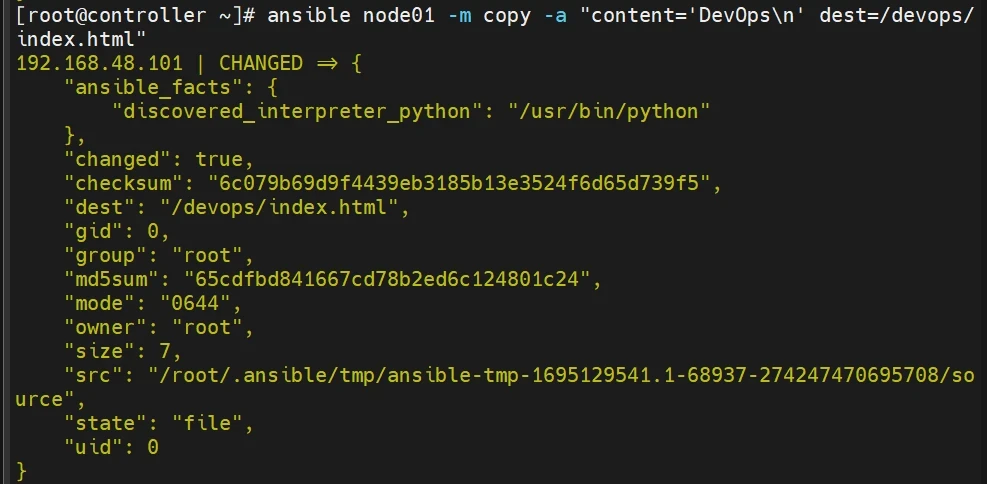
(4)创建一个文件 /devops/index.html 包含一行内容:DevOps:
1 ansible node01 -m copy -a "content='DevOps\n' dest=/devops/index.html"
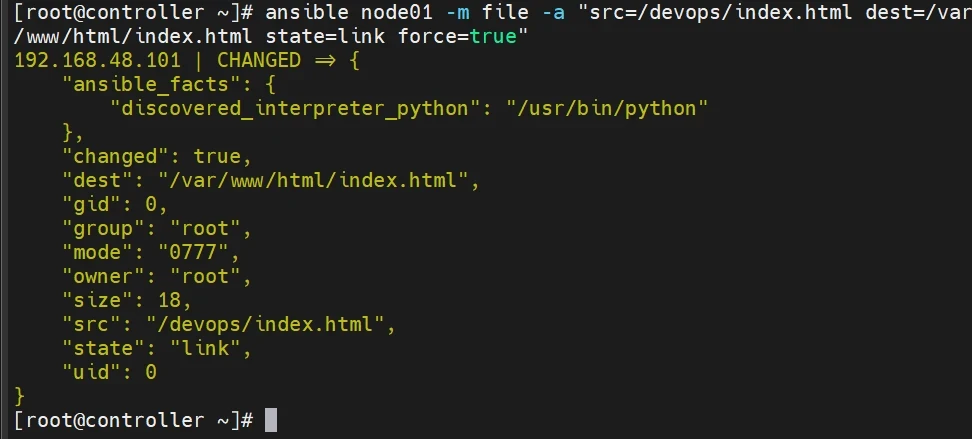
(5)创建软链接:/var/www/html/index.html 到 /devops/index.html:
1 ansible node01 -m file -a "src=/devops/index.html dest=/var/www/html/index.html state=link force=true"
(6)验证软链接:
1 ansible node01 -m shell -a "ls -l /var/www/html/index.html"
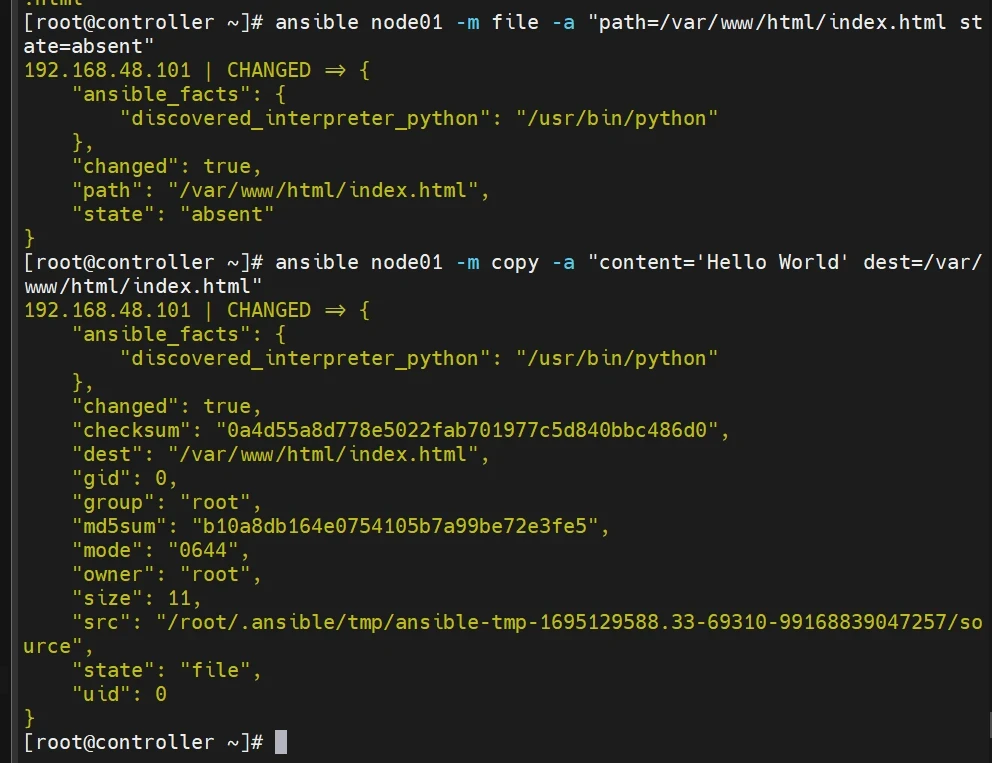
(7)取消软链接,新建/var/www/html/index.html 文档,访问网页:
1
2
ansible node01 -m file -a "path=/var/www/html/index.html state=absent" ansible node01 -m copy -a "content='Hello World' dest=/var/www/html/index.html"
使用浏览器访问http://192.168.48.101验证主页信息
Ansible-Playbook
介绍
playbook是由一个或多个"play"组成的列表
1
2
3
用户通过ansible命令直接调用yml语言写好的playbook,playbook由多条play组成 每条play都有一个任务(task)相对应的操作,然后调用模块modules,应用在主机清单上,通过ssh远程连接 从而控制远程主机或者网络设备
YAML语法
1
2
3
4
5
6
7
8
9
10
11
12
13
14
> 在单一档案中,可用连续三个连字号(---)区分多个档案。 另外,还有选择性的连续三个点号( ... )用来表示档案结尾 > 次行开始正常写Playbook的内容,一般建议写明该Playbook的功能 > 使用#号注释代码 > 缩进必须是统一的,不能空格和tab混用,一般缩进2个空格 > 缩进的级别也必须是一致的,同样的缩进代表同样的级别,程序判别配置的级别是通过缩进结合换行来实现的 > YAML文件内容是区别大小写的,key/value的值均需大小写敏感 > 多个key/value可同行写也可换行写,同行使用:分隔,同一行使用 , 逗号分隔 > value可以是个字符串,也可是另一个列表[] > 一个完整的代码块功能需最少元素需包括 name 和 task > 一个name只能包括一个task > YAML中不允许在双引号中出现转义符号,所以都是以单引号来避免转义符错误 > 使用 | 和 > 来分隔多行,实际上这只是一行。 > YAML文件扩展名通常为yml或yaml
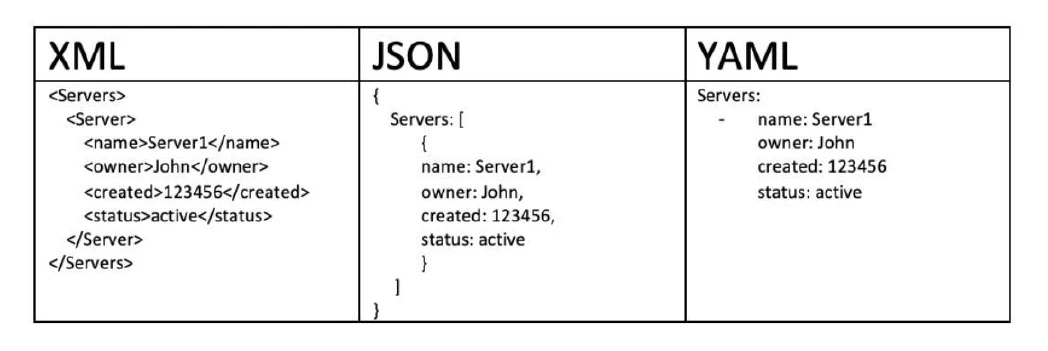
三种常见的数据交换格式
1
2
3
4
5
6
7
8
9
10
11
12
13
14
15
16
17
YAML的语法和其他高阶语言类似,并且可以简单表达清单、散列表、标量等数据结构。 序列(Sequence)里的项用"-"来代表,Map里的键值对(字典)用":"分隔 示例 name: John Smith age: 41 gender: Male spouse: name: Jane Smith age: 37 gender: Female children: - name: Jimmy Smith age: 17 gender: Male - name: Jenny Smith age 13 gender: Female
修改vim
1
2
3
4
5
6
7
8
9
10
11
12
13
14
15
16
17
18
19
vim ~/.vimrc set nu set paste set cursorline set cursorcolumn autocmd FileType yaml setlocal ai et ts=2 sw=2 set nu #显示行号 set paste #黏贴内容保留格式 set cursorline #行定位 set cursorcolumn #列定位 autocmd FileType yaml setlocal ai et ts=2 sw=2 #FileType 代表文件类型,后边跟参数yaml,就是这个作用于yaml文件,编写其他文件时不起作用 #ts=2是tabstop=2的缩写,表示使用2个空格自动代替tab键 #et=expandtab 表示tab键的缩写 #sw=2 是shiftwidth=2的缩写,表示开启自动缩进对齐,缩进宽度为2个空格 #ai=auto indent 自动退格对齐\
将这段代码添加到 ~/.vimrc 文件中,以使 Vim 在启动时自动应用这些设置
playbook基础组件
一个简单的剧本模型(YAML语言)
1> 缩进:用两个空格缩进
2> 列表:用 -
3> 字典:key: value
1
2
3
4
5
6
7
8
9
10
11
12
13
--- - hosts: YYY #待操作主机集,可以不写,执行时通过 -i 调用host文件 remote_user: root #在远端使用哪个用户执行 tasks: #任务集(必须) - name: task1 #只是一个文本提示,执行时会输出其中内容(例如输出Install httpd) module1: #真正干活的部分,其实就是前面讲过的ansible各种模块 argument1 : value1 argument2 : value2 - name: task2 module2: argument1 : value1 argument2 : value2 ...
解释:
1
2
3
4
Hosts: > playbook中的每一个play的目的都是为了让特定主机以某个指定的用户身份执行任务。 hosts用于指定要执行指定任务的主机,须事先定义在主机清单中
1
2
3
4
5
6
7
8
9
10
11
12
remote_user: 可用于Host和task中。 也可以通过指定其通过sudo的方式在远程主机上执行任务,其可用于play全局或某任务; 此外,甚至可以在sudo时使用sudo_user指定sudo时切换的用户 - hosts: all remote_user: root (可省略,默认为root) 以root身份连接 tasks: 指定任务 - name: test connection ping: remote_user: magedu sudo: yes 默认sudo为root sudo_user:wang sudo为wang
1
2
3
4
5
6
7
8
9
10
task列表和action 任务列表task:由多个动作,多个任务组合起来的,每个任务都调用的模块,一个模块一个模块执行 1> play的主体部分是task list,task list中的各任务按次序逐个在hosts中指定的所有主机上执行, 即在所有主机上完成第一个任务后,再开始第二个任务 2> task的目的是使用指定的参数执行模块,而在模块参数中可以使用变量。 模块执行是幂等的,这意味着多次执行是安全的,因为其结果均一致 3> 每个task都应该有其name,用于playbook的执行结果输出,建议其内容能清晰地描述任务执行步骤。 如果未提供name,则action的结果将用于输出
playbook书写风格
简单案例:
编写echo.yaml文件,内容如下
1
2
3
4
5
6
7
8
9
10
11
vim echo.yaml --- - hosts: 192.168.48.102 tasks: - name: 输出1 shell: echo "1" - name: 输出2 shell: echo "2" ... #执行该剧本文件: ansible-playbook echo.yaml
命令执行返回的结果:
第一行PLAY表示执行的主机或者主机组。
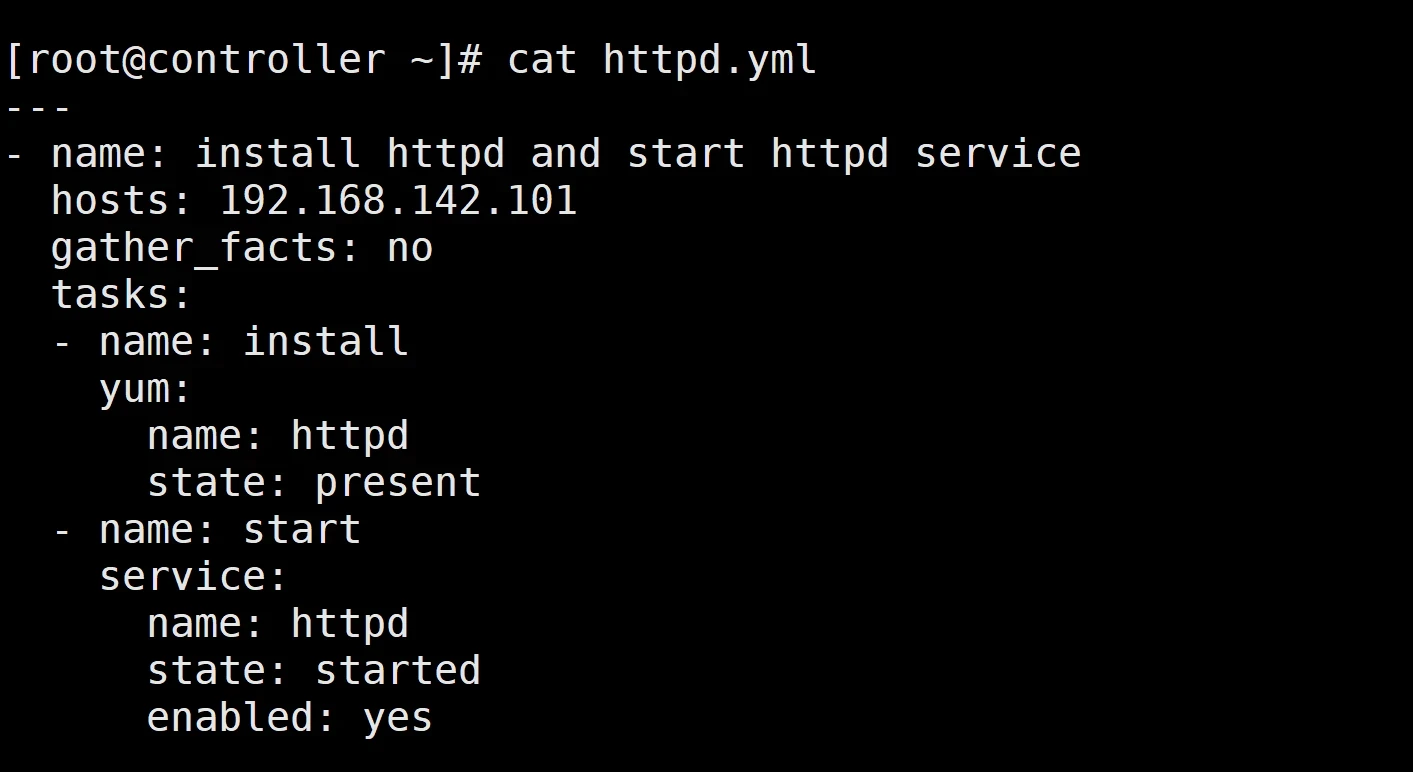
编写playbook
1
2
3
4
5
6
7
8
9
10
11
12
13
14
15
16
vim httpd.yaml --- - name: Install httpd package and start httpd service hosts: 192.168 .142 .101 tasks: - name: Install httpd package yum: name: httpd state: present - name: Start httpd service service: name: httpd state: started enabled: yes
运行playbook
1
2
3
4
5
6
7
8
9
10
11
12
13
14
15
16
17
18
19
运行playbook的方式 ansible-playbook <filename.yaml> ... [options] 常见选项 --check -C 只检测可能会发生的改变,但不真正执行操作 (只检查语法,如果执行过程中出现问题,-C无法检测出来) (执行playbook生成的文件不存在,后面的程序如果依赖这些文件,也会导致检测失败) --list-hosts 列出运行任务的主机 --list-tags 列出tag (列出标签) --list-tasks 列出task (列出任务) --limit 主机列表 只针对主机列表中的主机执行 -v -vv -vvv 显示过程 示例 ansible-playbook hello.yaml --check 只检测 ansible-playbook hello.yaml --list-hosts 显示运行任务的主机 ansible-playbook hello.yaml --limit 192.168.142.101 限制主机 ansible-playbook hello.yaml --list-tasks 显示运行任务的主机
1、在ansible工作目录运行 完整剧本:httpd.yaml
1
2
3
4
5
执行剧本 ansible-playbook playbooks/httpd.yaml 验证服务 ansible 192.168.142.101 -m shell -a 'rpm -qa |grep httpd' ansible 192.168.142.101 -m shell -a 'netstat -ntulp |grep 80'
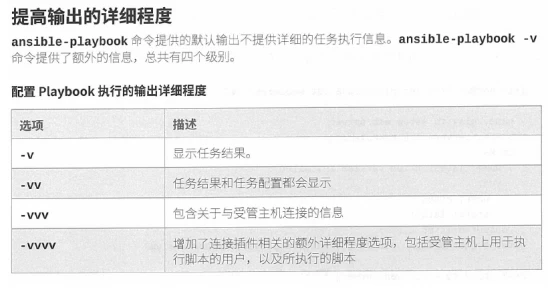
2.提高输出的详细程度
注:通常使用 ansible-playbook -v 即可。
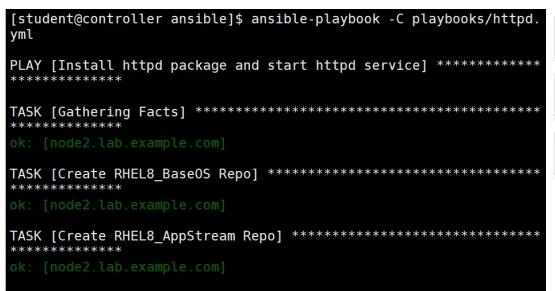
3.执行空运行(冒烟运行)
handlers+notify
Handlers 实际上就是一个触发 器,是task列表,这些task与前述的task并没有本质上的不同,用于当关注的资源发生变化时,才会采取一定的操作。任务都有状态changed或者ok,只有在任务执行状态为change时,才执行该任务调用的handler。
Notify此action可用于在每个play的最后被触发,这样可避免多次有改变发生时每次都执行指定的操作,仅在所有的变化发生完成后一次性地执行指定操作。在notify中列出的操作称为handler,也即notify中调用handler中定义的操作
示例1:
使用playbook安装httpd,并验证服务启动,查看httpd使用的端口
1
2
3
4
5
6
7
8
9
10
11
12
13
14
15
16
17
18
19
vim httpd3.yaml --- - hosts: all remote_user: root tasks: - name: Install httpd yum: name: httpd state: present - name: ensure apache is running service: name: httpd state: started enabled: yes ansible-playbook httpd3.yaml ansible all -m shell -a 'systemctl status httpd' ansible all -m shell -a 'netstat -tunlp|grep httpd'
在被控端(两台机 )修改httpd的conf文件,监听端口改成8080
1
2
3
4
5
mkdir -p /root/ansible/files cp /etc/httpd/conf/httpd.conf /root/ansible/files vim /root/ansible/files/httpd.conf
修改剧本文件,增加拷贝配置文件的task,并重新执行剧本。
1
2
3
4
5
6
7
8
9
10
11
12
13
14
15
16
17
18
19
20
21
22
23
24
25
26
27
28
29
vim httpd4.yaml --- - hosts: all remote_user: root tasks: - name: Install httpd yum: name: httpd state: present - name: backup httpd.conf shell: cp /etc/httpd/conf/httpd.conf{,.bak} - name: copy configure file copy: src: /root/ansible/files/httpd.conf dest: /etc/httpd/conf/ backup: yes - name: ensure apache is running service: name: httpd state: started enabled: yes ansible-playbook httpd4.yaml ansible all -m shell -a 'cat /etc/httpd/conf/httpd.conf|grep 8080' ansible all -m shell -a 'systemctl status httpd' ansible all -m shell -a 'netstat -tunlp|grep httpd'
增加handlers和notify
1
2
3
4
5
6
7
8
9
10
11
12
13
14
15
16
17
18
19
20
21
22
23
24
25
26
27
28
29
30
31
32
vim httpd4.yaml --- - hosts: all remote_user: root tasks: - name: Install httpd yum: name: httpd state: present - name: copy configure file copy: src: /root/ansible/files/httpd.conf dest: /etc/httpd/conf/ backup: yes notify: restart httpd - name: ensure apache is running service: name: httpd state: started enabled: yes handlers: - name: restart httpd service: name: httpd state: restarted ansible-playbook httpd4.yaml ansible all -m shell -a 'netstat -tunlp|grep httpd' 发现端口是8080(即成功)
修改/root/ansible/files/httpd.conf ,将端口修改为8081,重新执行httpd4.yaml,并验证服务端口已经改变。
1
2
ansible-playbook httpd4.yaml ansible all -m shell -a 'netstat -tunlp|grep httpd'
发现端口变成8081,说明只有在任务执行状态为change时,才执行该任务调用的handler。
tage: 添加标签 可以指定某一个任务添加一个标签,添加标签以后,想执行某个动作可以做出挑选来执行,多个动作可以使用同一个标签
停止httpd服务
1
2
ansible all -m service -a 'name=httpd state=stopped' ansible all -m shell -a 'ss -tln |grep :8081'
1 2 3 4 5 6 7 8 9 10 11 12 13 14 15 16 17 18 19 20 21 22 23 24 25 26 27 28 29 30 31 32 33 34 [root@controller ~ ] --- - hosts: all remote_user: root tasks: - name: install httpd yum: name: httpd state: present tags: install - name: set listen8080 shell: sed -i "s/Listen 80/Listen 8080/g" /etc/httpd/conf/httpd.conf tags: set8080 - name: backup cofing copy: src: /etc/httpd/conf/httpd.conf dest: /etc/httpd/conf/httpd.conf backup: yes notify: restart httpd tags: backup - name: 配置 httpd 服务 service: name: httpd state: started enabled: yes tags: started handlers: - name: restart httpd service: name: httpd state: restarted tags: restart ...
1
2
3
4
5
ansible-playbook -tstarted httpd5.yaml ansible all -m shell -a 'ss -tln |grep :8080' ansible-playbook -t install,conf httpd.yaml
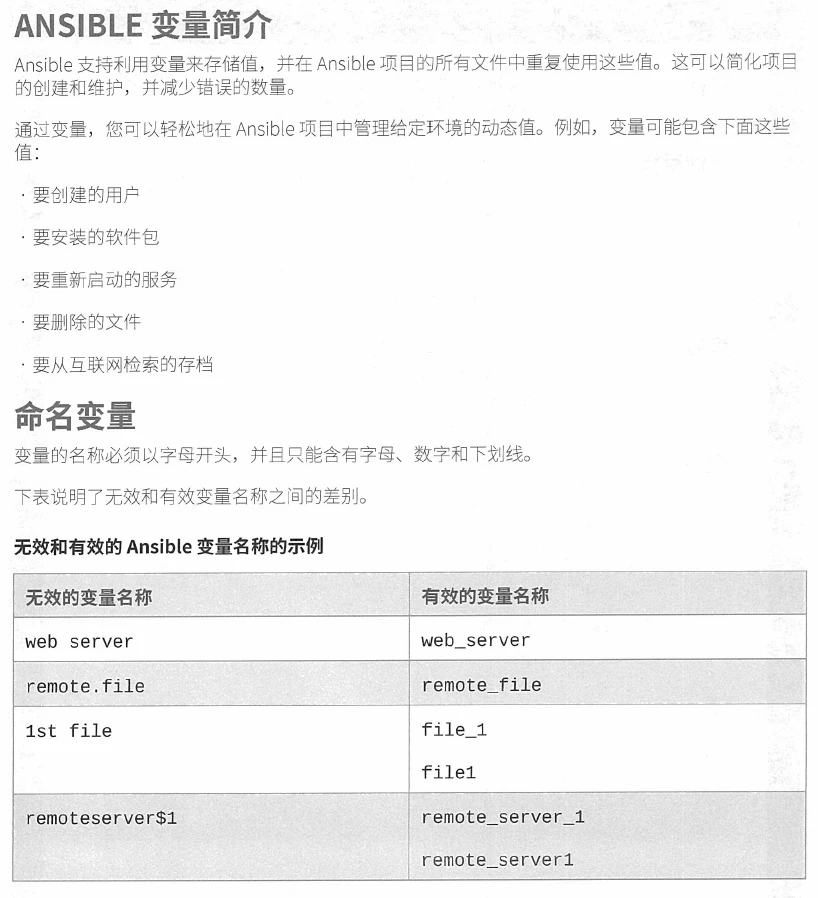
管理变量
变量定义:key=value
变量调用方式:且变量名前后必须有空格 ,有时用""才生效 (引号 )
在playbook中定义
vars语句定义全局变量(该变量作用于整个Play)
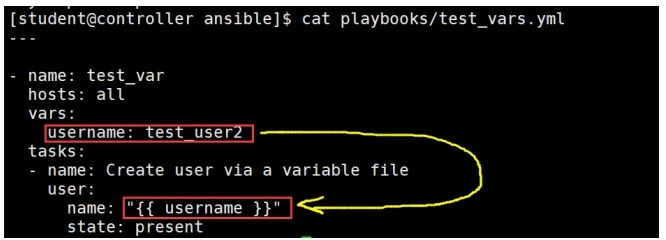
1
2
3
4
5
6
7
8
9
10
11
12
13
14
15
16
17
18
vim test_vars.yaml --- - name: test_var hosts: all vars: username: test_user1 tasks: - name: create user via a variable file user: name: "{{ username }} " state: present ansible-playbook -v test_vars.yaml ansible all -m shell -a 'getent passwd test_user1'
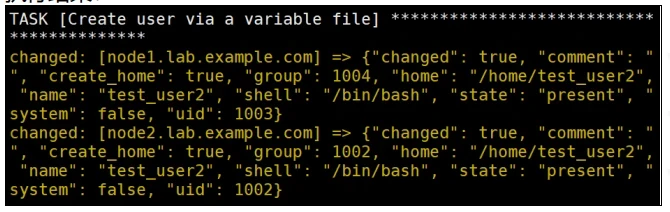
执行结果:
课堂练习
通过playbook中定义用户名和组名,实现变量引用,创建用户和组。
1
2
3
4
5
6
7
8
9
10
11
12
13
14
15
16
17
18
19
20
vim var.yaml --- - hosts: all remote_user: root vars: - username: user1 - groupname: group1 tasks: - name: create group group: name: "{{ groupname }} " state: present - name: create user user: name: "{{ username }} " state: present ansible-playbook -v var.yaml ansible all -m shell -a 'getent passwd user1' ansible all -m shell -a 'getent group group1'
1
2
3
4
5
6
7
8
9
10
11
12
13
14
15
16
17
18
19
20
21
开启防火墙 ansible all -m shell -a 'systemctl start firewalld' vim firewall.yaml --- - hosts: all remote_user: root vars: - http_port: 80 tasks: - name: insert firewalld rule for httpd firewalld: port: "{{ http_port }} /tcp" permanent: true state: enabled immediate: yes ansible-playbook -v firewall.yaml ansible all -m shell -a 'systemctl stop firewalld' ansible all -m shell -a 'firewall-cmd --query-port=80/tcp'
在独立的变量YAML文件中定义
当变量较多的时候,或者变量需要多个playbook重用的时候,可以把变量放到独立的文件中,通过关键字"var_files"把文件中定义的变量引用到playbook中。
vars_files 引用变量文件(只能所用于Play全局,不能在某个task中单独被引用)
1
2
3
4
5
6
7
8
9
10
11
12
13
14
15
16
17
18
19
20
vim var_file.yaml username: test_user3 vim test_var_file.yaml --- - name: test_var_file hosts: all vars_files: - /root/var_file.yaml tasks: - name: create user via a variable file user: name: "{{ username }} " state: present ... ansible-playbook -v test_var_file.yaml ansible all -m shell -a 'getent passwd test_user3'
练习:将防火墙端口写入
1
2
3
4
5
6
7
8
9
10
11
12
13
14
15
16
17
18
19
20
将变量写进单独的配置文件中引用 test_var_file.yaml --- - hosts: all remote_user: root vars_files: - /root/var_file.yaml tasks: - name: insert firewalld rule for httpd firewalld: port: "{{ http_port }} /tcp" permanent: true state: enabled immediate: yes ... vim var_file.yaml http_port: 78 ansible-playbook -v test_var_file.yaml ansible all -m shell -a 'firewall-cmd --query-port=78/tcp'
远程主机上的系统变量(Facts事实)
ansible会通过setup模块来搜集主机的系统信息,这些搜集到的系统信息叫做Facts。
每个playbook在执行前都会默认执行setup模块,所以这些facts信息是可以以变量的形式被使用。
查看Facts变量
1
2
3
4
5
6
7
8
9
10
11
12
13
14
15
16
17
18
19
20
21
22
23
24
25
26
27
ansible all -m setup 能查看到node节点的所有信息 ansible 192.168 .48 .101 -m setup |grep ansible_hostname 或者可以使用filter过滤信息 ansible all -m setup -a 'filter="ansible_hostname"' 查询主机名 ansible all -m setup -a 'filter="ansible_default_ipv4"' 查询ipv4地址 ansible all -m setup -a "filter=ansible_memory_mb" 查询内存 其他常用信息列出如下: ansible_all_ipv4_addresses:仅显示ipv4的信息。 ansible_devices:仅显示磁盘设备信息。 ansible_distribution:显示是什么系统,例:centos,suse等。 ansible_distribution_major_version:显示是系统主版本。 ansible_distribution_version:仅显示系统版本。 ansible_machine:显示系统类型,例:32位,还是64位。 ansible_eth0:仅显示eth0的信息。 ansible_hostname:仅显示主机名。 ansible_kernel:仅显示内核版本。 ansible_lvm:显示lvm相关信息。 ansible_memtotal_mb:显示系统总内存。 ansible_memfree_mb:显示可用系统内存。 ansible_memory_mb:详细显示内存情况。 ansible_swaptotal_mb:显示总的swap内存。 ansible_swapfree_mb:显示swap内存的可用内存。 ansible_mounts:显示系统磁盘挂载情况。 ansible_processor:显示cpu个数(具体显示每个cpu的型号)。 ansible_processor_vcpus:显示cpu个数(只显示总的个数)。
使用Facts变量
1
2
3
4
5
6
7
8
9
10
11
12
13
vim var2.yaml --- - hosts: all remote_user: root tasks: - name: create log file file: name: /root/{{ ansible_hostname }} state: touch ansible-playbook var2.yaml ansible all -m shell -a 'ls /root|grep node*'
复杂Facts变量的使用
方式1:使用中括号
1 {{ ansible_date_time["date"] }}
方式2:使用点号(推荐 )
1 {{ ansible_date_time.date }}
1
2
3
4
5
6
7
8
9
10
11
12
13
vim var2.yaml --- - hosts: all remote_user: root tasks: - name: 22 copy: content: "{{ ansible_date_time.date }} " dest: /tmp/f1 ansible-playbook var2.yaml ansible all -m shell -a 'cat /tmp/f1'
关闭Facts
搜集facts会消耗额外时间,可以在剧本中设置是否开启和关闭facts搜集。
开启gather_facts:yes,关闭gather_facts:no
在/etc/ansible/hosts(主机清单)中定义变量
普通变量 :主机组中主机单独定义,优先级高于公共变量(单个主机 )公共(组)变量 :针对主机组中所有主机定义统一变量(一组主机的同一类别)
可以是主机级别或者是主机组级别的
定义主机级别变量
1
2
3
4
5
vim /etc/ansible/hosts [all] 192.168.48.101 username=test_user3 #主机级别变量 192.168.48.102 username=test_user4
编辑剧本文件
1
2
3
4
5
6
7
8
9
10
11
12
13
14
vim test_vars2.yaml --- - name: test inventory vars hosts: all tasks: - name: create user via a variable file user: name: "{{ username }}" state: present ansible-playbook -v test_vars2.yaml ansible all -m shell -a 'getent passwd test_user3' ansible all -m shell -a 'getent passwd test_user4'
主机组级别定义变量(相对于主机级别定义的变量,优先级较低)
1
2
3
4
5
6
7
8
9
10
vim /etc/ansible/hosts [all] 192.168.142.101 username=test_user3 #主机级别变量 192.168.142.102 [all:vars] username=test_user5 ansible-playbook -v test_vars2.yaml 发现第一台主机不变,第二台主机创建新的用户test_user5,证明主机组变量比主机变量优先级低
通过命令行指定变量
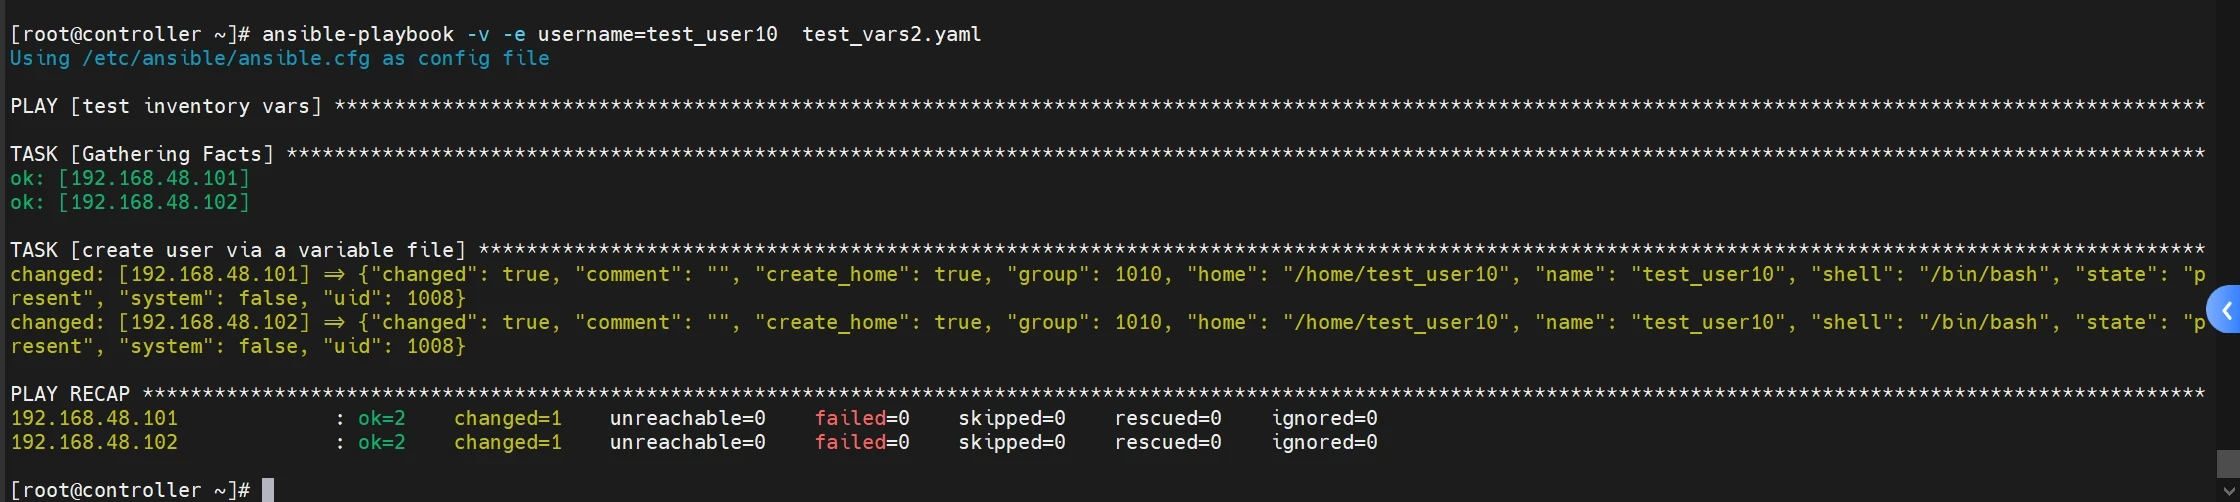
1
2
3
ansible-playbook -e 变量 剧本(优先级最高) ansible-playbook -v -e username=test_user10 test_vars2.yaml
安装httpd服务
1
2
3
4
5
6
7
8
9
10
11
12
13
14
15
16
17
示例:test_vars3.yaml --- - hosts: all remote_user: root tasks: - name: install package yum: name: "{{ pkname }}" state: present - name: start service service: name: "{{ pkname }}" state: started enabled: yes ansible-playbook –e pkname=httpd test_vars3.yaml
1
2
3
4
5
6
7
8
9
10
11
12
13
14
15
示例:test_vars3.yaml --- - hosts: all remote_user: root tasks: - name: install package yum: name: "{{ pkname1 }}" state: present - name: install package yum: name: "{{ pkname2 }}" state: present ansible-playbook -e 'pkname1=httpd pkname2=tree' -v test_vars3.yaml
复杂变量的使用
数组 如果我们定义变量,而这些值都属于同一类型的元素,那么我们必定要用数组。
例如:
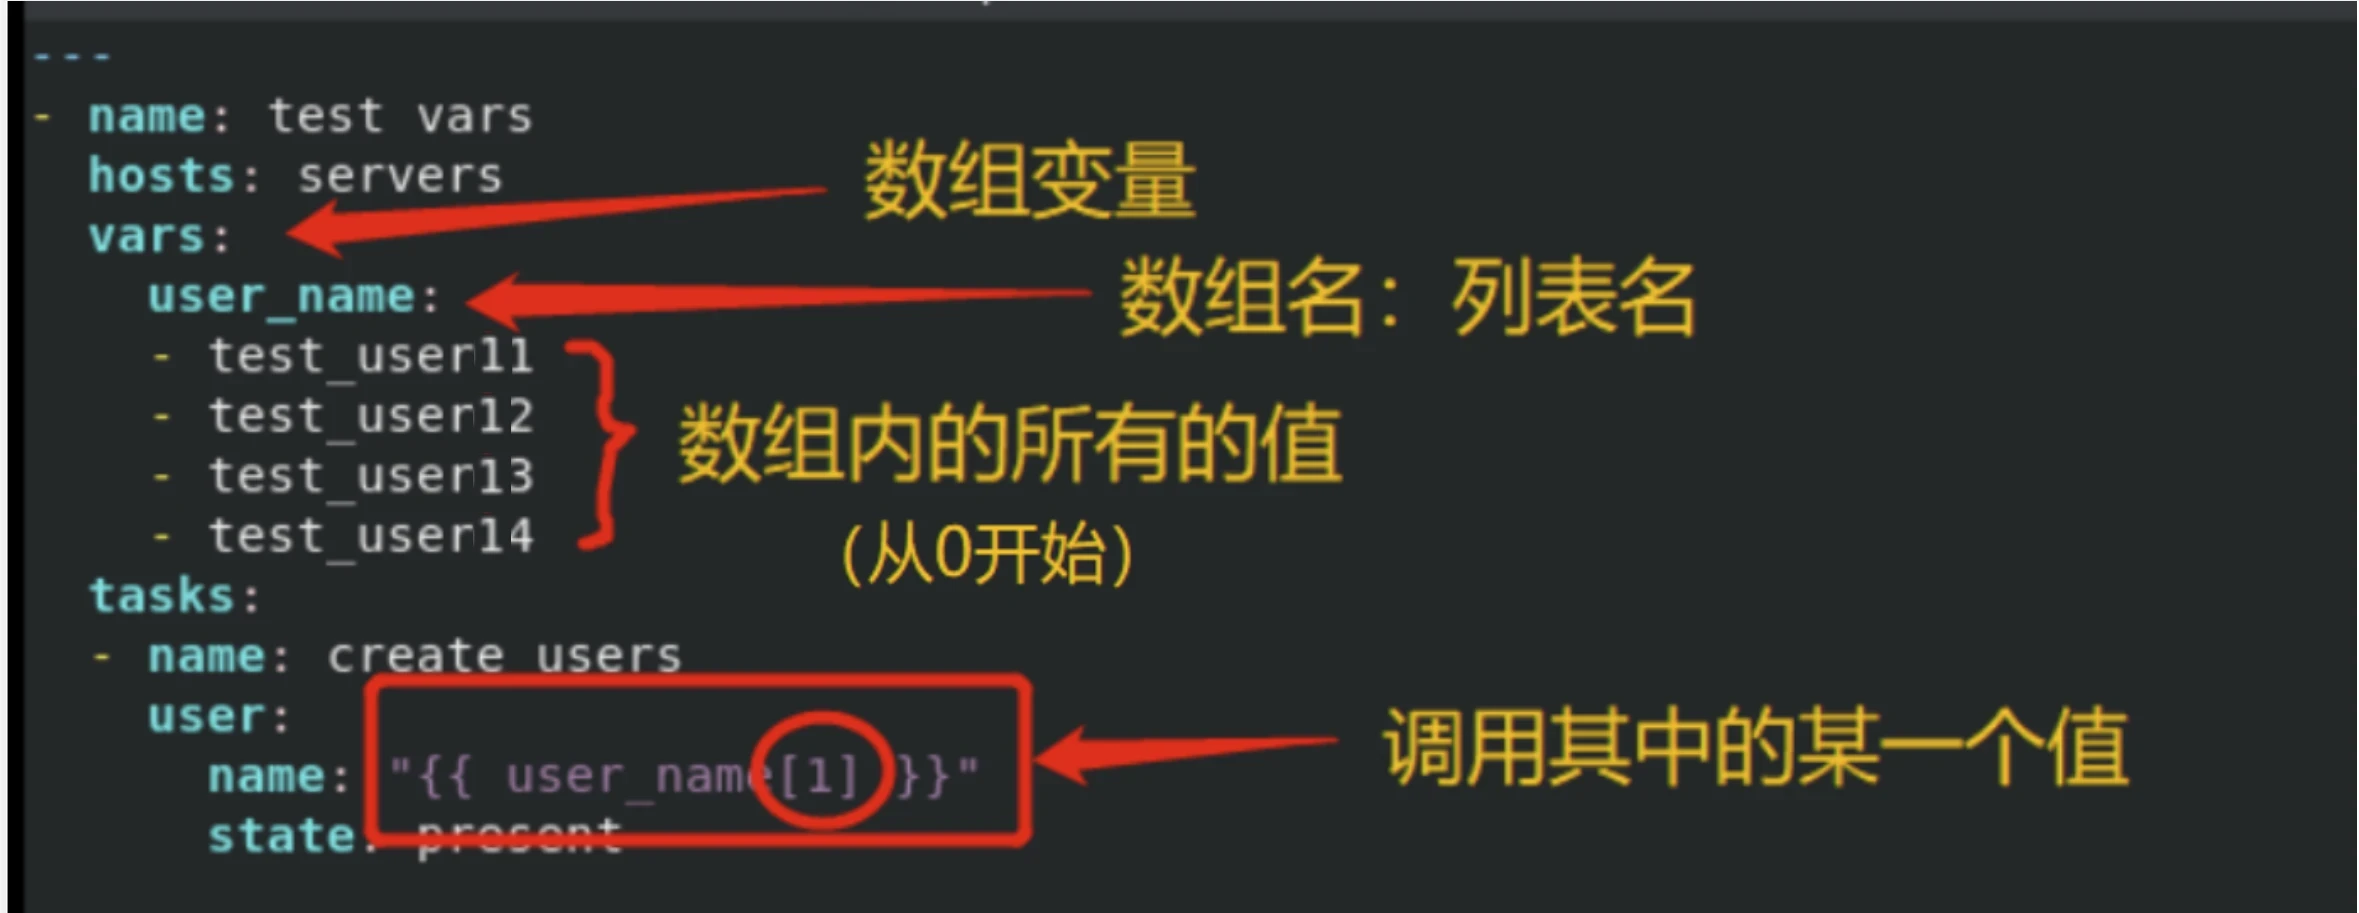
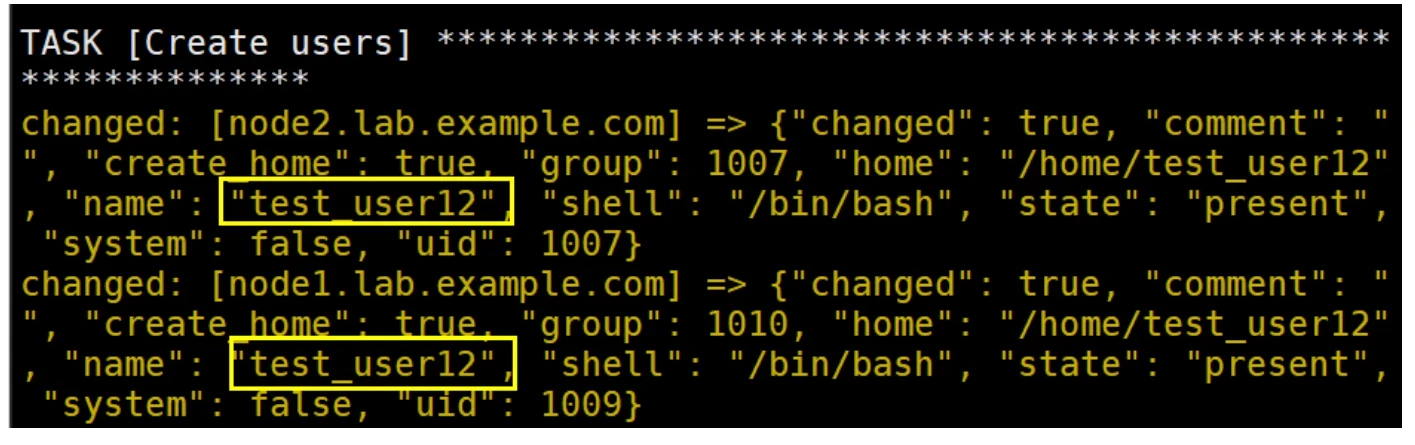
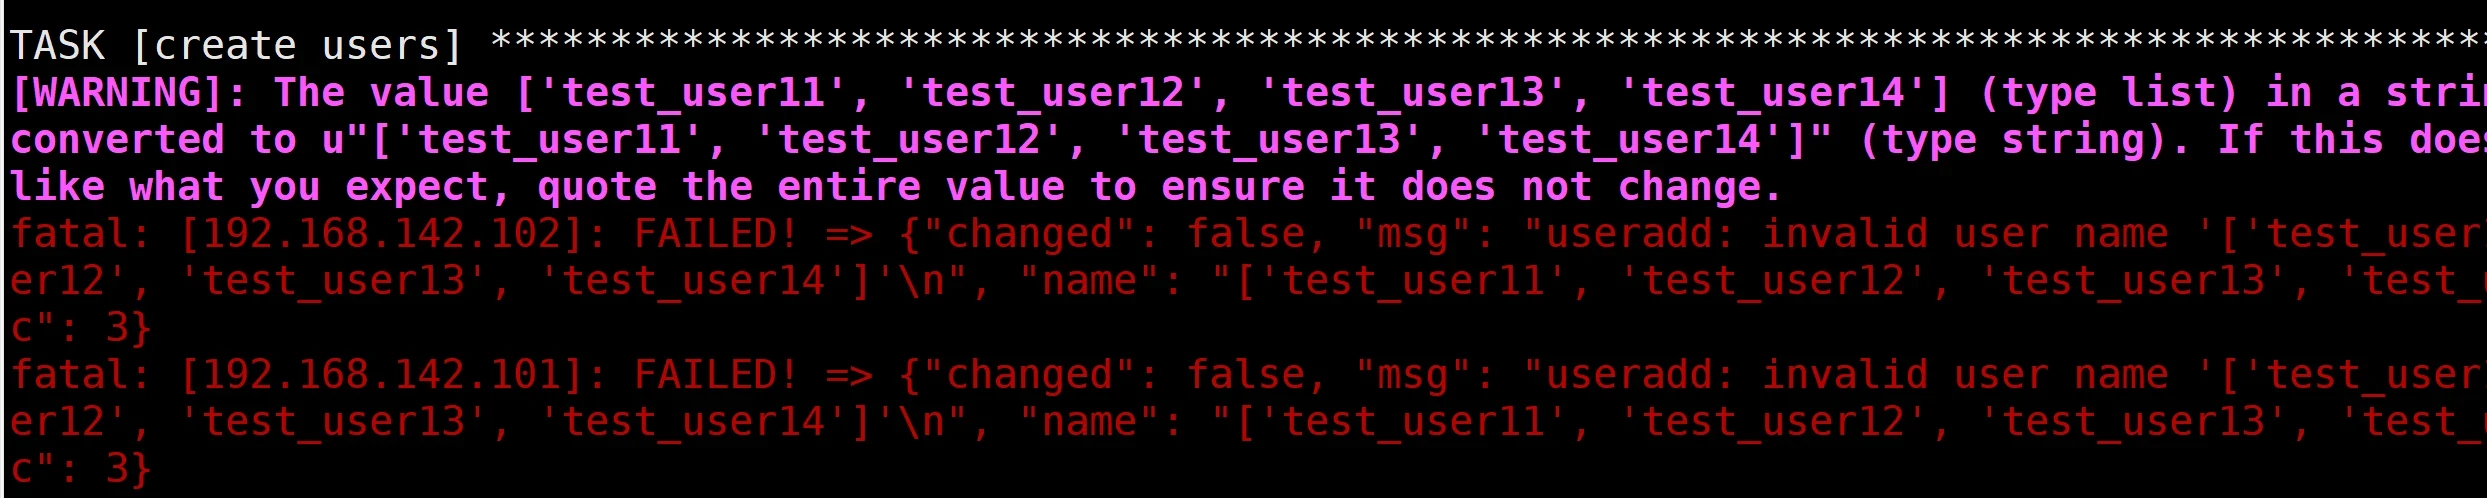
1
2
3
4
5
6
7
8
9
10
11
12
13
14
15
vim test_com_var.yaml --- - hosts: all vars: user_name: - test_user11 - test_user12 - test_user13 - test_user14 tasks: - name: create users user: name: "{{ user_name[1] }}" state: present
验证:ansible-playbook -v test_com_var.yaml
注意:在用user模块建用户的时候,只能调用数组中的某一个值,不能全部调用,否则报错“用户名不合法”
字典(dictionary)
如果我们的变量信息中具备多种不同的元素时,采用字典。
例如:
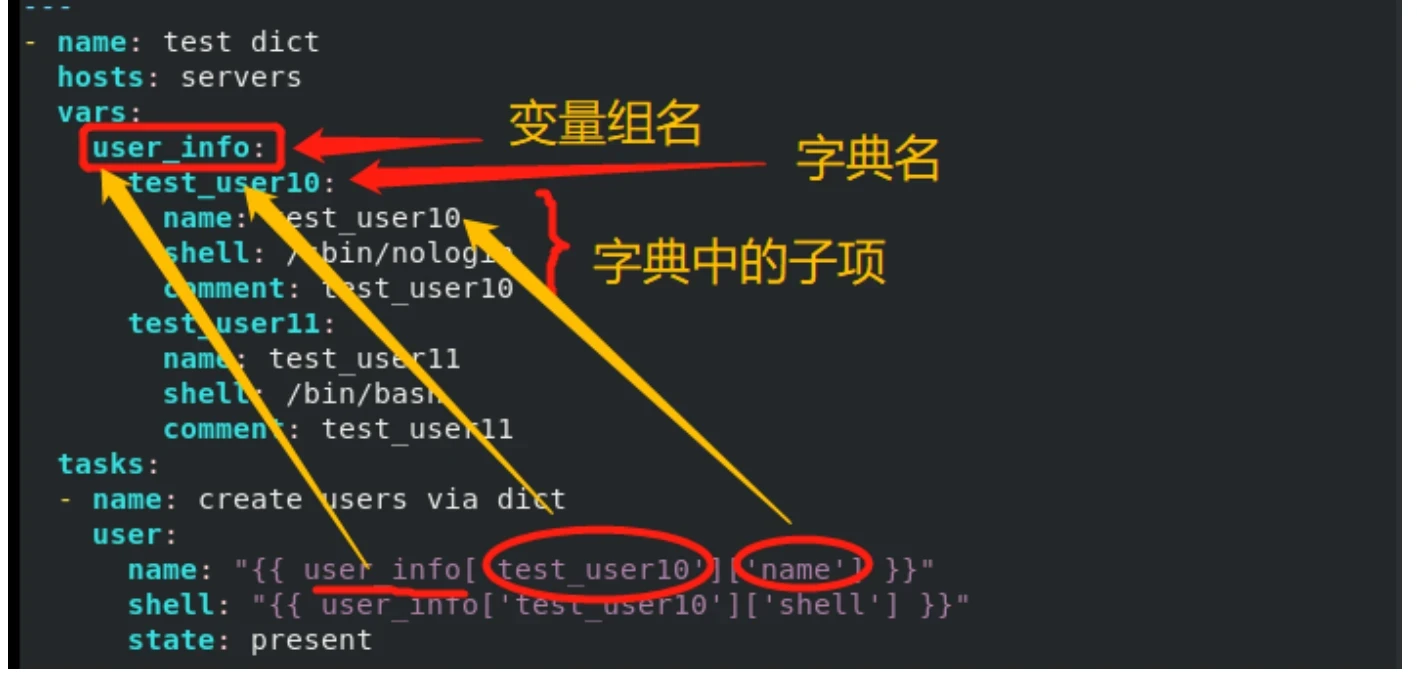
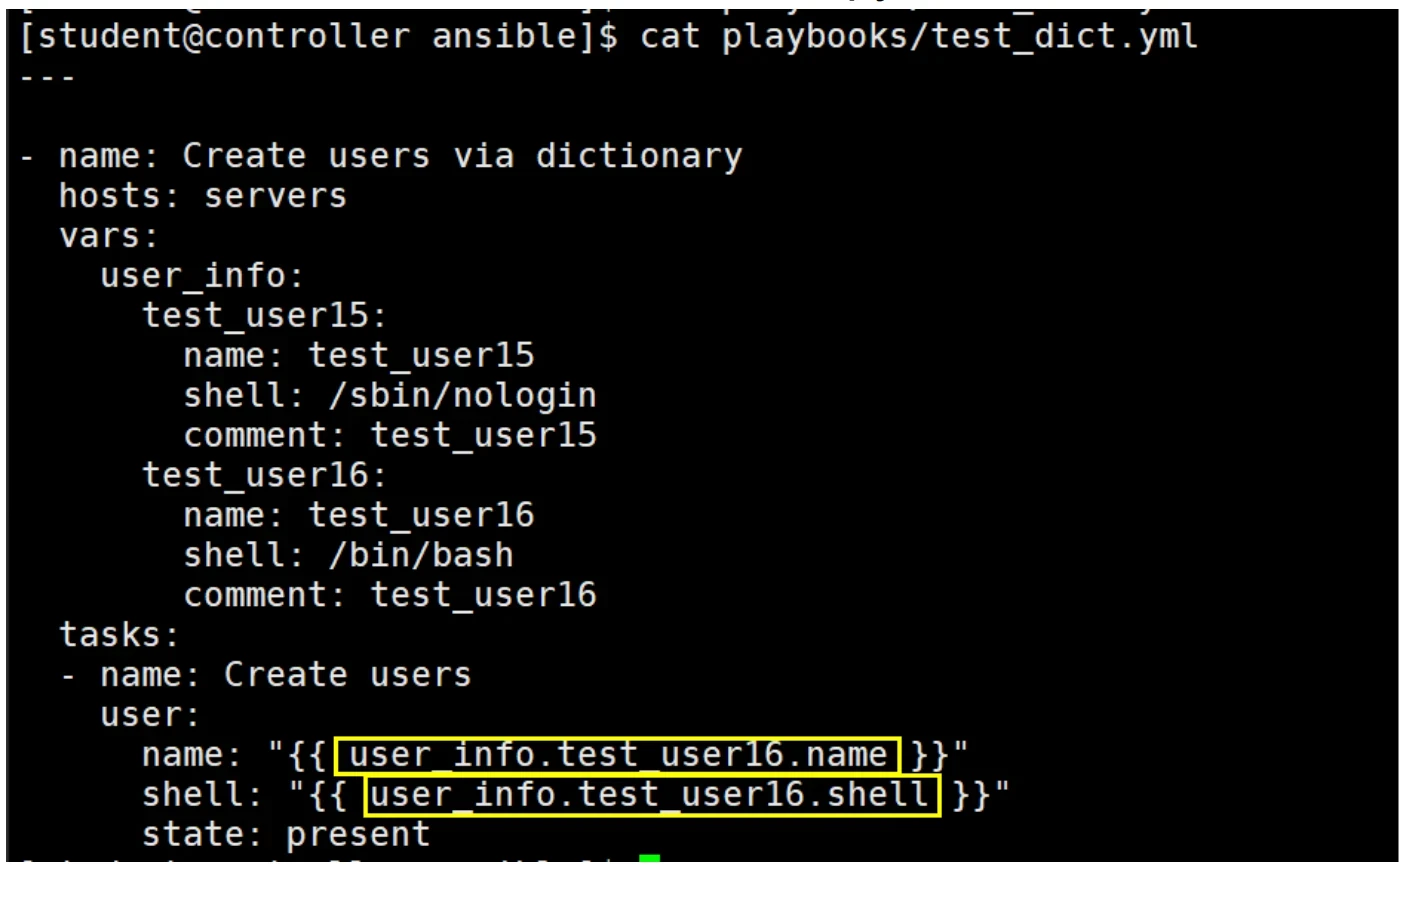
1
2
3
4
5
6
7
8
9
10
11
12
13
14
15
16
17
18
19
20
21
22
vim test_com_var.yaml --- - name: test_dict hosts: all vars: user_info: test_user20: name: test_user20 shell: /bin/bash comment: test_user20 test_user21: name: test_user21 shell: /bin/bash comment: test_user21 tasks: - name: create users via dict user: name: "{{ user_info['test_user20']['name'] }}" shell: "{{ user_info['test_user20']['shell'] }}" state: present
变量引用的另一种写法:引用对象写法(python语法)
注意:以点作为分隔(引用对象)这种方式,可能会和python本身的语义引起冲突,所以不建议使用这种方式
注册变量
注册变量是指将一个任务(task)的输出结果定义到一个变量中,这个变量就可以在随后的任务中像普通变量一样使用。
案例:
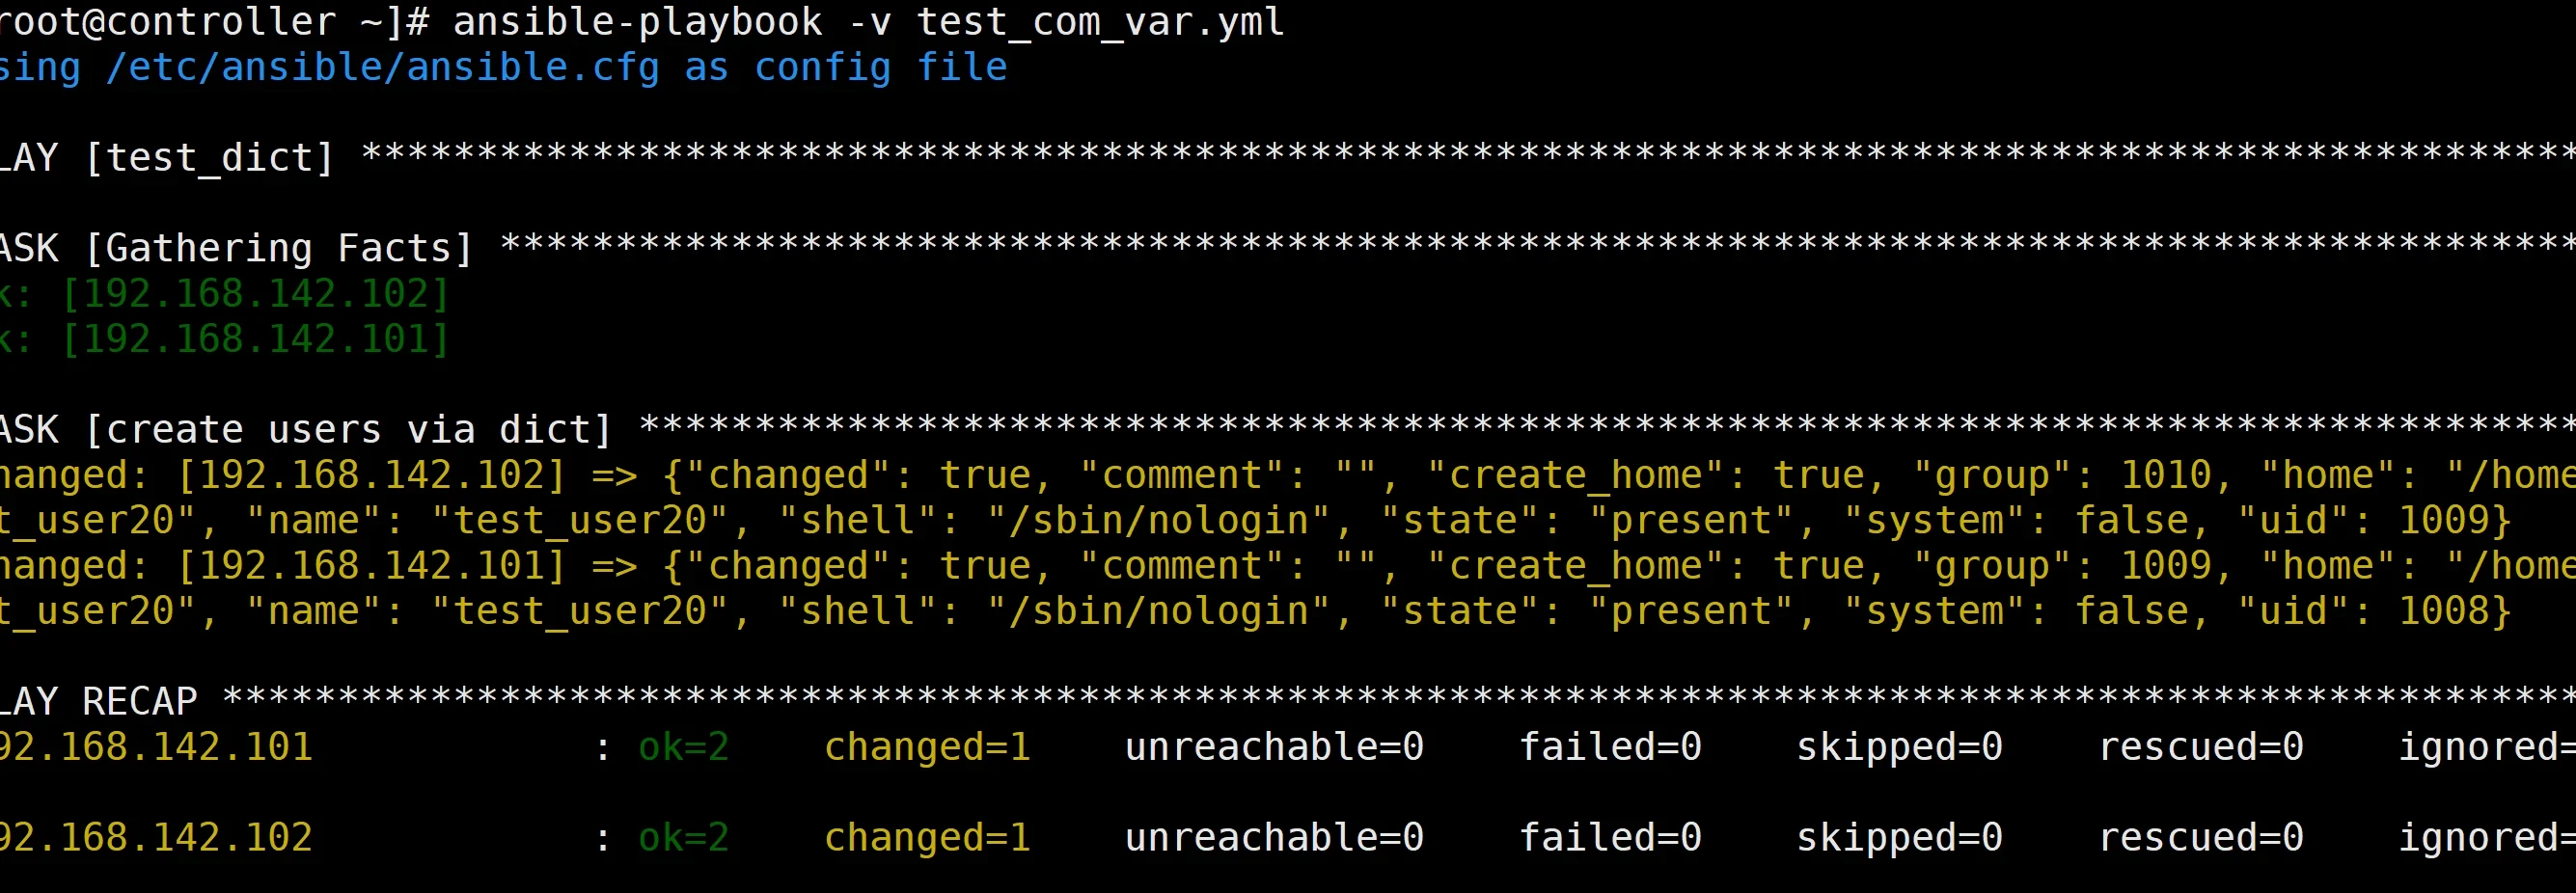
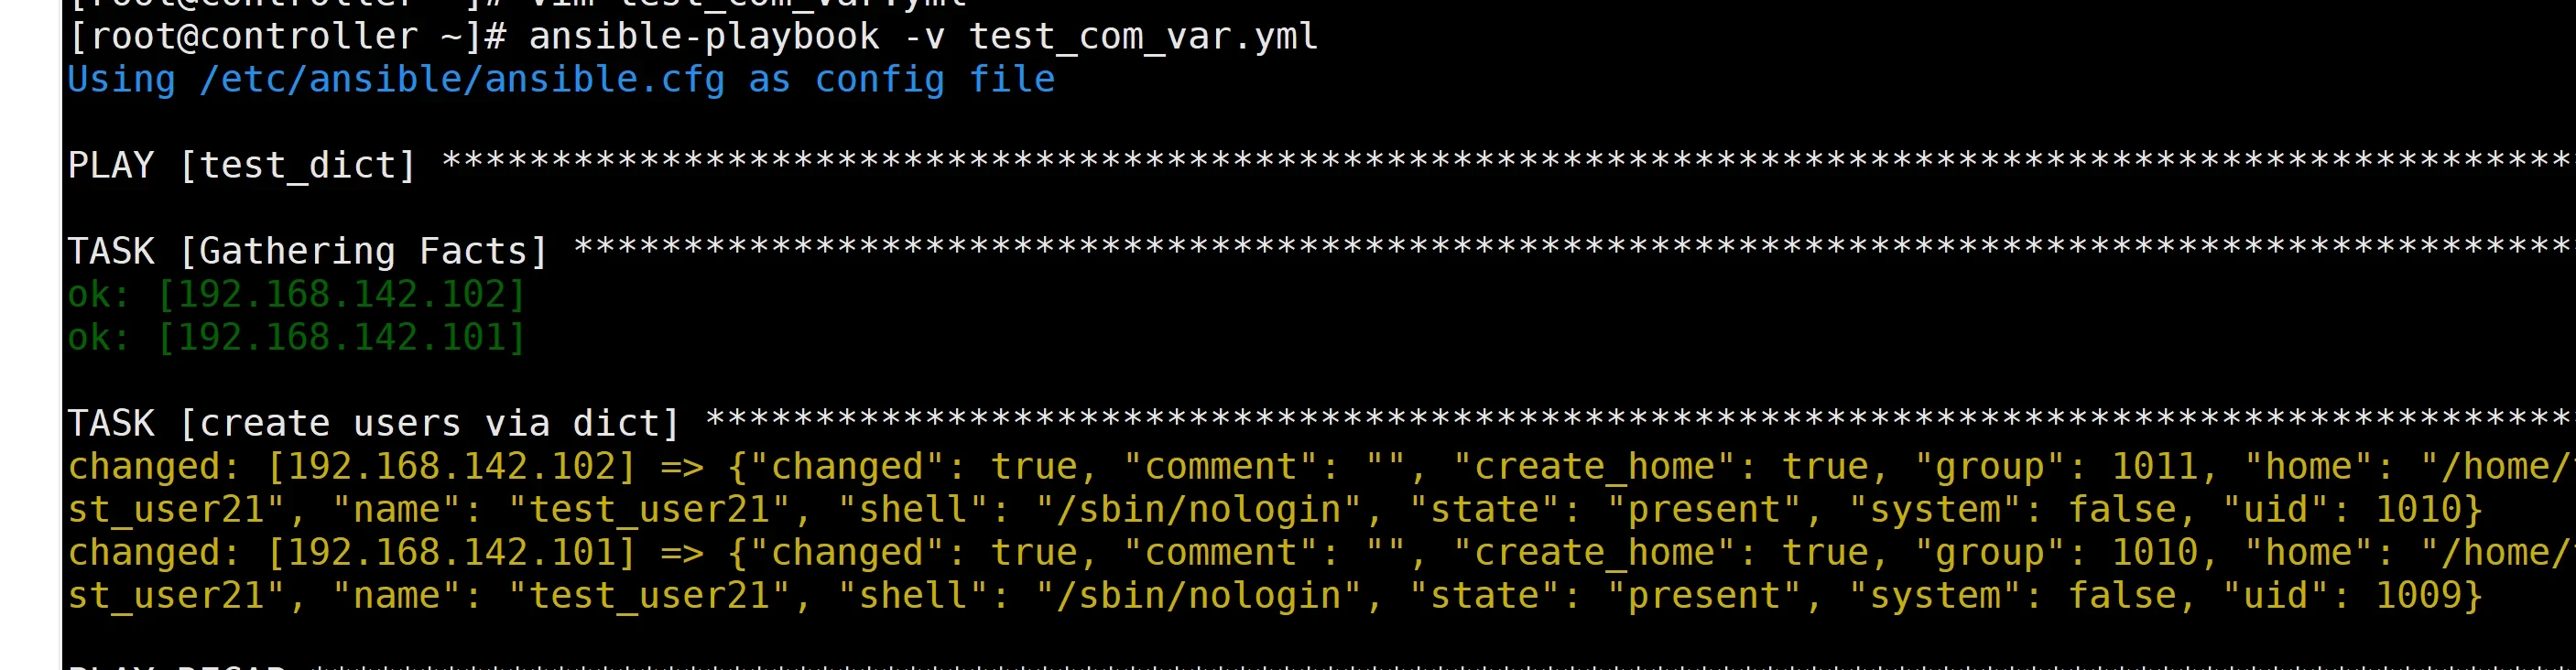
1
2
3
4
5
6
7
8
9
10
11
12
13
14
15
16
17
18
19
20
21
22
23
24
vim test_com_var.yaml --- - name: test_dict hosts: all vars: user_info: test_user20: name: test_user20 shell: /bin/bash comment: test_user20 test_user21: name: test_user21 shell: /bin/bash comment: test_user21 tasks: - name: create users via dict user: name: "{{ user_info.test_user21.name }}" shell: "{{ user_info.test_user21.shell }}" state: present ansible-playbook test_com_var.yaml
执行结果如下:
修改剧本文件,加入debug模块
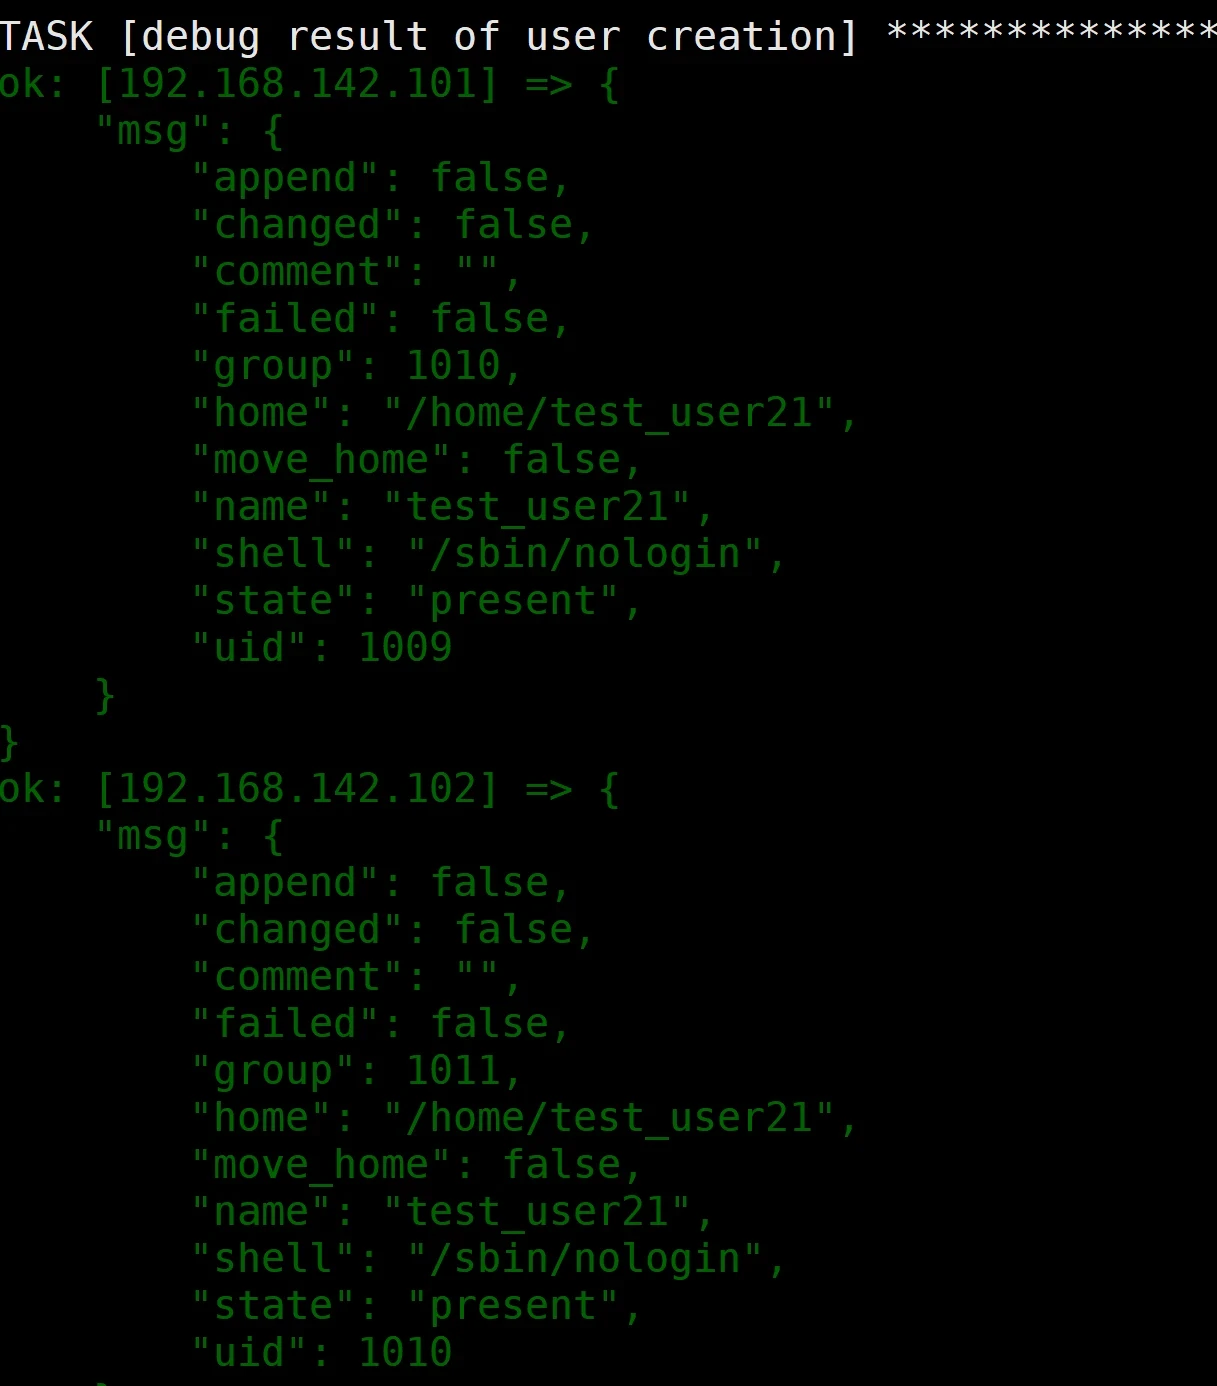
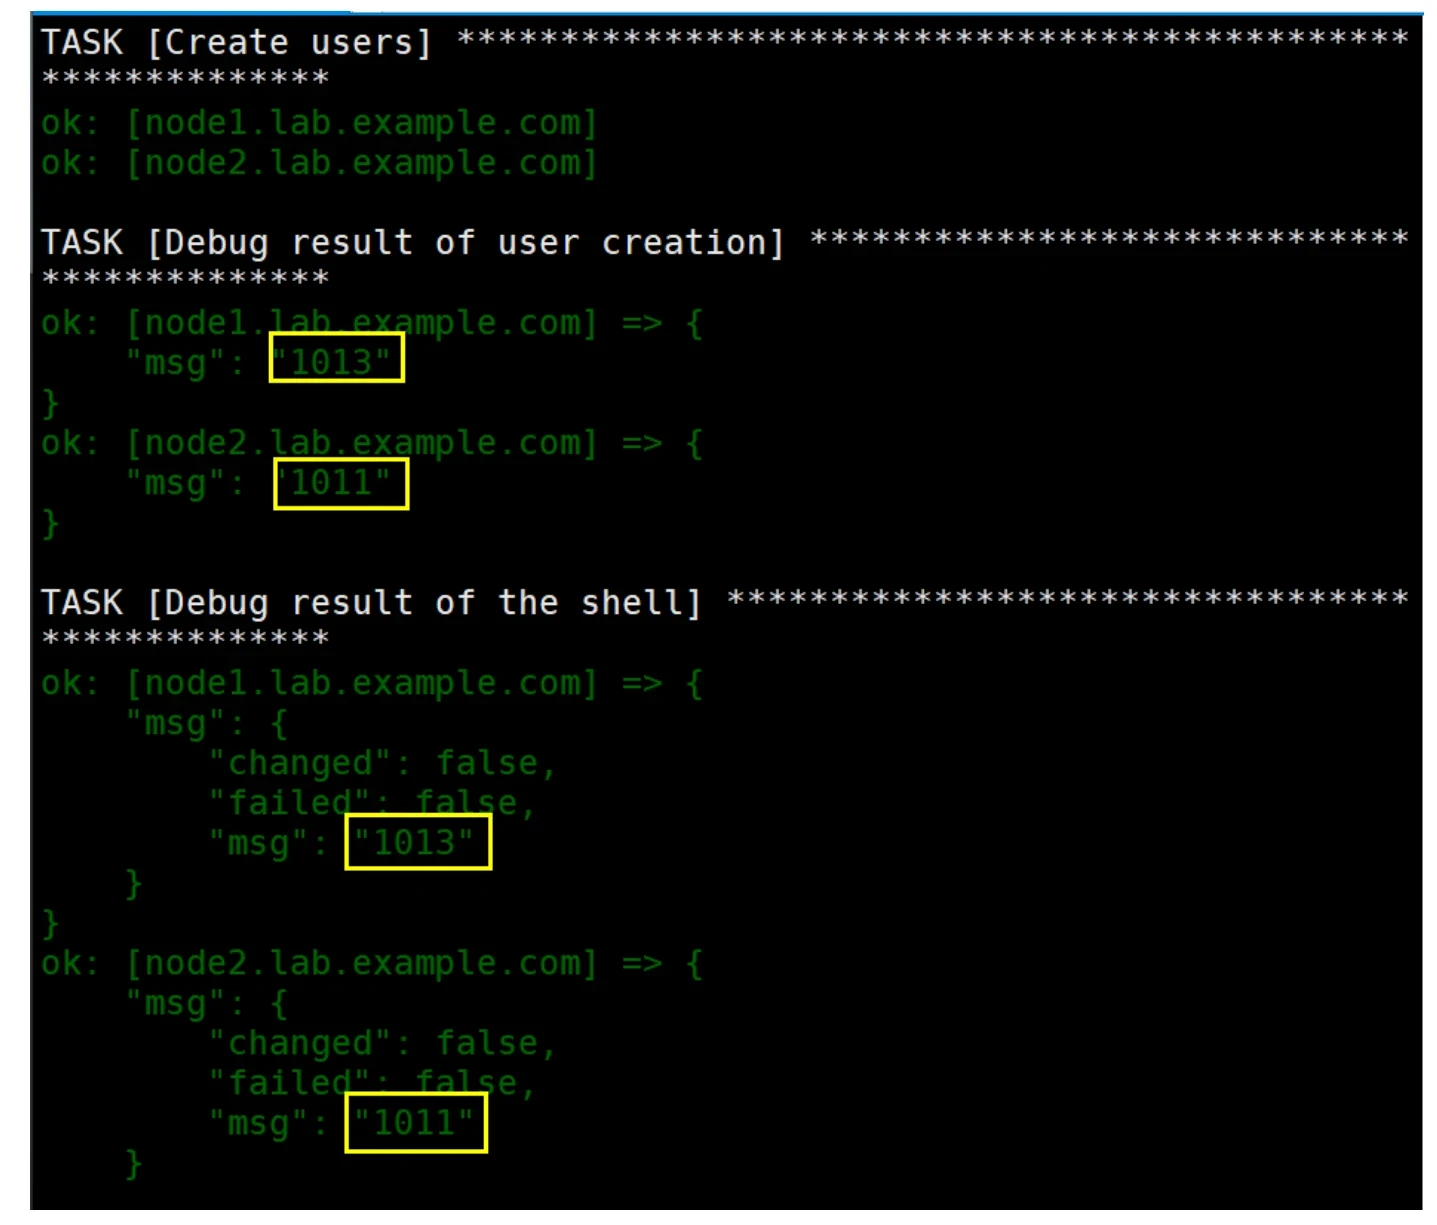
1
2
3
4
5
6
7
8
9
10
11
12
13
14
15
16
17
18
19
20
21
22
23
24
25
26
27
28
29
vim test_com_var.yaml - name: test_dict hosts: all vars: user_info: test_user20: name: test_user20 shell: /sbin/nologin comment: test_user20 test_user21: name: test_user21 shell: /sbin/nologin comment: test_user21 tasks: - name: create users via dict user: name: "{{ user_info.test_user21.name }}" shell: "{{ user_info.test_user21.shell }}" state: present register: user_result - name: debug result of user creation debug: msg: "{{ user_result }}" ansible-playbook test_com_var.yaml
运行结果:
可以引用结果中的部分元素(user_result[‘uid’] / user_result.uid)
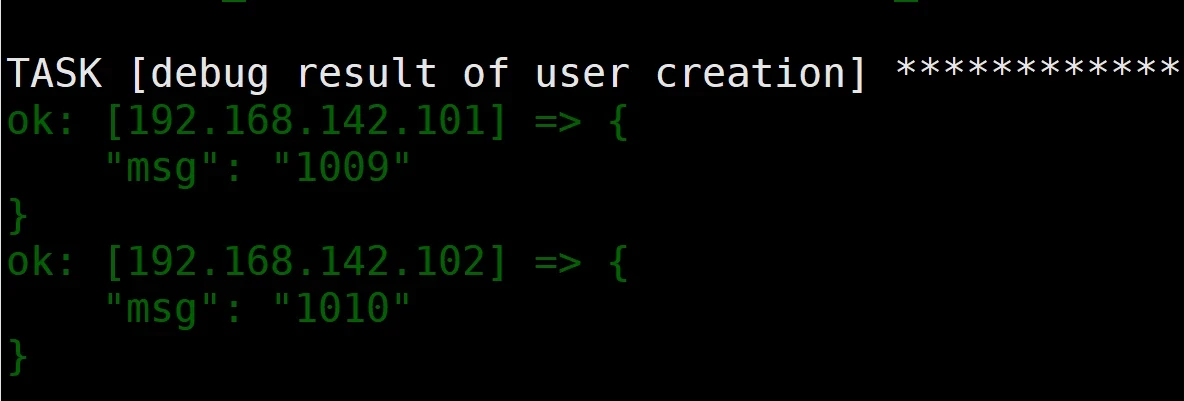
1
2
3
4
5
6
7
8
9
10
11
12
13
14
15
16
17
18
19
20
21
22
23
24
25
26
27
vim test_com_var.yaml - name: test_dict hosts: all vars: user_info: test_user20: name: test_user20 shell: /sbin/nologin comment: test_user20 test_user21: name: test_user21 shell: /sbin/nologin comment: test_user21 tasks: - name: create users via dict user: name: "{{ user_info.test_user21.name }}" shell: "{{ user_info.test_user21.shell }}" state: present register: user_result - name: debug result of user creation debug: msg: "{{ user_result.uid }}" ansible-playbook test_com_var.yaml
运行结果:
可以对输出结果进行迭代引用(用register存在多个变量中)
1
2
3
4
5
6
7
8
9
10
11
12
13
14
15
16
17
18
19
20
21
22
23
24
25
26
27
28
29
30
31
32
vim test_com_var.yaml --- - name: test_dict hosts: all vars: user_info: test_user20: name: test_user20 shell: /sbin/nologin comment: test_user20 test_user21: name: test_user21 shell: /sbin/nologin comment: test_user21 tasks: - name: create users via dict user: name: "{{ user_info.test_user21.name }}" shell: "{{ user_info.test_user21.shell }}" state: present register: user_result - name: debug result of user creation debug: msg: "{{ user_result.uid }}" register: shell_result - name: debug result of shell debug: msg: "{{ shell_result }}" ansible-playbook test_com_var.yaml
Ansible Vault(Ansible 保管箱)
作用:加密敏感的数据、密码等信息,通常情况下都是定义在变量内的敏感信息。
应用的情景:
1> 加密变量文件(敏感数据、密码信息等)
2> 加密证书
命令:ansible-vault
命令用法:
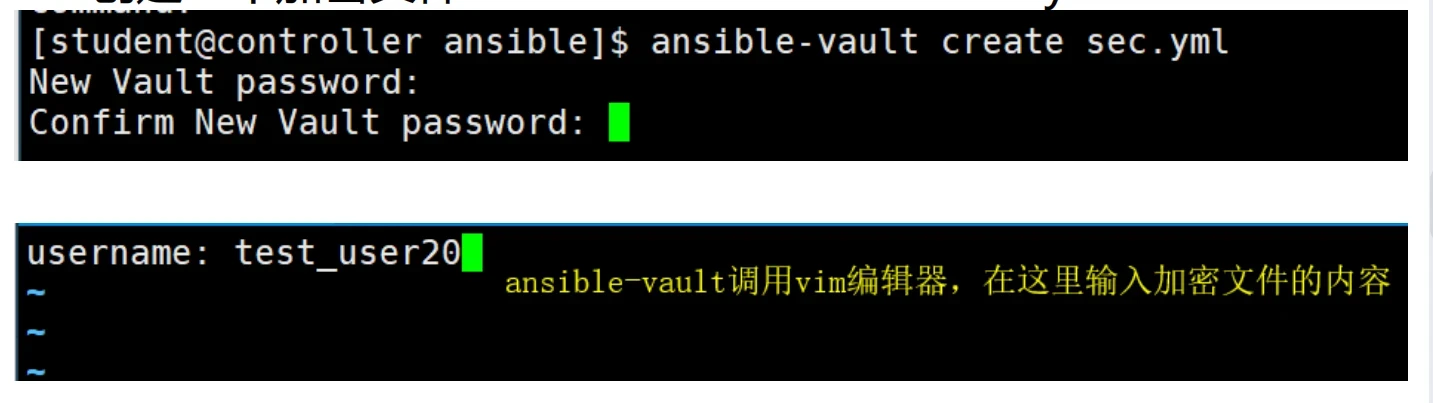
创建一个加密文件:
ansible-vault create sec.yaml
使用vim sec.ym或者cat sec.yaml只能看到加密后的内容
如何查看加密过的文件内容:
如何在剧本中调用加密文件
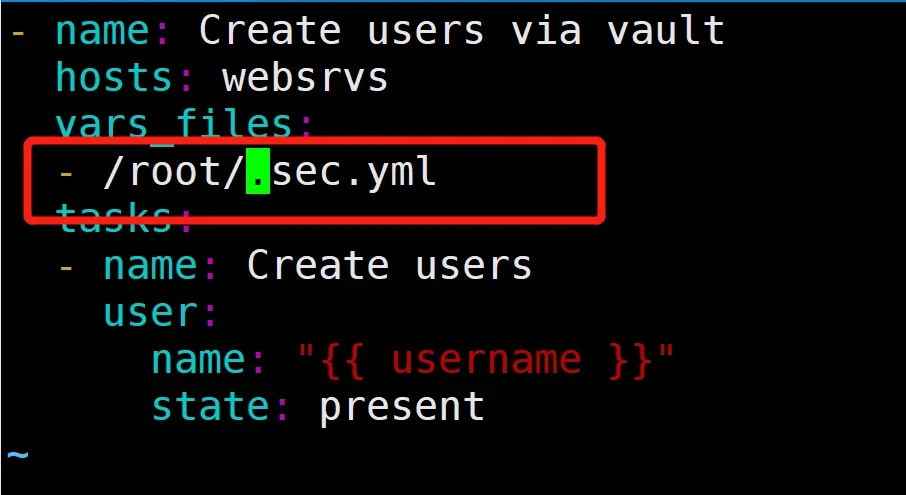
1
2
3
4
5
6
7
8
9
10
11
12
13
vim test_vault.yaml --- - name: Create users via vault hosts: all vars_files: - /root/sec.yaml tasks: - name: Create users user: name: "{{ username }}" state: present
执行剧本时报错
解决方法:
方法一:ansible-playbook 命令时候添加–ask-vault-pass参数
ansible-playbook --ask-vault-pass test_vault.yaml
方法二:ansible-playbook --vault-id @prompt test_vault.yaml(2.3之后使用,建议)
方法三:ansible-playbook --vault-password-file=pass.yaml test_vault.yaml
(纯文本形式的密码存放在文件中,只能单行写一个密码,需要对该密码文件加强安全措施)
解密
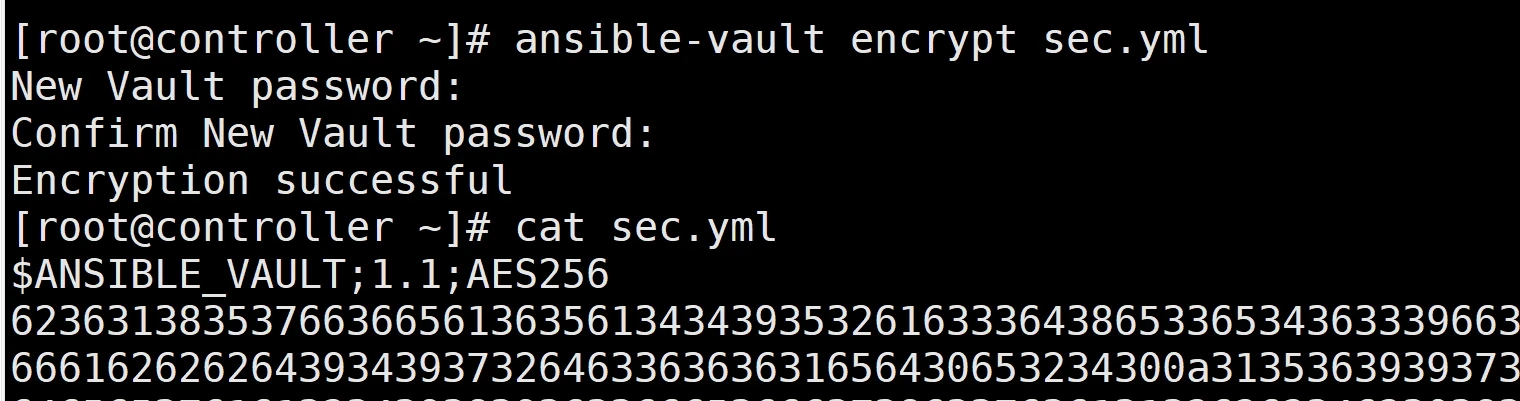
加密一个已存在的文件
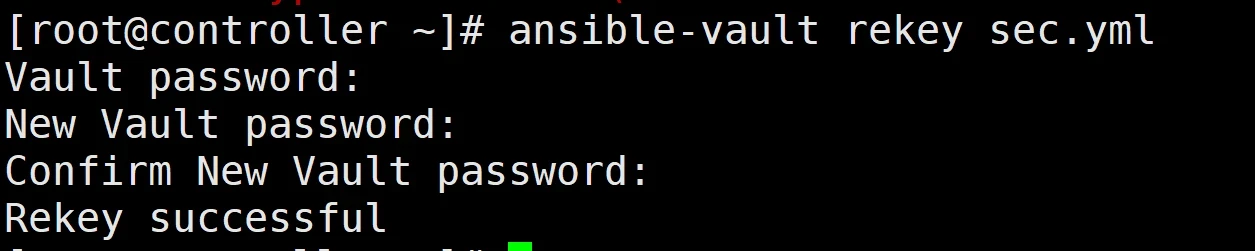
重置加密文件的密码
编辑已存在的加密文件
Tips:如果我们使用加密文件保存变量、密码等敏感数据,最好采用隐藏文件来存放,增强安全性。
1 ansible-playbook --vault-password-file=.pass.yaml test_vault.yaml
综合实践
编辑剧本文件实现以下功能:
0、设置主机组 all
1、设置变量 定义nginx服务端口为8081
2、关闭facts
3、调用service模块,卸载受控端的httpd
4、调用SELinux模块,关闭selinux
5、调用yum模块安装epel源
6、调用yum模块安装nginx
7、调用lineinfile模块修改nginx配置文件中的监听端口,使用自定义的服务端口变量,并将结果注册到 port_result
8、调用service模块启动nginx,并设置为开机自启动
9、调用debug模块,msg信息为port_result
10、验证受控端服务及端口
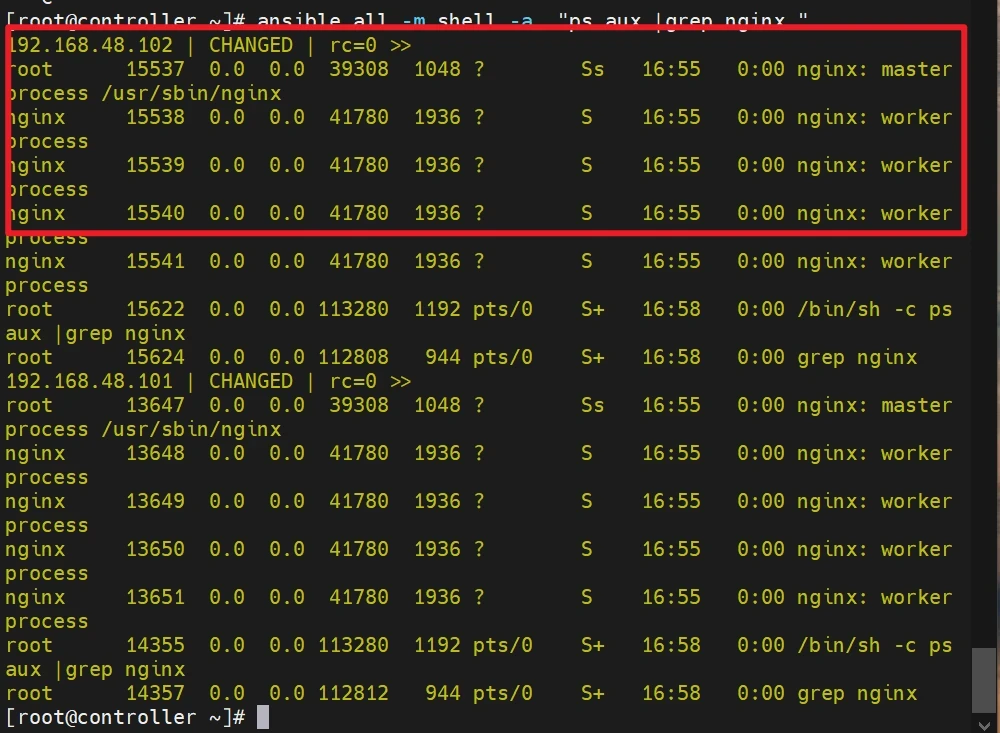
1
2
3
4
5
6
7
8
9
10
11
12
13
14
15
16
17
18
19
20
21
22
23
24
25
26
27
28
29
30
31
32
33
34
35
36
37
38
39
40
41
42
43
44
45
--- - hosts: all gather_facts: no vars: nginx_port: "8081" tasks: - name: uninstall httpd yum: name: httpd state: absent - name: stop selinux selinux: state: disabled - name: install epel yum: name: epel-release state: present - name: yum: name: nginx state: present - name: set nginx_port lineinfile: path: /etc/nginx/nginx.conf regexp: " listen 80;" line: " listen {{ nginx_port }};" register: port_result - name: start nginx service: name: nginx state: started enabled: yes - name: debug msg debug: msg: "{{ port_result }}" ansible-playbook install_nginx.yaml -C ansible-playbook install_nginx.yaml ansible all -m shell -a "ps aux |grep nginx " ansible all -m shell -a "netstat -lntp |grep nginx "
Ansible-templates
JINJA2语法简要介绍
Jinja2语言,支持的数据类型:
1
2
3
4
5
6
字符串:使用单引号或双引号 数字:整数,浮点数 列表:[item1, item2, ...] 元组:(item1, item2, ...) 字典:{key1:value1, key2:value2, ...} 布尔型:true/false
支持的运算及操作:
1
2
3
4
算术运算:+, -, *, /, //, %, ** 比较操作:==, !=, >, >=, <, <= 逻辑运算:and,or,not 流表达式:For,If,When
Playbook的进阶应用
使用when实现条件判断
条件测试:如果需要根据变量、facts或此前任务的执行结果来做为某task执行与否的前提时要用到条件测试。剧本中不能使用if判断,需要使用when判断。
when语句:在task后添加when子句即可使用条件测试,可以使用facts或playbook中定义的变量,支持Jinja2表达式语法
示例:
1
2
3
4
tasks: - name: "shutdown RedHat flavored systems" command: /sbin/shutdown -h now when: ansible_os_family == "RedHat" 当系统属于红帽系列,执行command模块,注意:'所有变量'都可以直接在条件语句中使用,而无需使用双大括号
也可以使用多个when进行多条件判断,等效于and。
1
2
3
4
5
6
7
8
9
10
11
12
13
vim test_when.yml --- - hosts: all tasks: - name: copy file copy: src: /etc/hosts dest: /root/hosts_when when: ansible_hostname is match "node1" #when支持通配符 ansible all --list ansible-playbook test_when.yml ansible all -m shell -a "ls -l /root/hosts_when"
使用with_items实现迭代
迭代:当有需要重复性执行的任务时,可以使用迭代机制
要在task中使用with_items给定要迭代的元素列表,
示例:打印1、2、3 1 2 3 4 5 6 7 8 9 10 11 12 13 14 vim test_items.yml --- - name: add serveral users gather_facts: no hosts: all tasks: - name: test loop debug: msg: "name --- {{ item }}" #{{ item }} 系统自定义变量 with_items: ##with_items定义{{ item }} 的值和个数, 一般放到模块的末尾,与模块同一缩进级别 - one - two - three
示例:创建用户
1 2 3 4 5 6 7 8 9 10 11 12 13 14 15 16 17 18 19 20 21 22 vim test_items.yml --- - name: add serveral users hosts: all tasks: - user: name: "{{ item }}" #{{ item }} 系统自定义变量 state: present with_items: ##with_items定义{{ item }} 的值和个数,一般放到模块的末尾,与模块同一缩进级别 - testuser1 - testuser2 ansible all --list ansible-playbook test_items.yml ansible all -m shell -a "getent passwd testuser1" 上面语句的功能等同于下面的语句: - name: add user testuser1 user: name=testuser1 state=present - name: add user testuser2 user: name=testuser2 state=present
示例:拷贝多个文件
1 2 3 4 5 6 7 8 9 10 11 12 13 14 15 16 touch /root/1.txt /root/2.txt vim test_items2.yml --- - name: copy serveral files hosts: all tasks: - copy: src: /root/{{ item }} dest: /etc/{{ item }} with_items: - 1.txt - 2.txt ansible-playbook test_items2.yml ansible all -m shell -a "ls -l /etc/*.txt"
示例:迭代字典
1 2 3 4 5 6 7 8 9 10 11 12 13 14 15 16 17 18 19 20 21 22 23 with_items中可以使用元素还可为hashes 示例: vim test_items3.yml --- - name: add several users gather_facts: no hosts: all tasks: - user: name: "{{ item.name }}" state: present groups: " {{ item.groups }}" with_items: - { name: 'testuser3', groups: 'wheel' } - { name: 'testuser4', groups: 'root' } ansible-playbook test_items3.yml ansible all -m shell -a "getent passwd testuser3" ansible all -m shell -a "id testuser3" ansible all -m shell -a "getent passwd testuser4" ansible all -m shell -a "id testuser4"
课堂作业:使用with—items拷贝多个文件
要求:item列表条目为字典类型,包含src、dest、mode3个键值对,使用with_items实现多个文件的拷贝,并赋予设定的权限。
1 2 3 4 5 6 7 8 9 10 11 12 13 14 15 16 17 touch /root/3.txt /root/4.txt vim test_items4.yml --- - name: copy several files hosts: all tasks: - copy: src: "{{ item.src }}" dest: "{{ item.dest }}" mode: "{{ item.mode }}" with_items: - { src: "/root/3.txt", dest: "/root/", mode: "0644" } - { src: "/root/4.txt", dest: "/root/", mode: "0644" } ansible-playbook test_items4.yml ansible all -m shell -a "ls -l /root/*.txt"
when和with items组合使用
当when和with_items一起使用的时候,每个项都会单独被when语句处理
1 2 3 4 5 6 7 8 9 vim test_when_items.yml --- - hosts: all tasks: - command: echo {{ item }} with_items: [ 1,2,3,4,5,6,8,10] when: item > 5 ansible-playbook test_when_items.yml
templates 模板
templates功能:根据模板文件动态生成对应的配置文件,命名必须以.j2结尾,支持jinja2语法。
在呈现 JINJA2模板时,文件中引用的变量和表达式被替换为对应的值。模板中使用的变量可以在 Playbook 的 vars 部分中指定。可以将受管主机的事实用作模板中的变量。
分隔符使用规范:
1 2 3 4 5 {% EXPR %}:用于表达式或逻辑(如循环、判断等) {{ EXPR }}:用于向最终用户输出表达式或变量的结果。在呈现时将被替换为一个或多个值,对最终用户可见。 {# COMMENT #},用于注释,不会出现在最终文件中。
templates的使用场景
在实际的工作中由于每台服务器的环境配置都可能不同,但是往往很多服务的配置文件都需要根据服务器环境进行不同的配置,比如Nginx最大进程数、Redis最大内存等。
为了解决这个问题可以使用Ansible的template模块,该模块和copy模块作用基本一样,都是把管理端的文件复制到客户端主机上,但是区别在于template模块可以通过变量来获取配置值,支持多种判断、循环、逻辑运算等,而copy只能原封不动的把文件内容复制过去。
示例:httpd.conf的templates模板
创建并编辑httpd.conf.j2文件
1 2 3 4 5 6 7 8 9 10 11 12 13 14 15 16 17 18 yum -y install httpd rpm -qa httpd cp /etc/httpd/conf/httpd.conf /root/httpd.conf.j2 vim /root/httpd.conf.j2 ---------42行---------- Listen {{port}} ----------95行--------- ServerName {{domain}} vim /etc/ansible/hosts [websrvs] 192.168.142.101 port=80 domain=www.node1.com 192.168.142.102 port=81 domain=www.node2.com
卸载受控机上的httpd服务
1 2 ansible websrvs -m shell -a 'yum remove -y httpd' ansible websrvs -m shell -a 'yum remove -y nginx'
新建yaml文件
1 2 3 4 5 6 7 8 9 10 11 12 13 14 15 16 17 18 19 20 21 22 23 24 25 26 27 28 29 30 31 32 cd /root vim a.yaml --- - hosts: websrvs remote_user: root vars: - package: httpd - service: httpd tasks: - name: install service yum: name: "{{ package }}" state: latest - name: httpd.conf template: src: /root/httpd.conf.j2 dest: /etc/httpd/conf/httpd.conf notify: restart service - name: start service service: name: "{{ service }}" state: started enabled: true handlers: - name: restart service service: name: "{{ service }}" state: restarted
执行yaml文件并验证
1 2 3 4 5 6 7 ansible-playbook a.yaml --syntax-check ansible-playbook a.yaml ansible websrvs -a 'systemctl status httpd' ansible websrvs -m shell -a 'ss -ntl' ansible websrvs -m shell -a 'netstat -ntlp |grep httpd' ansible websrvs -m shell -a 'lsof -i:80' ansible websrvs -m shell -a 'lsof -i:81'
tamplates-for(循环)
语法:
1 2 3 {% for 变量 in 列表 %} {{ 文本内容调用变量 }} {% endfor %}
示例:使用for循环遍历调用users列表变量的元素
1 2 3 {% for user in users %} {{ user }} {% endfor %}
示例:yaml文件中变量的调用
编写yaml文件 jinja2_for.yml
1 2 3 4 5 6 7 8 9 10 11 12 13 14 vim jinja2_for.yml --- - name: jinja2_for example hosts: all remote_user: root vars: users: - user1 - user2 tasks: - name: Copy template template: src: /root/users.j2 dest: /root/users
编写/root/users.j2文件
1 2 3 4 vim /root/users.j2 {% for user in users %} username: {{ user }} {% endfor %}
执行并验证
1 2 3 ansible-playbook jinjia2_for.yml --syntax-check ansible-playbook jinjia2_for.yml ansible all -m shell -a "cat /root/users"
扩展示例:
以下示例模板使用for语句逐一运行users变量中的所有值,将user替换为各个值,但值为root时除外。
1 2 3 4 5 6 vim users.j2 {# for statement #} {% for user in users if not user =="root" %} User number {{ loop.index }}- {{ user }} {% endfor %}
loop.index变量扩展至循环当前所处的索引号。它在循环第一次执行时值为1,每一次迭代递增1.
1 2 3 4 ansible-playbook jinjia2_for.yml --syntax-check ansible-playbook jinjia2_for.yml ansible all -m shell -a "cat /root/users"
示例:事实变量的调用
编写yaml文件 jinja2_for2.yml
1 2 3 4 5 6 7 8 9 10 11 12 13 14 vim jinja2_for2.yml --- - name: jinja2_for example2 hosts: all remote_user: root vars: users: - user1 - user2 tasks: - name: Copy template template: src: /root/host.j2 dest: /root/hosts
编写/root/host.j2文件
1 2 3 4 vim /root/host.j2 {% for host in groups['websrvs'] %} {{ ansible_facts.default_ipv4.address }}{{ ansible_facts.fqdn }} {% endfor %}
执行并验证
1 2 3 4 ansible-playbook jinjia2_for2.yml --syntax-check ansible-playbook jinjia2_for2.yml ansible websrvs -m shell -a "cat /root/hosts"
tamplates-if(判断)
Jinja2使用 if 语句来提供条件控制。如果满足条件,允许在文件中添加一行内容。
语法:
1 2 3 {% if 条件 %} {{ 语句 }} {% endif %}
示例:
编写yaml文件 jinja2_if.yml
1 2 3 4 5 6 7 8 9 10 11 vim jinja2_if.yml --- - name: jinja2_if example hosts: websrvs remote_user: root tasks: - name: Copy template template: src: /root/host2.j2 dest: /root/hosts2
编辑host2.j2文件
1 2 3 4 5 vim /root/host2.j2 {% if ansible_facts.default_ipv4.address =='192.168.142.101' %} {{ ansible_facts.default_ipv4.address }}{{ ansible_facts.fqdn }} {% endif %}
执行并验证
1 2 3 ansible-playbook jinja2_if.yml --syntax-check ansible-playbook jinja2_if.yml ansible all -m shell -a "cat /root/hosts2"
综合案例:nginx templates
0、编辑主机清单,组websrvs,包含2台受控主机
1、主控端安装ngxin、拷贝nginx配置文件为nginx.conf.j2模板文件。创建nginx首页模版,命名为html.j2,引用实事变量:主机名,文件内容格式如: Welcome to
2、编写test_template.yaml文件,要求tasks
1)安装epel源 2)安装nginx 3)拷贝nginx.conf.j2模板文件为受控主机的nginx配置文件4)拷贝html.j2模板文件为受控主机的nginx首页文件4)开启服务
3、校验playbook语法并执行,验证受控主机的nginx进程数\服务端口\首页
4、修改nginx.conf.j2模板文件,配置 worker_processes数量为实事变量:受控主机处理器vcpu个数的两倍,保存
5、修改test_template.yaml文件,添加notify和handlers,在配置文件变化时,重启nginx
6、校验playbook语法并执行,验证受控主机的nginx进程数
7、修改hosts文件为每台主机定义服务端口变量 第一台 8082,第二台8083
8、修改test_template.yaml文件,修改监听端口行,增加主机端口变量的引用
9、校验playbook语法并执行,验证受控主机的nginx服务端口
10、修改test_template.yaml,增加端口变量定义,端口88
11、校验playbook语法并执行,验证受控主机的nginx服务端口
1、主控端安装ngxin、拷贝nginx配置文件为nginx.conf.j2模板文件
1 2 3 4 5 6 yum install -y nginx cp /etc/nginx/nginx.conf /root/nginx.conf.j2 echo "welcome to {{ ansible_hostname }}" > html.j2 ansible all -m setup |grep hostname ansible all -m setup |grep vcpu
2、创建nginx首页模版,命名为html.j2,引用实事变量:主机名
内容格式如: Welcome to
2、编写test_template.yaml文件
1 2 3 4 5 6 7 8 9 10 11 12 13 14 15 16 17 18 19 20 21 22 23 24 25 26 27 28 vim test_template.yaml --- - hosts: websrvs remote_user: root tasks: - name: install epel yum: name: epel-release - name: install package yum: name: nginx - name: copy template template: src: /root/nginx.conf.j2 dest: /etc/nginx/nginx.conf - name: copy template template: src: /root/html.j2 dest: /usr/share/nginx/html - name: copy html template: src: /root/html.j2 dest: /usr/share/nginx/html/index.html - name: start service service: name: nginx state: started enabled: yes
执行并验证
1 2 3 4 5 6 ansible-playbook test_template.yaml --syntax-check ansible-playbook test_template.yaml ansible all -m shell -a 'systemctl status nginx' ansible all -m shell -a 'ss -ntpl|grep nginx' #可以查看到进程,每个cpu一个 ansible all -m shell -a 'ps aux|grep nginx'
3、修改template文件,修改进程数为cpu内核的2倍
1 2 3 4 5 ansible websrvs -m setup|grep "cpu" vim nginx.conf.j2 修改第6行 worker_processes {{ ansible_processor_vcpus*2 }} #worker_processes auto
修改test_template.yaml文件,添加notify和handlers,在配置文件变化时,重启nginx
1 2 3 4 5 6 7 8 9 10 11 12 13 14 15 16 17 18 19 20 21 22 23 24 25 26 27 28 vim test_template.yaml --- - hosts: websrvs remote_user: root tasks: - name: install package yum: name: nginx - name: copy template template: src: /root/nginx.conf.j2 dest: /etc/nginx/nginx.conf notify: - restart service - name: copy html template: src: /root/html.j2 dest: /usr/share/nginx/html/index.html - name: start service service: name: nginx state: started enabled: yes handlers: - name: restart service service: name: nginx state: restarted
执行并验证
1 2 3 ansible-playbook test_template.yaml #可以查看到进程, ansible all -m shell -a 'ps aux|grep nginx' #查看nginx进程数为cpu核数的2倍
检验nginx配置文件是否存在语法错误
nginx -t
nginx和httpd服务,web服务保证只有一个运行。
4、使用主机变量,修改服务端口
修改hosts文件增加端口变量
1 2 3 4 5 6 #使用主机变量 #修改nginx对应的端口 vim /etc/ansible/hosts [websrvs] 192.168.142.101 http_port=8083 192.168.142.102 http_port=8084
修改模板文件,增加端口引用
1 2 3 4 5 6 vim nginx.conf.j2 修改39、40行 server{ listen {{ http_port }} ; listen [::]:{{ http_port }} ; }
执行并验证
1 2 ansible-playbook test_template.yaml ansible websrvs -m shell -a 'ss -ntpl|grep nginx'
5、使用playbook变量
修改test_template.yaml,增加端口信息
1 2 3 4 5 6 7 8 9 10 11 12 13 14 15 16 17 18 19 20 21 22 23 24 25 26 27 28 29 30 31 32 vim test_template.yaml --- - hosts: websrvs remote_user: root vars: - http_port: 88 tasks: - name: install package yum: name: nginx - name: copy template template: src: /root/nginx.conf.j2 dest: /etc/nginx/nginx.conf notify: - restart service - name: copy html template: src: /root/html.j2 dest: /usr/share/nginx/html/index.html - name: start service service: name: nginx state: started enabled: yes handlers: - name: restart service service: name: nginx state: restarted
执行并验证
1 2 3 ansible-playbook test_template.yaml ansible websrvs -m shell -a 'ss -ntpl|grep nginx' #发现端口变成88
6、使用命令行变量
1 2 3 ansible-playbook -e "http_port=99" test_template.yaml ansible websrvs -m shell -a 'ss -ntpl|grep nginx' #发现端口变成99
Roles
1 2 3 ·由来: ansible自动化运行,基础由AD-Hoc命令来完成,在命令变多时,产生了playbook进行管理任务,简单任务使用playcook可以轻松处理,但是有复杂任务时单个playbook不可以胜任了,这时需要把多个playbook进行组合,少量用include将剧本中任务互相关联即可完成,但是playbook还在增多的情况时就不方便管理了,这时引入roles对playbook进行有效组织就十分必要了 · Roles:角色,是ansible自1.2版本开始引入的新特性 ·目的:用于层次性,结构化地组织playbook, roles能够根据层次型结构自动装载变量、文件、任务、模块及触发器·方法: roles通过分别将放置于变量、文件、任务、模块及触发器单独的目录中,并可以便捷地include它们的一种机制·应用:角色一般用于基于主机构建服务的场景中、但也可以是用于构建守护进程等场景中
roles默认路径设置
1 2 /etc/ansible/ansible.cfg roles_path= /etc/ansible/roles
Roles各目录结构及作用
1 2 3 4 5 6 7 8 9 10 11 12 13 14 15 16 17 18 19 20 21 22 23 24 25 每个角色,以特定的层级目录结构进行组织 roles目录结构: playbook.yml 调用角色 roles/ project/ (角色名称) tasks/ files/ vars/ templates/ handlers/ default/ 不常用,设定默认变量时使用此目录中的main.yml文件 meta/ 不常用,定义当前角色的特殊设定及其依赖关系,至少应该包含一个名为main.yml的文件;其它文件需在此文件中通过include进行包含 各目录的作用: /roles/project/ :项目名称,有以下子目录,project可以是mysql\httpd\nginx\memcached等 files/ :存放由copy或script模块等调用的文件 templates/:template模块查找所需要模板文件的目录 tasks/:定义task,role的基本元素,至少应该包含一个名为main.yml的文件, 其定义了此角色的任务列表. 在handler中使用include包含的其它的handler文件也应该位于此目录中; handlers/:至少应该包含一个名为main.yml的文件;用于定义此角色用到的各handler; 其它的文件需要在此文件中通过include进行包含 vars/:定义变量,至少应该包含一个名为main.yml的文件,; 其它的文件需要在此文件中通过include进行包含 meta/:定义当前角色的特殊设定及其依赖关系,至少应该包含一个名为main.yml的文件, 其它文件需在此文件中通过include进行包含, ansible1.3及其以后的版本才支持; defaults/:为当前角色设定默认变量时使用此目录;应当包含一个main.yml文件
创建role框架
您可以使用标准Linux命令创建新角色所需的所有子目录和文件。
1 2 3 4 cd /etc/ansible/roles/ mkdir httpd cd httpd mkdir tasks handlers vars meta defaults templates files
或者可以运行ansible-galaxy init来创建新角色的目录结构。指定角色的名称作为命令的参数,该命令在当前工作目录中为新角色创建子目录。
1 2 3 4 5 6 7 8 9 10 11 12 13 14 15 16 17 18 19 20 21 22 cd /etc/ansible/roles ansible-galaxy init httpd tree httpd [root@controller roles]# tree httpd httpd #具体的⾓⾊项⽬名称, ⽐如nginx、tomcat、php (⾃由设置) ├── defaults #⽤于为当前⾓⾊设定默认变量, 此⽬录应当包含⼀个main.yml⽂件 │ └── main.yml #类似代码中的主函数, 进⾏统⼀管理 ├── files #⽤来存放由copy模块或script模块等模块调⽤的⽂件 ├── handlers #⽤于定义此⾓⾊中触发条件时执⾏的动作, 此⽬录应当包含⼀个main.yml⽂件 │ └── main.yml ├── meta #⽤于定义此⾓⾊的特殊设定及其依赖关系, 此⽬录应当包含⼀个main.yml⽂件 │ └── main.yml ├── README.md #说明⽂件 ├── tasks #⽤于定义当前⾓⾊的任务列表, 此⽬录应当包含⼀个main.yml⽂件 │ └── main.yml ├── templates #⽤来存放jinjia2模板,template模块会⾃动在此⽬录中寻找jinjia2模板⽂件 ├── tests #⽤于存放测试role本⾝功能的playbook和主机定义⽂件, 在开发测试阶段⽐较常⽤ ,此⽬录应当包含⼀个main.yml⽂件和⾃⾝资源设定invetory │ ├── inventory │ └── test.yml └── vars #⽤于定义此⾓⾊⽤到的变量, 此⽬录应当包含⼀个main.yml⽂件 └── main.yml
实验任务:安装httpd服务
原始的playbook版本
1、制作主页
echo hi > index.html
2、拷贝本机httpd的配置文件为httpd.conf.j2模版,并修改
cp /etc/httpd/conf/httpd.conf httpd.conf.j2
vim httpd.j2 #42行 修改为
1 2 3 {% if http_port is defined %} Listen {{ ansible_facts.default_ipv4.address }}:{{ http_port }} {% endif %}
3、编写playbook文件,
创建变量http_port: 8080
执行任务:
1)安装httpd
2)拷贝主页
3)拷贝配置(做触发器)
4)防火墙放通自定义的端口
1 2 3 4 5 6 7 - name: firewalld configuration firewalld: port: "{{ http_port }}/tcp" permanent: yes immediate: yes state: enabled when: http_port is defined
5)开启服务
1 2 3 4 5 6 7 8 9 10 11 12 13 14 15 16 17 18 19 20 21 22 23 24 25 26 27 28 29 30 31 32 33 34 35 36 37 --- - hosts: all remote_user: root vars: http_port: 8080 tasks: - name: install httpd package yum: name: httpd state: present - name: create a web content copy: src: index.html dest: /var/www/html/index.html - name: config file template: src: httpd.conf.j2 dest: /etc/httpd/conf/httpd.conf notify: restart_httpd when: http_port is defined - name: firewalld configuration firewalld: port: "{{ http_port }}/tcp" permanent: yes immediate: yes state: enabled when: http_port is defined - name: start service service: name: httpd state: started enabled: yes handlers: - name: restart_httpd service: name: httpd state: restarted
验证端口及主页
ansible all -m shell -a “ss -tunlp|grep httpd”
任务分析:
1.配置 httpd 的时候,可能存在配置文件,配置文件可能含有变量
2.必要变量的定义
3.源码文件的定义
创建httpd角色框架
1 ansible-galaxy init httpd
查看目录结构
1 2 3 4 5 6 7 8 9 10 11 12 13 14 15 16 17 18 [root@controller roles]# tree httpd httpd ├── defaults │ └── main.yml ├── files ├── handlers │ └── main.yml ├── meta │ └── main.yml ├── README.md ├── tasks │ └── main.yml ├── templates ├── tests │ ├── inventory │ └── test.yml └── vars └── main.yml
部署完善httpd角色框架
1 2 cd roles/httpd/tasks/ touch install.yml conf_template.yml service.yml index.yml httpd_firewalld.yml
定义分任务(tasks/中存放)
1 2 3 4 5 6 7 8 9 10 11 12 13 14 15 16 17 18 19 20 21 22 23 24 25 26 27 28 29 30 31 32 33 34 35 vim install.yml - name: install httpd package yum: name: httpd state: present vim conf_template.yml - name: config file template: src: httpd.conf.j2 dest: /etc/httpd/conf/httpd.conf notify: restart_httpd when: http_port is defined vim service.yml - name: start service service: name: httpd state: started enabled: yes vim index.yml - name: create a web content copy: src: index.html dest: /var/www/html/index.html vim httpd_firewalld.yml - name: firewalld configuration firewalld: port: "{{ http_port }}/tcp" permanent: yes immediate: yes state: enabled when: http_port is defined
定义主任务(tasks/main.yml)
1 2 3 4 5 6 7 创建main.yml主控文件,调用以上单独的yml文件,main.yml定义了谁先执行谁后执行的顺序 vim main.yml - include: install.yml - include: index.yml - include: conf_template.yml - include: httpd_firewalld.yml - include: service.yml
定义变量(vars/main.yml)
1 2 3 4 5 vim /etc/ansible/roles/httpd/vars/main.yml --- #vars file for httpd http_port: 8080
定义首页文件(files/index.html)
1 2 3 cd /etc/ansible/roles/httpd/files/ vim index.html <h1> welcome to wd home <\h1>
定义模板(templates/httpd.conf.j2 )
1 2 3 4 5 6 7 8 9 yum -y install httpd cp /etc/httpd/conf/httpd.conf /etc/ansible/roles/httpd/templates/httpd.conf.j2 vim templates/httpd.conf.j2 将LISTEN 80 行修改为以下内容 {% if http_port is defined %} Listen {{ ansible_facts.default_ipv4.address }}:{{ http_port }} {% endif %}
定义角色处理程序(handlers/mail.yml)
1 2 3 4 5 vim /etc/ansible/roles/httpd/handlers/main.yml - name: restart_httpd service: name: httpd state: restarted
调用角色,配置httpd服务(roles/role_httpd.yml)
1 2 3 4 5 6 7 8 9 10 cd /etc/ansidle/roles vim role_httpd.yml --- # httpd role - name: httpd deployment hosts: websrvs remote_user: root roles: #调用角色 - httpd
检查语法及冒烟运行
1 ansible-playbook role_httpd.yml -C
正式执行
1 ansible-playbook role_httpd.yml
验证服务
1 2 3 ansible all -m shell -a "ss -tunlp |grep httpd" curl 192.168.142.101:8080
千屹博客旗下的所有文章,是通过本人课堂学习和课外自学所精心整理的知识巨著


 微信
微信 支付宝
支付宝