Shell | 总字数: 11.9k | 阅读时长: 48分钟 | 浏览量:
Shell
概述
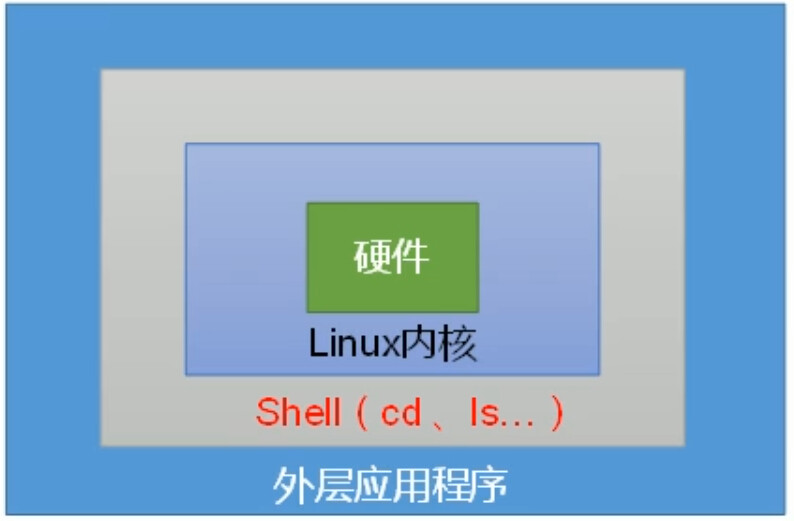
Shell是一个命令行解释器 ,他接收应用程序/用户命令,然后调用操作系统内核
Shell还是一个功能相当强大的编辑语言,易编写,易调试,灵活性强。
Shell解析器
Linux提供的Shell解析器有6种:
1
2
3
4
5
6
7
[root@Shell ~]# cat /etc/Shells /bin/sh /bin/bash /usr/bin/sh /usr/bin/bash /bin/tcsh /bin/csh
bash和sh的关系是
1
2
3
4
[root@Shell ~]# ll /bin/ | grep bash -rwxr-xr-x. 1 root root 964536 4月 1 2020 bash lrwxrwxrwx. 1 root root 4 9月 28 07:56 sh -> bash 软连接
Centos默认的解析器是bash
1
2
[root@Shell ~]# echo $Shell /bin/bash
Shell脚本入门
脚本格式
脚本以#!/bin/bash 开头(指向解析器)
第一个Shell脚本:helloworld
需求:创建一个Shell脚本,输出helloworld
实例操作:
1
2
3
4
5
6
7
8
9
10
11
12
13
14
15
16
17
18
[root@Shell ~]# mkdir datas ---创建一个脚本文件夹 [root@Shell ~]# cd datas/ ---以后所有脚本放在这 [root@Shell datas]# touch helloworld.sh [root@Shell datas]# vi helloworld.sh #!/bin/bash echo "helloworld 严千屹" ~ [root@Shell datas]# sh helloworld.sh ---相对路径 helloworld 严千屹 [root@Shell ~]# bash datas/helloworld.sh ---绝对路径 helloworld 严千屹 #上面都是bash和sh帮你执行脚本,脚本本身不需要执行权限。 #下面本质是脚本需要自己执行,所以需要执行权限 [root@Shell datas]# ./helloworld.sh -bash: ./helloworld.sh: 权限不够 [root@shell datas]# chmod 777 helloworld.sh ---给予权限 [root@shell datas]# ./helloworld.sh helloworld 严千屹
第二个Shell脚本:多命令处理
需求:
在/root/datas/目录下创建一个qianyi.txt,在 qianyi.txt 文件中增加“qianyios”
1
2
3
4
5
6
7
8
9
10
11
12
13
14
15
[root@shell datas]# touch qy.sh [root@shell datas]# vi qy.sh #!/bin/bash cd /root/datas/ touch qianyi.txt echo "qianyios" >> qianyi.txt [root@shell datas]# bash qy.sh #执行完成后会出现qianyi.txt [root@shell datas]# ll 总用量 12 -rwxrwxrwx 1 root root 43 1月 25 17:06 helloworld.sh -rw-r--r-- 1 root root 9 1月 25 17:22 qianyi.txt -rw-r--r-- 1 root root 76 1月 25 17:22 qy.sh [root@shell datas]# cat qianyi.txt qianyios
Shell中的变量
常用的系统变量
$HOME $PWD $SHELL $USER等
实例操作
查看系统变量的值
1
2
3
[root@shell datas]# echo $HOME /root 显示家目录
显示当前Shell中所有的变量:set
1
2
3
4
5
6
7
8
[root@shell datas]# set ABRT_DEBUG_LOG=/dev/null BASH=/usr/bin/bash BASH_ALIASES=() BASH_ARGC=() BASH_ARGV=() BASH_CMDS=() ......
自定义变量
基本语法
定义变量:变量=值
撤销变量:unset 变量
声明静态变量:readonly 变量 注意不能unset
变量定义规则
变量名称可以有字母,数字和下划线组成,但是不能以数字开头,环境变量名建议全部大写
等号两侧不能有空格 在bash中,变量默认类型都是字符串类型,无法直接进行数值运算
变量的值如果有空格 ,需要使用双引号或单引号括起来
实例操作
1
2
3
4
5
6
7
8
9
10
11
12
13
14
15
16
17
18
19
20
21
22
23
24
25
26
27
#自定义变量 [root@shell ~]# QY=qianyi [root@shell ~]# echo $QY qianyi [root@shell ~]# QY="qian yi" [root@shell ~]# echo $QY qian yi 变量为空和未定义变量是两个不同的概念 [root@shell ~]# echo $age ---未定义 [root@shell ~]# age="" [root@shell ~]# echo $age ---已定义 #两个没办法辨认 [root@shell ~]# set -u ---调用为声明变量会报错 [root@shell ~]# echo $add -bash: add: unbound variable [root@shell ~]# add=123 [root@shell ~]# echo $add 123 #删除变量 不需要加$add [root@shell ~]# echo $add 123 [root@shell ~]# unset add [root@shell ~]# echo $add -bash: add: unbound variable
环境变量
环境变量设置
1
2
[root@shell ~]# export qyage="18" #使用export声明的变量即是环境变量
环境变量查询 set可以查看所有变量,env只能查看环境变量
1
2
[root@shell ~]# env | grep qyage qyage=18
系统默认环境变量
1
2
3
4
5
6
7
[root@shell ~]# env XDG_SESSION_ID=10 HOSTNAME=shell TERM=xterm SHELL=/bin/bash HISTSIZE=1000 qyage=18
PATH变量:系统查找命令的路径
先查询下PATH环境变量的值:
1
2
3
[root@shell ~]# echo $PATH /usr/local/sbin:/usr/local/bin:/usr/sbin:/usr/bin:/root/bin
PATH 变量的值是用“:”分割的路径,这些路径就是系统查找命令的路径。也就是说当我们输入了一个程序名,如果没有写入路径,系统就会到 PATH 变量定义的路径中去寻找,是否有可以执行的程序。如果找到则执行,否则会报“命令没有发现”的错误。
那么是不是我们把自己的脚本拷贝到 PATH 变量定义的路径中,我们自己写的脚本也可以不输入路径而直接运行呢?
1
2
3
4
5
6
[root@shell ~]# cp datas/helloworld.sh /usr/bin/ [root@shell ~]# helloworld.sh helloworld 严千屹 [root@shell ~]# rm -rf /usr/bin/helloworld.sh [root@shell ~]# helloworld.sh -bash: /usr/bin/helloworld.sh: 没有那个文件或目录
那么我们是不是可以修改 PATH变量的值,而不是把程序脚本复制到/bin/目录中。当然是可以的,我们通过变量的叠加就可以实现了:
1
2
3
4
5
[root@shell ~]# PATH="$PATH":/root/datas [root@shell ~]# echo $PATH /usr/local/sbin:/usr/local/bin:/usr/sbin:/usr/bin:/root/bin:/root/datas [root@shell ~]# helloworld.sh helloworld 严千屹
PS1变量:命令提示符设置
PS1是一个很有意思的变量,是用来定义命令行的提示符,可以安装我们自己的需求来定义自己喜欢的提示符。PS1可以支持以下这些选项:
1
2
3
4
5
6
7
8
9
10
11
12
\d :#代表日期,格式为weekday month date,例如:"Mon Aug 1" \H :#完整的主机名称。 \h :#仅取主机的第一个名字。 \t :#显示时间为24小时格式,如:HH:MM:SS \T :#显示时间为12小时格式 \A :#显示时间为24小时格式:HH:MM \u :#当前用户的账号名称 \v :#BASH的版本信息 \w :#完整的工作目录名称。家目录会以 ~代替 \W :#利用basename取得工作目录名称,所以只会列出最后一个目录 \# :#下达的第几个命令 \$ :#提示字符,如果是root时,提示符为:# ,普通用户则为:$
1 格式 PS1='[ ]\$ ' \$空格' 有个空格 一定要单引号
1
2
3
4
5
[root@shell ~]# echo $PS1 [\u@\h \W]\$ [root@shell ~]# PS1='[\u@\t \w]\$ ' [root@20:14:51 ~]# cd datas/ [root@20:14:54 ~/datas]#
位置参数变量
位置参数变量
作用
$n
表示第n个参数,$1则表示第一个参数,$2表示第二个参数……如果有10以上的参数用${10}
$0
当前程序的名称,也就是命令本身。
$*
传递给程序的所有参数组成的字符串(参数)。
$@
以“参数1”、“参数2”……保存所有的参数。
$#
代表命令行中所有参数个数
$?
上一个代码或者Shell程序在Shell中退出的情况,如果正常退出则返回0,否则返回非0值。
$$
本程序的(进程ID)PID。
$!
上一个命令的PID。
实例操作
1
2
3
4
5
6
7
8
9
10
11
12
[root@shell datas]# vi count.sh #!/bin/bash a=$1 b=$2 sum=$(($a+$b)) #$(( ))双小括号才能进行数字运算,$( )运行命令 echo $sum echo $0 [root@shell datas]# chmod 755 count.sh [root@shell datas]# ./count.sh 22 33 55 ./count.sh #$0输出命令本身
1
2
3
4
5
6
7
8
9
10
11
12
13
14
15
16
17
18
19
20
21
22
23
24
25
26
27
28
29
30
[root@shell datas]# vi para.sh #!/bin/bash echo "\$* is $*" echo "\$@ is $@" echo "\$# is $#" [root@shell datas]# chmod 777 para.sh [root@shell datas]# ./para.sh 11 22 33 44 $* is 11 22 33 44 #{11 22 33 44}看成一个整体 $@ is 11 22 33 44 #{11},{22},{33},{44} $# is 4 #个数 验证过程 [root@shell datas]# vi para2.sh #!/bin/bash #for循环,有多少次出现多少次 for i in "$*" do echo $i done echo "------------------" for y in "$@" do echo $y done [root@shell datas]# ./para2.sh 11 22 33 44 11 22 33 44 #整体,循环1次 ------------------ 11 #4个,循环4次 22 33 44
预定义变量
$?
最后一次执行的命令的返回状态。如果这个变量的值为 0,证明上一个命令正确执行:如果这个变量的值为非 0(具体是哪个数,由命令自己来决定),则证明上一个命令执行不正确了。
$$
当前进程的进程号(PID)
$!
后台运行的最后一个进程的进程号(PID)
1
2
3
4
5
6
7
8
[root@shell ~]# ls anaconda-ks.cfg bin datas repo.bak [root@shell ~]# echo $? 0 [root@shell ~]# sjkdhasjkd -bash: sjkdhasjkd: 未找到命令 [root@shell ~]# echo $? 127
read键盘接收
定义
[root@shell datas]# read --help
read [-ers]
[-a 数组]
[-d 分隔符]
[-i 缓冲区文字]
[-n 读取字符数]
[-N 读取字符数]
[-p 提示符]
[-t 超时]
[-u 文件描述符]
[名称 …]名称指的是变量名
1
2
3
4
5
6
7
8
9
10
11
12
13
14
15
16
17
18
19
20
21
22
23
24
25
26
27
28
[root@shell datas]# vi count2.sh #!/bin/bash read -t 30 -p "请输入第一个数字:" num1 read -t 30 -p "请输入第二个数字:" num2 sum=$(($num1+$num2)) echo $sum [root@shell datas]# chmod 777 count2.sh [root@shell datas]# ./count2.sh 请输入第一个数字:1 请输入第二个数字:1 2 #########前者需要回车,下面的不需要回车 [root@shell datas]# vi count2.sh #!/bin/bash read -n 1 -t 30 -p "请输入第一个数字:" num1 #-n 1 限制输入1个字符数 echo -e "\n" read -s -t 30 -p "请输入第二个数字:" num2 #-s 是隐藏 echo -e "\n" sum=$(($num1+$num2)) echo $sum [root@shell datas]# ./count2.sh 请输入第一个数字:1 请输入第二个数字: #我这里输入的是12 13
declare声明变量类型
定义
既然所有变量的默认类型是字符串型,那么只要我们把变量声明为整数型不就可以运算了吗?
-:给变量设定类型属性
+:取消变量的类型属性
-a:将变量声明为数组型
-i:将变量声明为整数型(integer)
-x:将变量声明为环境变量
-r:将变量声明为只读变量,注意,一旦设置为只读变量,既不能修改变量的值,也不能删除变量,甚至不能通过+r取消只读属性
-p:显示指定变量的被声明的类型、
声明数值进行运算
1
2
3
4
5
6
7
8
[root@shell datas]# a=1 [root@shell datas]# b=2 [root@shell datas]# c=$a+$b [root@shell datas]# echo $c 1+2 [root@shell datas]# declare -i c=$a+$b #声明整数类型才可以进行数值运行 [root@shell datas]# echo $c 3
数组
1
2
3
4
5
[root@shell datas]# declare -a name[0]="qy" #声明数组 [root@shell datas]# name[1]="qy1" #也可以不用declare,就知道你在声明数组 [root@shell datas]# name[2]="qy2" [root@shell datas]# echo ${name[*]} qy qy1 qy2
环境变量
1
2
3
两个声明变量作用一样 [root@shell datas]# export test [root@shell datas]# declare -x test="123"
只读属性
注意,一旦设置为只读变量,既不能修改变量的值,也不能删除变量,甚至不能通过+r取消只读属性
1
2
3
4
5
6
7
8
9
10
11
12
[root@shell datas]# declare -r test #添加只读属性 [root@shell datas]# declare -p ...... declare -rx test="123" [root@shell datas]# echo $test 123 [root@shell datas]# test=1 #无法改值 -bash: test: 只读变量 [root@shell datas]# unset test #无法删除变量 -bash: unset: test: 无法反设定: 只读 variable [root@shell datas]# declare +r test #无法删除属性 -bash: declare: test: 只读变量
不过好在这个变量是命令行声明的,所以重启或重新登入,这个变量就会消失
数值运算
使用expr或let数值运算工具
1
2
3
4
5
6
7
8
9
10
[root@shell ~]# aa=11 [root@shell ~]# bb=22 [root@shell ~]# dd=$(expr $aa + $bb) [root@shell ~]# echo $dd 33 #dd的值是aa和bb的和。注意“+”号两侧比有空格 #如果是let呢 [root@shell ~]# let e=$aa+$bb [root@shell ~]# echo $e 33
使用双小括号 $((运算式子)) 或$[运算式子] 的方式运算 (看个人习惯,看你喜欢用哪种)
区分单小括号$( )调用的是系统命令 双小括号是计算数学运算的
1
2
3
4
5
6
7
8
[root@shell ~]# aa=11 [root@shell ~]# bb=22 [root@shell ~]# ff=$(($aa+$bb)) [root@shell ~]# echo $ff 33 [root@shell ~]# gg=$[$aa+$bb] [root@shell ~]# echo $gg 33
Shell常用运算符
优先级
运算符
说明
13
-,+
单目负,单目正
12
!,~
逻辑非,按位取反或补码
11
*,/,%
乘、除、取模
10
+,-
加、减
9
<<,>>
按位左移,按位右移
8
< = ,> = ,< , >
小于或等于、大于或等于、小于、大于
7
==, !=
等于
6
&
按位与
5
^
按位异或
4
|
按位或
3
&&
逻辑与
2
||
逻辑或
1
=,=,-=, =,/=,%=,&=,^=,|=,<<=,>>=
赋值,运算且赋值
取模运算
1
2
3
4
[root@shell ~]# bb=$((14%5)) [root@shell ~]# echo $bb 4 #14不能被5整除,余数是4
逻辑与
1
2
3
4
[root@shell ~]# cc=$((1&&0)) [root@shell ~]# echo $cc 0 逻辑与运算只有想与的两边都是1,与的结果才是1,否则与的结果是0
四则运算练习
1
2
3
4
5
6
7
8
[root@shell ~]# vi count3.sh #!/bin/bash vaule=$(($1 $2 $3)) echo $vaule [root@shell ~]# ./count3.sh 11 + 11 22 [root@shell ~]# ./count3.sh 11 / 11 1
但是上面会有bug不能用
1
2
3
4
5
6
7
8
9
10
11
12
13
[root@shell datas]# vi count4.sh #!/bin/bash read -t 30 -p "please input num1:" num1 read -t 30 -p "please input num2:" num2 read -n 1 -t 30 -p "please inpute operato[+-*/]:" oper echo -e “\n” [ "$oper" == "+" ] && echo "$(($num1 + $num2))" && exit [ "$oper" == "-" ] && echo "$(($num1 - $num2))" && exit [ "$oper" == "*" ] && echo "$(($num1 * $num2))" && exit [ "$oper" == "/" ] && echo "$(($num1 / $num2))" && exit echo "please input right oper" [空格"$oper"空格==空格"+"空格]
变量的测试与内容置换
变量置换方式
变量y没有设置
变量y为空值
变量y设置值
x=${y-新值}
x= 新值
x 为空
x=$y
x=${y:-新值}
x= 新值
x= 新值
x=$y
x=${y+新值}
x 为空
x= 新值
x=新值
x=${y:+新值}
x 为空
x 为空
x=新值
x=${y=新值}
x= 新值
x 为空
x=$y
同上
y= 新值
y 值不变
y值不变
x=${y:=新值}
x= 新值
X= 新值
x=$y
同上
y= 新值
y= 新值
y值不变
x=${y?新值}
新值输出到标准错误输出(屏幕)
x 为空
x=$y
x=${y:?新值}
新值输出到标准错误输出
新值输出到标准错误输出
x=$y
假设我们要测b变量,现在b变量我们从来没有设置过
1
2
3
4
5
6
7
8
9
10
11
12
13
以下可以判断变b不存在 [root@shell ~]# x=${b-new} [root@shell ~]# echo $x new 以下可以判断是否为空 [root@shell ~]# b="" [root@shell ~]# x=${b-new} [root@shell ~]# echo $x 以下可以判断是否有值 [root@shell ~]# b=123 [root@shell ~]# x=${b-new} [root@shell ~]# echo $x 123
环境变量配置文件
1、让环境变量生效的命令 source 配置文件 或 . 配置文件
2、环境变量配置文件
登录时生效的环境变量配置文件
在 Linux 系统登录时主要生效的环境变量配置文件有以下五个:
/etc/profile
/etc/profile.d/*.sh
/etc/bashrc
~/.bash_profile
~/.bashrc
写在前三个的配置文件对所有用户生效,写在最后两个对当前用户生效
基础正则
基础正则表达式
元字符
作 用
*
前一个字符匹配 0 次或任意多次。
.
匹配除了换行符外任意一个字符。
^
匹配行首。例如:^hello 会匹配以 hello 开头的行。
$
匹配行尾。例如:hello&会匹配以 hello 结尾的行。
[]
匹配中括号中指定的任意一个字符,只匹配一个字符。例如:[aoeiu] 匹配任意一个元音字母,[0-9] 匹配任意一位数字,[a-z][0-9]匹配小写字和一位数字构成的两位字符。
[^]
匹配除中括号的字符以外的任意一个字符。例如:[^0-9] 匹配任意一位非数字字符,[^a-z] 表示任意一位非小写字母。
\
转义符。用于取消讲特殊符号的含义取消。
{n}
表示其前面的字符恰好出现 n 次。例如:[0-9]{4} 匹配 4 位数字,[1][3-8][0-9]{9} 匹配手机号码。
{n,}
表示其前面的字符出现不小于 n 次。例如: [0-9]{2,} 表示两位及以上的数字。
{n,m}
表示其前面的字符至少出现n 次,最多出现m 次。例如:[a-z]{6,8}匹配 6 到 8 位的小写字母。
~/.bashrc 文件中建立这个别名:
实现grep能显示颜色
1 echo "alias grep=\'grep --color=auto\'" >> /root/.bashrc
建立练习文档
1
2
3
4
5
6
7
8
9
10
11
12
13
14
15
[root@shell datas]# vi test.txt Mr. Li Ming said: he was the most honest man. 123despise him. google gooooogle ggle gogle soooooid But since Mr. shen Chao came, he never saaaid those words. 5555nice! because,actuaaaally, Mr. Shen Chao is the most honest man Later,Mr. Li ming soid his hot body. hello is hello was
练习*号
1
2
3
4
5
6
7
8
9
10
11
12
13
14
15
16
17
18
19
20
21
22
23
24
25
26
# a*意思是最少包含0个a或无数个a [root@shell datas]# grep "a*" test.txt Mr. Li Ming said: he was the most honest man. 123despise him. But since Mr. shen Chao came, he never saaaid those words. 5555nice! because,actuaaaally, Mr. Shen Chao is the most honest man Later,Mr. Li ming soid his hot body. # aa*意思是最少包含1个a或无数个a [root@shell datas]# grep "aa*" test.txt Mr. Li Ming said: he was the most honest man. But since Mr. shen Chao came, he never saaaid those words. 5555nice! because,actuaaaally, Mr. Shen Chao is the most honest man Later,Mr. Li ming soid his hot body. # aaa*意思是最少包含2个a或无数个a [root@shell datas]# grep "aaa*" test.txt But since Mr. shen Chao came, he never saaaid those words. 5555nice! because,actuaaaally, grep "a" count4.sh 也行
练习 . 号 正则表达式“.”只能匹配一个字符,这个字符可以是任意字符
1
2
3
[root@shell datas]# grep "s..d" test.txt Mr. Li Ming said: Later,Mr. Li ming soid his hot body.
[root@shell datas]# grep “s.*d” test.txtsaid :since Mr. shen Chao came, he never saaaid those word s. 5555nice!soid his hot bod y.
“[]”会匹配中括号中指定任意一个字符,注意只能匹配一个字符。比如[ao]要不会匹配一个 a
字符,要不会匹配一个 o 字符:
1
2
3
4
5
6
[root@shell datas]# grep "s[ao]id" test.txt Mr. Li Ming said: Later,Mr. Li ming soid his hot body. [root@shell datas]# grep "[0-9]" test.txt 123despise him. But since Mr. shen Chao came, he never saaaid those words. 5555nice!
扩展正则
扩展元字符
作 用
+
前一个字符匹配 1 次或任意多次。如“go+gle”会匹配“gogle”、“google”或“gooogle”,当然如果“o”有更多个,也能匹配。
?
前一个字符匹配 0 次或 1 次。如“colou?r”可以匹配“colour”或“color”。
|
匹配两个或多个分支选择。如“was|his”会匹配既包含“was”的行,也匹配包含“his”的行。
()
匹配其整体为一个字符,即模式单元。可以理解为由多个单个字符组成的大字符。
grep 参数列表
-i : 忽略大小写-v : 查找不包含指定字符串的所有行(取反)-r : 递归查找文件夹下的文件-n : 显示匹配行所在位置(行号)-l : 只显示包含搜索字符串的文件名,而非每个匹配行-c : 统计符合条件的行数-e pattern : 指定要查找的正则表达式模式-w : 匹配整个单词,即只匹配独立的单词而非单词内的字符-A num : 输出匹配行后 N 行内容-B num : 输出匹配行前 N 行内容-C[num] 或者 --context[=num]: 输出匹配行前后总共 N 行内容。--exclude : 排除指定文件类型,多个文件类型用 “,” 隔开
1
2
3
4
5
6
7
8
9
10
11
12
13
14
15
16
17
18
19
20
21
22
23
24
25
[root@localhost sh]# grep -E "go*gle" test.txt google gooooogle ggle gogle [root@localhost sh]# grep -E "go+gle" test.txt google gooooogle gogle [root@localhost sh]# grep -E "go?gle" test.txt ggle gogle [root@localhost sh]# grep -E "go+" test.txt google gooooogle gogle [root@localhost sh]# grep -E "g(oo)+" test.txt google gooooogle [root@localhost sh]# grep -E "g(ooo)+" test.txt gooooogle [root@localhost sh]# grep -E "hello (was|is)" test.txt hello is hello was
匹配邮箱
1 grep -E "[0-9a-zA-Z_]+@[0-9a-zA-Z_]+(\.[0-9a-zA-Z_]+){1,3}" test.txt
字符截取和替换命令
1
2
3
4
[root@localhost ~]# cut [选项] 文件名选项: -f 列号: 提取第几列 -d 分隔符: 按照指定分隔符分割列 -c 字符范围: 不依赖分隔符来区分列,而是通过字符范围(行首为 0)来进行字段提取。“n-”表示从第 n 个字符到行尾;“n-m”从第 n 个字符到第 m个字符;“-m”表示从第 1 个字符到第 m 个字符。
测试文件
1
2
3
4
5
6
[root@localhost ~]# cat student.txt ID Name gender Mark 1 Liming M 86 2 Sc M 90 3 Tg M 83 用tab键隔开所有列,不要空格
测试
1
2
3
4
5
6
7
8
9
10
11
12
13
14
15
16
17
18
19
20
21
22
23
24
[root@localhost ~]# cut -f 2 student.txt Name Liming Sc Tg #提取多列 [root@localhost ~]# cut -f 2,3 student.txt Name gender Liming M Sc M Tg M ##cut 可以按照字符进行提取,需要注意“8-”代表的是提取所有行的第八个字符开始到行尾,而 “10-20”代表提取所有行的第十个字符到第二十个字符,而“-8”代表提取所有行从行首到第八个 字符: [root@localhost ~]# cut -c 9- student.txt gender Mark M 86 0 3 [root@localhost ~]# cut -c -9 student.txt ID Name g 1 Liming 2 Sc M 90 3 Tg M 83
awk编程
printf 格式化输出
1
2
3
4
5
6
7
8
9
10
11
12
[root@localhost ~]# printf ‘输出类型输出格式’ 输出内容输出类型: %ns: 输出字符串。n 是数字指代输出几个字符 %ni: 输出整数。n 是数字指代输出几个数字 %m.nf: 输出浮点数。m 和 n 是数字,指代输出的整数位数和小数位数。如%8.2f代表 共输出 8 位数,其中 2 位是小数,6 位是整数。 输出格式: \a: 输出警告声音 \b: 输出退格键,也就是 Backspace 键 \f: 清除屏幕 \n: 换行 \r: 回车,也就是 Enter 键 \t: 水平输出退格键,也就是 Tab 键 \v: 垂直输出退格键,也就是 Tab 键
建立测试文件
1
2
3
4
5
vi student.txt ID Name PHP Linux MySQL Average 1 Liming 82 95 86 87.66 2 Sc 74 96 87 85.66 3 Tg 99 83 93 91.66
不指定格式输出
1
2
3
[root@localhost ~]# printf '%s' $(cat student.txt) IDNamePHPLinuxMySQLAverage1Liming82958687.662Sc74968785.663Tg99839391.66 #乱作一锅粥
指定格式输出
1
2
3
4
5
6
[root@localhost ~]# printf '%s\t %s\t %s\t %s\t %s\t %s\t \n' $(cat student.txt) ID Name PHP Linux MySQL Average 1 Liming 82 95 86 87.66 2 Sc 74 96 87 85.66 3 Tg 99 83 93 91.66
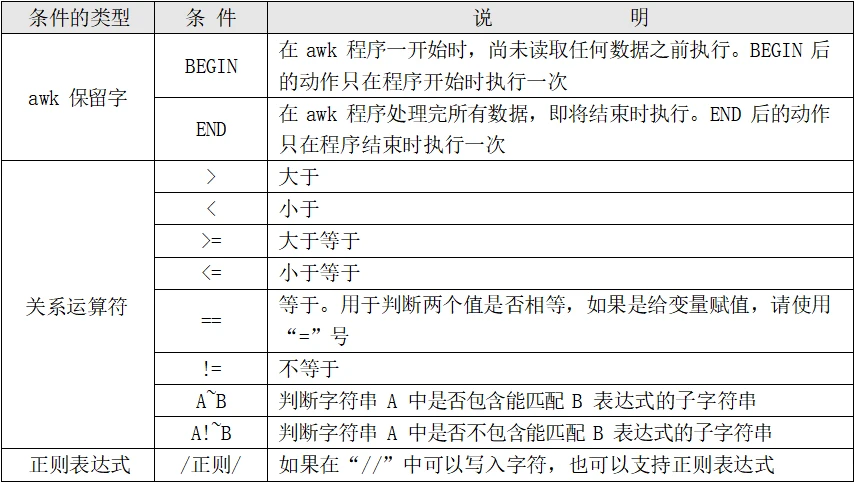
awk条件
1 [root@localhost ~]# awk '条件 1{动作 1} 条件 2{动作 2}…' 文件名
awk条件(Pattern)
一般使用关系表达式作为条件。这些关系表达式非常多,具体参考表 12-3 所示,例如:
x > 10 判断变量 x 是否大于 10
x == y 判断变量 x 是否等于变量 y
A ~ B 判断字符串 A 中是否包含能匹配 B 表达式的子字符串
A !~ B 判断字符串 A 中是否不包含能匹配 B 表达式的子字符串
动作(Action):
格式化输出 流程控制语句
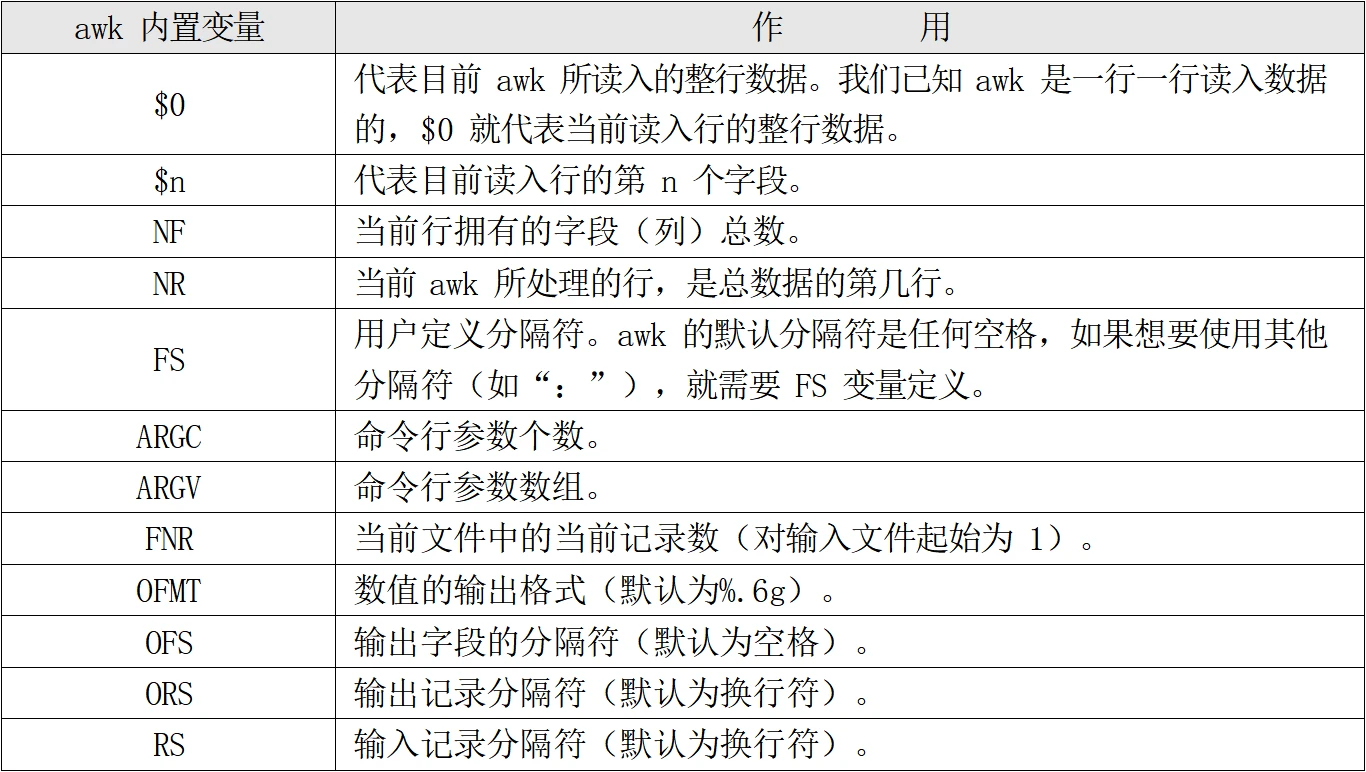
awk内置变量
例子:
1
2
[root@localhost ~]# awk '{printf $2 "\t" $6 "\n"}' student.txt #输出第二列和第六列
1
2
3
4
5
6
7
8
9
10
11
12
13
假设我要提取根分区/dev/sda1 第五列的使用率 [root@localhost ~]# df -h Filesystem Size Used Avail Use% Mounted on devtmpfs 475M 0 475M 0% /dev tmpfs 487M 0 487M 0% /dev/shm tmpfs 487M 7.7M 479M 2% /run tmpfs 487M 0 487M 0% /sys/fs/cgroup /dev/mapper/centos-root 50G 1.5G 49G 3% / /dev/mapper/centos-home 47G 33M 47G 1% /home /dev/sda1 1014M 141M 874M 14% /boot tmpfs 98M 0 98M 0% /run/user/0 [root@localhost ~]# df -h | grep "/dev/sda1"| awk '{print $5}'| cut -d "%" -f 1 14
Begin
1
2
3
4
5
6
[root@localhost ~]# awk 'BEGIN{printf "11111111\n" } {printf $2 "\t" $6 "\n"}' student.txt 11111111 Name Average Liming 87.66 Sc 85.66 Tg 91.66
End
1
2
3
4
5
6
[root@localhost ~]# awk 'END{printf "111111111\n" } {printf $2 "\t" $6 "\n"}' student.txt Name Average Liming 87.66 Sc 85.66 Tg 91.66 111111111
假设我想看看平均成绩大于等于 87 分的学员是谁
1
2
3
4
5
6
7
8
9
[root@localhost ~]# cat student.txt ID Name PHP Linux MySQL Average 1 Liming 82 95 86 87.66 2 Sc 74 96 87 85.66 3 Tg 99 83 93 91.66 [root@localhost ~]# cat student.txt | grep -v "Name" | awk '$6 >= 87{print $2}' Liming Tg
加入了条件之后,只有条件成立动作才会执行,如果条件不满足,则动作则不运行。通过这个实验,大家可以发现,虽然 awk 是列提取命令,但是也要按行来读入的。这个命令的执行过程是这样的:
1) 如果有 BEGIN 条件,则先执行 BEGIN 定义的动作
2) 如果没有 BEGIN 条件,则读入第一行,把第一行的数据依次赋予$0、$1、$2 等变量。其中$0代表此行的整体数据,$1 代表第一字段,$2 代表第二字段。
3) 依据条件类型判断动作是否执行。如果条件符合,则执行动作,否则读入下一行数据。如果没有条件,则每行都执行动作。
4) 读入下一行数据,重复执行以上步骤。
1
2
3
4
例子 2: [root@localhost ~]# awk '$2 ~ /Sc/ {printf $6 "\n"}' student.txt #如果第二字段中输入包含有“Sc”字符,则打印第六字段数据 85.66
这里要注意在 awk 中,使用“//”包含的字符串,awk 命令才会查找。也就是说字符串必须用“//”包含,awk 命令才能正确识别。
1
2
3
[root@localhost ~]# awk '/Liming/ {print}' student.txt 1 Liming 82 95 86 87.66 #打印 Liming 的成绩
当使用 df 命令查看分区使用情况是,如果我只想查看真正的系统分区的使用状况,而不想查看光盘和临时分区的使用状况,则可以:
1
2
3
[root@localhost ~]# df -h | awk '/sda[0-9]/ {printf $1 "\t" $5 "\n"} ' /dev/sda1 14% #查询包含有 sda 数字的行,并打印第一字段和第五字段
查看/etc/passwd文件
1
2
3
4
5
6
7
8
9
10
11
12
13
14
15
16
17
18
19
20
[root@localhost ~]# useradd user1 [root@localhost ~]# useradd user2 [root@localhost ~]# cat /etc/passwd | grep "/bin/bash" root:x:0:0:root:/root:/bin/bash user1:x:1000:1000::/home/user1:/bin/bash user2:x:1001:1001::/home/user2:/bin/bash [root@localhost ~]# cat /etc/passwd | grep "/bin/bash" | awk '{FS=":"} {print $1}' root:x:0:0:root:/root:/bin/bash user1 user2 #第一行root好像没有以冒号为分割读取第一列 是因为awk 先把第一行数据读取了 才进行{FS=":"} 直到上一步之后,才发现要以冒号作为分隔符 后面的user1 user2 才正常 ###所以正确写法是BEGIN {FS=":"} 在读取数据之前,先执行{FS=":"} [root@localhost ~]# cat /etc/passwd | grep "/bin/bash" | awk 'BEGIN {FS=":"} {print $1}' root user1 user2
1
2
3
[root@localhost ~]# cat /etc/passwd | grep "/bin/bash" | awk 'BEGIN{FS=":"} $3=="1000" {print $1}' user1 判断是否相等 要用双=号
1
2
3
4
5
6
7
8
9
[root@localhost ~]# cat /etc/passwd | grep "/bin/bash" | \ > awk 'BEGIN {FS=":"} {printf $1 "\t" $3 "\t 行号:" NR "\t 字段数:" NF "\n"}' root 0 行号:1 字段数:7 user1 1000 行号:2 字段数:7 user2 1001 行号:3 字段数:7 #如果我只想看sshd [root@localhost ~]# cat /etc/passwd | awk 'BEGIN {FS=":"} $1=="sshd" {printf $1 "\t" $3 "\t 行号:"NR "\t 字段数:"NF "\n"}' sshd 74 行号:20 字段数:7
Sed
sed命令
1
2
3
4
5
6
7
8
9
10
11
12
[root@localhost ~]# sed [选项] ‘[动作]’ 文件名 选项: -n: 一般 sed 命令会把所有数据都输出到屏幕,如果加入此选择,则只会把经过 sed 命令处理 的行输出到屏幕。 -e: 允许对输入数据应用多条 sed 命令编辑。 -f 脚本文件名: 从 sed 脚本中读入 sed 操作。和 awk 命令的-f 非常类似。 -r: 在 sed 中支持扩展正则表达式。 -i: 用 sed 的修改结果直接修改读取数据的文件,而不是由屏幕输出动作: a \: 追加,在当前行后添加一行或多行。添加多行时,除最后 一行外, 每行末尾需要用“\”代表数据未完结。 c \: 行替换,用 c 后面的字符串替换原数据行,替换多行时,除最后一行外,每行末尾需用“\”代表数据未完结。 i \:插入,在当期行前插入一行或多行。插入多行时,除最后 一行外,每行末尾需要用“\”代表数据未完结。 d:删除,删除指定的行。
打印p
1
2
3
4
5
6
7
8
9
[root@localhost ~]# sed 2p student.txt ID Name PHP Linux MySQL Average 1 Liming 82 95 86 87.66 1 Liming 82 95 86 87.66 2 Sc 74 96 87 85.66 3 Tg 99 83 93 91.66 #你会发现第二行多打印了一遍,只有加-n才不会 [root@localhost ~]# sed -n '2p' student.txt 1 Liming 82 95 86 87.66
删除d(删除2到4行)
此操作并不会写入文件中,只是输出的时候删除了
1
2
3
4
5
6
7
8
9
10
11
12
[root@localhost ~]# sed '2,4d' student.txt ID Name PHP Linux MySQL Average [root@localhost ~]# cat student.txt ID Name PHP Linux MySQL Average 1 Liming 82 95 86 87.66 2 Sc 74 96 87 85.66 3 Tg 99 83 93 91.66 若想直接修改读取数据到文件的话加入 -i [root@localhost ~]# sed -i '2,4d' student.txt [root@localhost ~]# cat student.txt ID Name PHP Linux MySQL Average
前追加i
1
2
3
4
5
6
7
8
9
#在第二行前面插入内容 [root@localhost ~]# sed '2i 前面新内容1 \ > 前面新内容(大量) 2222222222222222222 ' student.txt ID Name PHP Linux MySQL Average 前面新内容1 前面新内容(大量) 2222222222222222222 1 Liming 82 95 86 87.66 2 Sc 74 96 87 85.66 3 Tg 99 83 93 91.66
后追加a
1
2
3
4
5
6
7
8
在第二行后追加内容 [root@localhost ~]# sed -i '2a 新内容' student.txt [root@localhost ~]# cat student.txt ID Name PHP Linux MySQL Average 1 Liming 82 95 86 87.66 新内容 2 Sc 74 96 87 85.66 3 Tg 99 83 93 91.66
替换c
1
2
3
4
5
6
7
8
9
10
11
12
13
14
15
16
17
#把2行新内容替换为其他数据 [root@localhost ~]# cat student.txt ID Name PHP Linux MySQL Average 1 Liming 82 95 86 87.66 2 Sc 74 96 87 85.66 3 Tg 99 83 93 91.66 [root@localhost ~]# sed '2c 0 xiaoshan 83 55 11 44.2' student.txt ID Name PHP Linux MySQL Average 0 xiaoshan 83 55 11 44.2 2 Sc 74 96 87 85.66 3 Tg 99 83 93 91.66 #我前面是空格,若对齐用\t且\t后没有空格 [root@localhost ~]# sed '2c 0 \txiaos\t83 \t55 \t11 \t44.2' student.txt ID Name PHP Linux MySQL Average 0 xiaos 83 55 11 44.2 2 Sc 74 96 87 85.66 3 Tg 99 83 93 91.66
多命令执行e
1
2
3
4
5
6
7
8
9
10
11
12
13
14
[root@localhost ~]# cat student.txt ID Name PHP Linux MySQL Average 前面新内容1 前面新内容1 1 Liming 82 95 86 87.66 2 Sc 74 96 87 85.66 3 Tg 99 83 93 91.66 ##同时删除第二和第三行 [root@localhost ~]# sed -i -e '2d;3d' student.txt [root@localhost ~]# cat student.txt ID Name PHP Linux MySQL Average 1 Liming 82 95 86 87.66 2 Sc 74 96 87 85.66 3 Tg 99 83 93 91.66
替换字符串 s/旧内容/新内容/g
1
2
3
4
5
6
7
8
9
10
11
12
13
14
15
16
17
18
19
20
21
22
23
24
25
#替换Liming为Lm [root@localhost ~]# sed -i 's/Liming/Lm/g' student.txt [root@localhost ~]# cat student.txt ID Name PHP Linux MySQL Average 1 Lm 82 95 86 87.66 2 Sc 74 96 87 85.66 3 Tg 99 83 93 91.66 #多命令执行,分号隔开 [root@localhost ~]# sed -i 's/Sc/sc1/g; s/Tg/Eg/g' student.txt [root@localhost ~]# cat student.txt ID Name PHP Linux MySQL Average 1 Lm 82 95 86 87.66 2 sc1 74 96 87 85.66 3 Eg 99 83 93 91.66 #也可以多行执行 [root@localhost ~]# sed -i 's/Sc/sc1/g s/Tg/Eg/g' student.txt #替换字符串为空值 [root@localhost ~]# sed -i 's/Lm//g' student.txt [root@localhost ~]# cat student.txt ID Name PHP Linux MySQL Average 1 82 95 86 87.66 2 sc1 74 96 87 85.66 3 Eg 99 83 93 91.66
字符串处理命令
sort排序命令
1
2
3
4
5
6
7
8
[root@localhost ~]# sort [选项] 文件名选项: -f: 忽略大小写 -b: 忽略每行前面的空白部分 -n: 以数值型进行排序,默认使用字符串型排序 -r: 反向排序 -u: 删除重复行。就是 uniq 命令 -t: 指定分隔符,默认是分隔符是制表符 -k n[,m]: 按照指定的字段范围排序。从第 n 字段开始,m 字段结束(默认到行尾)
1
2
3
4
5
6
7
8
9
10
11
12
13
#默认按开头字符排序 [root@localhost ~]# sort /etc/passwd abrt:x:173:173::/etc/abrt:/sbin/nologin adm:x:3:4:adm:/var/adm:/sbin/nologin bin:x:1:1:bin:/bin:/sbin/nologin chrony:x:997:995::/var/lib/chrony:/sbin/nologin #反向排序 [root@localhost ~]# sort -r /etc/passwd user2:x:1001:1001::/home/user2:/bin/bash user1:x:1000:1000::/home/user1:/bin/bash tcpdump:x:72:72::/:/sbin/nologin systemd-network:x:192:192:systemd Network Management:/:/sbin/nologin sync:x:5:0:sync:/sbin:/bin/sync
指定字段排序
1
2
3
4
5
6
7
8
9
10
11
12
13
14
15
16
17
18
19
20
21
22
23
24
25
26
27
28
#如UID [root@localhost ~]# sort -t ":" -k 3,3 /etc/passwd root:x:0:0:root:/root:/bin/bash bin:x:1:1:bin:/bin:/sbin/nologin user1:x:1000:1000::/home/user1:/bin/bash user2:x:1001:1001::/home/user2:/bin/bash operator:x:11:0:operator:/root:/sbin/nologin games:x:12:100:games:/usr/games:/sbin/nologin ftp:x:14:50:FTP User:/var/ftp:/sbin/nologin abrt:x:173:173::/etc/abrt:/sbin/nologin systemd-network:x:192:192:systemd Network Management:/:/sbin/nologin daemon:x:2:2:daemon:/sbin:/sbin/nologin adm:x:3:4:adm:/var/adm:/sbin/nologin #你会发现他先排第一位数字1,再排2。、 #就是1 12 13 到 2 22 23 并没有123456排下去 #所以要加上 -n -n:以数值型进行排序,默认使用字符串型排序 [root@localhost ~]# sort -nt ":" -k 3,3 /etc/passwd root:x:0:0:root:/root:/bin/bash bin:x:1:1:bin:/bin:/sbin/nologin daemon:x:2:2:daemon:/sbin:/sbin/nologin adm:x:3:4:adm:/var/adm:/sbin/nologin lp:x:4:7:lp:/var/spool/lpd:/sbin/nologin sync:x:5:0:sync:/sbin:/bin/sync shutdown:x:6:0:shutdown:/sbin:/sbin/shutdown halt:x:7:0:halt:/sbin:/sbin/halt mail:x:8:12:mail:/var/spool/mail:/sbin/nologin operator:x:11:0:operator:/root:/sbin/nologin games:x:12:100:games:/usr/games:/sbin/nologin
uniq取消重复行
uniq 命令是用来取消重复行的命令,其实和“sort -u”选项是一样的。命令格式如下
1
2
[root@localhost ~]# uniq [选项] 文件名选项: -i: 忽略大小写
1
2
3
4
5
6
7
8
9
10
11
[root@localhost ~]# cat student.txt ID Name PHP Linux MySQL Average 1 82 95 86 87.66 1 82 95 86 87.66 2 sc1 74 96 87 85.66 3 Eg 99 83 93 91.66 [root@localhost ~]# uniq student.txt ID Name PHP Linux MySQL Average 1 82 95 86 87.66 2 sc1 74 96 87 85.66 3 Eg 99 83 93 91.66
wc统计命令
1
2
3
4
[root@localhost ~]# wc [选项] 文件名选项: -l: 只统计行数 -w: 只统计单词数 -m: 只统计字符数
1
2
3
4
5
6
7
8
9
10
11
12
13
[root@localhost ~]# cat student.txt ID Name PHP Linux MySQL Average 1 82 95 86 87.66 1 82 95 86 87.66 2 sc1 74 96 87 85.66 3 Eg 99 83 93 91.66 [root@localhost ~]# wc -l student.txt 5 student.txt [root@localhost ~]# wc -w student.txt 28 student.txt [root@localhost ~]# wc -m student.txt 109 student.txt
条件判断(test命令)
按照文件类型进行判断(test)
测试选项
作 用
-b 文件
判断该文件是否存在,并且是否为块设备文件(是块设备文件为真)
-c 文件
判断该文件是否存在,并且是否为字符设备文件(是字符设备文件为真)
-d 文件
判断该文件是否存在,并且是否为目录文件(是目录为真)
-e 文件
判断该文件是否存在(存在为真)
-f 文件
判断该文件是否存在,并且是否为普通文件(是普通文件为真)
-L 文件
判断该文件是否存在,并且是否为符号链接文件(是符号链接文件为真)
-p 文件
判断该文件是否存在,并且是否为管道文件(是管道文件为真)
-s 文件
判断该文件是否存在,并且是否为非空(非空为真)
-S 文件
判断该文件是否存在,并且是否为套接字文件(是套接字文件为真)
1
2
3
4
5
6
7
8
9
10
11
12
[root@localhost ~]# ls anaconda-ks.cfg file.txt file.txtn netstart.bak student.txt 第一种格式:#-e 判断该文件是否存在(存在为真) [root@localhost ~]# test -e file.txt #输出为0即为真 [root@localhost ~]# echo $? 0 第一种格式:#-e 判断不存在的文件 [root@localhost ~]# [ -e abc ] [root@localhost ~]# echo $? 1 #输出为非0即为假
1
2
3
4
5
6
7
###判断该文件是否存在,并且是否为目录文件 [root@localhost ~]# [ -d student.txt ] && echo yes || echo no no ###判断该文件是否存在,并且是否为普通文件 [root@localhost ~]# [ -f student.txt ] && echo yes || echo no yes
1
2
3
4
5
6
###判断文件是否有数据 [root@localhost ~]# [ -s abc ] && echo yes || echo no no [root@localhost ~]# echo 111 >> abc [root@localhost ~]# [ -s abc ] && echo yes || echo no yes
按照文件权限判断
测试选项
作 用
-r 文件
判断该文件是否存在,并且是否该文件拥有读权限(有读权限为真)
-w 文件
判断该文件是否存在,并且是否该文件拥有写权限(有写权限为真)
-x 文件
判断该文件是否存在,并且是否该文件拥有执行权限(有执行权限为真)
-u 文件
判断该文件是否存在,并且是否该文件拥有 SUID 权限(有 SUID 权限为真)
-g 文件
判断该文件是否存在,并且是否该文件拥有 SGID 权限(有 SGID 权限为真)
-k 文件
判断该文件是否存在,并且是否该文件拥有 SBit 权限(有 SBit 权限为真)
1
2
3
4
5
6
7
8
9
10
11
12
13
##判断文件是否有写的权限 [root@localhost ~]# [ -w abc ] && echo yes || echo no yes [root@localhost ~]# [ -u abc ] && echo yes || echo no no ##判断文件是否有SUID的权限 [root@localhost ~]# chmod u+s abc [root@localhost ~]# [ -u abc ] && echo yes || echo no yes [root@localhost ~]# ll total 24 -rwSr--r-- 1 root root 4 May 2 03:02 abc
两个文件之间进行比较
测试选项
作 用
文件 1 -nt 文件 2
判断文件 1 的修改时间是否比文件 2 的新(如果新则为真)
文件 1 -ot 文件 2
判断文件 1 的修改时间是否比文件 2 的旧(如果旧则为真)
文件 1 -ef 文件 2
判断文件 1 是否和文件 2 的 Inode 号一致,可以理解为两个文件是否 为同一个文件。这个判断用于判断硬链接是很好的方法
1
2
3
4
5
6
7
8
##判断两个文件是否是硬链接 [root@localhost ~]# ln /root/abc /tmp/abc [root@localhost ~]# ll /tmp/abc -rw-r--r-- 2 root root 4 May 2 03:02 /tmp/abc [root@localhost ~]# [ /root/abc -ef /tmp/abc ] && echo yes || echo no yes
两个整数之间比较
测试选项
作 用
整数 1 -eq 整数 2
判断整数 1 是否和整数 2 相等(相等为真)
整数 1 -ne 整数 2
判断整数 1 是否和整数 2 不相等(不相等位置)
整数 1 -gt 整数 2
判断整数 1 是否大于整数 2(大于为真)
整数 1 -lt 整数 2
判断整数 1 是否小于整数 2(小于位置)
整数 1 -ge 整数 2
判断整数 1 是否大于等于整数 2(大于等于为真)
整数 1 -le 整数 2
判断整数 1 是否小于等于整数 2(小于等于为真)
-eq: equal : 相等 -ne: not equal : 不相等
-gt: greater than : 大于 -lt: less than : 小于
1
2
3
4
5
6
7
8
9
##判断整数1是否等于整数2 [root@localhost ~]# [ 22 -eq 22 ] && echo yes || echo no yes ##判断整数1是否小于整数2 [root@localhost ~]# [ 22 -lt 22 ] && echo yes || echo no no [root@localhost ~]# [ 21 -lt 22 ] && echo yes || echo no yes
字符串判断
测试选项
作 用
-z 字符串
判断字符串是否为空(为空返回真)
-n 字符串
判断字符串是否为非空(非空返回真)
字串 1 ==字串 2
判断字符串 1 是否和字符串 2 相等(相等返回真)
字串 1 != 字串 2
判断字符串 1 是否和字符串 2 不相等(不相等返回真)
1
2
3
4
5
6
7
8
9
10
11
12
13
##判断两个字符串相等 [root@localhost ~]# aa=11 [root@localhost ~]# bb=22 [root@localhost ~]# [ "$aa" == 8 ] && echo yes || echo no no [root@localhost ~]# [ $aa == $bb ] && echo yes || echo no no [root@localhost ~]# [ "$aa" == 11 ] && echo yes || echo no yes ##判断字符是否为空 [root@localhost ~]# name=xx [root@localhost ~]# [ -z $name ] && echo yes || echo no no
多重条件判断
测试选项
作 用
判断 1 -a 判断 2
逻辑与,判断 1 和判断 2 都成立,最终的结果才为真
判断 1 -o 判断 2
逻辑或,判断 1 和判断 2 有一个成立,最终的结果就为真
!判断
逻辑非,使原始的判断式取反
1
2
3
4
5
#先给aa赋值 [root@localhost ~]# aa=24 #-n先判断是否为空,明显不为空则为真,真就继续判断是否大于23 [root@localhost ~]# [ -n "$aa" -a "$aa" -gt 23 ] && echo yes || echo no yes
1
2
3
4
5
6
##逻辑非 [root@localhost ~]# [ ! -n "$aa" ] && echo "yes" || echo "no" no #本来“-n”选项是变量 aa 不为空,返回值就是真。 #加入!之后,判断值就会取反,所以当变量 aa 有值时,返回值是假
流程控制
if条件判断
单分支 if 条件语句
单分支条件语句最为简单,就是只有一个判断条件,如果符合条件则执行某个程序,否则什么事情都不做。语法如下:
1
2
3
if [ 条件判断式 ];then 程序 fi
单分支条件语句需要注意几个点:
·if 语句使用 fi 结尾,和一般语言使用大括号结尾不同
· [ 条件判断式 ]就是使用 test 命令判断,所以中括号和条件判断式之间必须有空格
· then 后面跟符合条件之后执行的程序,可以放在[]之后,用“;”分割。也可以换行写入,就不需要“;”了,比如单分支 if 语句还可以这样写:
1
2
3
4
if [ 条件判断式 ] then 程序 fi
例子:判断sda1并设置警告信息
1
2
3
4
5
6
7
8
9
10
11
12
13
14
15
16
17
18
19
20
21
[root@localhost ~]# df -h Filesystem Size Used Avail Use% Mounted on /dev/sda1 1014M 141M 874M 14% /boot [root@localhost ~]# df -h | grep "/dev/sda1" | awk '{print $5}' | cut -d "%" -f 1 14 [root@localhost ~]# vi if1.sh #!/bin/bash #统计分区使用率 rate=$(df -h | grep "/dev/sda1" | awk '{print $5}'| cut -d "%" -f 1) #把根分区使用率作为变量值赋予变量rate if [ $rate -ge 14 ] #判断 rate 的值如果大于等于 14,则执行then 程序 then echo "Warning! /dev/sda1 快满了!" #打印警告信息。在实际工作中,也可以向管理员发送邮件。 fi [root@localhost ~]# sh if1.sh Warning! /dev/sda1 快满了!
双分支if语句
1
2
3
4
5
6
if [ 条件判断式 ] then 条件成立时,执行的程序 else 条件不成立时,执行的另一个程序 fi
数据备份的例子
1
2
3
4
5
6
7
8
9
10
11
12
13
14
15
16
17
18
19
20
21
22
23
24
25
26
27
28
29
30
31
32
33
34
35
36
#备份mysql数据库(并不完善,但可以使用) [root@localhost ~]# vi sh/bakmysql.sh #!/bin/bash #备份 mysql 数据库。 #同步系统时间 ntpdate asia.pool.ntp.org &>/dev/null #把当前系统时间按照“年月日”格式赋予变量date date=$(date +%y%m%d) #统计 mysql 数据库的大小,并把大小赋予size 变量 size=$(du -sh /var/lib/mysql) if [ -d /tmp/dbbak ] #判断备份目录是否存在,是否为目录 then #如果判断为真,执行以下脚本 echo "Date : $date!" > /tmp/dbbak/dbinfo.txt #把当前日期写入临时文件 echo "Data size : $size" >> /tmp/dbbak/dbinfo.txt #把数据库大小写入临时文件 cd /tmp/dbbak #进入备份目录 tar -zcf mysql-lib-$date.tar.gz /var/lib/mysql dbinfo.txt &>/dev/null #打包压缩数据库与临时文件,把所有输出丢入垃圾箱(不想看到任何输出) rm -rf /tmp/dbbak/dbinfo.txt #删除临时文件 else mkdir /tmp/dbbak #如果判断为假,则建立备份目录 echo "Date : $date!" > /tmp/dbbak/dbinfo.txt echo "Data size : $size" >> /tmp/dbbak/dbinfo.txt #把日期和数据库大小保存如临时文件 cd /tmp/dbbak tar -zcf mysql-lib-$date.tar.gz dbinfo.txt /var/lib/mysql &>/dev/null #压缩备份数据库与临时文件 rm -rf /tmp/dbbak/dbinfo.txt #删除临时文件 fi
常用字符表
echo
在 echo 命令中如果使用了“-e”选项,则可以支持控制字符,如表 11-2 所示:
控制字符
作 用
\
输出\本身
\a
输出警告音
\b
退格键,也就是向左删除键
\c
取消输出行末的换行符。和“-n”选项一致
\e
ESCAPE 键
\f
换页符
\n
换行符
\r
回车键
\t
制表符,也就是 Tab 键
\v
垂直制表符
\0nnn
按照八进制 ASCII 码表输出字符。其中 0 为数字零,nnn 是三位八进制数
\xhh
按照十六进制 ASCII 码表输出字符。其中 hh 是两位十六进制数
Bash常用快捷键
快捷键
作 用
ctrl+A
把光标移动到命令行开头。如果我们输入的命令过长,想要把光标移动到命令行开头时使用。
ctrl+E
把光标移动到命令行结尾。
ctrl+C 强制终止当前的命令。
ctrl+L 清屏,相当于 clear 命令。
ctrl+U 删除或剪切光标之前的命令。我输入了一行很长的命令,不用使用退格键一个一个字符的删除,使用这个快捷键会更加方便
ctrl+K
删除或剪切光标之后的内容。
ctrl+Y 粘贴 ctrl+U 或 ctrl+K 剪切的内容。
ctrl+R 在历史命令中搜索,按下ctrl+R 之后,就会出现搜索界面,只要输入搜索内容,就会从历史命令中搜索。
ctrl+D 退出当前终端。
ctrl+Z
暂停,并放入后台。这个快捷键牵扯工作管理的内容,我们在系统管理章节详细介绍。
ctrl+S
暂停屏幕输出。
ctrl+Q
恢复屏幕输出。
基础正则表达式
元字符
作 用
*
前一个字符匹配 0 次或任意多次。
.
匹配除了换行符外任意一个字符。
^
匹配行首。例如:^hello 会匹配以 hello 开头的行。
$
匹配行尾。例如:hello&会匹配以 hello 结尾的行。
[]
匹配中括号中指定的任意一个字符,只匹配一个字符。例如:[aoeiu] 匹配任意一个元音字母,[0-9] 匹配任意一位数字,[a-z][0-9]匹配小写字和一位数字构成的两位字符。
[^]
匹配除中括号的字符以外的任意一个字符。例如:[^0-9] 匹配任意一位非数字字符,[^a-z] 表示任意一位非小写字母。
\
转义符。用于取消讲特殊符号的含义取消。
{n}
表示其前面的字符恰好出现 n 次。例如:[0-9]{4} 匹配 4 位数字,[1][3-8][0-9]{9} 匹配手机号码。
{n,}
表示其前面的字符出现不小于 n 次。例如: [0-9]{2,} 表示两位及以上的数字。
{n,m}
表示其前面的字符至少出现n 次,最多出现m 次。例如:[a-z]{6,8}匹配 6 到 8 位的小写字母。
扩展正则
扩展元字符
作 用
+
前一个字符匹配 1 次或任意多次。如“go+gle”会匹配“gogle”、“google”或“gooogle”,当然如果“o”有更多个,也能匹配。
?
前一个字符匹配 0 次或 1 次。如“colou?r”可以匹配“colour”或“color”。
|
匹配两个或多个分支选择。如“was|his”会匹配既包含“was”的行,也匹配包含“his”的行。
()
匹配其整体为一个字符,即模式单元。可以理解为由多个单个字符组成的大字符。
grep 参数列表
-i : 忽略大小写-v : 查找不包含指定字符串的所有行(取反)-r : 递归查找文件夹下的文件-n : 显示匹配行所在位置(行号)-l : 只显示包含搜索字符串的文件名,而非每个匹配行-c : 统计符合条件的行数-e pattern : 指定要查找的正则表达式模式-w : 匹配整个单词,即只匹配独立的单词而非单词内的字符-A num : 输出匹配行后 N 行内容-B num : 输出匹配行前 N 行内容-C[num] 或者 --context[=num]: 输出匹配行前后总共 N 行内容。--exclude : 排除指定文件类型,多个文件类型用 “,” 隔开
cut
1
2
3
4
[root@localhost ~]# cut [选项] 文件名选项: -f 列号: 提取第几列 -d 分隔符: 按照指定分隔符分割列 -c 字符范围: 不依赖分隔符来区分列,而是通过字符范围(行首为 0)来进行字段提取。“n-”表示从第 n 个字符到行尾;“n-m”从第 n 个字符到第 m个字符;“-m”表示从第 1 个字符到第 m 个字符。
awk条件(Pattern)
awk内置变量
千屹博客旗下的所有文章,是通过本人课堂学习和课外自学所精心整理的知识巨著

 微信
微信 支付宝
支付宝