运维必备工具安装
系统测试:OpenEuler24.03LTS,Centos 8 stream
理论上不限制系统,其他系统可对一些命令自行做修改即可
Nginx(RPM安装)
资料来源:Nginx入门笔记 | 严千屹博客
官方文档:nginx:Linux 软件包
截止2025年4月20日目前:nginx最新版本:1.26.3
centos7或centos8
1
2
3
4
5
6
7
8
9
10
11
12
13
14
15
16
17
18
19
20
21
22
23
sudo yum install -y tar gcc make pcre pcre-devel zlib zlib-devel openssl openssl-develsudo yum install yum-utils -ysudo cat >/etc/yum.repos.d/nginx.repo << "EOF" [nginx-stable] name=nginx stable repo baseurl=http://nginx.org/packages/centos/$releasever /$basearch / gpgcheck=1 enabled=1 gpgkey=https://nginx.org/keys/nginx_signing.key module_hotfixes=true [nginx-mainline] name=nginx mainline repo baseurl=http://nginx.org/packages/mainline/centos/$releasever /$basearch / gpgcheck=1 enabled=0 gpgkey=https://nginx.org/keys/nginx_signing.key module_hotfixes=true EOF sudo yum install nginx -ysudo systemctl enable nginx --nownginx -v
因为没有适配openeuler的版本,这里直接用centos8的来代替,兼容的没关系,你可以根据你的系统去自行替换
原本是$releasever的,但是没有openeuler的版本直接用8来代替也就是centos8,openeuler兼容centos
1
2
3
4
5
6
7
8
9
10
11
12
13
14
15
16
17
18
19
20
21
22
sudo yum install -y tar gcc make pcre pcre-devel zlib zlib-devel openssl openssl-develsudo cat >/etc/yum.repos.d/nginx.repo << "EOF" [nginx-stable] name=nginx stable repo baseurl=http://nginx.org/packages/centos/8/$basearch / gpgcheck=1 enabled=1 gpgkey=https://nginx.org/keys/nginx_signing.key module_hotfixes=true [nginx-mainline] name=nginx mainline repo baseurl=http://nginx.org/packages/mainline/centos/8/$basearch / gpgcheck=1 enabled=0 gpgkey=https://nginx.org/keys/nginx_signing.key module_hotfixes=true EOF sudo yum install nginx -ysudo systemctl enable nginx --nownginx -v
Docker
截止2025年4月20日目前:
docker-compose最新版2.35.1 版
docker-ce最新版:Docker 文档 26.1.3
centos7或centos8
1
2
3
4
5
6
7
8
9
10
11
12
13
14
15
16
17
18
19
20
21
22
23
24
25
26
27
28
29
30
31
32
33
34
35
36
37
38
39
40
41
42
43
44
45
46
47
48
49
50
sudo curl -L "https://qygit.qianyisky.cn/https://github.com/docker/compose/releases/download/v2.35.1/docker-compose-linux-x86_64" -o /usr/local/bin/docker-composesudo yum -y remove docker \ docker-client \ docker-client-latest \ docker-common \ docker-latest \ docker-latest-logrotate \ docker-logrotate \ docker-selinux \ docker-engine-selinux \ docker-engine sudo yum remove docker-ce docker-ce-cli containerd.io docker-compose docker-machine docker-swarm -ysudo rm /etc/yum.repos.d/docker-ce.reposudo rm -rf /var/lib/dockersudo yum install -y yum-utils device-mapper-persistent-data lvm2sudo yum-config-manager --add-repo https://mirrors.aliyun.com/docker-ce/linux/centos/docker-ce.reposudo yum install docker-ce -ysudo systemctl enable --now dockersudo chmod +x /usr/local/bin/docker-composesudo tee /etc/docker/daemon.json > /dev/null <<'EOF' { "registry-mirrors" : [ "https://docker.xuanyuan.me" , "https://docker.m.daocloud.io" , "https://docker.1ms.run" , "https://run-docker.cn" , "https://docker.sunzishaokao.com" , "https://docker.1panel.live" , "https://registry.cn-hangzhou.aliyuncs.com" , "https://docker.qianyios.top" , "https://registry.aliyuncs.com" , "https://ghcr.nju.edu.cn" , "https://k8s.nju.edu.cn" ], "max-concurrent-downloads" : 10, "log-driver" : "json-file" , "log-level" : "warn" , "log-opts" : { "max-size" : "10m" , "max-file" : "3" }, "data-root" : "/var/lib/docker" } EOF systemctl daemon-reload systemctl restart docker docker-compose --version docker version
openeuler
1
2
3
4
5
6
7
8
9
10
11
12
13
14
15
16
17
18
19
20
21
22
23
24
25
26
27
28
29
30
31
32
33
34
35
36
37
38
39
40
41
42
43
44
45
46
47
48
49
50
51
sudo curl -L "https://qygit.qianyisky.cn/https://github.com/docker/compose/releases/download/v2.35.1/docker-compose-linux-x86_64" -o /usr/local/bin/docker-composesudo yum -y remove docker \ docker-client \ docker-client-latest \ docker-common \ docker-latest \ docker-latest-logrotate \ docker-logrotate \ docker-selinux \ docker-engine-selinux \ docker-engine sudo yum remove docker-ce docker-ce-cli containerd.io docker-compose docker-machine docker-swarm -ysudo rm /etc/yum.repos.d/docker-ce.reposudo rm -rf /var/lib/dockersudo yum install -y device-mapper-persistent-data lvm2sudo yum-config-manager --add-repo https://download.docker.com/linux/centos/docker-ce.reposudo sed -i 's/\$releasever/8/g' /etc/yum.repos.d/docker-ce.reposudo yum install docker-ce docker-ce-cli containerd.io -ysudo systemctl enable --now dockersudo chmod +x /usr/local/bin/docker-composesudo tee /etc/docker/daemon.json > /dev/null <<'EOF' { "registry-mirrors" : [ "https://docker.xuanyuan.me" , "https://docker.m.daocloud.io" , "https://docker.1ms.run" , "https://run-docker.cn" , "https://docker.sunzishaokao.com" , "https://docker.1panel.live" , "https://registry.cn-hangzhou.aliyuncs.com" , "https://docker.qianyios.top" , "https://registry.aliyuncs.com" , "https://ghcr.nju.edu.cn" , "https://k8s.nju.edu.cn" ], "max-concurrent-downloads" : 10, "log-driver" : "json-file" , "log-level" : "warn" , "log-opts" : { "max-size" : "10m" , "max-file" : "3" }, "data-root" : "/var/lib/docker" } EOF systemctl daemon-reload systemctl restart docker docker-compose --version docker version
PHP(RPM)
截止2025年4月20日目前:PHP最新版8.4.6
centos 8 stream
默认安装最新版8.3.19
1
2
3
4
yum update -y yum install yum-utils -y rpm -ivh https://dl.fedoraproject.org/pub/epel/epel-release-latest-8.noarch.rpm yum install -y php php-fpm php-cli php-common php-devel php-gd php-pdo php-mbstring php-bcmath php-xml php-process php-intl php-soap php-ldap php-opcache
openeuler24.03lts
欧拉系统有自己的仓库,默认安装最新版8.3.19
1
2
3
yum update -y yum install -y php php-fpm php-cli php-common php-devel php-gd php-pdo php-mbstring php-bcmath php-xml php-process php-intl php-soap php-ldap php-opcache php -v
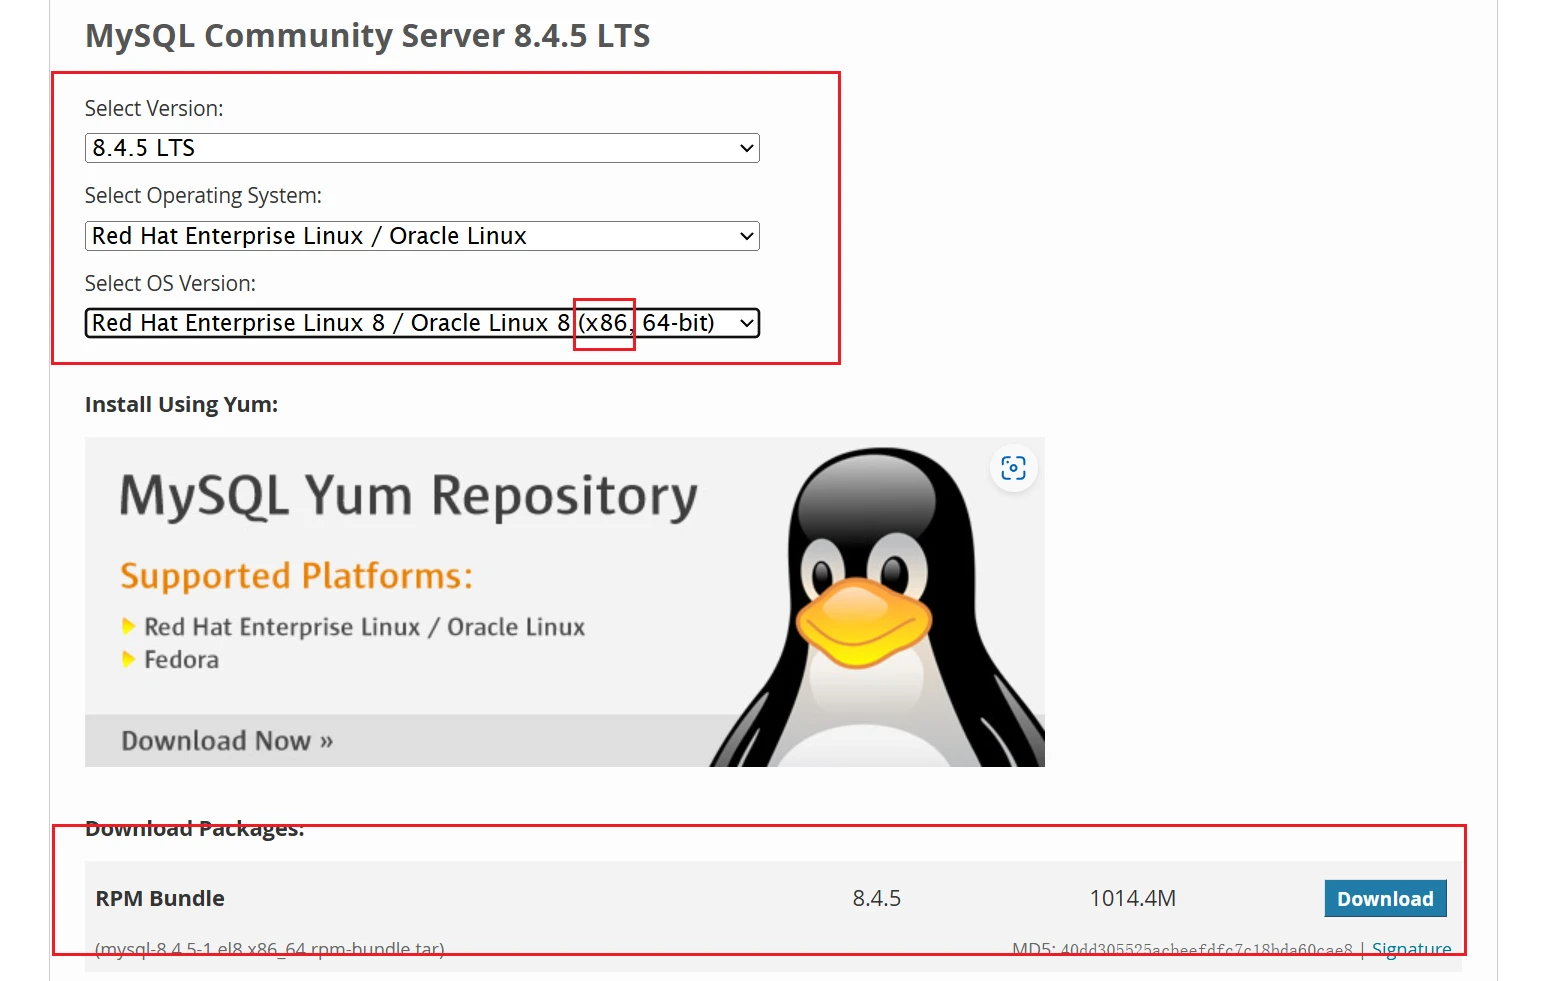
Mysql LTS
截止2025年4月20日目前:Mysql LTS最新版8.4.5
资料来源:Linux安装Mysql8.4.2 LTS | 严千屹博客
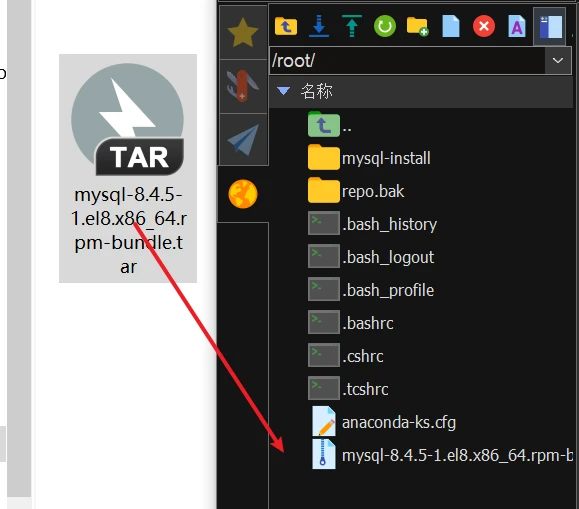
这是在root目录下,自行去到root目录,你也可以自己定义路径
注意:如果需要搭载php使用,需要安装php7.2,因为rpm -ivh mysql-community-libs-compat是php的依赖。;如果不安装php,则无需安装php7.2的依赖。
这里就演示需要php,版本7.2以上,安装教程
centos 8 stream,openeuler
1
2
3
4
5
6
7
8
9
10
11
12
13
14
15
16
17
18
19
20
21
22
23
24
25
26
mkdir mysql-installtar -xvf mysql-8.4*.rpm-bundle.tar -C mysql-install cd mysql-installyum remove mariadb mariadb-config mariadb-libs -y yum remove mysql-community-common mysql-community-icu-data-files mysql-community-client-plugins mysql-community-libs mysql-community-client mysql-community-server mysql-community-libs-compat -y rpm -ivh mysql-community-common-8.4.5-1.el8.x86_64.rpm rpm -ivh mysql-community-icu-data-files-8.4.5-1.el8.x86_64.rpm rpm -ivh mysql-community-client-plugins-8.4.5-1.el8.x86_64.rpm rpm -ivh mysql-community-libs-8.4.5-1.el8.x86_64.rpm rpm -ivh mysql-community-client-8.4.5-1.el8.x86_64.rpm rpm -ivh mysql-community-server-8.4.5-1.el8.x86_64.rpm rpm -ivh mysql-community-libs-compat-8.4.5-1.el8.x86_64.rpm systemctl enable mysqld --now mysqlpasswd=$(awk '/temporary password/ {print $NF}' /var/log/mysqld.log) mysql -u root -p"$mysqlpasswd " ALTER USER 'root' @'localhost' IDENTIFIED BY 'Qianyios@007' ; FLUSH PRIVILEGES; exit mysql -uroot -pQianyios@007
例子1:可以设置123456为密码
1
2
3
4
5
6
7
8
9
mysql -uroot -pQianyios@007 ALTER USER 'root' @'localhost' IDENTIFIED BY 'Qianyios@007' ; SHOW VARIABLES LIKE 'validate_password%' ; SET GLOBAL validate_password.policy = LOW; SET GLOBAL validate_password.length = 6; ALTER USER 'root' @'localhost' IDENTIFIED BY '123456' ; FLUSH PRIVILEGES; exit mysql -uroot -p123456
containerd
centos
1
2
3
4
5
6
7
8
9
10
11
12
13
14
15
16
17
18
19
20
21
22
23
24
25
26
27
28
29
30
31
32
33
34
35
36
37
38
39
40
41
42
43
44
45
46
47
48
49
50
51
52
53
54
55
56
57
58
59
60
61
62
63
64
65
66
67
68
69
70
71
72
73
74
75
76
77
78
79
80
81
82
83
84
85
86
87
88
89
90
91
92
93
94
95
96
97
98
99
100
101
102
103
104
105
106
107
108
109
110
111
112
113
114
115
116
117
118
119
120
121
122
123
124
125
126
127
128
129
130
131
132
133
134
#!/usr/bin/env bash sudo yum install -y yum-utilssudo yum-config-manager --add-repo https://mirrors.aliyun.com/docker-ce/linux/centos/docker-ce.reposudo yum clean all && yum makecachesudo yum install -y containerd.iosudo mkdir -p /etc/containerd/certs.d/docker.iosudo mkdir -p /etc/containerd/certs.d/registry-1.docker.iosudo mkdir -p /etc/containerd/certs.d/registry.k8s.iosudo mkdir -p /etc/containerd/certs.d/k8s.gcr.iosudo mkdir -p /etc/containerd/certs.d/ghcr.iosudo mkdir -p /etc/containerd/certs.d/gcr.iosudo mkdir -p /etc/containerd/certs.d/quay.iosudo tee /etc/containerd/certs.d/docker.io/hosts.toml > /dev/null <<'EOF' server = "https://docker.io" [host."https://registry.cn-hangzhou.aliyuncs.com/" ] capabilities = ["pull" , "resolve" ] [host."https://docker.xuanyuan.me" ] capabilities = ["pull" , "resolve" ] [host."https://docker.m.daocloud.io" ] capabilities = ["pull" , "resolve" ] [host."https://docker.1ms.run" ] capabilities = ["pull" , "resolve" ] [host."https://docker.1panel.live" ] capabilities = ["pull" , "resolve" ] [host."https://docker.qianyios.top/" ] capabilities = ["pull" , "resolve" ] [host."https://reg-mirror.giniu.com" ] capabilities = ["pull" , "resolve" ] EOF sudo tee /etc/containerd/certs.d/registry-1.docker.io/hosts.toml > /dev/null <<'EOF' server = "https://registry-1.docker.io" [host."https://registry.cn-hangzhou.aliyuncs.com/" ] capabilities = ["pull" , "resolve" ] [host."https://docker.xuanyuan.me" ] capabilities = ["pull" , "resolve" ] [host."https://docker.m.daocloud.io" ] capabilities = ["pull" , "resolve" ] [host."https://docker.1ms.run" ] capabilities = ["pull" , "resolve" ] [host."https://docker.1panel.live" ] capabilities = ["pull" , "resolve" ] [host."https://docker.qianyios.top/" ] capabilities = ["pull" , "resolve" ] [host."https://reg-mirror.giniu.com" ] capabilities = ["pull" , "resolve" ] EOF sudo tee /etc/containerd/certs.d/k8s.gcr.io/hosts.toml > /dev/null <<'EOF' server = "https://k8s.gcr.io" [host."https://registry.aliyuncs.com/google_containers" ] capabilities = ["pull" , "resolve" ] EOF sudo tee /etc/containerd/certs.d/ghcr.io/hosts.toml > /dev/null <<'EOF' server = "https://ghcr.io" [host."https://ghcr.m.daocloud.io/" ] capabilities = ["pull" , "resolve" ] EOF sudo tee /etc/containerd/certs.d/gcr.io/hosts.toml > /dev/null <<'EOF' server = "https://gcr.io" [host."https://gcr.m.daocloud.io/" ] capabilities = ["pull" , "resolve" ] EOF sudo tee /etc/containerd/certs.d/registry.k8s.io/hosts.toml > /dev/null <<'EOF' server = "registry.k8s.io" [host."k8s.m.daocloud.io" ] capabilities = ["pull" , "resolve" , "push" ] [host."https://registry.aliyuncs.com/v2/google_containers" ] capabilities = ["pull" , "resolve" ] EOF sudo tee /etc/containerd/certs.d/quay.io/hosts.toml > /dev/null <<'EOF' server = "https://quay.io" [host."https://quay.tencentcloudcr.com/" ] capabilities = ["pull" , "resolve" ] EOF cat > /etc/modules-load.d/containerd.conf <<'EOF' overlay br_netfilter EOF modprobe -- overlay modprobe -- br_netfilter cat > /etc/sysctl.d/99-kubernetes.conf <<'EOF' net.bridge.bridge-nf-call-iptables = 1 net.bridge.bridge-nf-call-ip6tables = 1 net.ipv4.ip_forward = 1 EOF sysctl --system sudo sh -c 'containerd config default > /etc/containerd/config.toml' sudo sed -i 's#sandbox_image = "registry.k8s.io/pause:.*"#sandbox_image = "registry.aliyuncs.com/google_containers/pause:3.10"#' /etc/containerd/config.tomlsudo sed -i 's/SystemdCgroup = false/SystemdCgroup = true/g' /etc/containerd/config.tomlsed -i '/\[plugins\."io\.containerd\.grpc\.v1\.cri"\.registry\]/!b;n;s/config_path = ""/config_path = "\/etc\/containerd\/certs.d"/' /etc/containerd/config.toml sudo systemctl daemon-reloadsudo systemctl restart containerd.servicecat > /etc/crictl.yaml <<'EOF' runtime-endpoint: unix:///run/containerd/containerd.sock image-endpoint: unix:///run/containerd/containerd.sock timeout : 10debug: false EOF sudo ctr image ls
ubuntu
1 2 3 4 5 6 7 8 9 10 11 12 13 14 15 16 17 18 19 20 21 22 23 24 25 26 27 28 29 30 31 32 33 34 35 36 37 38 39 40 41 42 43 44 45 46 47 48 49 50 51 52 53 54 55 56 57 58 59 60 61 62 63 64 65 66 67 68 69 70 71 72 73 74 75 76 77 78 79 80 81 82 83 84 85 86 87 88 89 90 91 92 93 94 95 96 97 98 99 100 101 102 103 104 105 106 107 108 109 110 111 112 113 114 115 116 117 118 119 120 121 122 123 124 125 126 127 128 129 130 131 132 133 134 135 136 137 138 139 140 141 142 sudo apt-get updatesudo apt-get install -y ca-certificates curl gnupg lsb-releasesudo install -m 0755 -d /etc/apt/keyringscurl -fsSL https://mirrors.aliyun.com/docker-ce/linux/ubuntu/gpg | sudo gpg --dearmor -o /etc/apt/keyrings/docker.gpg sudo chmod a+r /etc/apt/keyrings/docker.gpgecho \ "deb [arch=$(dpkg --print-architecture) signed-by=/etc/apt/keyrings/docker.gpg] https://mirrors.aliyun.com/docker-ce/linux/ubuntu \ $(lsb_release -cs) stable" | sudo tee /etc/apt/sources.list.d/docker.list > /dev/nullsudo apt-get updatesudo apt-get install -y containerd.iosudo mkdir -p /etc/containerd/certs.d/docker.iosudo mkdir -p /etc/containerd/certs.d/registry-1.docker.iosudo mkdir -p /etc/containerd/certs.d/registry.k8s.iosudo mkdir -p /etc/containerd/certs.d/k8s.gcr.iosudo mkdir -p /etc/containerd/certs.d/ghcr.iosudo mkdir -p /etc/containerd/certs.d/gcr.iosudo mkdir -p /etc/containerd/certs.d/quay.iosudo tee /etc/containerd/certs.d/docker.io/hosts.toml > /dev/null <<'EOF' server = "https://docker.io" [host."https://registry.cn-hangzhou.aliyuncs.com/" ] capabilities = ["pull" , "resolve" ] [host."https://docker.xuanyuan.me" ] capabilities = ["pull" , "resolve" ] [host."https://docker.m.daocloud.io" ] capabilities = ["pull" , "resolve" ] [host."https://docker.1ms.run" ] capabilities = ["pull" , "resolve" ] [host."https://docker.1panel.live" ] capabilities = ["pull" , "resolve" ] [host."https://docker.qianyios.top/" ] capabilities = ["pull" , "resolve" ] [host."https://reg-mirror.giniu.com" ] capabilities = ["pull" , "resolve" ] EOF sudo tee /etc/containerd/certs.d/registry-1.docker.io/hosts.toml > /dev/null <<'EOF' server = "https://registry-1.docker.io" [host."https://registry.cn-hangzhou.aliyuncs.com/" ] capabilities = ["pull" , "resolve" ] [host."https://docker.xuanyuan.me" ] capabilities = ["pull" , "resolve" ] [host."https://docker.m.daocloud.io" ] capabilities = ["pull" , "resolve" ] [host."https://docker.1ms.run" ] capabilities = ["pull" , "resolve" ] [host."https://docker.1panel.live" ] capabilities = ["pull" , "resolve" ] [host."https://docker.qianyios.top/" ] capabilities = ["pull" , "resolve" ] [host."https://reg-mirror.giniu.com" ] capabilities = ["pull" , "resolve" ] EOF sudo tee /etc/containerd/certs.d/k8s.gcr.io/hosts.toml > /dev/null <<'EOF' server = "https://k8s.gcr.io" [host."https://registry.aliyuncs.com/google_containers" ] capabilities = ["pull" , "resolve" ] EOF sudo tee /etc/containerd/certs.d/ghcr.io/hosts.toml > /dev/null <<'EOF' server = "https://ghcr.io" [host."https://ghcr.m.daocloud.io/" ] capabilities = ["pull" , "resolve" ] EOF sudo tee /etc/containerd/certs.d/gcr.io/hosts.toml > /dev/null <<'EOF' server = "https://gcr.io" [host."https://gcr.m.daocloud.io/" ] capabilities = ["pull" , "resolve" ] EOF sudo tee /etc/containerd/certs.d/registry.k8s.io/hosts.toml > /dev/null <<'EOF' server = "registry.k8s.io" [host."k8s.m.daocloud.io" ] capabilities = ["pull" , "resolve" , "push" ] [host."https://registry.aliyuncs.com/v2/google_containers" ] capabilities = ["pull" , "resolve" ] EOF sudo tee /etc/containerd/certs.d/quay.io/hosts.toml > /dev/null <<'EOF' server = "https://quay.io" [host."https://quay.tencentcloudcr.com/" ] capabilities = ["pull" , "resolve" ] EOF cat > /etc/modules-load.d/containerd.conf <<'EOF' overlay br_netfilter EOF modprobe -- overlay modprobe -- br_netfilter cat > /etc/sysctl.d/99-kubernetes.conf <<'EOF' net.bridge.bridge-nf-call-iptables = 1 net.bridge.bridge-nf-call-ip6tables = 1 net.ipv4.ip_forward = 1 EOF sysctl --system sudo sh -c 'containerd config default > /etc/containerd/config.toml' sudo sed -i 's#sandbox_image = "registry.k8s.io/pause:.*"#sandbox_image = "registry.aliyuncs.com/google_containers/pause:3.10"#' /etc/containerd/config.tomlsudo sed -i 's/SystemdCgroup = false/SystemdCgroup = true/g' /etc/containerd/config.tomlsed -i '/\[plugins\."io\.containerd\.grpc\.v1\.cri"\.registry\]/!b;n;s/config_path = ""/config_path = "\/etc\/containerd\/certs.d"/' /etc/containerd/config.toml sudo systemctl daemon-reloadsudo systemctl restart containerd.servicecat > /etc/crictl.yaml <<'EOF' runtime-endpoint: unix:///run/containerd/containerd.sock image-endpoint: unix:///run/containerd/containerd.sock timeout : 10debug: false EOF sudo ctr image ls
系统更换Yum源办法
阿里网站:repo安装包下载_开源镜像站-阿里云 (aliyun.com)
Centos Stream 8
1
2
3
4
5
mkdir repo.bakmv /etc/yum.repos.d/* repo.bak/wget -O /etc/yum.repos.d/CentOS-Stream-AppStream.repo https://mirrors.aliyun.com/repo/centos-stream/8/CentOS-Stream-AppStream.repo wget -O /etc/yum.repos.d/CentOS-Stream-BaseOS.repo https://mirrors.aliyun.com/repo/centos-stream/8/CentOS-Stream-BaseOS.repo dnf clean all && dnf makecache
Centos 7
1
2
3
4
mkdir repo.bak mv /etc/yum.repos.d/* repo.bak/ wget -O /etc/yum.repos.d/Centos-7.repo https://mirrors.aliyun.com/repo/Centos-7.repo yum clean all && yum makecache
Centos 8
1
2
3
4
mkdir repo.bakmv /etc/yum.repos.d/* repo.bak/curl -o /etc/yum.repos.d/CentOS-Base.repo https://mirrors.aliyun.com/repo/Centos-vault-8.5.2111.repo yum clean all && yum makecache
Rocky 系列
1
2
3
4
5
6
7
8
sed -e 's|^mirrorlist=|#mirrorlist=|g' \ -e 's|^#baseurl=http://dl.rockylinux.org/$contentdir|baseurl=https://mirrors.aliyun.com/rockylinux|g' \ -e 's|^#baseurl=http://mirrors.rockylinux.org/$contentdir|baseurl=https://mirrors.aliyun.com/rockylinux|g' \ -i.bak \ /etc/yum.repos.d/Rocky-*.repo yum clean all && yum makecache
运维脚本(更新ing)
1
2
wget https://blog.qianyios.top/file/qy-yunwei.sh bash qy-yunwei.sh
千屹博客旗下的所有文章,是通过本人课堂学习和课外自学所精心整理的知识巨著


 微信
微信 支付宝
支付宝