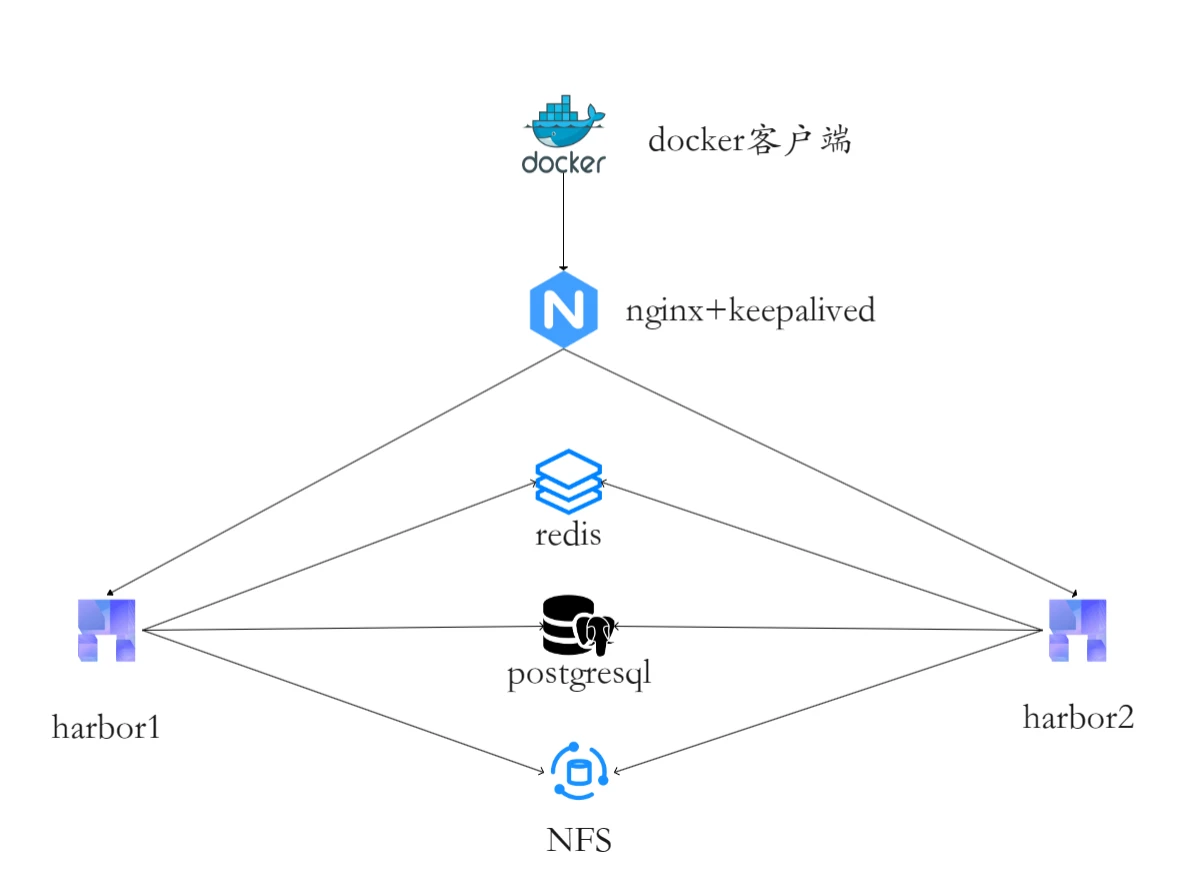
Harbor共享存储高可用 主机拓扑
角色
主机名
ip
系统
资源最低要求
Harbor1
harbor1
192.168.48.106
OpenEuler22.03LTS
CPU:4核
Harbor2
harbor2
192.168.48.107
OpenEuler22.03LTS
CPU:4核
postgresql
zujian
192.168.48.108
OpenEuler22.03LTS
CPU:4核
高可用ip
192.168.48.100
系统架构图
基本配置 操作节点:[harbor1,harbour2,zujian]
将以下脚本内容添加进去
1 2 3 4 5 6 7 8 9 10 11 12 13 14 15 16 17 18 19 20 21 22 23 24 25 26 27 28 29 30 31 32 33 34 35 36 37 38 39 40 41 42 43 44 45 46 47 48 49 50 51 52 53 54 55 56 57 58 59 60 61 62 63 64 65 66 67 68 69 70 71 72 73 74 75 76 77 78 79 80 81 82 83 84 85 86 87 88 89 90 91 92 93 94 95 96 97 if [ $# -eq 2 ];then"设置主机名为:$1 " "ens160设置IP地址为:192.168.48.$2 " else "使用方法:sh $0 主机名 主机位" "--------------------------------------" "1.正在设置主机名:$1 " $1 "2.正在关闭firewalld、dnsmasq、selinux" disable firewalld &> /dev/null disable dnsmasq &> /dev/null "s#SELINUX=enforcing#SELINUX=disabled#g" /etc/selinux/config "3.正在设置ens160:192.168.48.$2 " TYPE =EthernetPROXY_METHOD =noneBROWSER_ONLY =no BOOTPROTO =staticDEFROUTE =yes IPV4_FAILURE_FATAL =no IPV6INIT =yes IPV6_AUTOCONF =yes IPV6_DEFROUTE =yes IPV6_FAILURE_FATAL =no NAME =ens160UUID =53b402ff-5865-47dd-a853-7afcd6521738DEVICE =ens160ONBOOT =yes IPADDR =192.168.48.$2GATEWAY =192.168.48.2PREFIX =24DNS1 =192.168.48.2DNS2 =114.114.114.114"4.优化ssh" "s#\#UseDNS yes#UseDNS no#g" /etc/ssh/sshd_config"s#GSSAPIAuthentication yes#GSSAPIAuthentication no#g" /etc/ssh/sshd_config"5.更改欧拉源为华为云源,速度快一点" 's/\$basearch/x86_64/g' /etc/yum.repos.d/openEuler.repo's/repo.openeuler.org/mirrors.huaweicloud.com\/openeuler/g' /etc/yum.repos.d/openEuler.repo"6.更新yum源软件包缓存" "7.修改history格式及记录数" "s#HISTSIZE=1000##g" /etc/profile /profile <<EOFUSER_IP =`who -u am i 2>/dev/null | awk '{print $NF}' |sed -e 's/[()]//g' `export HISTFILE =~/.commandline_warriorexport HISTTIMEFORMAT ="%Y-%m-%d %H:%M:%S `whoami`@${USER_IP} : " export HISTSIZE =200000export HISTFILESIZE =1000000export PROMPT_COMMAND ="history -a" /profile "8.添加hosts解析" "10.安装chrony服务,并同步时间" enable chronyd"11、安装依赖包"
1 2 3 4 5 6 7 执行脚本命令格式:sh jichu_init.sh 主机名 主机位sh jichu_init.sh harbor1 106 sh jichu_init.sh harbor2 107 sh jichu_init.sh zujian 108
配置ssh免密
操作节点:[harbor1,harbour2,zujian]
1
2
3
4
5
6
7
8
9
10
11
12
13
14
15
16
17
18
19
20
21
22
dnf install -y sshpass cat > sshmianmi.sh << "EOF" "harbor1" "harbor2" "zujian" )"Lj201840." "" -f ~/.ssh/id_rsafor host in "${hosts[@]} " do "$password " ssh-copy-id -o StrictHostKeyChecking=no "$host " "$password " ssh -o StrictHostKeyChecking=no "$host " "echo '免密登录成功'" done
安装高可用组件 操作节点:[harbor1,harbour2]
1 dnf install -y keepalived nginx
安装nginx 操作节点:[harbor1,harbour2]
1
2
3
4
5
6
7
8
9
10
11
12
13
14
15
16
17
18
19
20
21
22
23
24
25
26
27
28
29
30
31
32
33
34
35
36
37
38
39
40
41
42
43
44
cat > /etc/nginx/nginx.conf <<"EOF" worker_processes auto;error_log /var/log/nginx/error .log notice ;pid /run/nginx.pid;include /usr/share/nginx/modules/*.conf ;events {worker_connections 1024 ;stream {log_format main '$remote_addr $upstream_addr - [$time_local ] $status $upstream_bytes_sent ' ;access_log /var/log/nginx/harbor-access.log main;upstream harbor{server 192.168.48.106:8081 ; server 192.168.48.107:8081 ; server {listen 80 ;proxy_pass harbor;http {log_format main '$remote_addr - $remote_user [$time_local ] "$request " ' '$status $body_bytes_sent "$http_referer " ' '"$http_user_agent " "$http_x_forwarded_for "' ;access_log /var/log/nginx/access.log main;sendfile on ;tcp_nopush on ;keepalive_timeout 65 ;types_hash_max_size 4096 ;include /etc/nginx/mime.types;default_type application/octet-stream;include /etc/nginx/conf.d/*.conf ;server {listen 8888 default_server;server_name _;location / {EOF
安装安装keepalived 操作节点:[harbor1]
1
2
3
4
5
6
7
8
9
10
11
12
13
14
15
16
17
18
19
20
21
22
23
24
25
26
27
28
29
30
31
32
33
34
35
cat >/ etc/ keepalived/ keepalived.conf << "EOF" ! Configuration File for keepalivedglobal_defs {notification_email {@ qq.comzh {interface ens160192.168 .48 .106 107 100 1 authentication {1111 virtual_ipaddress {192.168 .48 .100 / 24 track_script {chk_nginx {"/etc/keepalived/check_nginx.sh" 2 -20
操作节点:[harbor2]
1
2
3
4
5
6
7
8
9
10
11
12
13
14
15
16
17
18
19
20
21
22
23
24
25
26
27
28
29
30
31
32
33
34
35
cat >/ etc/ keepalived/ keepalived.conf << "EOF" ! Configuration File for keepalivedglobal_defs {notification_email {@ qq.comzh {interface ens160192.168 .48 .107 107 99 1 authentication {1111 virtual_ipaddress {192.168 .48 .100 / 24 track_script {chk_nginx {"/etc/keepalived/check_nginx.sh" 2 -20
配置检查脚本
操作节点:[harbor1,harbour2]
1
2
3
4
5
6
7
8
9
10
11
12
13
cat >/etc/keepalived/check_nginx.sh <<"EOF" wc -l`if [ $counter -eq 0 ]; then sleep 2wc -l`if [ $counter -eq 0 ]; then fi fi
启动服务
1
2
3
systemctl start nginx keepalivedstart keepalived
查看VIP虚拟ip
1
2
3
4
5
6
7
8
9
10
11
[root@harbor1 ~]2 : ens160: <BROADCAST,MULTICAST,UP,LOWER_UP> mtu 1500 qdisc mq state UP group default qlen 1000 00 :0 c:29 :af:76 :8 c brd ff:ff:ff:ff:ff:ffinet 192.168 .48.106 /24 brd 192.168 .48.255 scope global noprefixroute ens160inet 192.168 .48.100 /24 scope global secondary ens160 inet6 fe80::20 c:29 ff:feaf:768 c/64 scope link noprefixroute
安装postgresql 操作节点:[zujian]
安装 1 2 3 4 5 6 7 8 9 10 11 12 13 14 15 16 17 18 19 20 21 22 23 24 25 26 27 28 29 30 31 32 33 34 35 36 37 38 39 40 41 42 43 44 45 46 47 48 49 50 51 52 53 54 55 56 57 58 59 60 61 62 63 64 65 66 67 68 69 70 71 72 73 74 75 76 77 78 79 80 81 82 // ftp.postgresql.org/pub/ source/v16.2/ postgresql-16.2 .tar.gz16.2 .tar.gz -C /usr/ local/bin/ /usr/ local/bin/ postgresql-16.2 //configure --prefix=/u sr/local/ postgresql/data/ postgresql/data/data/ postgresql/log/data/ postgresql/tmp/usr/ local/postgresql/ /data/ postgresql"EOF" >> ~/.bash_profile/usr/ local/postgresql/data/ postgresql/data$PATH :$HOME /bin:$HOME/ .local/bin:$PGHOME/ bin/data/ postgresql/data/data/ postgresql/data/ postgresql.conf << "EOF" 100 128 MB 1 GB80 MB'Asia/Shanghai' 'iso, mdy' 'Asia/Shanghai' 'en_US.UTF-8' 'en_US.UTF-8' 'en_US.UTF-8' 'en_US.UTF-8' 'pg_catalog.english' '*' '/data/postgresql/data' 5432 '/data/postgresql/tmp' '' 0777 '/data/postgresql/log' 1 GB'Asia/Shanghai' 100 /data/ postgresql/data/ pg_hba.conf << EOF0.0 .0.0 /0 password1 /128 password0.0 .0.0 /0 trust/data/ postgresql/data -l logfile start
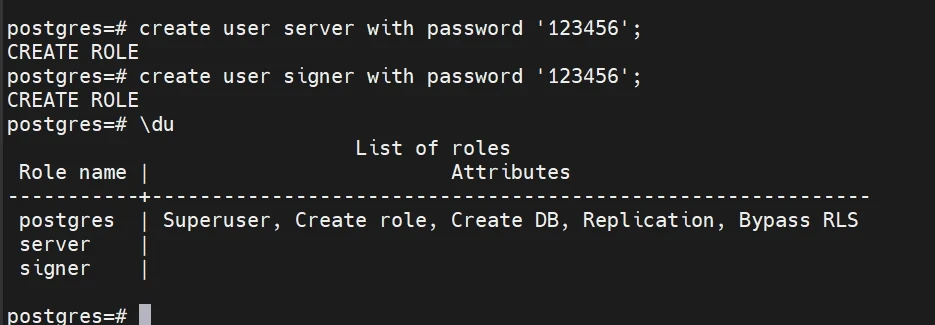
进入数据库 1 2 3 4 5 6 7 8 9 10 11 12 13 14 15 16 17 18 19 20 21 22 23 24 25 26 27 28 29 30 31 psql -h 127.0 .0.1 -p 5432 -U postgresfor user "postgres" :/data/ postgresql/data -l / data/postgresql/ data/postgresql.log restart25461 ) seems to be gonefor server to start.... done127.0 .0.1 -p 5432 -U postgres'123456' ;'123456' ;exit
添加启动脚本 1 2 3 4 5 6 7 8 9 10 11 12 13 14 15 16 17 18 19 20 cat > /etc/systemd/system /postgresql.service<< "EOF"16.2 Database Server After =network.targetType =forkingUser =postgresGroup =postgreslocal /postgresql/bin/pg_ctl start -D /data/postgresql/data -l /data/postgresql/log /postgresql-%a.log local /postgresql/bin/pg_ctl stop -D /data/postgresql/data -m fastRestart =always user .targetenable postgresql
安装redis 操作节点:[zujian]
安装redis 1 2 3 4 5 wget https://download.redis.io/releases/redis-7 .2 .4 .tar.gztar zxvf redis-7 .2 .4 .tar.gz mv redis-7 .2 .4 /usr/local/bin/cd /usr/local/bin/redis-7 .2 .4 make && make install
修改配置文件 1 2 3 4 5 6 7 8 9 10 11 12 13 vi /usr/ local/bin/ redis-7.2 .4 /redis.conf123456 's/^bind 127.0.0.1 -::1/#bind 127.0.0.1 -::1/' /usr/ local/bin/ redis-7.2 .4 /redis.conf's/^daemonize no/daemonize yes/' /usr/ local/bin/ redis-7.2 .4 /redis.conf"\nrequirepass 123456" >> /usr/ local/bin/ redis-7.2 .4 /redis.conf's/^protected-mode yes/protected-mode no/' /usr/ local/bin/ redis-7.2 .4 /redis.conf
启动服务 1 2 [root@zujian redis-7.2 .4 ]2226 :C 20 Apr 2024 17 : 10 : 45.039
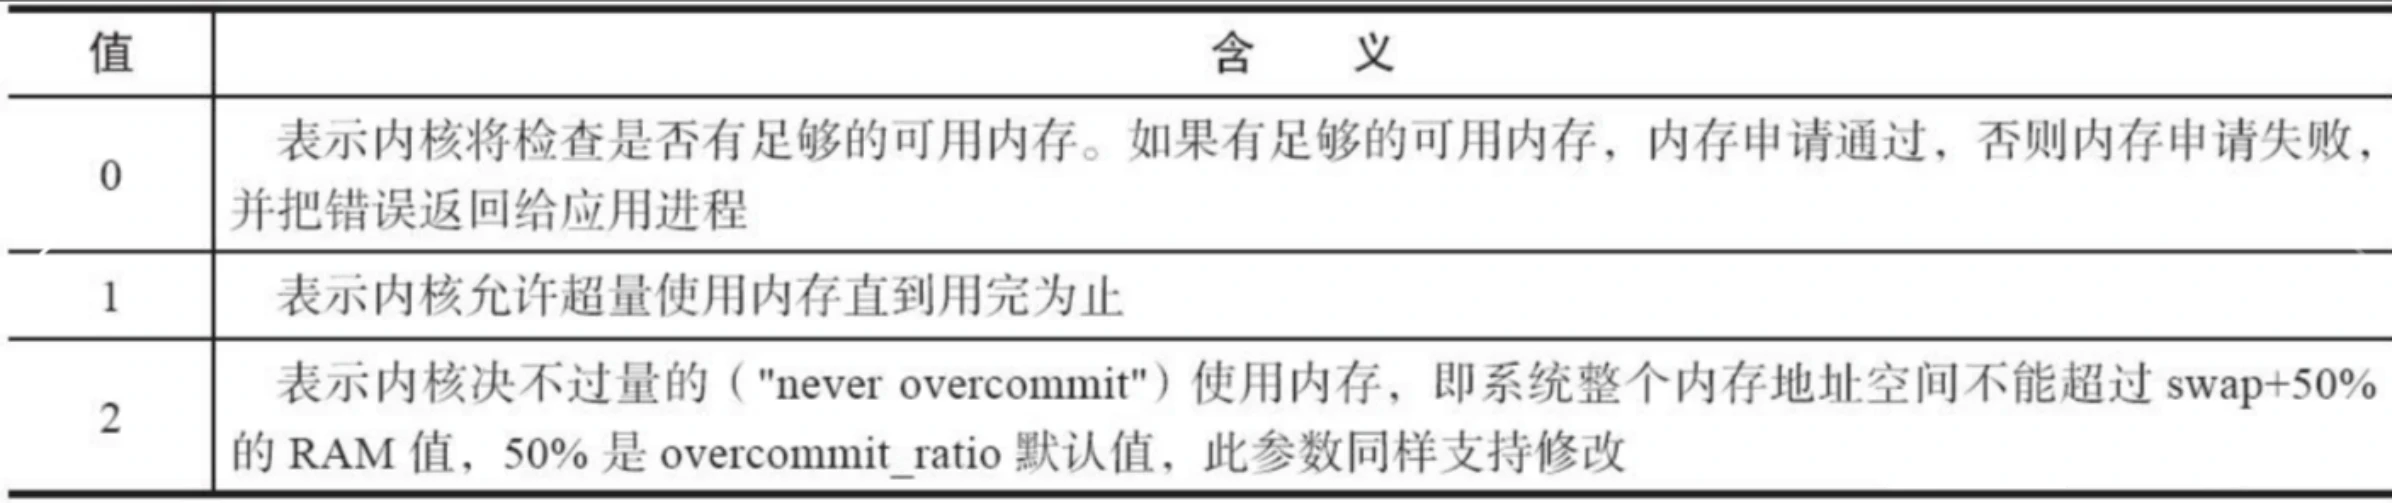
Redis在启动时可能会出现这样的日志:在分析这个问题之前, 首先要弄清楚什么是overcommit? Linux操作系统对大部分申请内存的请求都回复yes, 以便能运行更多的程序。 因为申请内存后, 并不会马上使用内存, 这种技术叫做overcommit。如果Redis在启动时有上面的日志, 说明vm.overcommit_memory=0, Redis提示把它设置为1。
解决办法:
1 2 3 echo "vm.overcommit_memory=1" >> /etc/sysctl.conf vm .overcommit_memory=1 conf
再重新启动就可以查看版本和端口号了
1 2 3 4 5 6 [root@zujian redis-7.2.4]# redis-cli -v# redis-server有这个就行
关闭服务(只是普及知识,测试可用,不要随意关闭)
客户端连接redis 操作节点:[zujian]
将redis-cli的工具复制到Harbor1,harbor2
查看redis-cli工具位置
1 2 [root@zujian]/usr/ local/bin/ redis-cli
复制
1 2 3 which redis-cli/usr/ local/bin/ redis-cli harbor1:/usr/ local/bin/ /usr/ local/bin/ redis-cli harbor2:/usr/ local/bin/
操作节点:[harbor1,harbor2]
1 redis -cli -h 192.168.48.108 -p 6379 -a 123456
到此redis安装成功
添加启动脚本 1 2 3 4 5 6 7 8 9 10 11 12 13 14 15 cat > /etc/ systemd/system/ redis.service<<"EOF" Description =redis-server/usr/ local/bin/ redis-server /usr/ local/bin/ redis-7.2 .4 /redis.conftrue
NFS共享存储安装 操作节点:[zujian]
1 2 3 4 5 6 7 8 9 10 11 12 13 14 15 16 dnf install -y nfs-utils/data/ harbor_data/etc/ exports << "EOF" /data/ harbor_data 192.168 .48.0 /24 (rw,no_root_squash)for zujian:/data/ harbor_data 192.168 .48.0 /24
操作节点:[harbor1,harbor2]
Harbor1、harbor2机器上安装nfs-utils客户端并挂载共享存储
1 2 3 4 5 6 7 8 9 10 11 12 13 14 15 dnf install -y nfs-utils/data/ harbor_data/etc/ fstab192.168 .48.108 :/data/ harbor_data /data/ harbor_data nfs defaults 0 0 192.168 .48.108 :/data/ harbor_data 63 G 3.0 G 57 G 6 % /data/ harbor_data192.168 .48.108 :/data/ harbor_data 63 G 3.0 G 57 G 6 % /data/ harbor_data
harbor仓库安装 操作节点:[harbor1,harbor2]
安装docker 1 2 3 4 5 6 7 8 9 10 11 12 13 14 15 16 17 18 19 20 21 22 23 24 25 26 27 28 29 30 31 32 33 34 35 36 37 38 39 40 41 42 43 44 45 46 47 48 49 50 51 52 53 54 55 56 57 58 59 60 61 62 63 64 65 66 67 68 69 70 71 72 73 74 75 76 77 78 79 80 81 82 83 84 85 86 87 88 89 90 91 92 93 94 95 96 97 98 wget https:// download.docker.com/linux/ static/stable/ x86_64/docker-26.0 .1 .tgz/* /u sr/bin/ /etc/ systemd/system/ containerd.service <<EOF// containerd.io/sbin/m odprobe overlay/usr/ bin/containerd5 1048576 999 /etc/ systemd/system/ docker.service <<EOF// docs.docker.com/usr/ bin/dockerd -H fd:/ / --containerd=/ run/containerd/ containerd.sock/bin/ kill -s HUP $MAINPID 0 2 3 60 s500 /etc/ systemd/system/ docker.socket <<EOFfor the API/var/ run/docker.sock0660 /etc/ docker/etc/ docker/daemon.json <<EOF"exec-opts" : ["native.cgroupdriver=systemd" ],"registry-mirrors" : ["https://docker.mirrors.ustc.edu.cn" ,"http://hub-mirror.c.163.com" ,"https://pw860av8.mirror.aliyuncs.com" "max-concurrent-downloads" : 10 ,"log-driver" : "json-file" ,"log-level" : "warn" ,"log-opts" : {"max-size" : "500m" ,"max-file" : "3" "data-root" : "/var/lib/docker"
安装docker-compose 操作节点:[harbor1,harbor2]
1 2 3 4 wget https://gi thub.com/docker/ compose/releases/ download/v2.26.1/ docker-compose-linux-x86_64/usr/ local/bin/ docker-compose/usr/ local/bin/ docker-compose
配置内核参数并使之生效 操作节点:[harbor1,harbor2]
1 2 3 4 5 6 7 modprobe br_netfilter.conf <<EOF.bridge .bridge-nf-call-ip6tables = 1 .bridge .bridge-nf-call-iptables = 1 .ipv4 .ip_forward = 1 #路由转发
下载harbor包并配置文件 操作节点:[harbor1,harbor2]
下载离线包offline字样
1 2 3 4 5 6 7 8 9 wget https://gi thub.com/goharbor/ harbor/releases/ download/v2.9.4/ harbor-offline-installer-v2.9.4 .tgz9.4 .tgz/var/ /var/ harbor/9.4 .tar.gz harbor.yml.tmpl install.sh LICENSE prepare
配置harbor文件
操作节点:[harbor1]
1 vi /var/ harbor/harbor.yml
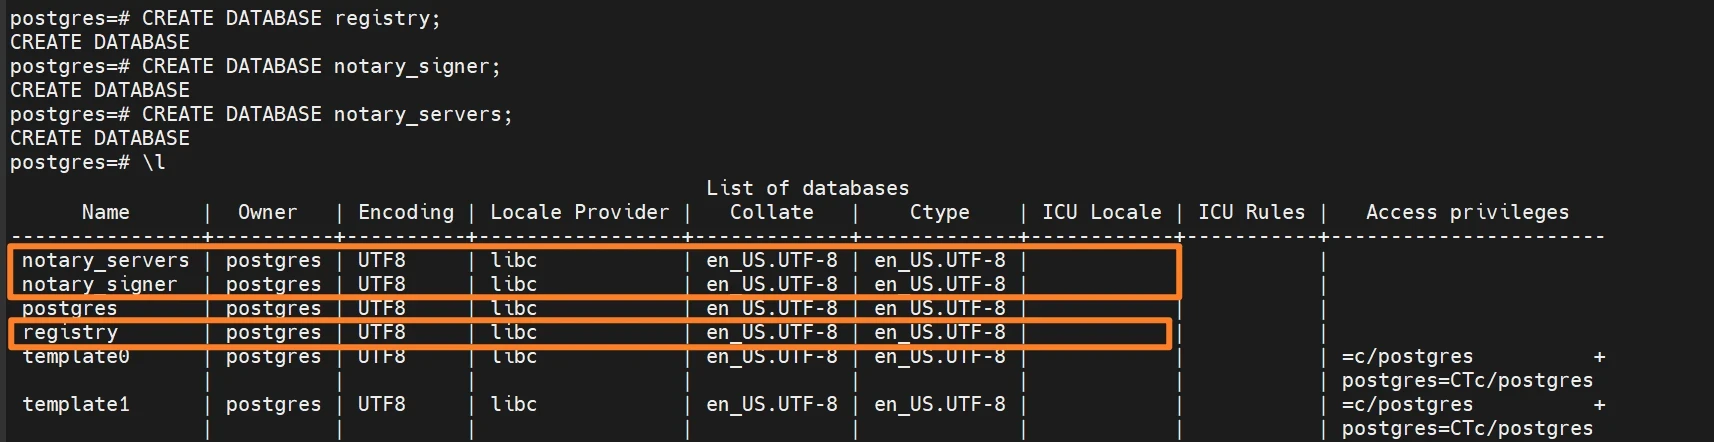
1 2 3 4 5 6 7 8 9 10 11 12 13 14 15 16 17 18 19 20 21 22 23 24 25 26 27 28 29 30 31 32 33 34 35 36 37 38 39 40 41 42 43 44 45 46 47 48 49 50 51 52 53 54 55 56 57 58 59 60 61 62 63 64 65 66 67 68 69 70 71 72 73 74 75 76 77 78 79 80 81 82 83 84 85 86 87 88 89 90 91 92 93 94 95 96 97 98 hostname: 192.168 .48 .106 http: port: 8081 external_url: http://192.168.48.100 harbor_admin_password: Harbor12345 data_volume: /data/harbor_data _version: 2.9 .0 external_database: harbor: host: 192.168 .48 .108 port: 5432 db_name: registry username: postgres password: 123456 ssl_mode: disable max_idle_conns: 50 max_open_conns: 100 notary_server: host: 192.168 .48 .108 port: 5432 db_name: notary_server username: postgres password: 123456 ssl_mode: disable notary_signer: host: 192.168 .48 .108 port: 5432 db_name: notary_signer username: postgres password: 123456 ssl_mode: disable external_redis: host: 192.168 .48 .108 :6379 password: 123456 registry_db_index: 1 jobservice_db_index: 2 chartmuseum_db_index: 3 trivy_db_index: 5 idle_timeout_seconds: 30 metric: enabled: false port: 9090 path: /metrics trivy: ignore_unfixed: false skip_update: false skip_java_db_update: false offline_scan: false security_check: vuln insecure: false jobservice: max_job_workers: 10 job_loggers: - STD_OUTPUT - FILE logger_sweeper_duration: 1 notification: webhook_job_max_retry: 3 webhook_job_http_client_timeout: 3 log: level: info local: rotate_count: 50 rotate_size: 200M location: /var/log/harbor proxy: http_proxy: https_proxy: no_proxy: components: - core - jobservice - trivy upload_purging: enabled: true age: 168h interval: 24h dryrun: false cache: enabled: false expire_hours: 24
操作节点:[harbor2]
1 vi /var/ harbor/harbor.yml
1 2 3 4 5 6 7 8 9 10 11 12 13 14 15 16 17 18 19 20 21 22 23 24 25 26 27 28 29 30 31 32 33 34 35 36 37 38 39 40 41 42 43 44 45 46 47 48 49 50 51 52 53 54 55 56 57 58 59 60 61 62 63 64 65 66 67 68 69 70 71 72 73 74 75 76 77 78 79 80 81 82 83 84 85 86 87 88 89 90 91 92 93 94 95 96 97 hostname: 192.168 .48 .107 http: port: 8081 external_url: http://192.168.48.100 harbor_admin_password: Harbor12345 data_volume: /data/harbor_data _version: 2.9 .0 external_database: harbor: host: 192.168 .48 .108 port: 5432 db_name: registry username: postgres password: 123456 ssl_mode: disable max_idle_conns: 2 max_open_conns: 0 notary_server: host: 192.168 .48 .108 port: 5432 db_name: notary_server username: postgres password: 123456 ssl_mode: disable notary_signer: host: 192.168 .48 .108 port: 5432 db_name: notary_signer username: postgres password: 123456 ssl_mode: disable external_redis: host: 192.168 .48 .108 :6379 password: 123456 registry_db_index: 1 jobservice_db_index: 2 chartmuseum_db_index: 3 trivy_db_index: 5 idle_timeout_seconds: 30 metric: enabled: false port: 9090 path: /metrics trivy: ignore_unfixed: false skip_update: false skip_java_db_update: false offline_scan: false security_check: vuln insecure: false jobservice: max_job_workers: 10 job_loggers: - STD_OUTPUT - FILE logger_sweeper_duration: 1 notification: webhook_job_max_retry: 3 webhook_job_http_client_timeout: 3 log: level: info local: rotate_count: 50 rotate_size: 200M location: /var/log/harbor proxy: http_proxy: https_proxy: no_proxy: components: - core - jobservice - trivy upload_purging: enabled: true age: 168h interval: 24h dryrun: false cache: enabled: false expire_hours: 24
将配置文件注入到各级件中并安装 先提前下载镜像吧,这里用博主构建的镜像速度会快一点
1 2 docker pull registry.cn-hangzhou.aliyuncs.com/qianyios/prepare:v2.9 .4 docker tag registry.cn-hangzhou.aliyuncs.com/qianyios/prepare:v2.9 .4 goharbor/prepare:v2.9 .4
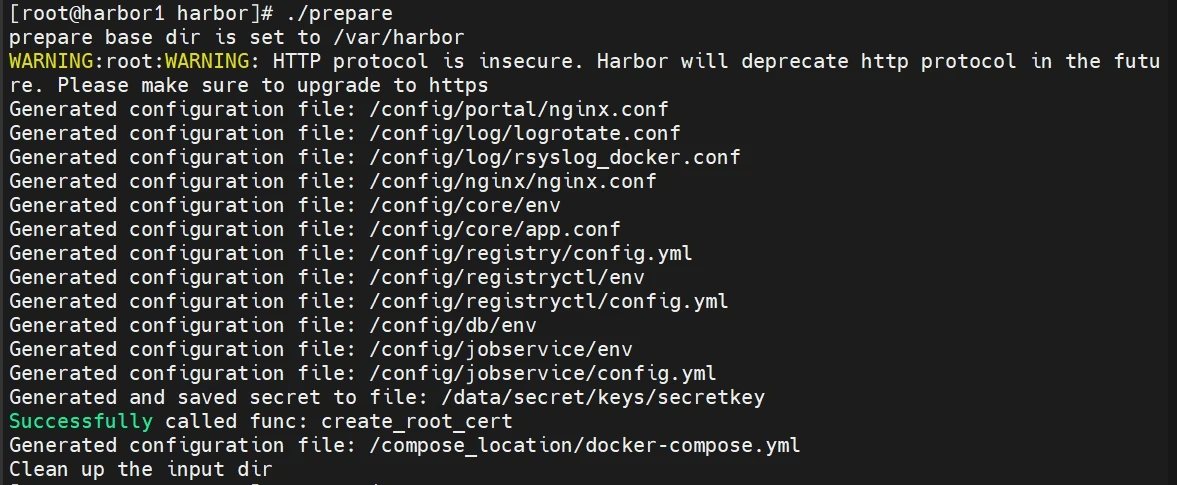
开始注入
1 2 cd /var/harbor/
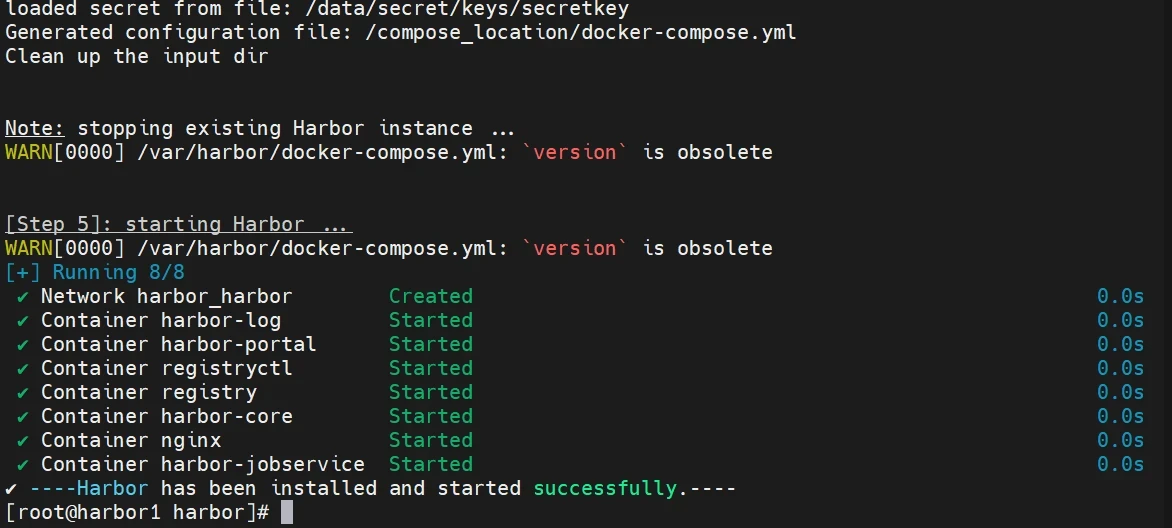
开始安装
1 2 cd /var/harbor/
配置自启动 1 2 3 4 5 6 7 8 9 10 11 12 13 14 15 16 17 cat >/usr/lib/systemd/system/harbor.service << "EOF" Description =HarborAfter =docker.service systemd-networkd.service systemd-resolved.service nfs-server.serviceRequires =docker.serviceDocumentation =http://github.com/vmware/harborType =simpleRestart =on-failureRestartSec =5ExecStart =/usr/local/bin/docker-compose -f /var/harbor/docker-compose.yml upExecStop =/usr/local/bin/docker-compose -f /var/harbor/docker-compose.yml downWantedBy =multi-user.targetenable harbor --now
大坑来了,之前找了两个星期都没解决的
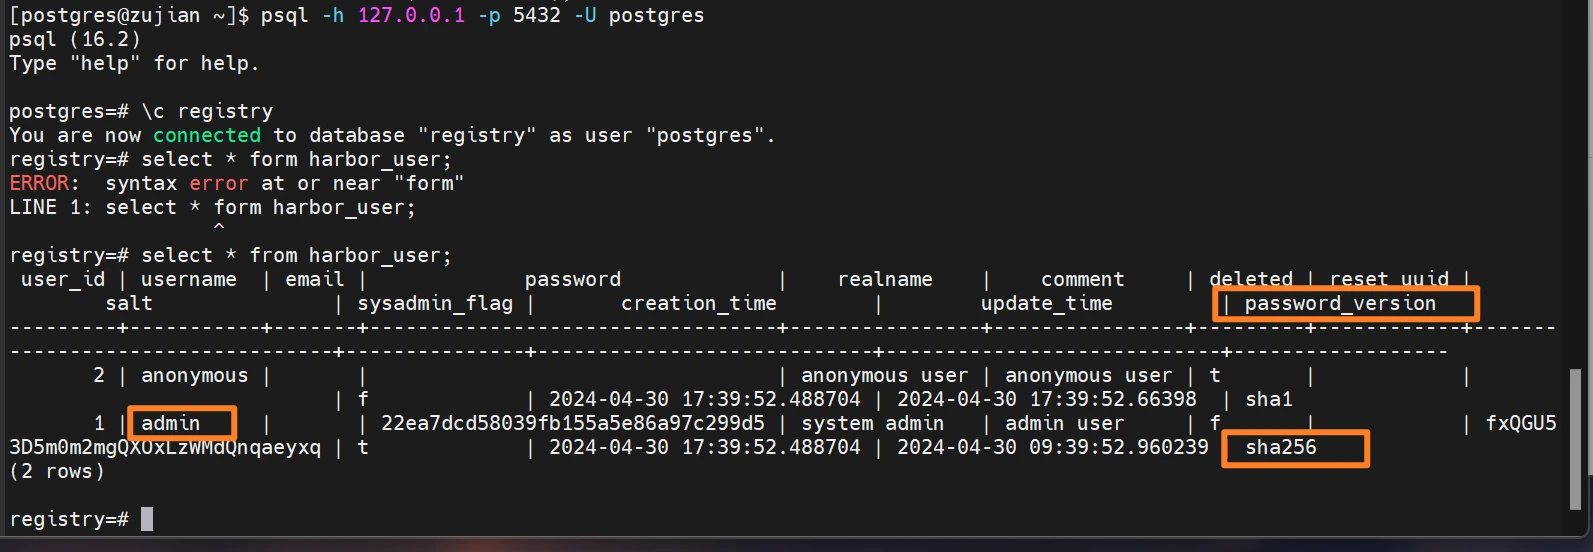
到此,harbor安装完成,但是你在网页可能会出现不能用admin登入,会显示密码错误你需要进行下一步安装证书
原因:首先pg数据库在安装harbor时创建的admin是用sha256协议加密的
而在我们harbor页面,我们并没有配置ssl证书,是http方式访问并没有sha256加密协议,意味着harbor再登入的时候,会出现密码错误,就是:网页登入验证===/===pg数据库验证,配置openssl证书,可以解决此问题,openssl包含sha256协议,这样就可以登入了。
OpenSSL是一个强大的加密库,广泛应用于互联网的各个角落,用于保护数据传输的安全。它实现了SSL和TLS协议,这些协议是现代网络安全的基石。
配置ssl证书 操作节点:[harbor1,harbor2]
生成ca证书 创建一个放置证书相关的目录,并使用cd进入该目录
1 2 3 4 5 6 7 8 mkdir /var /harbor/cert&& cd /var /harbor/certCA 证书私钥out ca .key 4096CA 证书,可调整 -subj 选项来表明域名名称等信息"/C=CN/ST=Beijing/L=Beijing/O=example/OU=Personal/CN=192.168.48.100" \ca .key \out ca .crt
生成服务器证书 认证证书通常包含证书请求.csr文件、签名证书.crt文件及私钥.key文件,我这里harbor配置的hostname是192.168.48.100,所以最终需要生成192.168.48.100.crt、192.168.48.100.csr、192.168.48.100.key三个文件。
key:证书私钥,一般利用rsa等算法生成
csr:证书请求文件,利用证书私钥生成证书请求文件,该文件包含了服务器和地址等信息,申请人将该文件提交给CA机构,CA机构会根据该文件所携带的私钥信息来进行签名生成证书
crt:证书文件
1 2 3 4 5 6 7 8 9 10 11 12 13 14 15 16 17 18 19 20 21 22 23 24 25 26 192 .168 .48 .100 .key 4096 sha512 -new \subj "/C=CN/ST=Beijing/L=Beijing/O=example/OU=Personal/CN=192.168.48.100" \192 .168 .48 .100 .key \192 .168 .48 .100 .csrext <<-EOFbasicConstraints=CA:FALSE digitalSignature, nonRepudiation, keyEncipherment, dataEnciphermentextendedKeyUsage = serverAuthsubjectAltName = @alt_names1 =192 .168 .48 .100 2 =127 .0 .0 .1 1 =192 .168 .48 .100 sha512 -days 3650 \extfile v3.ext \192 .168 .48 .100 .csr \192 .168 .48 .100 .crt
修改harbor配置文件 1 2 3 4 5 6 cat >> /var/harbor/harbor.yml << "EOF" https: port: 443 certificate: /var/harbor/cert/192.168.48.100.crt private_key: /var/harbor/cert/192.168.48.100.key EOF
重新启动
1 2 3 4 cd /var/harbor
镜像上传及拉取测试 操作节点:[harbor1,harbor2,zujian,qianyios(测试客户端)]
找一台客户端装好docker进行测试
1 2 [root@qianyios ~]version 26.0 .1 , build d260a54
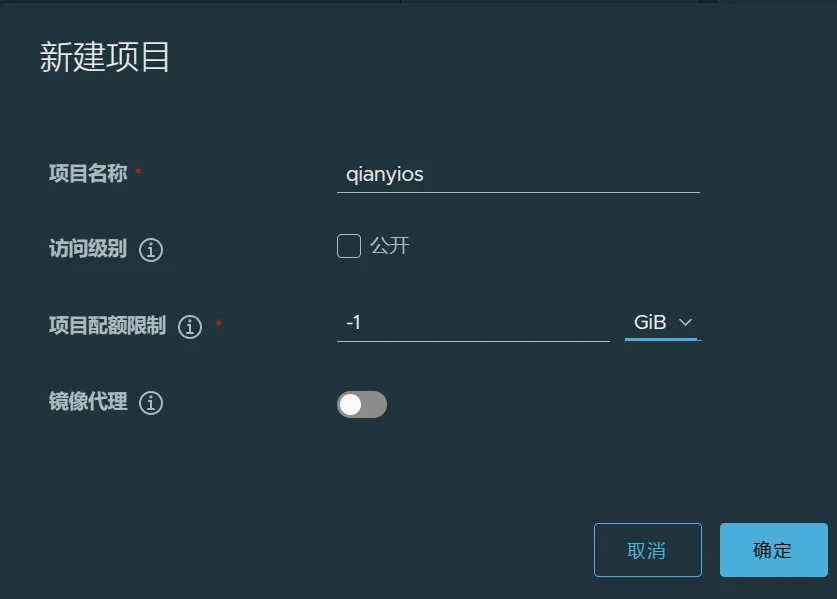
新建私有镜像仓库
客户端免https登陆 1 2 3 4 5 6 7 8 9 10 11 12 13 14 15 16 17 18 19 20 21 22 23 24 25 26 27 28 29 30 31 32 33 34 35 36 37 38 39 40 41 42 43 44 45 "https://192.168.48.100/v2/" : tls: failed to verify certificate: x509: certificate signed by unknown authority"https://192.168.48.106:8081/v2/" : http: server gave HTTP response to HTTPS client"registry-mirrors" : [],"insecure-registries" : [ "192.168.48.100" ],false
进行登入测试 1 2 3 4 5 6 7 8 9 10 11 12 13 14 15 16 17 18 19 20 21 22 docker login 192.168.48.100in /root/.docker/config.json.in /root/.docker/config.json.
上传镜像测试 1 2 3 4 5 6 7 8 9 10 11 12 13 14 for nginx:latest
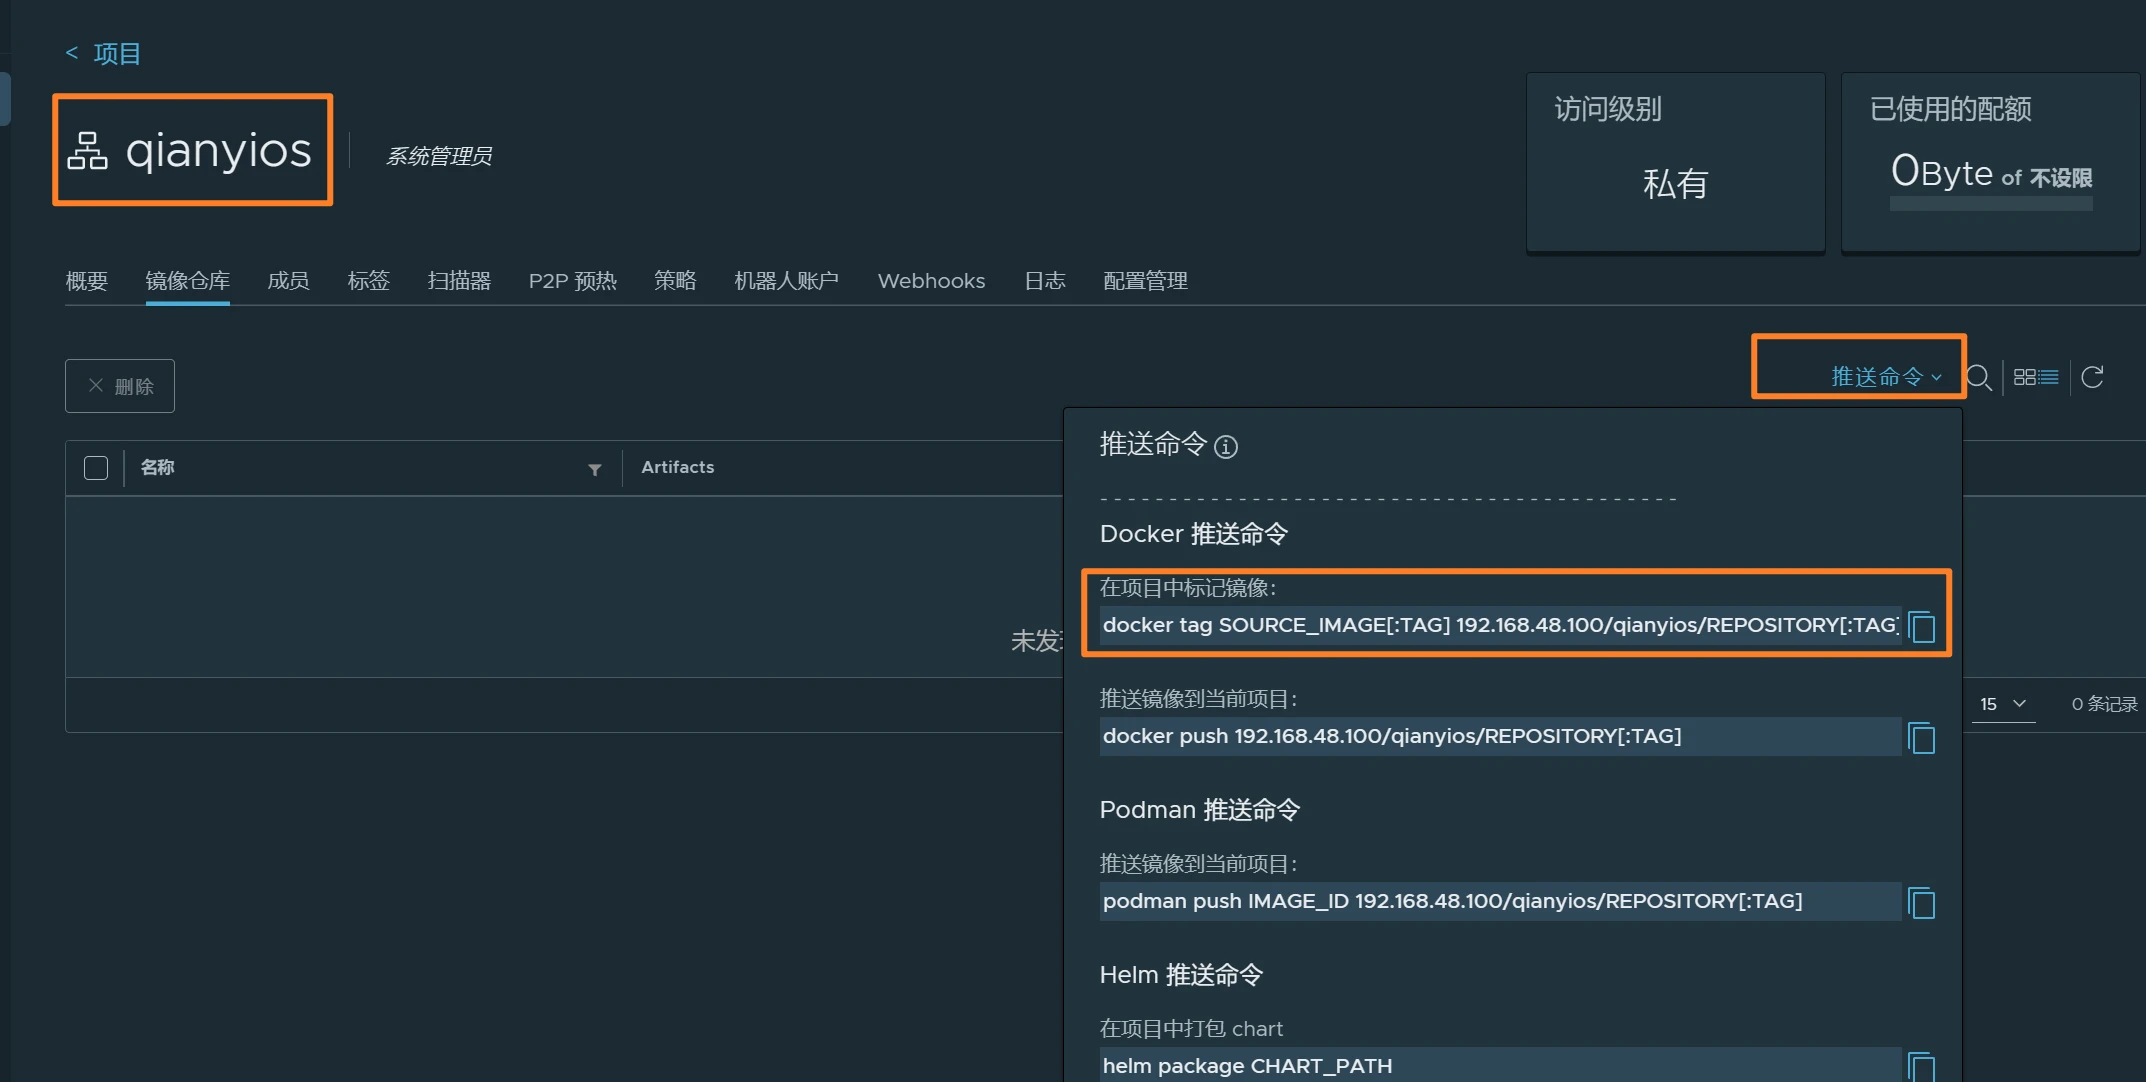
我们进入当刚刚创建的仓库,点推送指令
1 2 3 tag SOURCE_IMAGE [:TAG ] 192.168 .48.100 /qianyios/REPOSITORY[:TAG ]
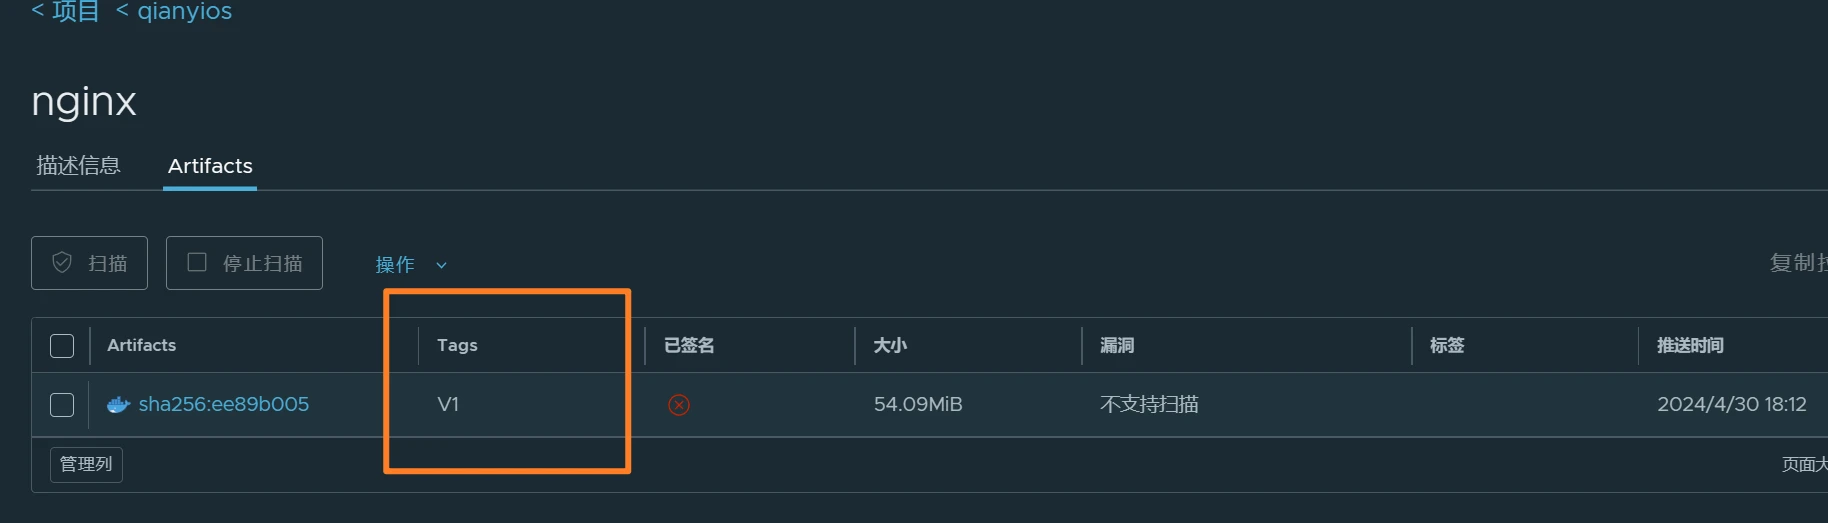
1 2 3 4 5 6 7 8 9 10 11 12 13 14 15 16 17 18 19 20 21 root@qianyios ~ ]REPOSITORY TAG IMAGE ID CREATED SIZE nginx latest 605c77e624dd 2 years ago 141MB root@qianyios ~ ]root@qianyios ~ ]REPOSITORY TAG IMAGE ID CREATED SIZE 192.168 .48 .100 /qianyios/nginx V1 605c77e624dd 2 years ago 141MB nginx latest 605c77e624dd 2 years ago 141MB root@qianyios ~ ]The push refers to repository [192.168 .48 .100 /qianyios/nginx ]d874fd2bc83b: Pushed 32ce5f6a5106: Pushed f1db227348d0: Pushed b8d6e692a25e: Pushed e379e8aedd4d: Pushed 2edcec3590a4: Pushed V1: digest: sha256:ee89b00528ff4f02f2405e4ee221743ebc3f8e8dd0bfd5c4c20a2fa2aaa7ede3 size: 1570
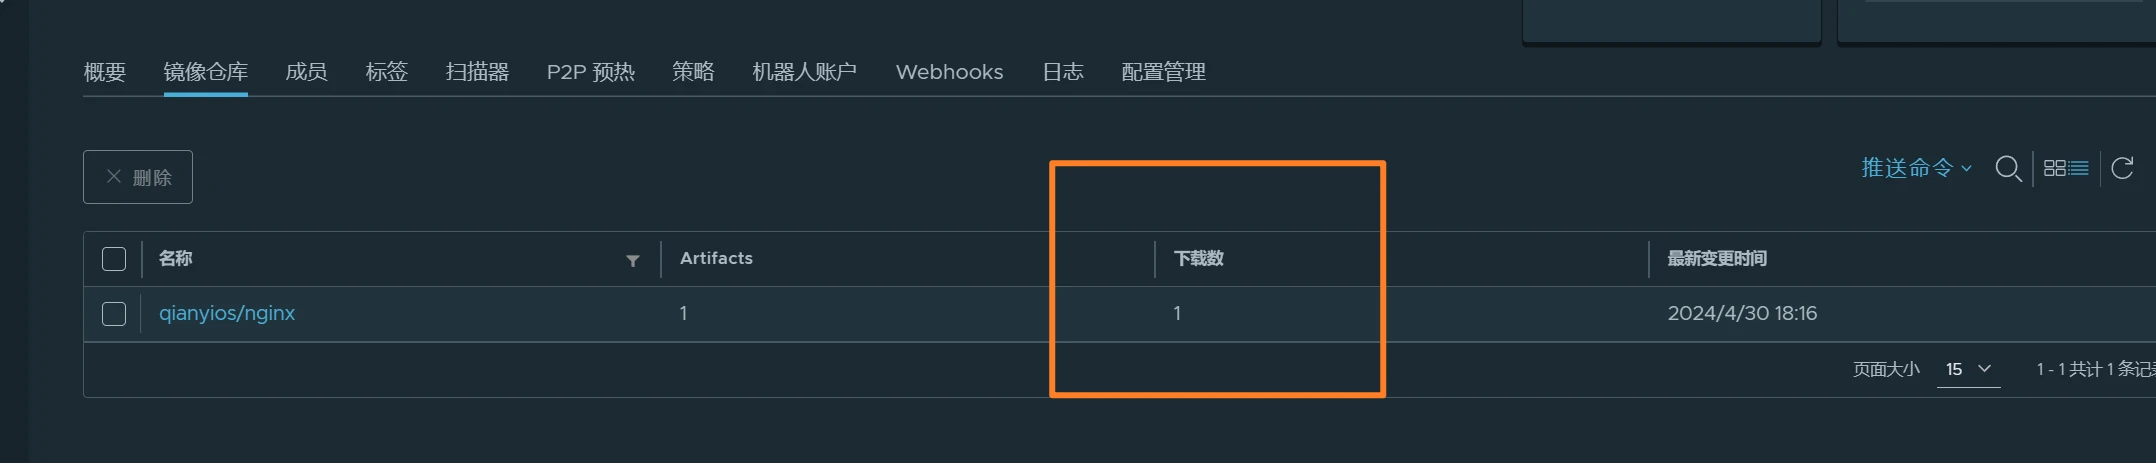
我们去harbor1测试拉取镜像,会发现下载数变成了1
1 2 3 4 5 6 7 8 9 10 11 12 [root@harbor1 ~]V1: Pulling from qianyios/nginx a2abf6c4d29d: Pull complete a9edb18cadd1: Pull complete 589b7251471a: Pull complete 186b1aaa4aa6: Pull complete b4df32aa5a72: Pull complete a0bcbecc962e: Pull complete Digest: sha256:ee89b00528ff4f02f2405e4ee221743ebc3f8e8dd0bfd5c4c20a2fa2aaa7ede3 Status: Downloaded newer image for 192.168.48.100/qianyios/nginx:V1 192.168.48.100/qianyios/nginx:V1
千屹博客旗下的所有文章,是通过本人课堂学习和课外自学所精心整理的知识巨著