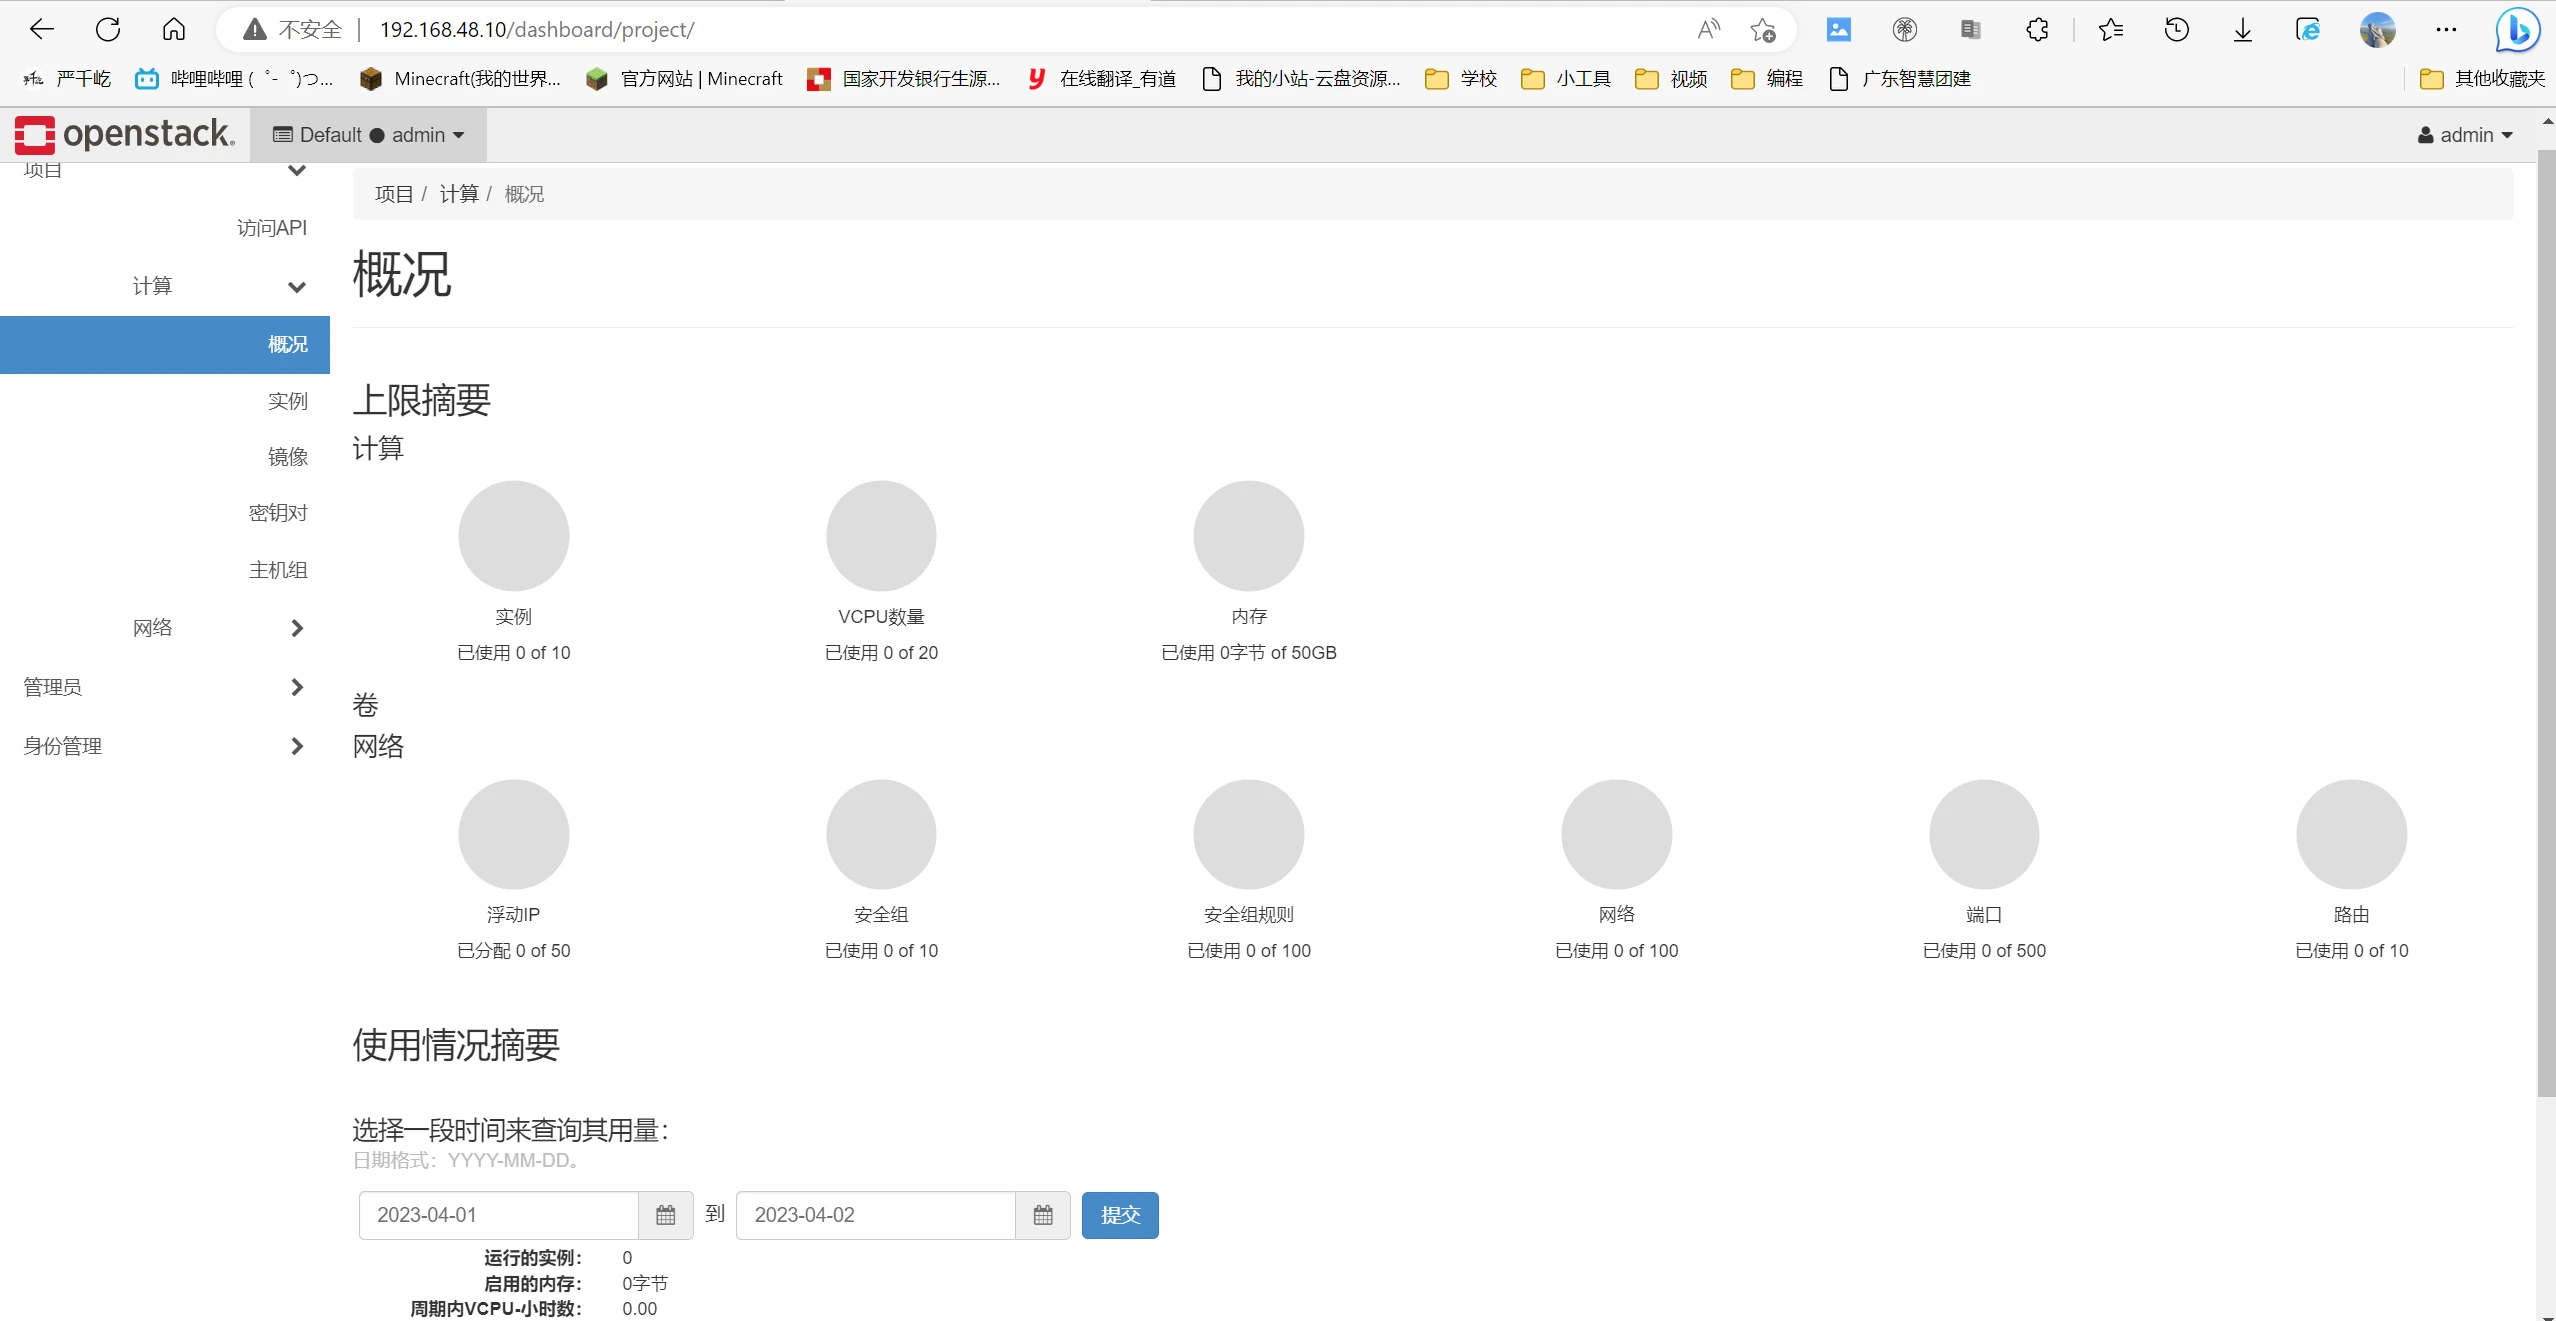
OpenStack-Train双节点部署 节点架构图(最小配置)
主机名
ip1(NAT)
ip2(仅主机)
硬盘
内存
controller-48
192.168.48.10
192.168.148.10
100G
8G
computer-48
192.168.48.20
192.168.148.20
100G
3G
双节点均采用CentOS-7-x86_64-DVD-2009.iso 英文最小化安装,安装过程不做解释
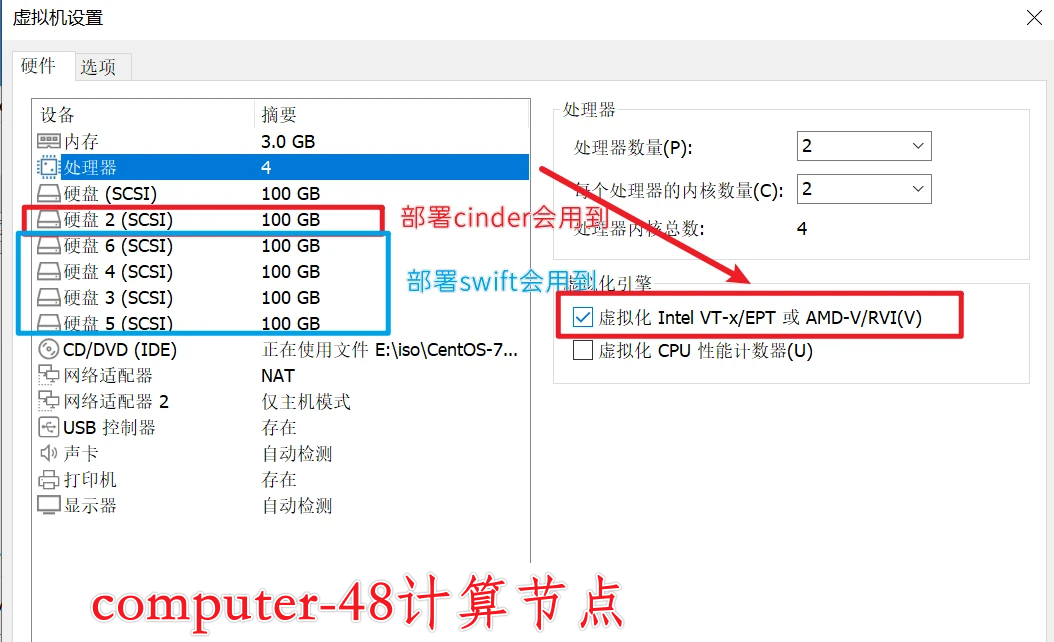
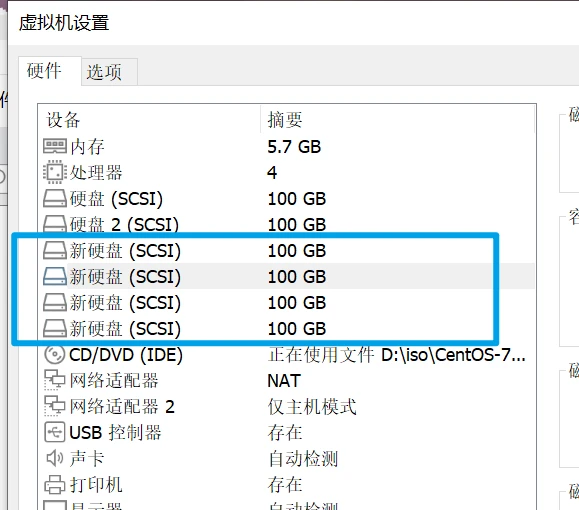
Computer-48需要特别注意加硬盘
computer-48需要勾选处理器虚拟化
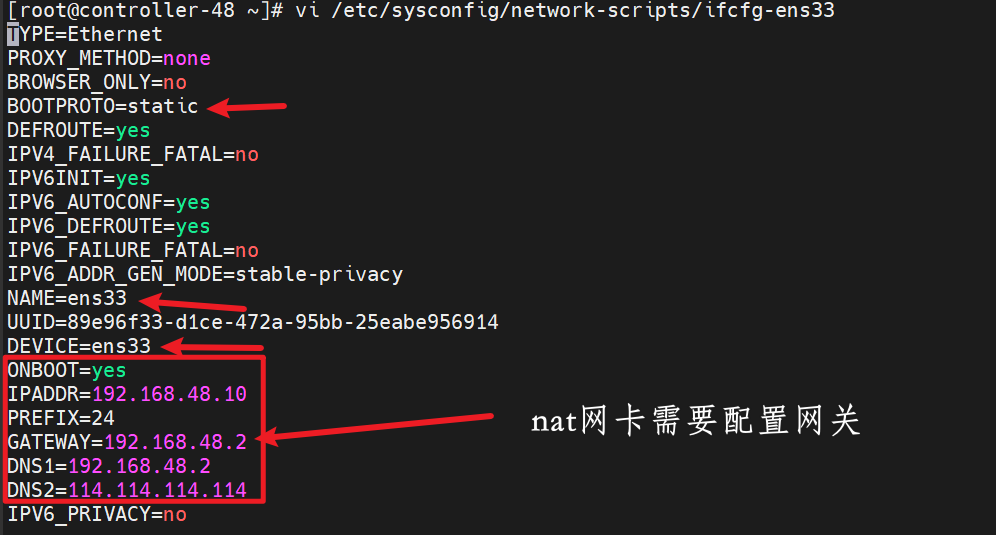
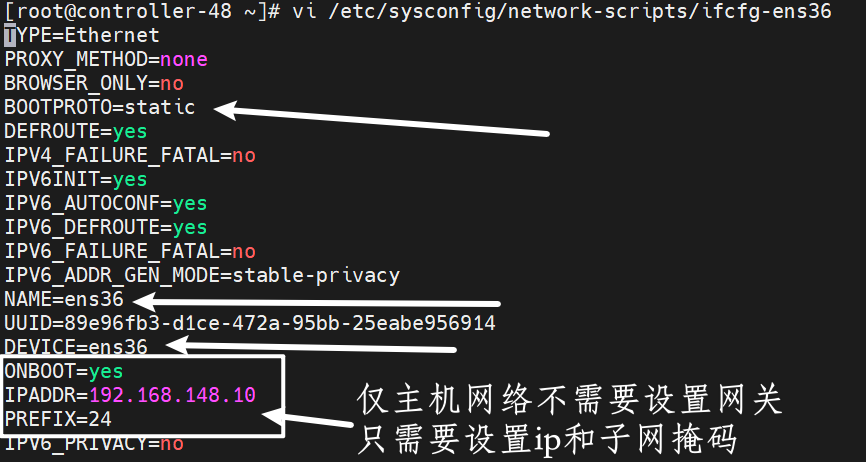
网络设置 控制节点网络设置
ens33
ens36
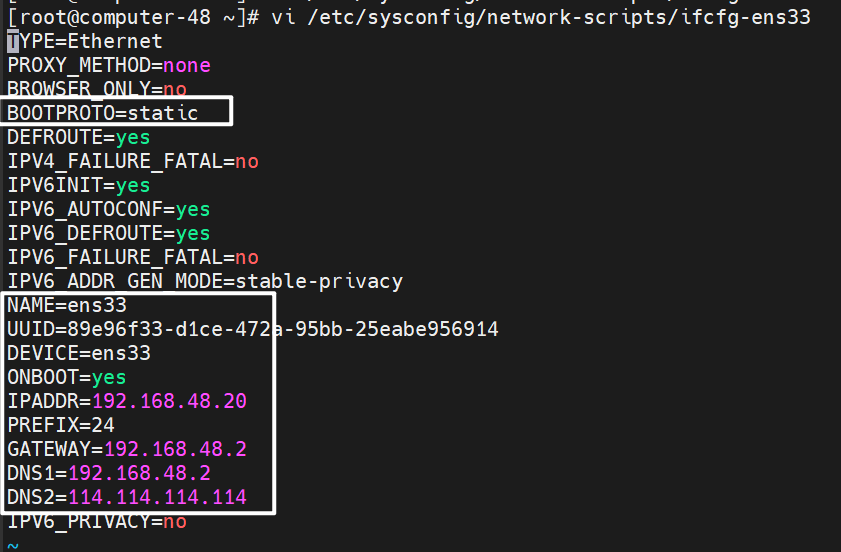
计算节点
原理和控制节点一样,第二张网卡不用设置网关
ens33
ens36
温馨提示(小贴士)
这里就说一下为什么第二张仅主机网卡不用设置网关,因为我们本意是通过NAT进行与外网做数据交换和获取外网资源可以连接互联网的,仅主机仅仅只是用于进行虚拟机内部资源的数据交换,不具备与外网连接的作用,是无法访问互联网的,如果两张网卡同时设置了网关,可能会造成无法访问openstack里创建的虚拟机无法访问互联网,或者本机无法访问互联网的情况,原因是默认路由可能会以仅主机网卡的网络进行与外网链接,但是没办法联网。所以请不要在第二块网卡设置网关
版本对照表
OpenStack 版本
CentOS 版本
Train 以及更早
7
Ussuri and Victoria
8
Wallaby 到 Yoga
Stream 8
安全性 基本用户信息 OpenStack 各组件都需要在控制节点数据库中注册专属账户以存放数据信息,故需要设置密码,强烈建议各组件的密码以及宿主机密码各不相同。
OpenStack 组件
密码
控制节点 root
123456
计算节点 root
123456
Metadata 元数据密钥
METADATA_SECRET
Mariadb root 账户
MARIADB_PASS
RabbitMQ 服务
RABBIT_PASS
OpenStack admin
ADMIN_PASS
Placement 服务
PLACEMENT_PASS
Keystone 数据库
KEYSTONE_DBPASS
Glance 服务
GLANCE_PASS
Glance 数据库
GLANCE_DBPASS
Nova 服务
NOVA_PASS
Nova 数据库
NOVA_DBPASS
Neutron 服务
NEUTRON_PASS
Neutron 数据库
NEUTRON_DBPASS
Cinder 服务
CINDER_PASS
Cinder 数据库
CINDER_DBPASS
Horizon 数据库
DASH_DBPASS
Swift服务
SWIFT_PASS
Heat服务
HEAT_PASS
Heat数据库服务
HEAT_DBPASS
heat_domain_admin用户
HEAT_DOMAIN_USER_PASS
身份验证 控制节点管理 OpenStack 服务时需要进行身份认证,可将认证信息导入到控制节点环境变量中,方便后续安装配置使用。
1
2
3
4
5
6
7
8
9
10
11
12
13
14
15
16
17
18
19
20
21
22
23
24
25
26
27
28
29
30
31
cat >> admin-openrc.sh << EOFexport OS_PROJECT_DOMAIN_NAME =Defaultexport OS_USER_DOMAIN_NAME =Defaultexport OS_PROJECT_NAME =adminexport OS_USERNAME =adminexport OS_PASSWORD =123456export OS_AUTH_URL =http://controller-48:5000/v3export OS_IDENTITY_API_VERSION =3export OS_IMAGE_API_VERSION =2export OS_USERNAME =user_dogexport OS_PASSWORD =123456export OS_PROJECT_NAME =Trainexport OS_USER_DOMAIN_NAME =RegionOneexport OS_PROJECT_DOMAIN_NAME =RegionOneexport OS_AUTH_URL =http://controller-48:5000/v3export OS_IDENTITY_API_VERSION =3export OS_IMAGE_API_VERSION =2
测试用户
用户
密码
admin
123456
use_dog
123456
物理节点关闭顺序 给每台机都加上两个脚本
1
2
3
4
5
6
7
8
9
10
11
12
13
14
15
16
17
18
19
20
21
22
23
24
25
26
27
28
29
30
31
32
33
34
35
36
37
38
39
40
41
42
43
44
45
46
47
48
49
50
51
52
53
54
55
56
57
58
59
60
61
62
63
64
65
66
67
68
69
70
71
72
73
74
75
76
77
78
79
80
81
82
83
84
85
86
87
88
89
90
91
cat >> stop.sh << EOF$server "Stopping compute services..." system ctl stop openstack-nova-compute.servicesystem ctl stop libvirtd.service"Stopping network services..." system ctl stop openvswitch.servicesystem ctl stop neutron-server.servicesystem ctl stop neutron-linuxbridge-agent.servicesystem ctl stop neutron-dhcp-agent.servicesystem ctl stop neutron-metadata-agent.servicesystem ctl stop neutron-l3-agent.service"Stopping control services..." system ctl stop mariadb.servicesystem ctl stop rabbitmq-server.servicesystem ctl stop memcached.servicesystem ctl stop httpd.servicesystem ctl stop openstack-glance-api.servicesystem ctl stop openstack-glance-registry.servicesystem ctl stop openstack-cinder-api.servicesystem ctl stop openstack-cinder-scheduler.servicesystem ctl stop openstack-cinder-volume.servicesystem ctl stop openstack-nova-api.servicesystem ctl stop openstack-nova-scheduler.servicesystem ctl stop openstack-nova-conductor.servicesystem ctl stop openstack-nova-novncproxy.servicesystem ctl stop openstack-nova-consoleauth.servicesystem ctl stop openstack-keystone.servicesystem ctl stop openstack-heat-api.servicesystem ctl stop openstack-heat-api-cfn.servicesystem ctl stop openstack-heat-engine.servicesystem ctl stop openstack-swift-proxy.servicesystem ctl stop openstack-swift-account.servicesystem ctl stop openstack-swift-container.servicesystem ctl stop openstack-swift-object.service"Stopping all services..." system ctl stop --all "Shutting down the system..." "Starting control services..." system ctl start mariadb.servicesystem ctl start rabbitmq-server.servicesystem ctl start memcached.servicesystem ctl start httpd.servicesystem ctl start openstack-glance-api.servicesystem ctl start openstack-glance-registry.servicesystem ctl start openstack-cinder-api.servicesystem ctl start openstack-cinder-scheduler.servicesystem ctl start openstack-cinder-volume.servicesystem ctl start openstack-nova-api.servicesystem ctl start openstack-nova-scheduler.servicesystem ctl start openstack-nova-conductor.servicesystem ctl start openstack-nova-novncproxy.servicesystem ctl start openstack-nova-consoleauth.servicesystem ctl start openstack-keystone.servicesystem ctl start openstack-heat-api.servicesystem ctl start openstack-heat-api-cfn.servicesystem ctl start openstack-heat-engine.servicesystem ctl start openstack-swift-proxy.servicesystem ctl start openstack-swift-account.servicesystem ctl start openstack-swift-container.servicesystem ctl start openstack-swift-object.service"Starting network services..." system ctl start openvswitch.servicesystem ctl start neutron-server.servicesystem ctl start neutron-linuxbridge-agent.servicesystem ctl start neutron-dhcp-agent.servicesystem ctl start neutron-metadata-agent.servicesystem ctl start neutron-l3-agent.service"Starting compute services..." system ctl start libvirtd.servicesystem ctl start openstack-nova-compute.service
(先给两个计算节点执行-最后等计算节点完全关闭,再给控制节点执行)
1 2 3 关闭物理机的时候运行sh stop .sh
物理节点开启顺序
先给controller-48运行start.sh再给计算节点运行start.sh
sh start.sh
基础环境 修改主机名和防火墙 controller-48节点
1
2
3
4
5
6
7
8
hostnamectl set -hostname
computer-48节点
1
2
3
4
5
6
7
8
hostnamectl set -hostname
修改yum controller-48和computer-48节点
1
2
3
4
5
6
7
8
9
10
11
12
rm -rf /etc/yum .repos.d/*/etc/yum .repos.d/epel.repo http:/ /mirrors.aliyun.com/ repo/epel-7 .repo/etc/yum .repos.d/CentOS-Base.repo http:/ /mirrors.aliyun.com/ repo/Centos-7 .repo/etc/yum .repos.d/openstack.repo<<EOF//mi rrors.aliyun.com/centos/ 7 /cloud/ x86_64/openstack-train/ 0 1
SSH免密 1 2 3 4 5 6 7 8 9 10 11 12 13 14 15 16 17 18 19 20 21 22 23 cat > sshmianmi.sh << "EOF" "controller-48" "computer-48" )"123456" "" -f ~/.ssh/id_rsafor host in "${hosts[@]} " do "$password " ssh-copy-id -o StrictHostKeyChecking=no "$host " "$password " ssh -o StrictHostKeyChecking=no "$host " "echo '免密登录成功'" done
安装OpenStack包 1 2 3 install openstack-utils openstack-selinux python-openstackclient
依赖组件 四个组件安装在controller-48节点上
Mariadb数据库 1 2 3 4 5 6 7 8 9 10 11 12 13 14 15 16 17 18 19 20 21 yum install mariadb mariadb-server python2-PyMySQL -y192.168 .48 .10 default -storage -engine = innodbon 4096 collation -server = utf8_general_cicharacter -set -server = utf8enable mariadb current password for root (enter for none ): 回车Set root password ? [Y/n] ylogin remotely? [Y/n] ndatabase and access to it? [Y/n] ytables now? [Y/n] y
Rabbitmq 1 2 3 4 5 yum install rabbitmq-server -yenable rabbitmq-server
Memcached 1 2 3 yum install memcached python-memcached -y"s/OPTIONS=\" -l 127.0.0.1,::1\" /OPTIONS=\" -l 127.0.0.1,::1,controller-48\" /g" /etc/sysconfig/memcached
注意这里的-l 127.0.0.1,::1,controller-48中controller-48是你的主机名,后续不做解释
etcd 1 2 3 4 5 6 7 8 9 10 11 12 13 14 15 16 17 yum install -y etcdETCD_DATA_DIR ="/var/lib/etcd/default.etcd" ETCD_LISTEN_PEER_URLS ="http://192.168.48.10:2380" ETCD_LISTEN_CLIENT_URLS ="http://192.168.48.10:2379" ETCD_NAME ="controller-48" ETCD_INITIAL_ADVERTISE_PEER_URLS ="http://192.168.48.10:2380" ETCD_ADVERTISE_CLIENT_URLS ="http://192.168.48.10:2379" ETCD_INITIAL_CLUSTER ="controller-48=http://192.168.48.10:2380" ETCD_INITIAL_CLUSTER_TOKEN ="etcd-cluster-01" ETCD_INITIAL_CLUSTER_STATE ="new" enable etcd --now
Keystone(身份验证服务) 1 2 3 4 5 6 7 8 9 10 11 12 13 14 15 16 17 18 19 20 21 22 23 24 25 26 27 28 29 30 31 32 33 34 35 36 37 38 39 40 41 42 43 44 45 46 47 48 49 50 51 52 53 54 55 56 57 58 59 60 61 62 63 64 65 66 67 68 69 70 71 72 73 74 75 76 77 78 79 80 81 82 83 'keystone' @'localhost' IDENTIFIED BY 'KEYSTONE_DBPASS' ;'keystone' @'%' IDENTIFIED BY 'KEYSTONE_DBPASS' ;exit 0.26 .0 -2 .el7.x86_64/etc/ keystone/keystone.conf{,.bak}/etc/ keystone/keystone.conf << EOF// keystone:KEYSTONE_DBPASS@controller-48 /keystone/bin/ sh -c "keystone-manage db_sync" keystone"KEYSTONE_DBPASS" exit 123456 \// controller-48 :5000 /v3/ \// controller-48 :5000 /v3/ \// controller-48 :5000 /v3/ \/etc/ httpd/conf/ httpd.conf{,.bak}"s/#ServerName www.example.com:80/ServerName controller-48/g" /etc/ httpd/conf/ httpd.conf/usr/ share/keystone/ wsgi-keystone.conf /etc/ httpd/conf.d/ "Service Project" service"RegionOne Domain" RegionOne"Train Project" Train123456 user_dog// controller-48 :5000 /v3 \// controller-48 :5000 /v3 \7 fcb64a8c47f40a48265a9db94f0c963 | RegionOne | True | RegionOne Domain |
Glance(镜像服务) 1 2 3 4 5 6 7 8 9 10 11 12 13 14 15 16 17 18 19 20 21 22 23 24 25 26 27 28 29 30 31 32 33 34 35 36 37 38 39 40 41 42 43 44 45 46 47 48 49 50 51 52 53 54 55 56 57 58 59 60 61 62 63 64 65 66 67 68 69 70 71 72 73 74 75 76 77 78 79 80 81 82 'glance' @'localhost' \'GLANCE_DBPASS' ;'glance' @'%' \'GLANCE_DBPASS' ;exit "OpenStack Image" image// controller-48 :9292 // controller-48 :9292 // controller-48 :9292 /etc/g lance/glance-api.conf{,.bak}/etc/g lance/glance-api.conf << EOF/var/ log/glance/g lance.log//g lance:GLANCE_DBPASS@controller-48 /glance// controller-48 :5000 // controller-48 :5000 48 :11211 'store_one' : 'http' , 'store_two' : 'file' }/var/ lib/glance/im ages//bin/ sh -c "glance-manage db_sync" glance// download.cirros-cloud.net/0.3.3/ cirros-0.3 .3 -x86_64-disk.img"cirros" \0.3 .3 -x86_64-disk.img \
Placement(资源调度) 1 2 3 4 5 6 7 8 9 10 11 12 13 14 15 16 17 18 19 20 21 22 23 24 25 26 27 28 29 30 31 32 33 34 35 36 37 38 39 40 41 42 43 44 45 46 47 48 49 50 51 52 53 54 55 56 57 58 59 60 61 62 63 64 65 66 67 68 69 70 71 72 73 74 75 76 77 78 mysql -u root -pMARIADB_PASS'placement' @'localhost' IDENTIFIED BY 'PLACEMENT_DBPASS' ;'placement' @'%' IDENTIFIED BY 'PLACEMENT_DBPASS' ;exit "Placement API" placement// controller-48 :8778 // controller-48 :8778 // controller-48 :8778 /etc/ placement/placement.conf{,.bak}/etc/ placement/placement.conf << EOF// placement:PLACEMENT_DBPASS@controller-48 /placement// controller-48 :5000 /v348 :11211 /bin/ sh -c "placement-manage db sync" placement/etc/ httpd/conf.d/ 00 -placement-api.conf{,.bak}/etc/ httpd/conf.d/ 00 -placement-api.conf << EOF/usr/ bin>2.4 >2.4 >2.2 .0 1.2 resource class list --sort-column name1.6 trait list --sort-column name
Nova(计算服务) 控制节点 1 2 3 4 5 6 7 8 9 10 11 12 13 14 15 16 17 18 19 20 21 22 23 24 25 26 27 28 29 30 31 32 33 34 35 36 37 38 39 40 41 42 43 44 45 46 47 48 49 50 51 52 53 54 55 56 57 58 59 60 61 62 63 64 65 66 67 68 69 70 71 72 73 74 75 76 77 78 79 80 81 82 83 84 85 86 87 88 89 90 91 92 93 94 95 96 97 98 99 100 101 102 103 104 105 106 107 108 109 #控制节点controller-48 CREATE DATABASE nova_api;CREATE DATABASE nova;CREATE DATABASE nova_cell0;GRANT ALL PRIVILEGES ON nova_api.* TO 'nova' @'localhost' \BY 'NOVA_DBPASS' ;GRANT ALL PRIVILEGES ON nova_api.* TO 'nova' @'%' \BY 'NOVA_DBPASS' ;GRANT ALL PRIVILEGES ON nova.* TO 'nova' @'localhost' \BY 'NOVA_DBPASS' ;GRANT ALL PRIVILEGES ON nova.* TO 'nova' @'%' \BY 'NOVA_DBPASS' ;GRANT ALL PRIVILEGES ON nova_cell0.* TO 'nova' @'localhost' \BY 'NOVA_DBPASS' ;GRANT ALL PRIVILEGES ON nova_cell0.* TO 'nova' @'%' \BY 'NOVA_DBPASS' ;privileges ;exit admin -openrc.shuser create role add create create public http://controller-48 :8774 /v2.1 create internal http://controller-48 :8774 /v2.1 create admin http://controller-48 :8774 /v2.1 DEFAULT ]-48 :5672 /192.168 .48 .10 log /nova/nova-controller.log connection = mysql+pymysql://nova:NOVA_DBPASS@controller-48 /nova_apidatabase ]connection = mysql+pymysql://nova:NOVA_DBPASS@controller-48 /nova-48 :5000 /-48 :5000 /-48 :11211 password Default Default password =NOVA_PASStrue -48 :9292 Default password Default -48 :5000 /v3password = PLACEMENT_PASSenable
计算节点 1 2 3 4 5 6 7 8 9 10 11 12 13 14 15 16 17 18 19 20 21 22 23 24 25 26 27 28 29 30 31 32 33 34 35 36 37 38 39 40 41 42 43 44 45 46 47 48 49 50 51 52 53 54 55 56 57 58 59 60 61 62 63 64 65 66 67 68 69 70 71 72 73 74 75 76 77 /etc/yum .repos.d/CentOS-Base.repo<<EOF$releasever - Base//mi rrors.aliyun.com/centos/ 7.9 .2009 /virt/ x86_64/kvm-common/ 0 // /etc/ pki/rpm-gpg/ RPM-GPG-KEY-CentOS-7 0.26 .0 -2 .el7.x86_64 -y/etc/ nova/nova.conf{,.bak}/etc/ nova/nova.conf <<EOF// openstack:RABBIT_PASS@controller-48 192.168 .48.20 /var/ log/nova/ nova-compute.log// controller-48 :5000 /// controller-48 :5000 /48 :11211 0.0 .0.0 $my_ip // 192.168 .48.10 :6080 /vnc_auto.html// controller-48 :9292 /var/ lib/nova/ tmp// controller-48 :5000 /v3// controller-48 :5000 '(vmx|svm)' /proc/ cpuinfo/etc/ nova/nova.conf
控制节点验证 1 2 3 4 5 6 7 8 9 10 11 12 13 14 15 16 17 18 19 20 21 22 23 24 25 26 27 28 29 30 31 32 33 34 35 36 37 38 39 40 41 42 43 44 45 46 47 48 49 50 51 52 53 54 55 56 57 58 59 60 61 62 63 64 65 66 67 68 69 70 71 72 73 74 75 76 77 78 79 80 81 82 83 84 85 86 87 88 89 90 91 92 93 94 95 96 97 98 99 100 101 102 103 104 105 106 107 108 ID | Binary | Host | Zone | Status | State | Updated At | 10 | nova-computer | computer-48 | nova | enabled | up | 2023-04-02T17:17:08.000000 |"nova-manage cell_v2 discover_hosts --verbose" nova@controller-48 ~] ID | Binary | Host | Zone | Status | State | Updated At | 1 | nova-conductor | controller-48 | internal | enabled | up | 2023-05-27T17:44:38.000000 | 4 | nova-scheduler | controller-48 | internal | enabled | up | 2023-05-27T17:44:40.000000 | 5 | nova-compute | computer-48 | nova | enabled | up | 2023-05-27T17:44:43.000000 | Name | Type | Endpoints | placement | placement | RegionOne | | | internal: http://controller-48:8778 | | | RegionOne | | | admin: http://controller-48:8778 | | | RegionOne | | | public: http://controller-48:8778 | | | | keystone | identity | RegionOne | | | admin: http://controller-48:5000/v3/ | | | RegionOne | | | internal: http://controller-48:5000/v3/ | | | RegionOne | | | public: http://controller-48:5000/v3/ | | | | neutron | network | RegionOne | | | public: http://controller-48:9696 | | | RegionOne | | | internal: http://controller-48:9696 | | | RegionOne | | | admin: http://controller-48:9696 | | | | glance | image | RegionOne | | | admin: http://controller-48:9292 | | | RegionOne | | | internal: http://controller-48:9292 | | | RegionOne | | | public: http://controller-48:9292 | | | | nova | computer-48 | RegionOne | | | admin: http://controller-48:8774/v2.1 | | | RegionOne | | | internal: http://controller-48:8774/v2.1 | | | RegionOne | | | public: http://controller-48:8774/v2.1 | | | | | | | ID | Name | Status | 4e022193-03c2-40c4-872f-0adb606f31e4 | cirros | active |@controller-48 ~] Upgrade Check Results | Check: Cells v2 | Result: Success | Details: None | Check: Placement API | Result: Success | Details: None | Check: Ironic Flavor Migration | Result: Success | Details: None | Check: Cinder API | Result: Success | Details: None |<< EOF [scheduler] discover_hosts_in_cells_interval = 300 EOF
Neutron(网络服务) 控制节点 1 2 3 4 5 6 7 8 9 10 11 12 13 14 15 16 17 18 19 20 21 22 23 24 25 26 27 28 29 30 31 32 33 34 35 36 37 38 39 40 41 42 43 44 45 46 47 48 49 50 51 52 53 54 55 56 57 58 59 60 61 62 63 64 65 66 67 68 69 70 71 72 73 74 75 76 77 78 79 80 81 82 83 84 85 86 87 88 89 90 91 92 93 94 95 96 97 98 99 100 101 102 103 104 105 106 107 108 109 110 111 112 113 114 115 116 117 118 119 120 121 122 123 124 125 126 127 128 129 130 131 132 133 134 135 136 137 138 139 140 141 142 143 144 145 146 147 148 149 150 151 152 153 154 155 156 157 158 'neutron' @'localhost' \'NEUTRON_DBPASS' ;'neutron' @'%' \'NEUTRON_DBPASS' ;exit "OpenStack Networking" network// controller-48 :9696 // controller-48 :9696 // controller-48 :9696 /etc/ neutron/neutron.conf{,.bak}/etc/ neutron/neutron.conf <<EOF// neutron:NEUTRON_DBPASS@controller-48 /neutron// openstack:RABBIT_PASS@controller-48 // controller-48 :5000 // controller-48 :5000 48 :11211 // controller-48 :5000 /etc/ neutron/plugins/m l2/ml2_conf.ini{,.bak}/etc/ neutron/plugins/m l2/ml2_conf.ini << EOF1 :1000 /etc/ neutron/plugins/m l2/linuxbridge_agent.ini{,.bak}/etc/ neutron/plugins/m l2/linuxbridge_agent.ini <<EOF192.168 .48.10 /etc/ neutron/l3_agent.ini{,.bak}/etc/ neutron/l3_agent.ini << EOF/etc/ neutron/dhcp_agent.ini{,.bak}/etc/ neutron/dhcp_agent.ini << EOF/etc/ rc.sysinit<<EOFfor file in /etc/ sysconfig/modules/ *.modules ; do $file ] && $file "modprobe br_netfilter" >/etc/ sysconfig/modules/ br_netfilter.modules755 /etc/ sysconfig/modules/ br_netfilter.modules/etc/ neutron/metadata_agent.ini{,.bak}/etc/ neutron/metadata_agent.ini << EOF48 /etc/ nova/nova.conf << EOF// controller-48 :5000 /etc/ neutron/plugins/m l2/ml2_conf.ini / etc/neutron/ plugin.ini/bin/ sh -c "neutron-db-manage --config-file /etc/neutron/neutron.conf --config-file /etc/neutron/plugins/ml2/ml2_conf.ini upgrade head" neutron192.168 .48.2 dev ens33
计算节点 1 2 3 4 5 6 7 8 9 10 11 12 13 14 15 16 17 18 19 20 21 22 23 24 25 26 27 28 29 30 31 32 33 34 35 36 37 38 39 40 41 42 43 44 45 46 47 48 49 50 51 52 53 54 55 ###compute计算节点/etc/ neutron/neutron.conf{,.bak}/etc/ neutron/neutron.conf << EOFDEFAULT ]48 :11211 default default /var/ lib/neutron/ tmp/etc/ neutron/plugins/m l2/linuxbridge_agent.ini{,.bak}/etc/ neutron/plugins/m l2/linuxbridge_agent.ini <<EOFtrue 192.168 .48.20 true 192.168 .48.20 为 计算节点 管理网络的 IP 地址true /etc/ rc.sysinit<<EOF/bin/ bashfor file in /etc/ sysconfig/modules/ *.modules ; do file ] && $file "modprobe br_netfilter" >/etc/ sysconfig/modules/ br_netfilter.modules755 /etc/ sysconfig/modules/ br_netfilter.modulesgrep net.bridge.bridrge-nf-call
控制节点验证 1 2 3 4 5 6 7 8 9 10 11 12 13 14 15 16 17 18 @controller-48 ~] ID | Agent Type | Host | Availability Zone | Alive | State | Binary | 201870b9-aac0-4830-9788-03da13b125c7 | Metadata agent | controller-48 | None | :-) | UP | neutron-metadata-agent | 55ae2391-4cd6-4cd1-bf4f-4465f1b561a1 | L3 agent | controller-48 | nova | :-) | UP | neutron-l3-agent | bae3fe77-a005-4cdf-aee6-8cfe3cf918ba | Linux bridge agent | controller-48 | None | :-) | UP | neutron-linuxbridge-agent | f0bd6fbc-2889-4558-80fa-8f2a08989b74 | Linux bridge agent | computer-48 | None | :-) | UP | neutron-linuxbridge-agent | f5546196-9950-4c5a-b709-060a1bba5944 | DHCP agent | controller-48 | nova | :-) | UP | neutron-dhcp-agent |
Horizon(Web管理页面) 1 2 3 4 5 6 7 8 9 10 11 12 13 14 15 16 17 18 19 20 21 22 23 24 25 26 27 28 29 30 31 32 33 34 35 36 37 38 39 40 41 42 43 44 45 46 47 48 49 50 51 52 53 54 55 56 57 58 59 systemctl restart neutron* openstack-nova*/etc/ openstack-dashboard/local_settings{,.bak}'s/^ALLOWED_HOSTS/#&/' /etc/ openstack-dashboard/local_settings's/^OPENSTACK_HOST/#&/' /etc/ openstack-dashboard/local_settings's/^OPENSTACK_KEYSTONE_URL/#&/' /etc/ openstack-dashboard/local_settings's/^TIME_ZONE/#&/' /etc/ openstack-dashboard/local_settings/etc/ openstack-dashboard/local_settings <<EOF'*' ]'django.contrib.sessions.backends.cache' 'default' : {'BACKEND' : 'django.core.cache.backends.memcached.MemcachedCache' ,'LOCATION' : 'controller-48:11211' ,"controller-48" "http://%s:5000/identity/v3" % OPENSTACK_HOSTTrue "identity" : 3 ,"image" : 2 ,"volume" : 3 ,"Default" "user" "Asia/Shanghai" /etc/ httpd/conf.d/ openstack-dashboard.conf{,.bak}/etc/ httpd/conf.d/ openstack-dashboard.conf << EOF'/' 中的 / 改成 / dashboard"s#WEBROOT\s*=.*#WEBROOT = '/dashboard'#" /usr/ share/openstack-dashboard/ openstack_dashboard/defaults.py"s#WEBROOT\s*=.*#WEBROOT = '/dashboard'#" /usr/ share/openstack-dashboard/ openstack_dashboard/test/ settings.py's|WEBROOT\s*=.*|WEBROOT = "/dashboard"|' /usr/ share/openstack-dashboard/ static /dashboard/ js/1453 ede06e9f.js1453 ede06e9f.js是否存在,若不存在,则看下面三个文件中有WEBROOT = '/' 替换文件名即可48 ~]# cd /usr/ share/openstack-dashboard/ static /dashboard/ js/48 js]# ll2472 #以下几个文件也要改 ,我这里就一个文件有1 root root 606959 May 17 2021 1453 ede06e9f.js1 root root 1659039 May 17 2021 b5e88d434bd1.js1 root root 254022 May 17 2021 eb687af7228a.jsDefault
cinder(块存储服务) 控制节点 1 2 3 4 5 6 7 8 9 10 11 12 13 14 15 16 17 18 19 20 21 22 23 24 25 26 27 28 29 30 31 32 33 34 35 36 37 38 39 40 41 42 43 44 45 46 47 48 49 50 51 52 53 54 55 56 57 58 59 'cinder' @'localhost' \'CINDER_DBPASS' ;'cinder' @'%' \'CINDER_DBPASS' ;exit "OpenStack Block Storage" volumev3// controller-48 :8776 /v3/ %\(project_id\)s// controller-48 :8776 /v3/ %\(project_id\)s// controller-48 :8776 /v3/ %\(project_id\)s/etc/ cinder/cinder.conf{,.bak}/etc/ cinder/cinder.conf << EOF// openstack:RABBIT_PASS@controller-48 192.168 .48.10 // cinder:CINDER_DBPASS@controller-48 /cinder// controller-48 :5000 // controller-48 :5000 48 :11211 /var/ lib/cinder/ tmp/bin/ sh -c "cinder-manage db sync" cinder/etc/ nova/nova.conf << EOF
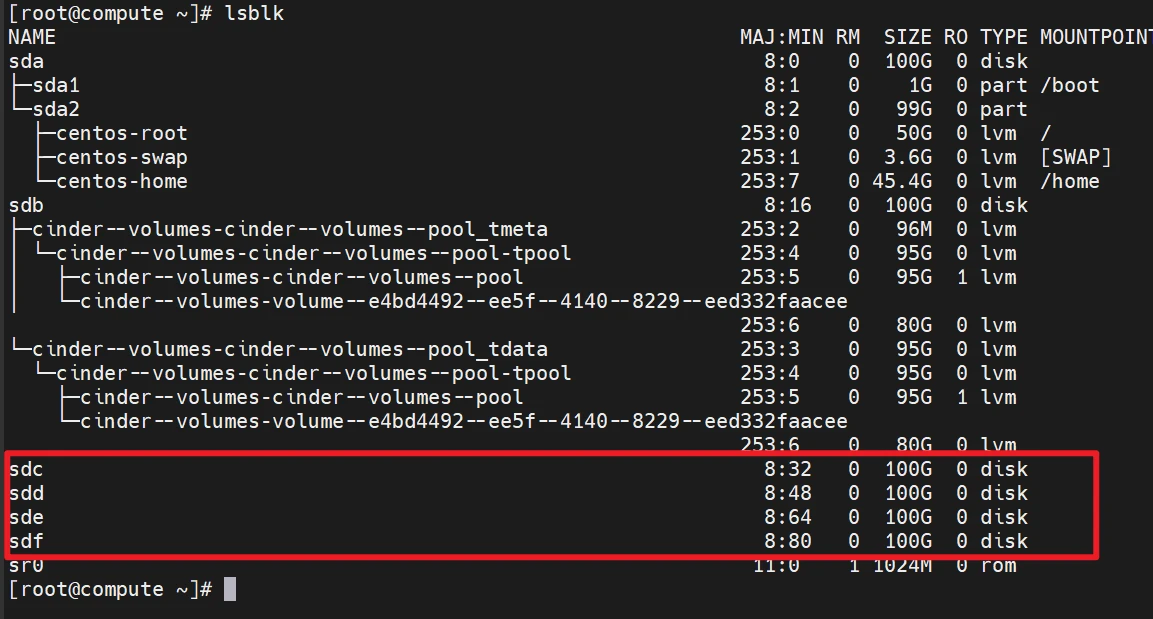
计算节点 1 2 3 4 5 6 7 8 9 10 11 12 13 14 15 16 17 18 19 20 21 22 23 24 25 26 27 28 29 30 31 32 33 34 35 36 37 38 39 40 41 42 43 44 45 46 47 48 49 50 51 52 53 54 55 56 57 58 59 60 61 62 63 64 65 66 67 68 69 70 71 48 ~]8 :0 0 100 G 0 disk8 :1 0 1 G 0 part /boot8 :2 0 99 G 0 part253 :0 0 50 G 0 lvm /253 :1 0 3.6 G 0 lvm [SWAP]253 :2 0 45.4 G 0 lvm /home8 :16 0 100 G 0 disk11 :0 1 1024 M 0 rom/dev/ sdb/dev/ sdb/etc/ lvm/lvm.conf{,.bak}'130 a\filter = [ "a/sdb/","r/.*/"]' /etc/ lvm/lvm.conf/etc/ cinder/cinder.conf{,.bak}/etc/ cinder/cinder.conf << EOF// openstack:RABBIT_PASS@controller-48 192.168 .48.20 // controller-48 :9292 // cinder:CINDER_DBPASS@controller-48 /cinder// controller-48 :5000 // controller-48 :5000 48 :11211 /var/ lib/cinder/ tmp
控制节点验证 1 2 3 4 5 6 7 8 9 10 11 12 13 @controller-48 ~] Binary | Host | Zone | Status | State | Updated At | cinder-scheduler | controller-48 | nova | enabled | up | 2023-05-24T08:24:18.000000 | cinder-volume | computer-48@lvm | nova | enabled | up | 2023-05-24T08:24:17.000000 |
Swift(对象存储) 控制节点 1 2 3 4 5 6 7 8 9 10 11 12 13 14 15 16 17 18 19 20 21 22 23 24 25 26 27 28 29 30 31 32 33 34 35 36 37 38 39 40 41 42 43 44 45 46 47 48 49 50 51 52 53 54 55 56 57 58 59 60 61 62 63 64 65 66 67 68 69 70 71 72 73 74 75 76 77 78 79 80 81 82 83 84 85 86 87 88 89 90 91 92 93 94 95 "OpenStack Object Storage" object-store[pipeline:main] [app:proxy-server] [filter:authtoken] [filter:keystoneauth] [filter:healthcheck] [filter:cache] [filter:ratelimit] [filter:domain_remap] [filter:catch_errors] [filter:cname_lookup] [filter:staticweb] [filter:tempurl] [filter:formpost] [filter:name_check] [filter:list-endpoints] [filter:proxy-logging] [filter:bulk] [filter:slo] [filter:dlo] [filter:container-quotas] [filter:account-quotas] [filter:gatekeeper] [filter:container_sync] [filter:xprofile] [filter:versioned_writes]
computer-48 添加4张硬盘
1 2 3 4 5 6 7 8 9 10 11 12 13 14 15 16 17 18 19 20 21 22 23 24 25 26 27 28 29 30 31 32 33 34 35 36 37 38 39 40 41 42 43 44 45 46 47 48 49 50 51 52 53 54 55 56 57 58 59 60 61 62 63 64 65 66 67 68 69 70 71 72 73 74 75 76 77 78 79 80 81 82 83 84 85 86 87 88 89 90 91 92 93 94 95 96 97 98 99 100 101 102 103 104 105 106 107 108 109 110 111 112 113 114 115 116 117 118 119 120 121 122 123 124 125 126 127 128 129 130 131 132 133 134 135 136 137 138 139 140 141 142 143 144 145 146 147 148 149 150 151 152 153 154 155 156 157 158 /dev/ sdc/dev/ sdd/dev/ sde/dev/ sdf/srv/ node/sdc/srv/ node/sdd/srv/ node/sde/srv/ node/sdf/etc/ fstab << EOF/dev/ sdc /srv/ node/sdc xfs noatime,nodiratime,nobarrier,logbufs=8 0 2 /dev/ sdd /srv/ node/sdd xfs noatime,nodiratime,nobarrier,logbufs=8 0 2 /dev/ sdc /srv/ node/sde xfs noatime,nodiratime,nobarrier,logbufs=8 0 2 /dev/ sdd /srv/ node/sdf xfs noatime,nodiratime,nobarrier,logbufs=8 0 2 /srv/ node/sdc/srv/ node/sdd/srv/ node/sde/srv/ node/sdf/etc/ rsyncd.conf<<EOF/var/ log/rsyncd.log/var/ run/rsyncd.pid192.168 .148.20 2 /srv/ node//var/ lock/account.lock2 /srv/ node//var/ lock/container.lock2 /srv/ node//var/ lock/object.lock/etc/ swift/account-server.conf{,.bak}/etc/ swift/account-server.conf<<EOF192.168 .148.20 6202 /etc/ swift/srv/ node/var/ cache/swift/etc/ swift/container-server.conf{,.bak}/etc/ swift/container-server.conf<<EOF192.168 .148.20 6201 /etc/ swift/srv/ node/etc/ swift/object-server.conf{,.bak}/etc/ swift/object-server.conf<<EOF0.0 .0.0 6200 /etc/ swift/srv/ node/var/ cache/swift/var/ lock/dev/ log /srv/ node/var/ cache/swift/var/ cache/swift775 /var/ cache/swift6200 /tcp6201 /tcp6202 /tcp
创建和分发初始环 controller-48 1 2 3 4 5 6 7 8 9 10 11 12 13 14 15 16 17 18 19 20 21 22 23 24 25 26 27 28 29 30 31 32 33 34 35 36 37 38 39 40 41 42 43 44 45 46 47 48 49 50 51 52 53 54 55 56 57 58 59 60 61 62 63 64 65 66 67 68 69 70 71 72 #控制节点6202 )创建用户环.builder create 10 3 1 .builder add \--region 1 --zone 1 --ip 192.168 .148.20 --port 6202 --device sdc --weight 100 .builder add \--region 1 --zone 1 --ip 192.168 .148.20 --port 6202 --device sdd --weight 100 .builder add \--region 1 --zone 2 --ip 192.168 .148.20 --port 6202 --device sde --weight 100 .builder add \--region 1 --zone 2 --ip 192.168 .148.20 --port 6202 --device sdf --weight 100 .builder .builder rebalance.builder 6201 )创建容器环.builder create 10 3 1 .builder add \--region 1 --zone 1 --ip 192.168 .148.20 --port 6201 --device sdc --weight 100 .builder add \--region 1 --zone 1 --ip 192.168 .148.20 --port 6201 --device sdd --weight 100 .builder add \--region 1 --zone 2 --ip 192.168 .148.20 --port 6201 --device sde --weight 100 .builder add \--region 1 --zone 2 --ip 192.168 .148.20 --port 6201 --device sdf --weight 100 .builder .builder rebalance6200 )创建对象环object .builder create 10 3 1 object .builder add \--region 1 --zone 1 --ip 192.168 .148.20 --port 6200 --device sdc --weight 100 object .builder add \--region 1 --zone 1 --ip 192.168 .148.20 --port 6200 --device sdd --weight 100 object .builder add \--region 1 --zone 2 --ip 192.168 .148.20 --port 6200 --device sde --weight 100 object .builder add \--region 1 --zone 2 --ip 192.168 .148.20 --port 6200 --device sdf --weight 100 object .builder object .builder rebalance.ring .gz container.ring .gz object .ring .gz 192.168 .148.20 :/etc/swift48 [swift-hash] [storage-policy:0] 0 .conf 192.168 .148.20 :/etc/swift.service memcached.service --now .service memcached.service
计算节点 1 2 3 4 5 6 7 8 9 10 11 12 13 14 15 在存储节点启动所有服务.service openstack-swift-account-auditor.service \.service openstack-swift-account-replicator.service .service openstack-swift-account-auditor.service \.service openstack-swift-account-replicator.service .service \.service openstack-swift-container-replicator.service \.service .service \.service openstack-swift-container-replicator.service \.service object .service openstack-swift-object-auditor.service \.service openstack-swift-object-updater.service object .service openstack-swift-object-auditor.service \.service openstack-swift-object-updater.service
验证 1 2 3 4 5 6 7 8 9 10 11 12 13 14 15 16 17 [root@controller-48 swift ]Account: AUTH_07a1ce96dca54f1bb0d3b968f1343617 Containers: 0 Objects: 0 Bytes: 0 X-Put-Timestamp: 1684919814.32783 X-Timestamp: 1684919814.32783 X-Trans-Id: txd6f3affa0140455b935ff-00646dd605 Content-Type: text/plain; charset=utf-8 X-Openstack-Request-Id: txd6f3affa0140455b935ff-00646dd605 root@controller-48 swift ]root@controller-48 ~ ]image sudo systemctl restart openstack-nova*
Heat(编排) 控制节点 1 2 3 4 5 6 7 8 9 10 11 12 13 14 15 16 17 18 19 20 21 22 23 24 25 26 27 28 29 30 31 32 33 #创建heat数据库和用户CREATE DATABASE heat;GRANT ALL PRIVILEGES ON heat.* TO 'heat' @'localhost' \BY 'HEAT_DBPASS' ;GRANT ALL PRIVILEGES ON heat.* TO 'heat' @'%' \BY 'HEAT_DBPASS' ;privileges ;exit admin -openrc.shuser create admin 角色到 heat 用户上role add create create create public http://controller-48 :8004 /v1/%\(tenant_id\)screate internal http://controller-48 :8004 /v1/%\(tenant_id\)screate admin http://controller-48 :8004 /v1/%\(tenant_id\)screate public http://controller-48 :8000 /v1create internal http://controller-48 :8000 /v1create admin http://controller-48 :8000 /v1
为了管理栈,在认证服务中Orchestration需要更多信息
1 2 3 4 5 6 7 8 9 10 11 12 13 14 15 16 17 18 19 20 "Stack projects and users" heatuser create --domain heat --password= HEAT_DOMAIN_USER_PASS heat_domain_adminrole add --domain heat --user-domain heat --user heat_domain_admin adminrole create heat_stack_ownerrole add --project demo --user demo heat_stack_ownerrole create heat_stack_user
安装并配置Heat组件相关软件
1 2 3 4 5 6 7 8 9 10 11 12 13 14 15 16 17 18 19 20 21 22 23 24 25 26 27 28 29 30 31 32 33 34 35 36 37 38 39 40 41 42 43 44 45 46 47 48 49 50 51 52 53 54 /etc/ heat/heat.conf{,.bak}/etc/ heat/heat.conf << EOF// heat:HEAT_DBPASS@controller-48 /heat // openstack:RABBIT_PASS@controller-48 // controller-48 :5000 // controller-48 :5000 48 :11211 // controller-48 :5000 // controller-48 :5000 // controller-48 :8000 // controller-48 :8000 /v1/ waitcondition/bin/ sh -c "heat-manage db_sync" heat48 ~]
验证 1 2 3 4 5 6 7 8 9 10 11 12 13 14 15 16 cd@controller-48 ~] Hostname | Binary | Engine ID | Host | Topic | Updated At | Status | controller-48 | heat-engine | 230ae8e8-3c9f-4b82-b0ca-caef3d5497f1 | controller-48 | engine | 2023-05-27T14:42:52.000000 | up | controller-48 | heat-engine | 626e74a4-918b-46b8-8993-d6db92eb861e | controller-48 | engine | 2023-05-27T14:42:52.000000 | up | controller-48 | heat-engine | f648e766-cdb9-4e06-b190-a713baf33df8 | controller-48 | engine | 2023-05-27T14:42:52.000000 | up | controller-48 | heat-engine | 2cb3dfd3-0636-432c-8d59-f22d850510d5 | controller-48 | engine | 2023-05-27T14:42:52.000000 | up |
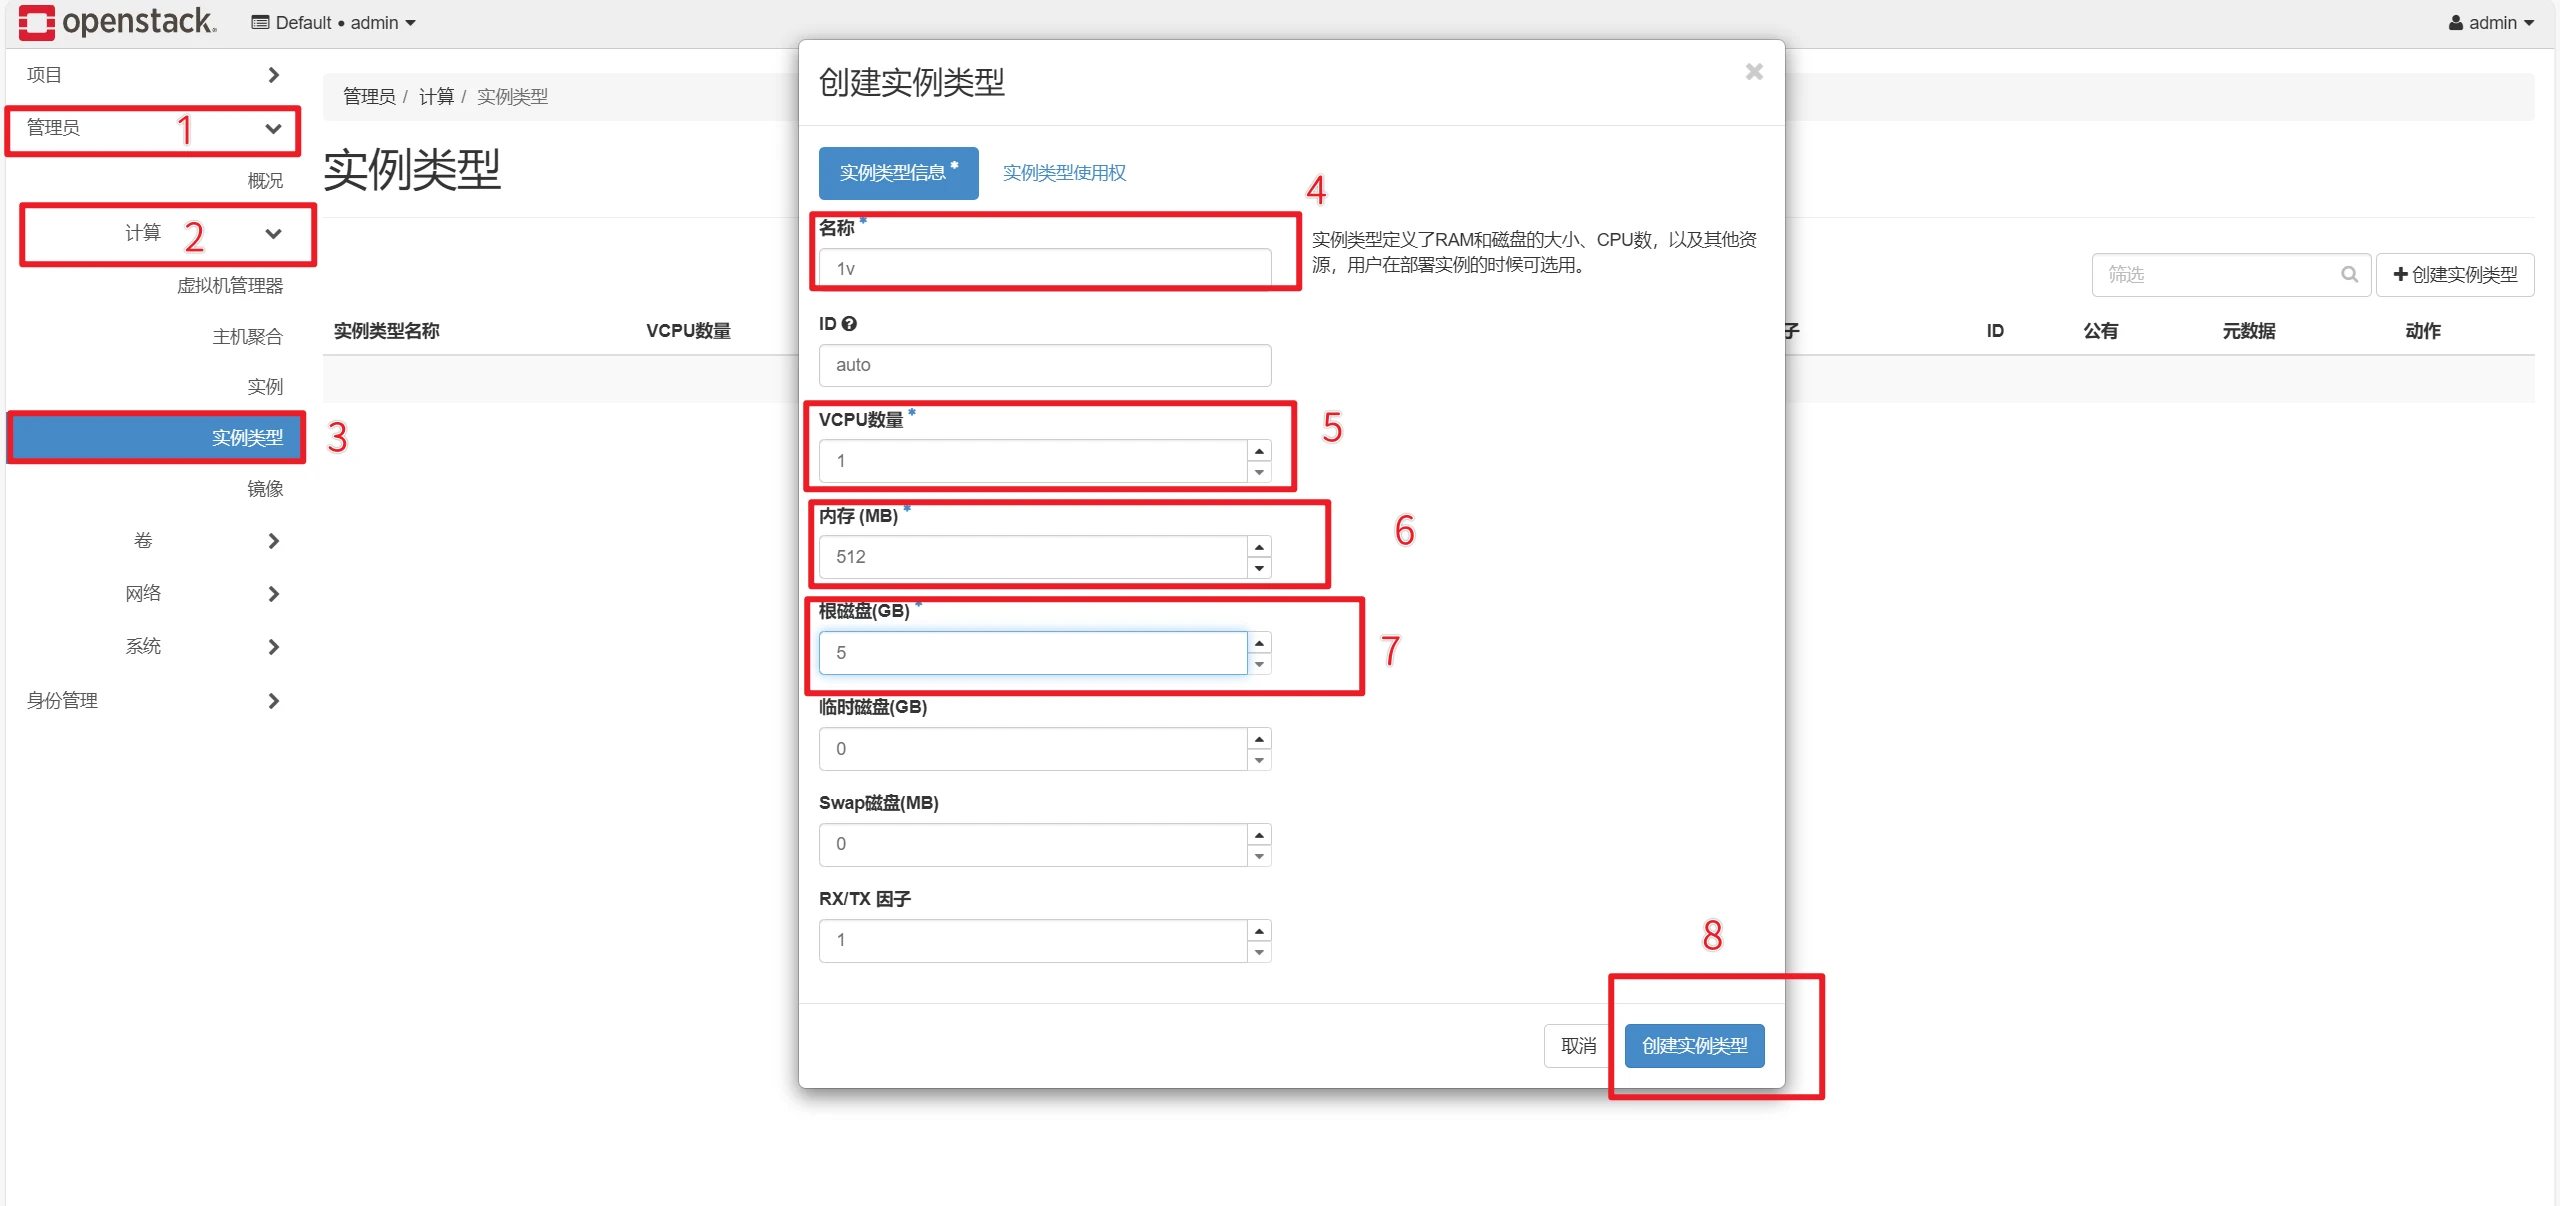
创建实例 创建实例类型 左侧选择管理员,点击计算,点击实例类型,右侧点击创建实例类型。
根据以上图片步骤依次填入:实例名称、VCPU数量、内存大小、根磁盘大小,确认无误后点击创建实例类型。
创建镜像 测试镜像:https://download.cirros-cloud.net/0.6.2/cirros-0.6.2-x86_64-disk.img
有两种上传方式(二选一)!!!
1.Windows上传镜像方式
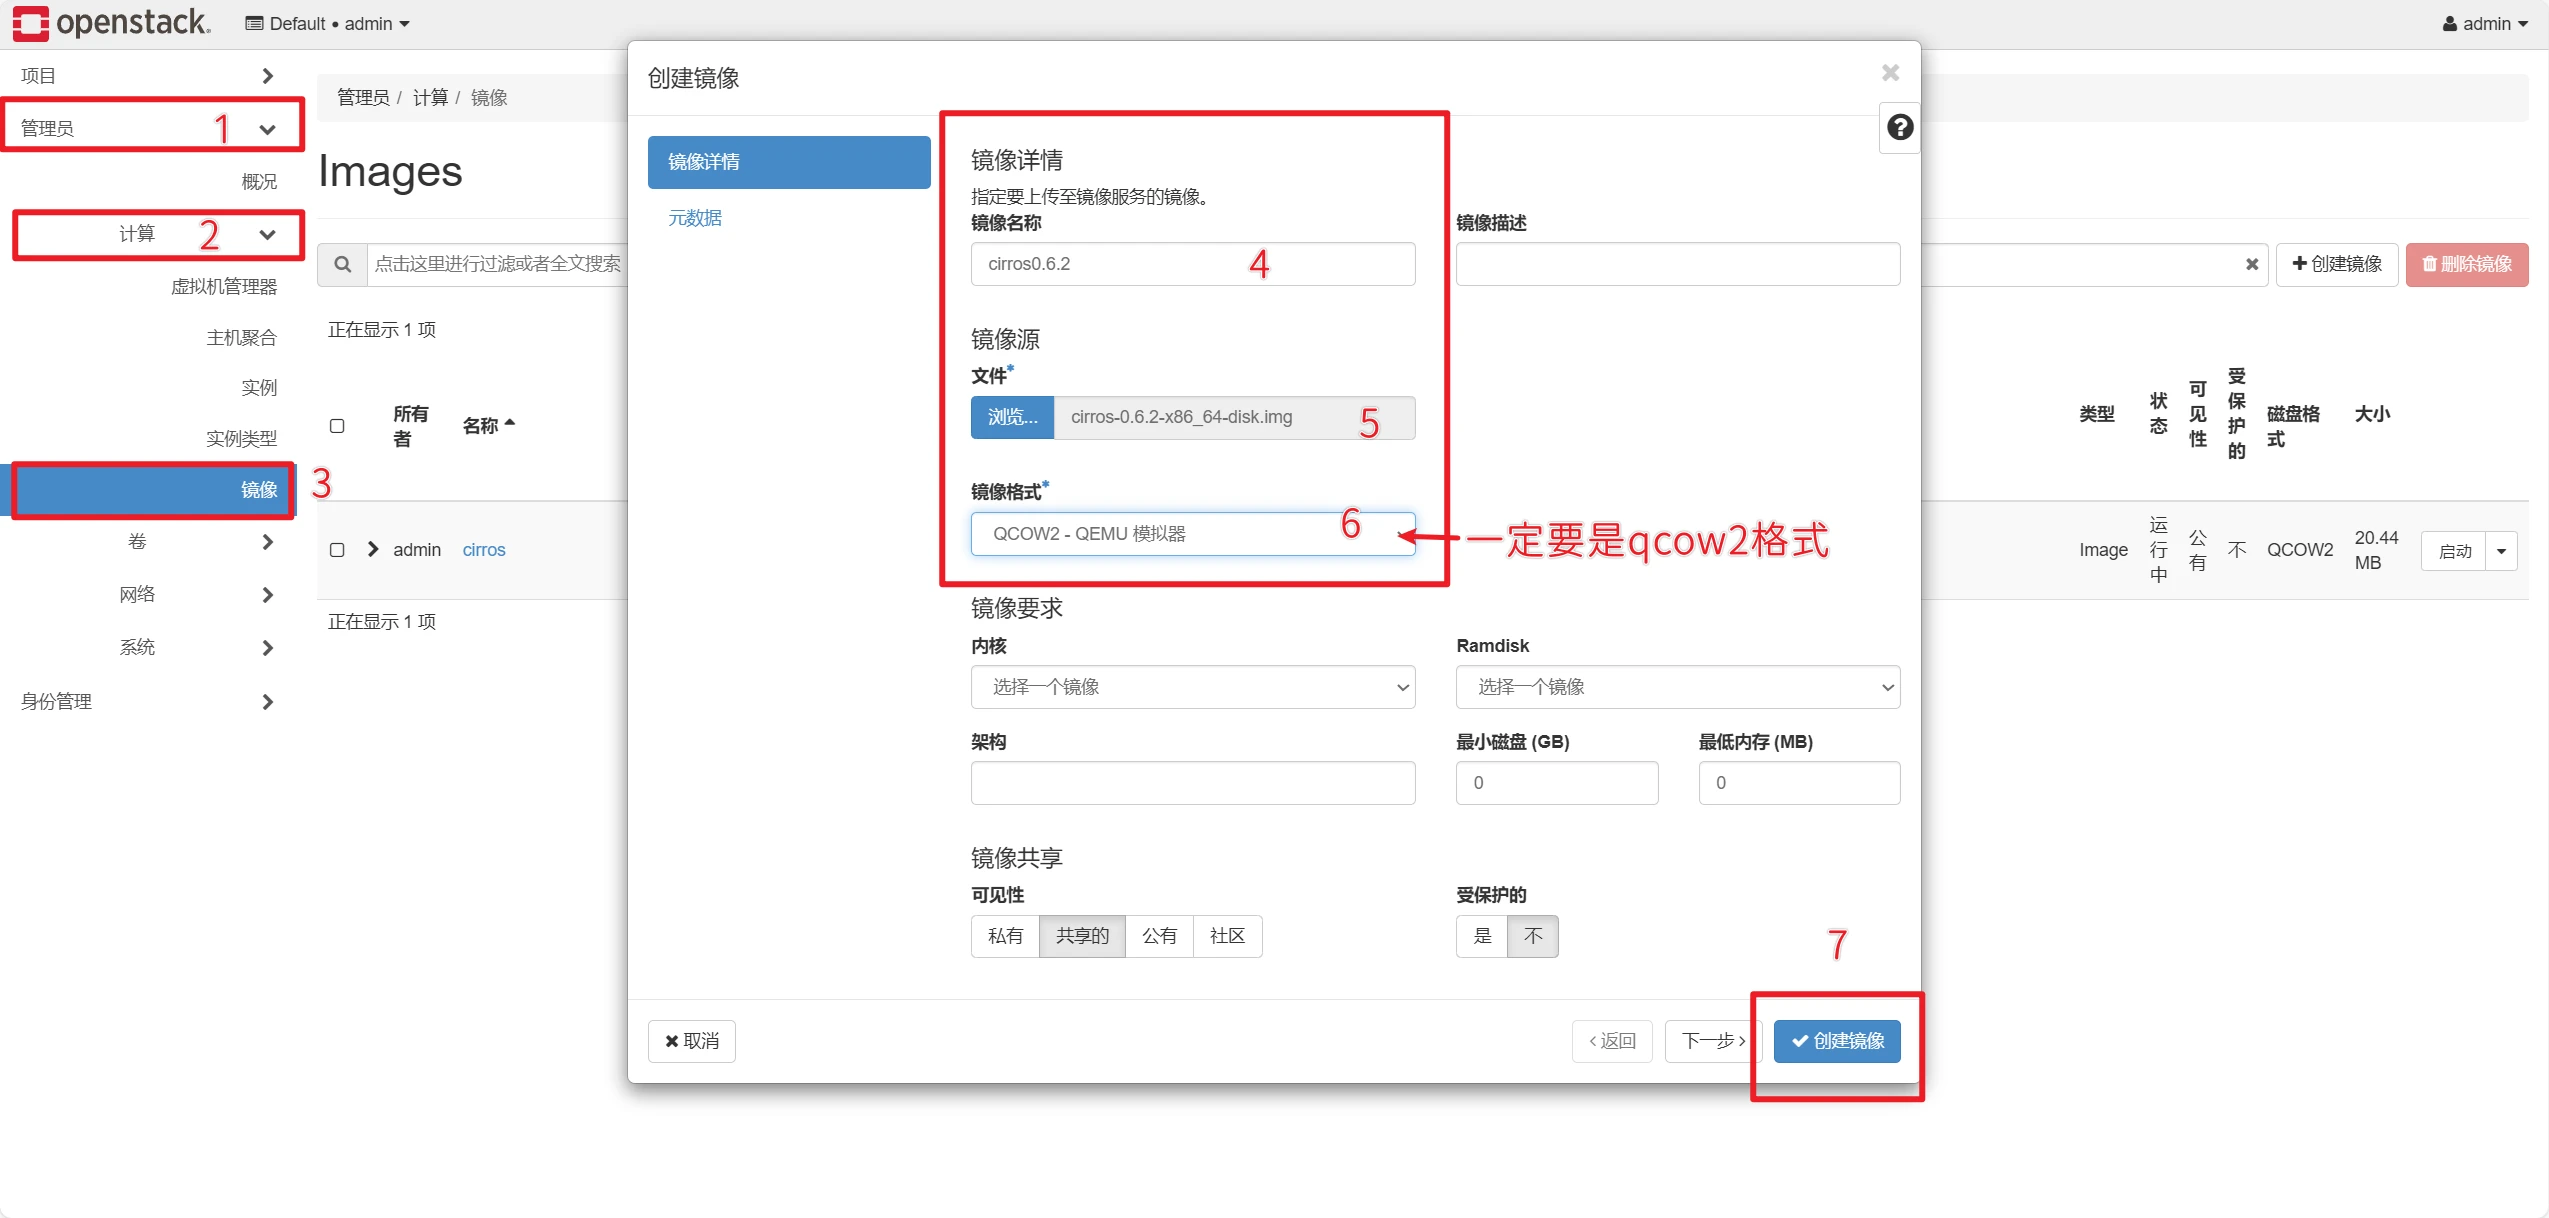
左侧选择管理员,点击计算,点击镜像,右侧点击创建镜像。
Windows下载到本地即可
根据以上图片步骤依次填入:镜像名称、选择文件、镜像格式,确认无误后点击创建镜像。注 :演示上传的 img 镜像格式需选用 QCOW2 - QEMU模拟器 才可正常加载。
2.Linux上传镜像方式
1 2 3 4 5 6 7 8 9 10 11 12 13 14 15 16 17 source admin-openrc_64-disk.img #可能会下载不到,可以复制链接到浏览器下载,然后移到/root/目录下 glance image-create --name "cirros" \ --file cirros-0.6.2-x86_ 64-disk.img \ --disk-format qcow2 --container-format bare \ --visibility=public +--------------------------------------+ --------+--------+ | ID | Name | Status | +--------------------------------------+--------+--------+ | 627761da-7f8c-4780-842a-e50e62f5c464 | cirros | active | +--------------------------------------+--------+--------+
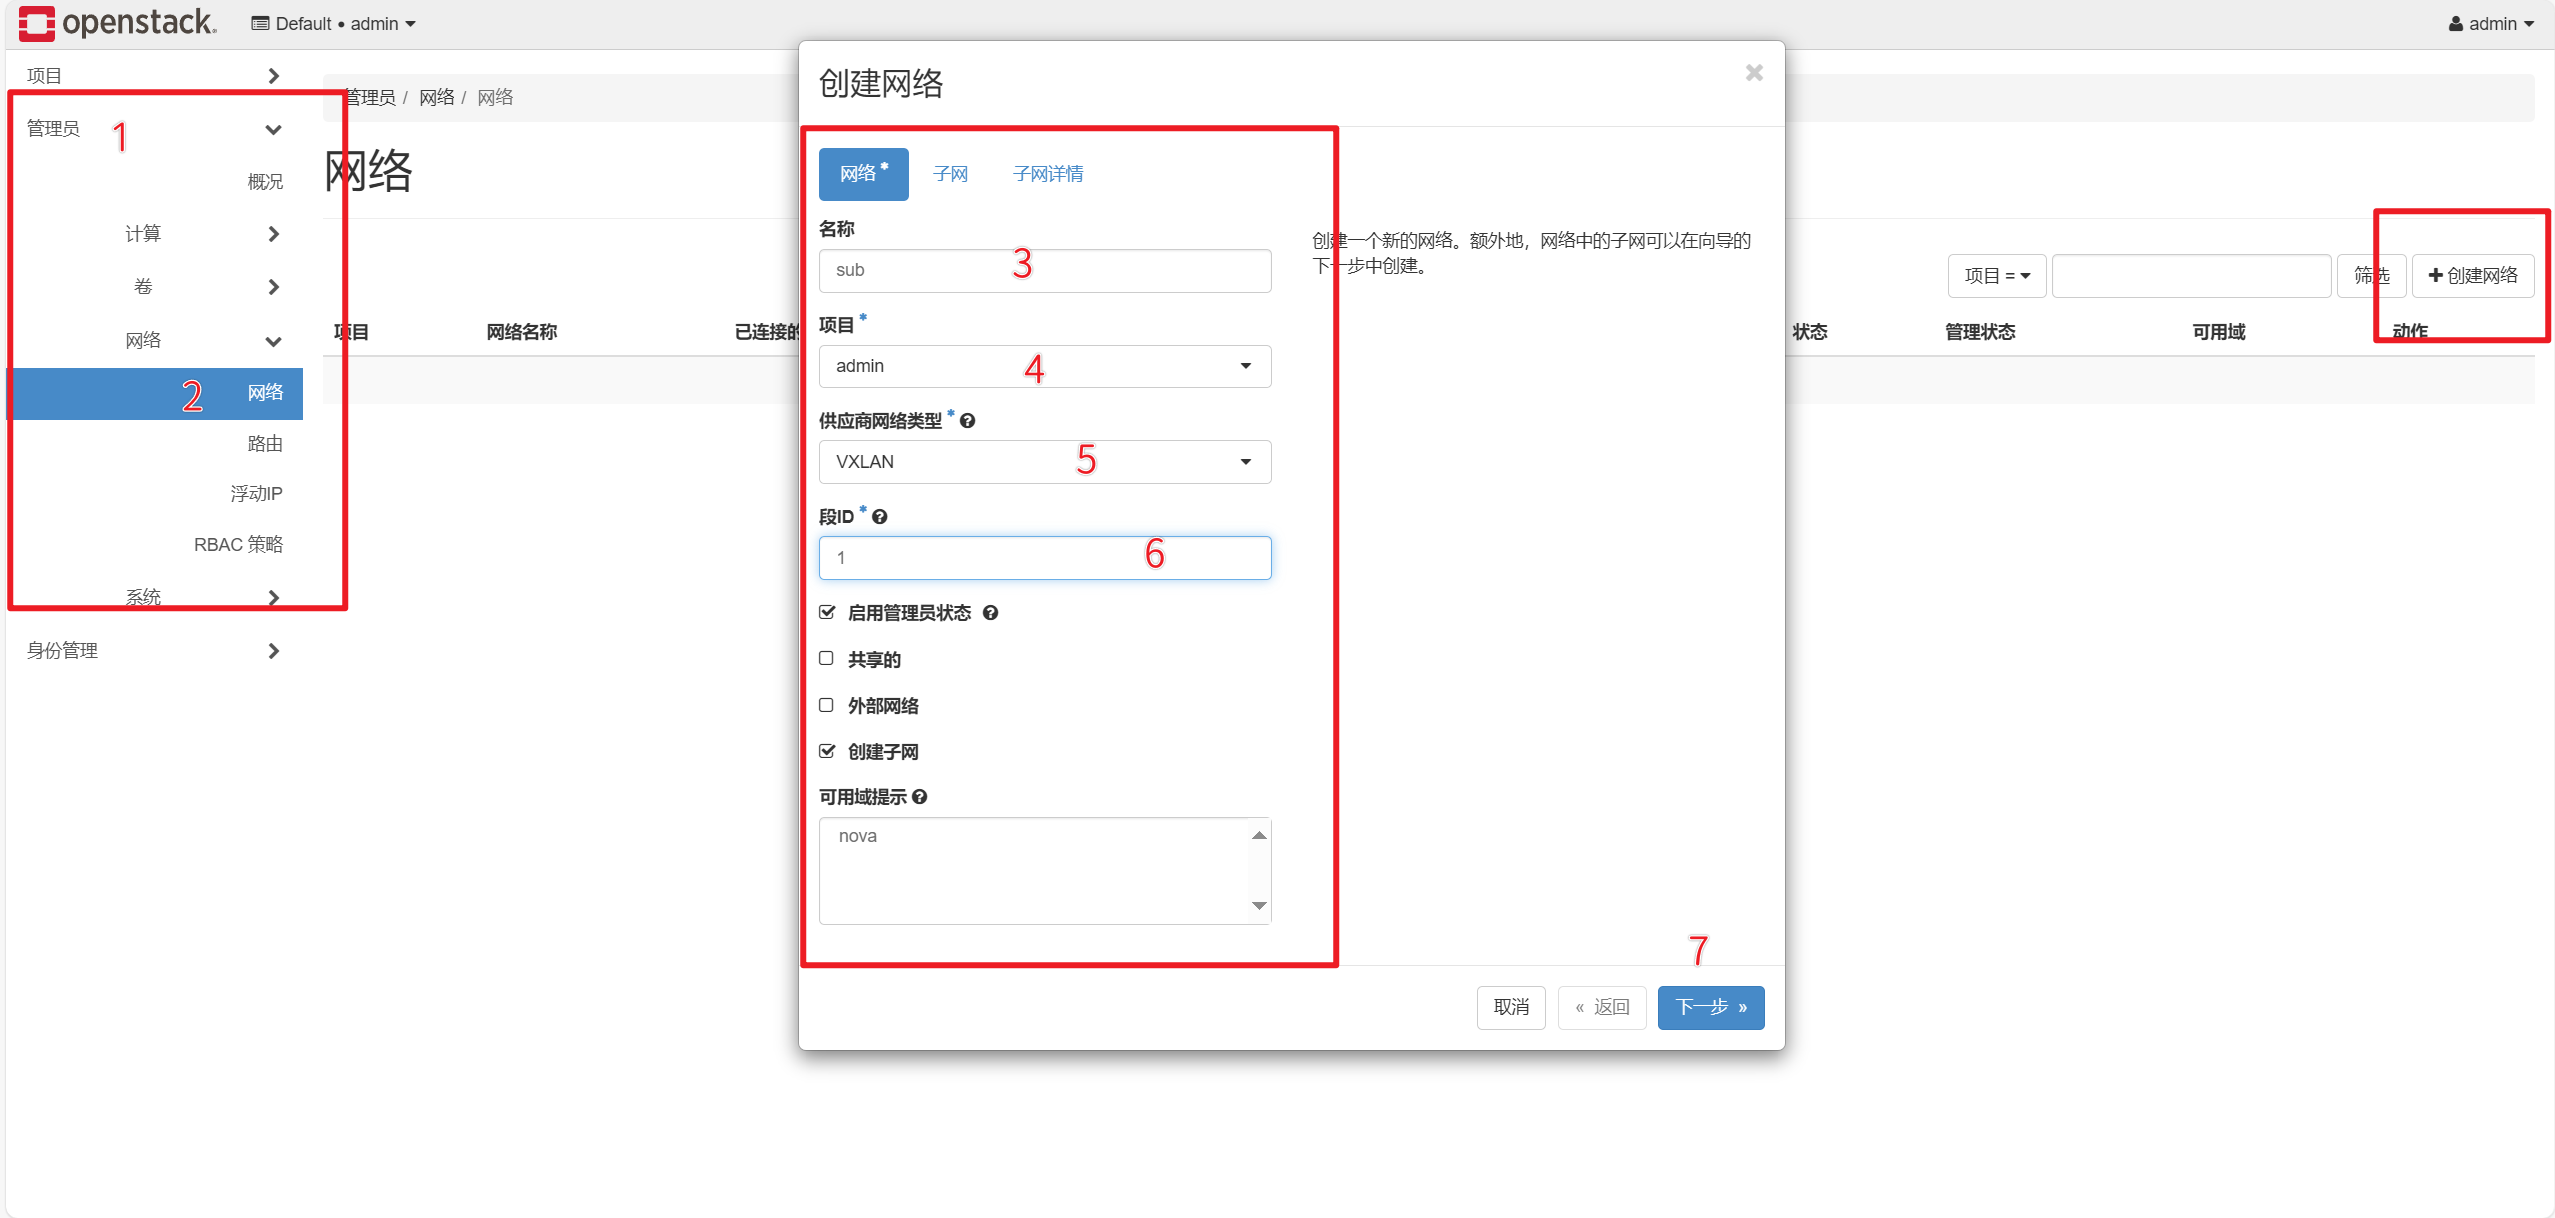
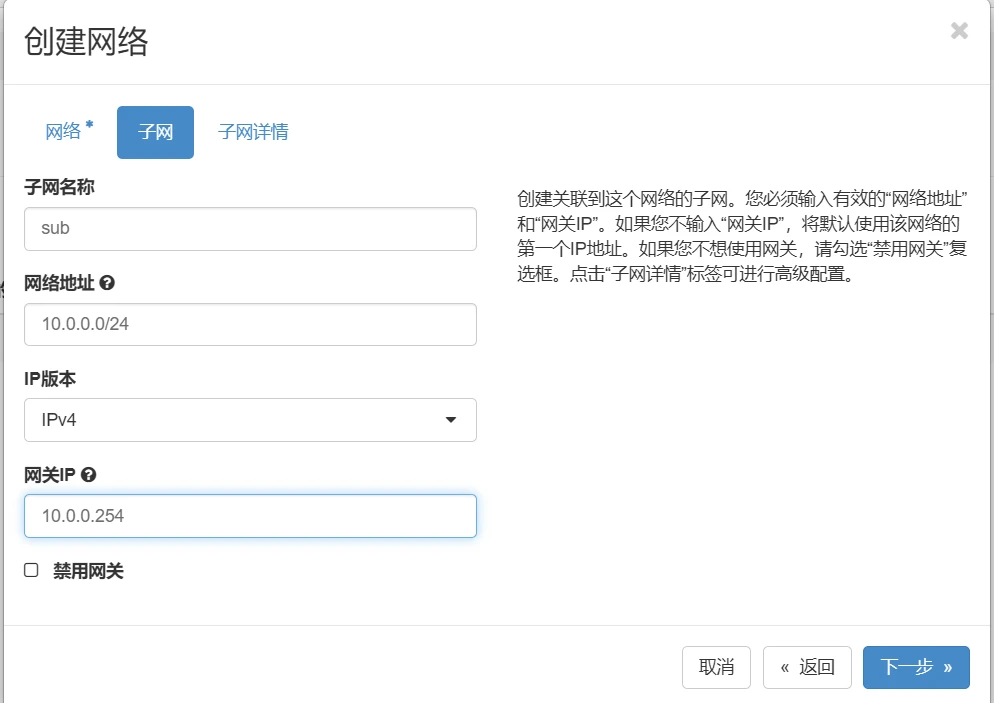
创建内部网络 左侧选择管理员,点击网络,点击网络,右侧点击创建网络。
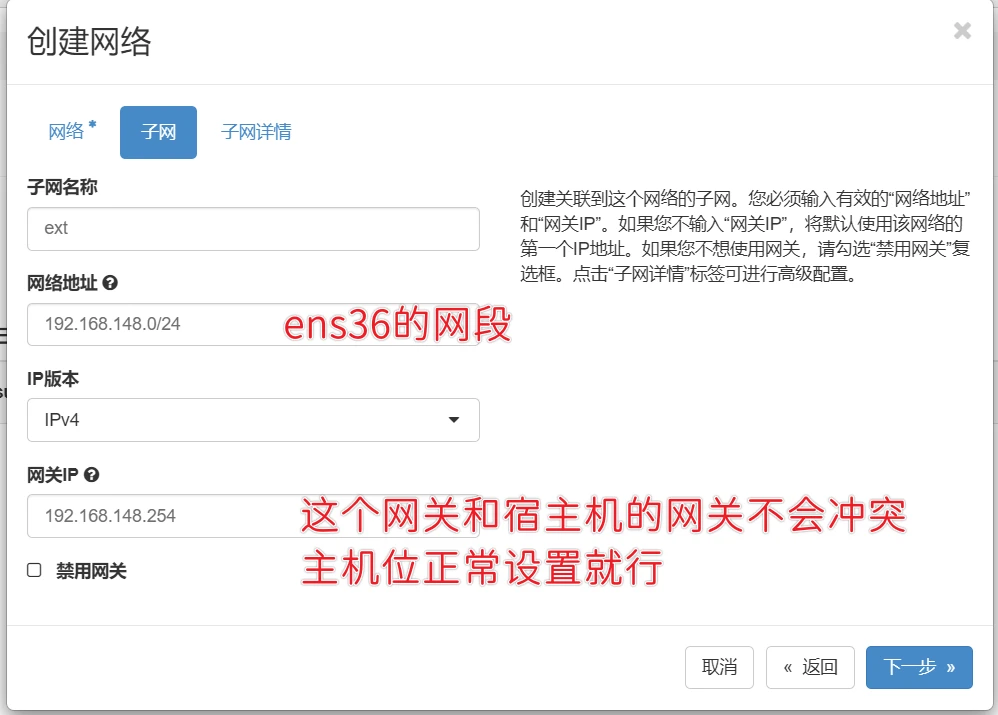
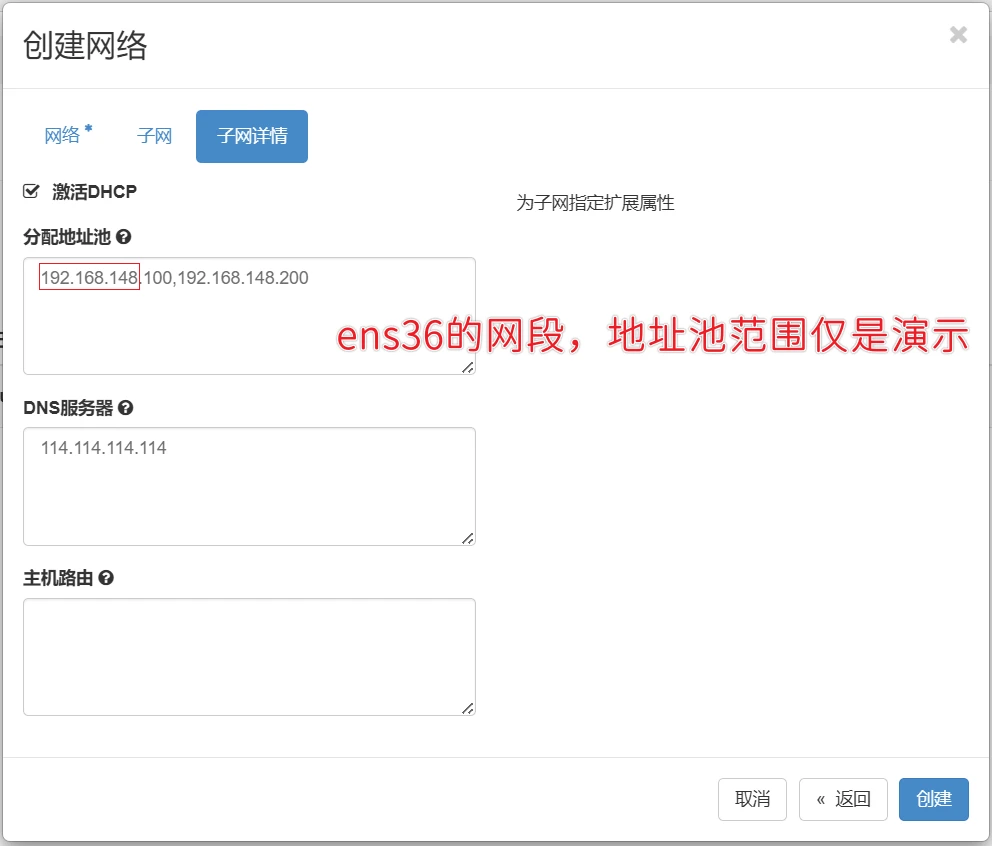
创建外部网络 左侧选择管理员,点击网络,点击网络,右侧点击创建网络。
如果你是按照本文档搭建的,就填provider
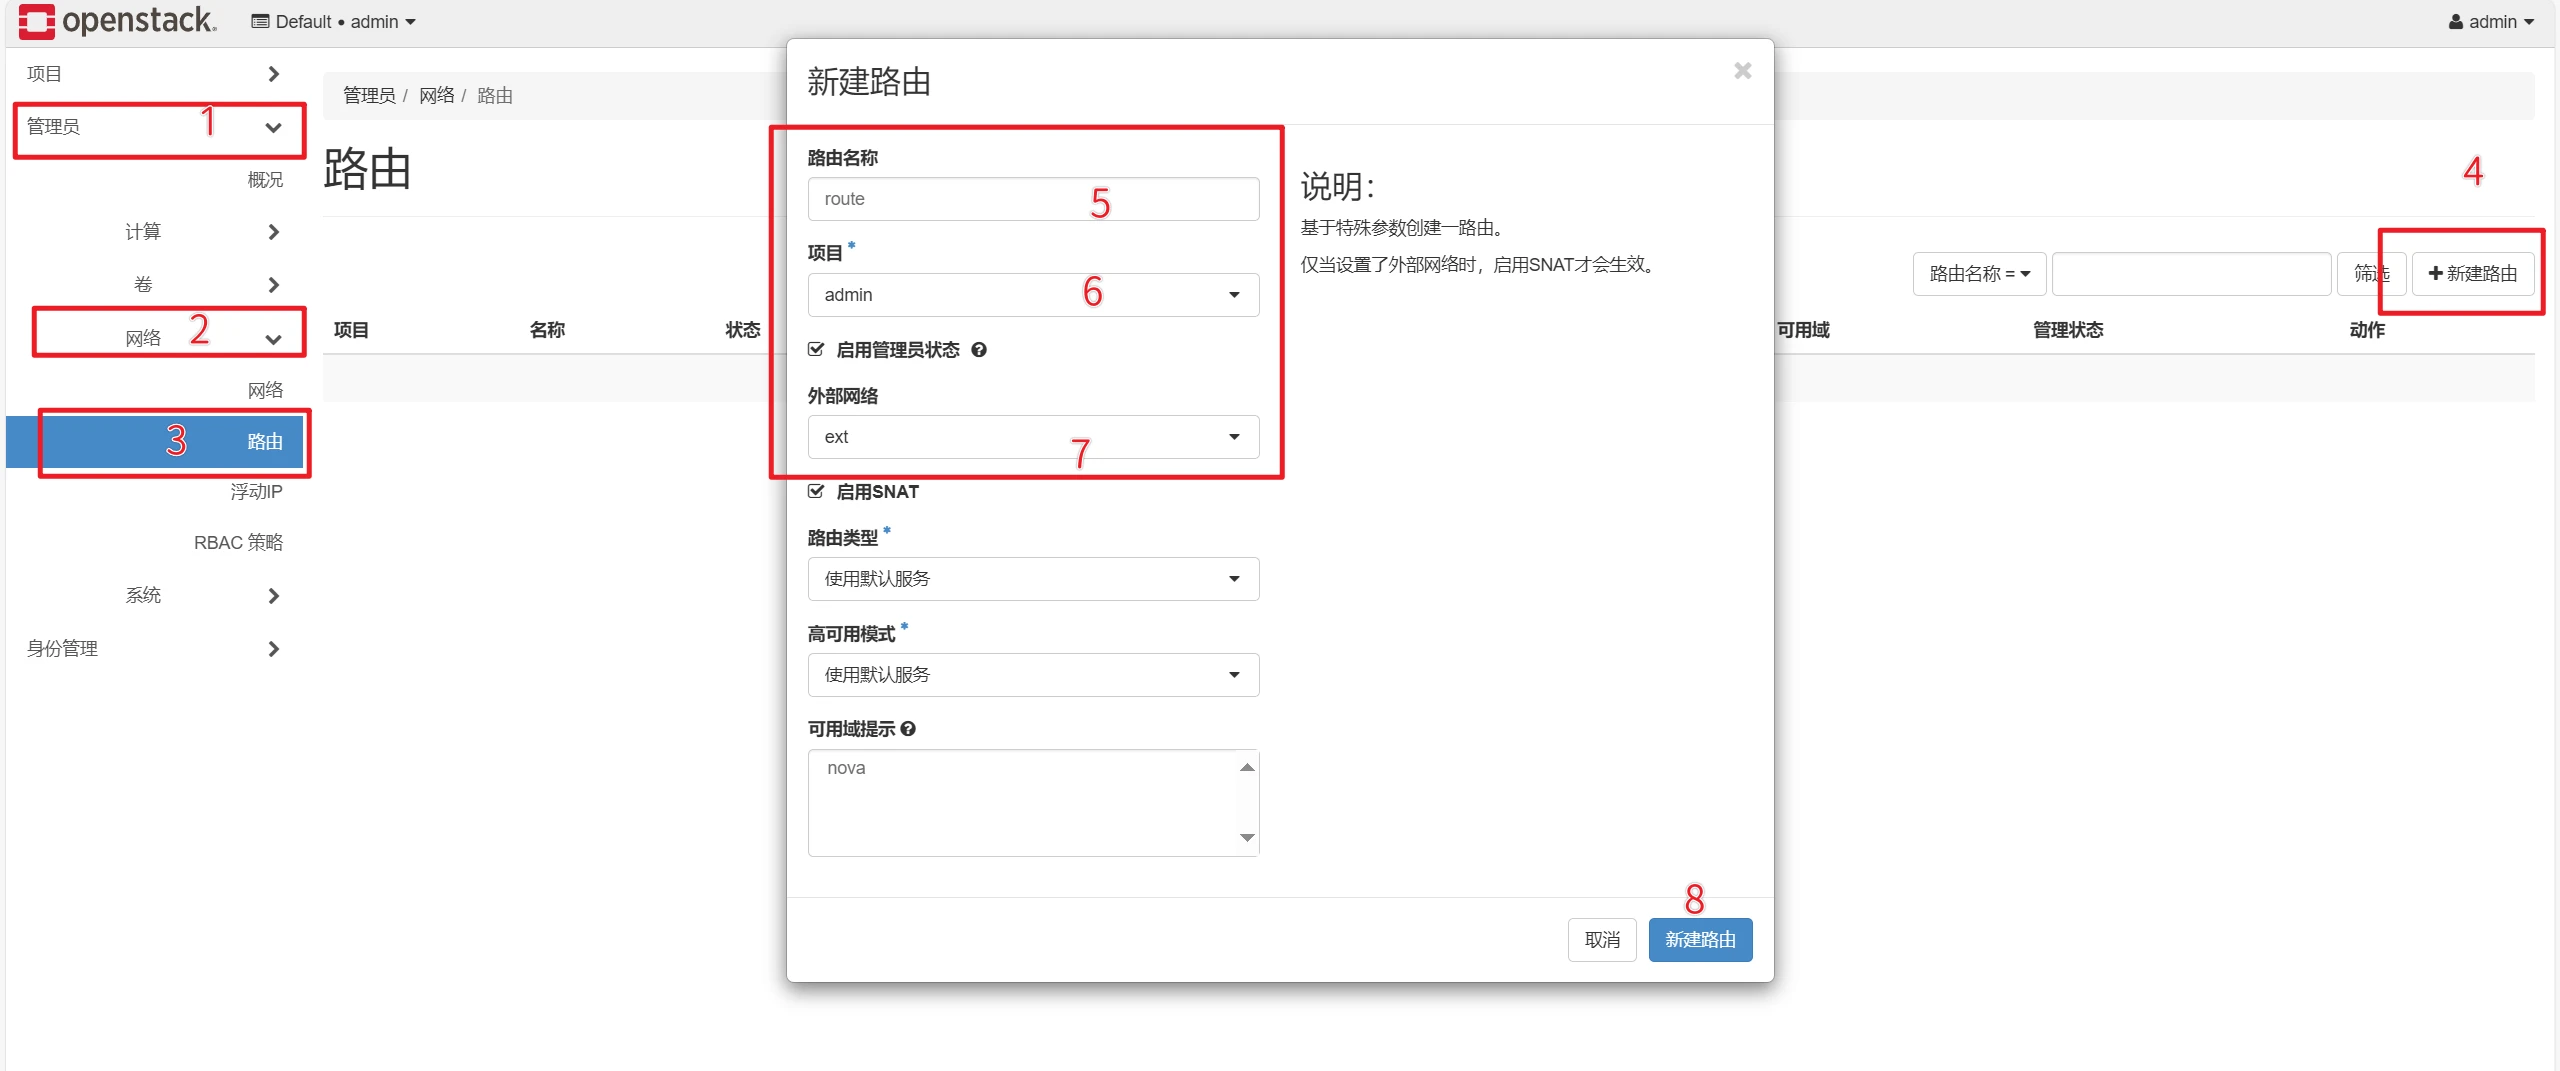
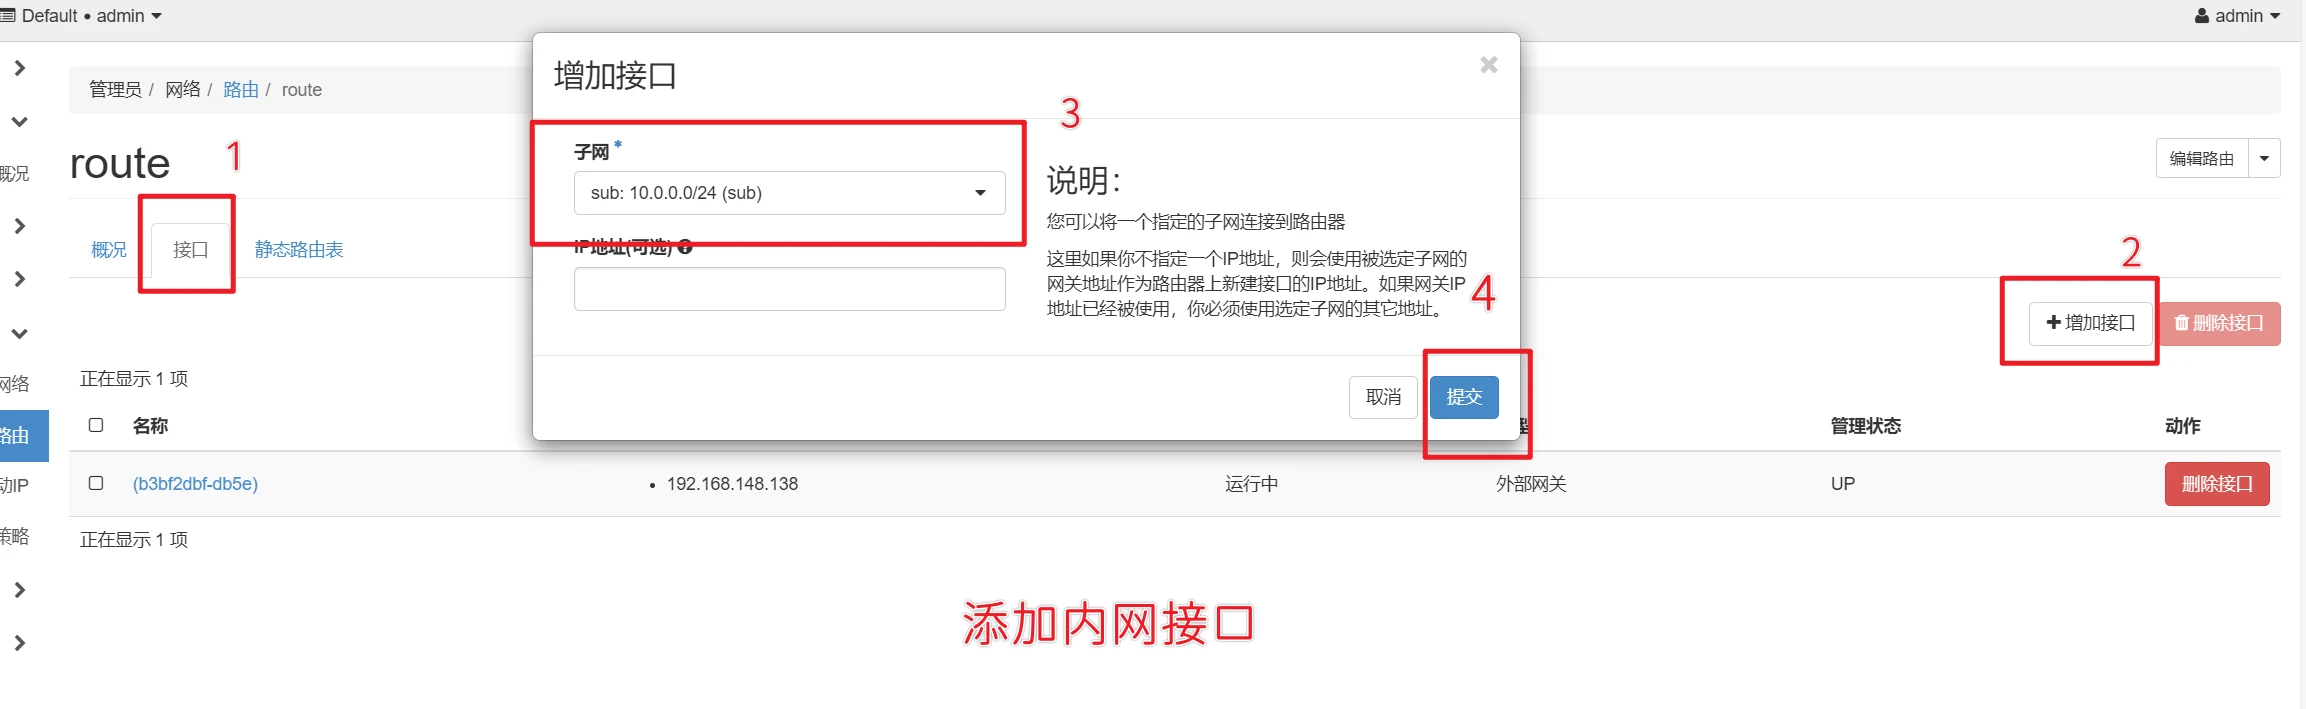
创建路由 左侧选择管理员,点击网络,点击路由,右侧点击创建路由。
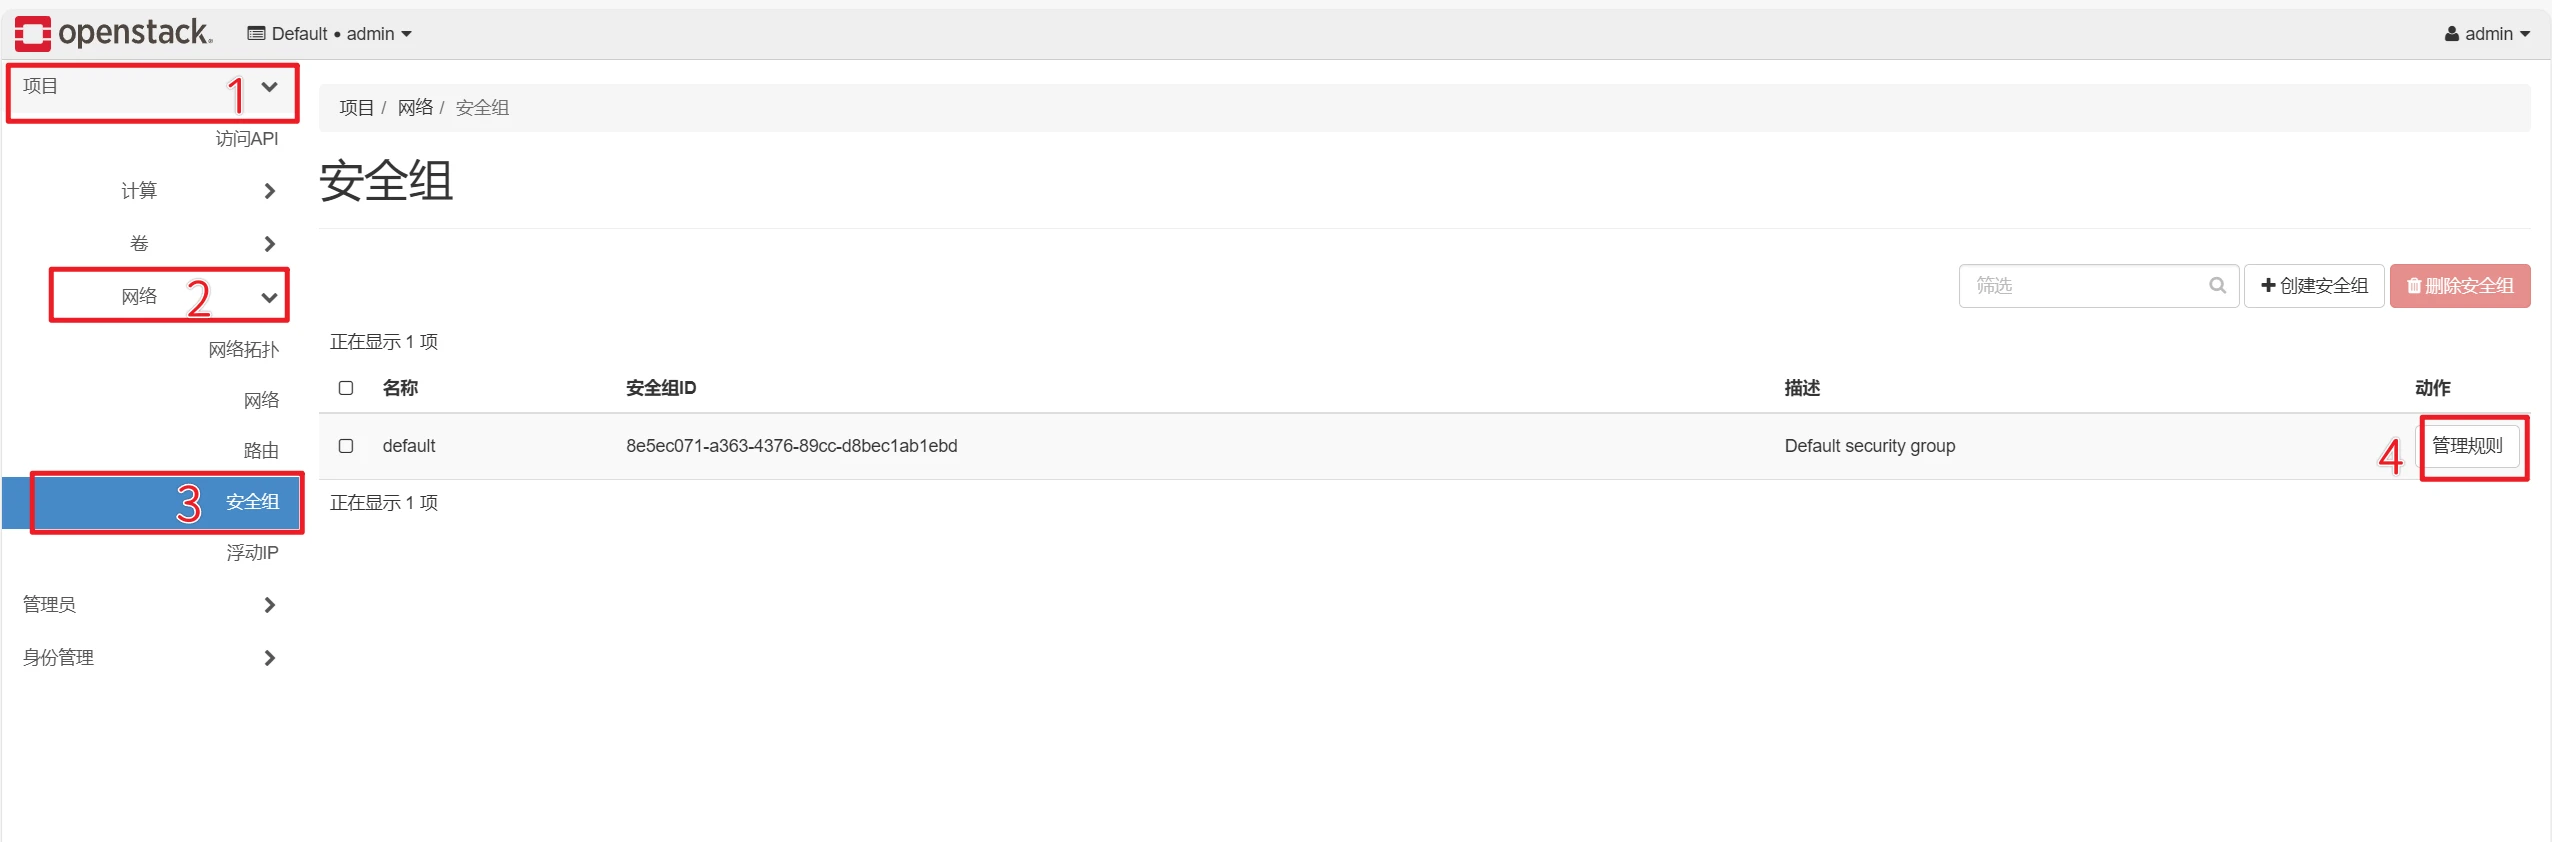
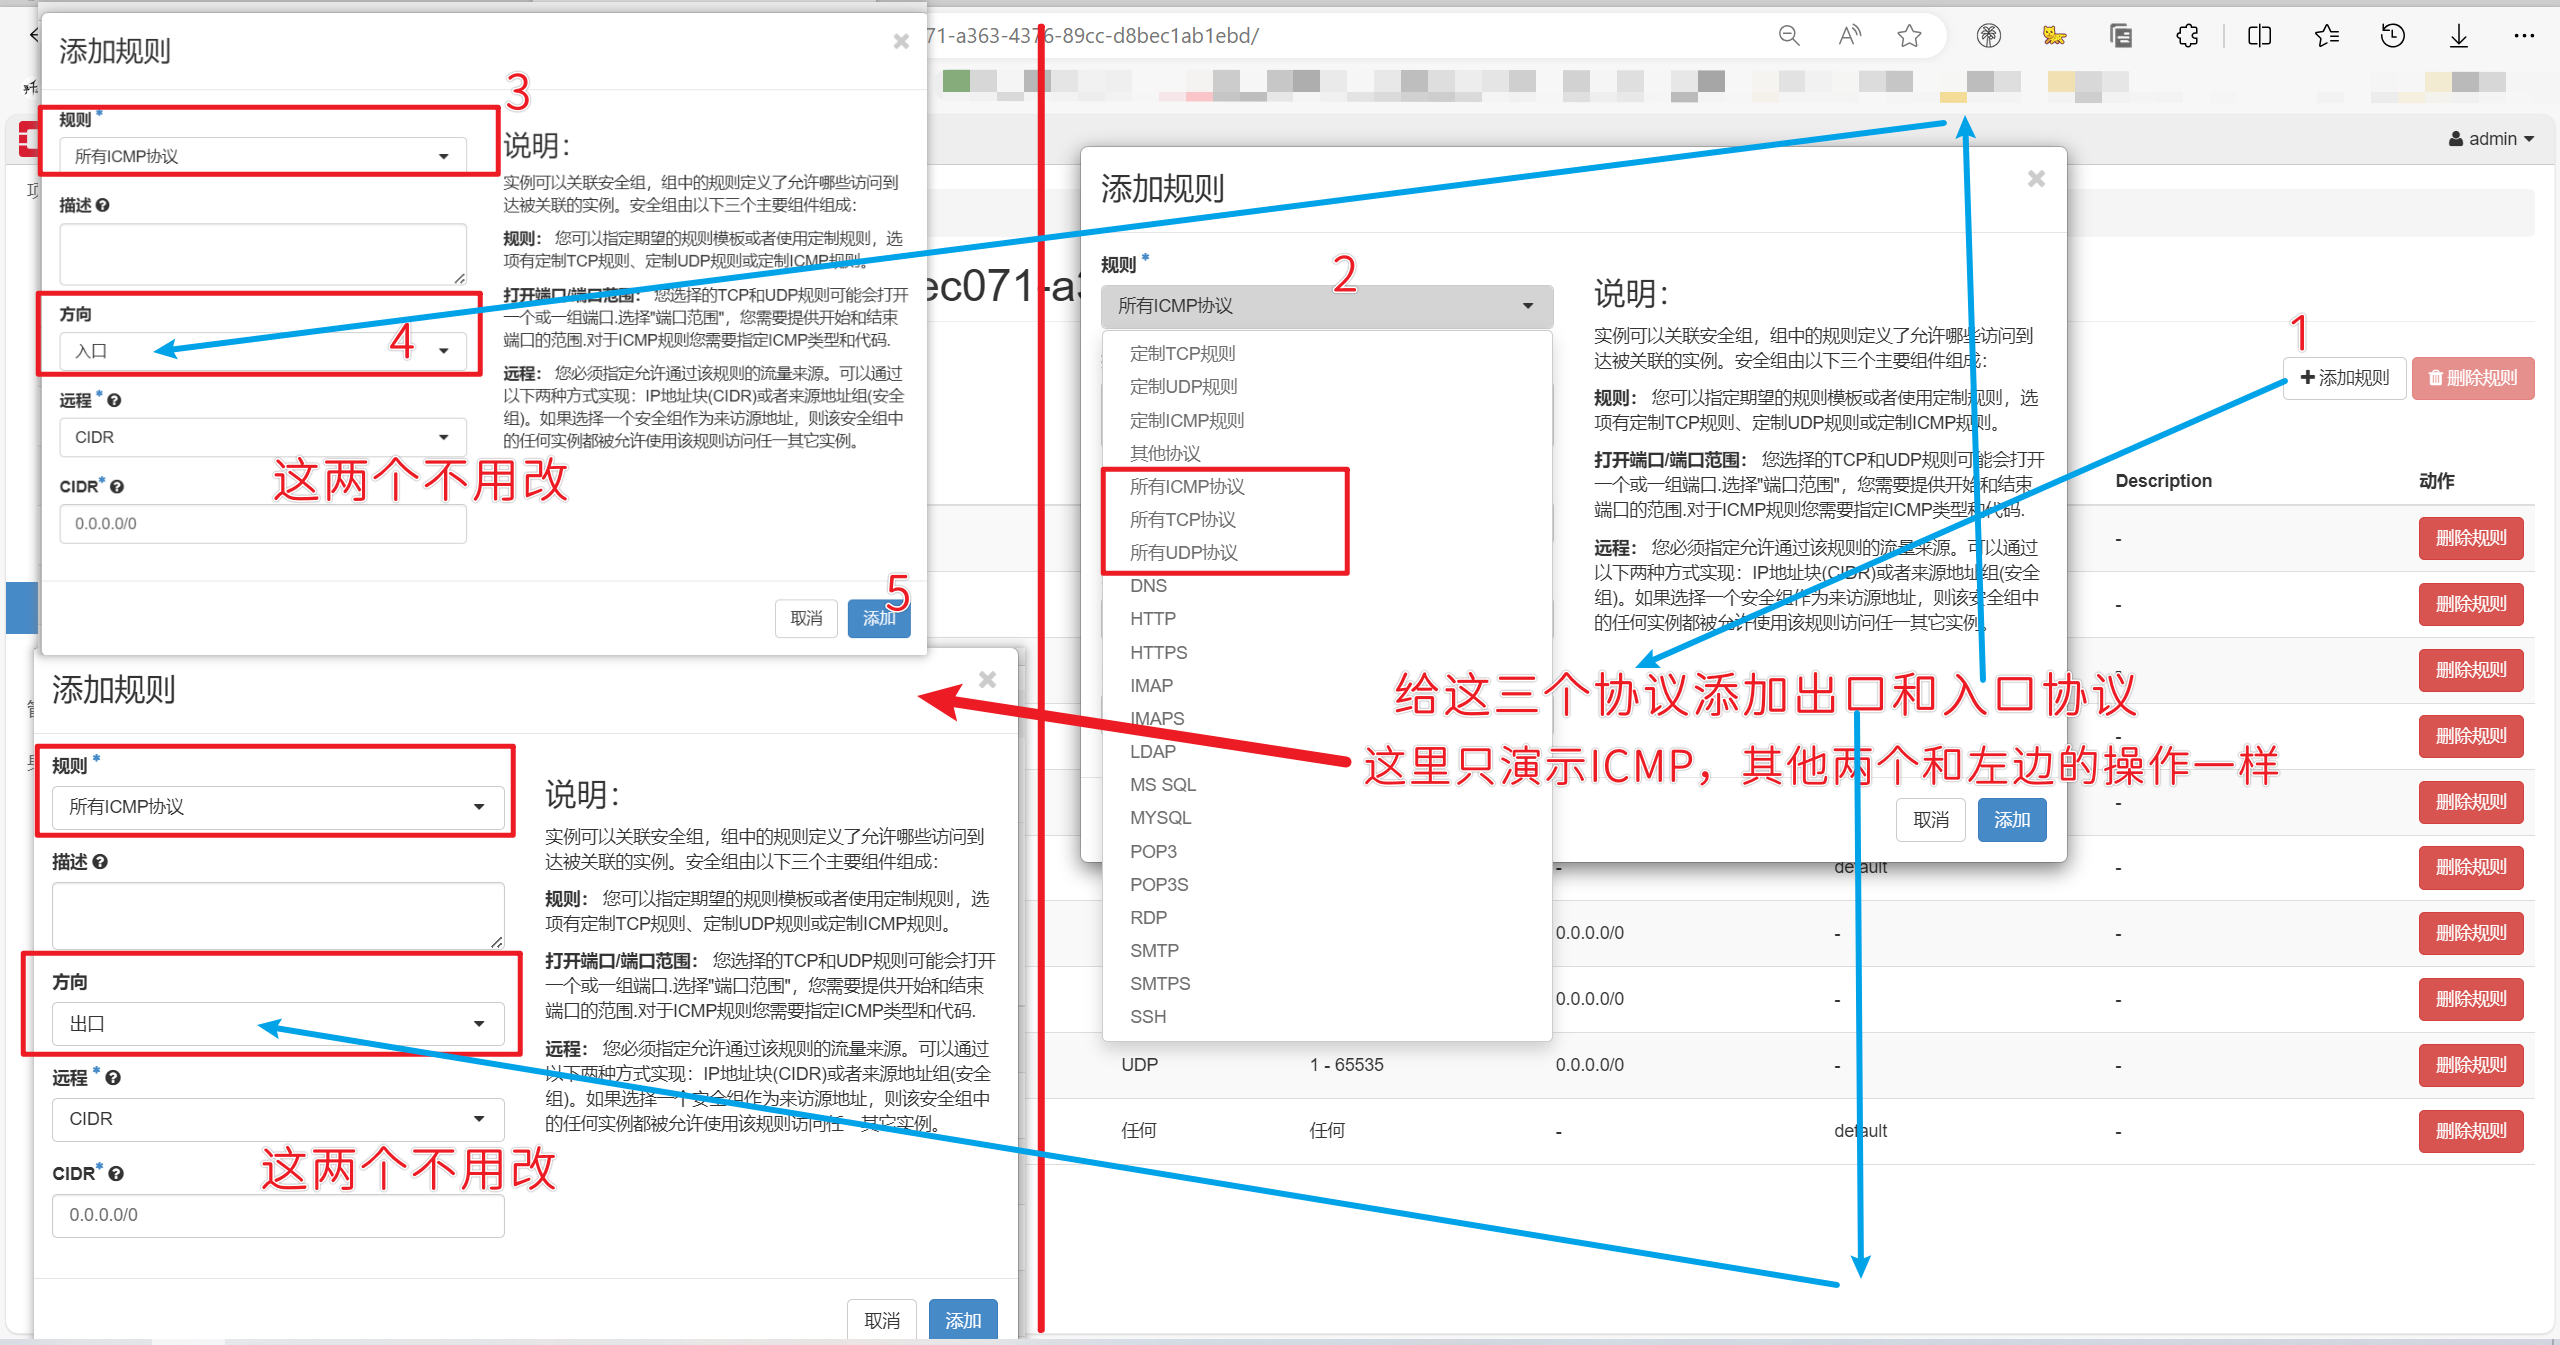
添加安全组规则
最后效果长这样
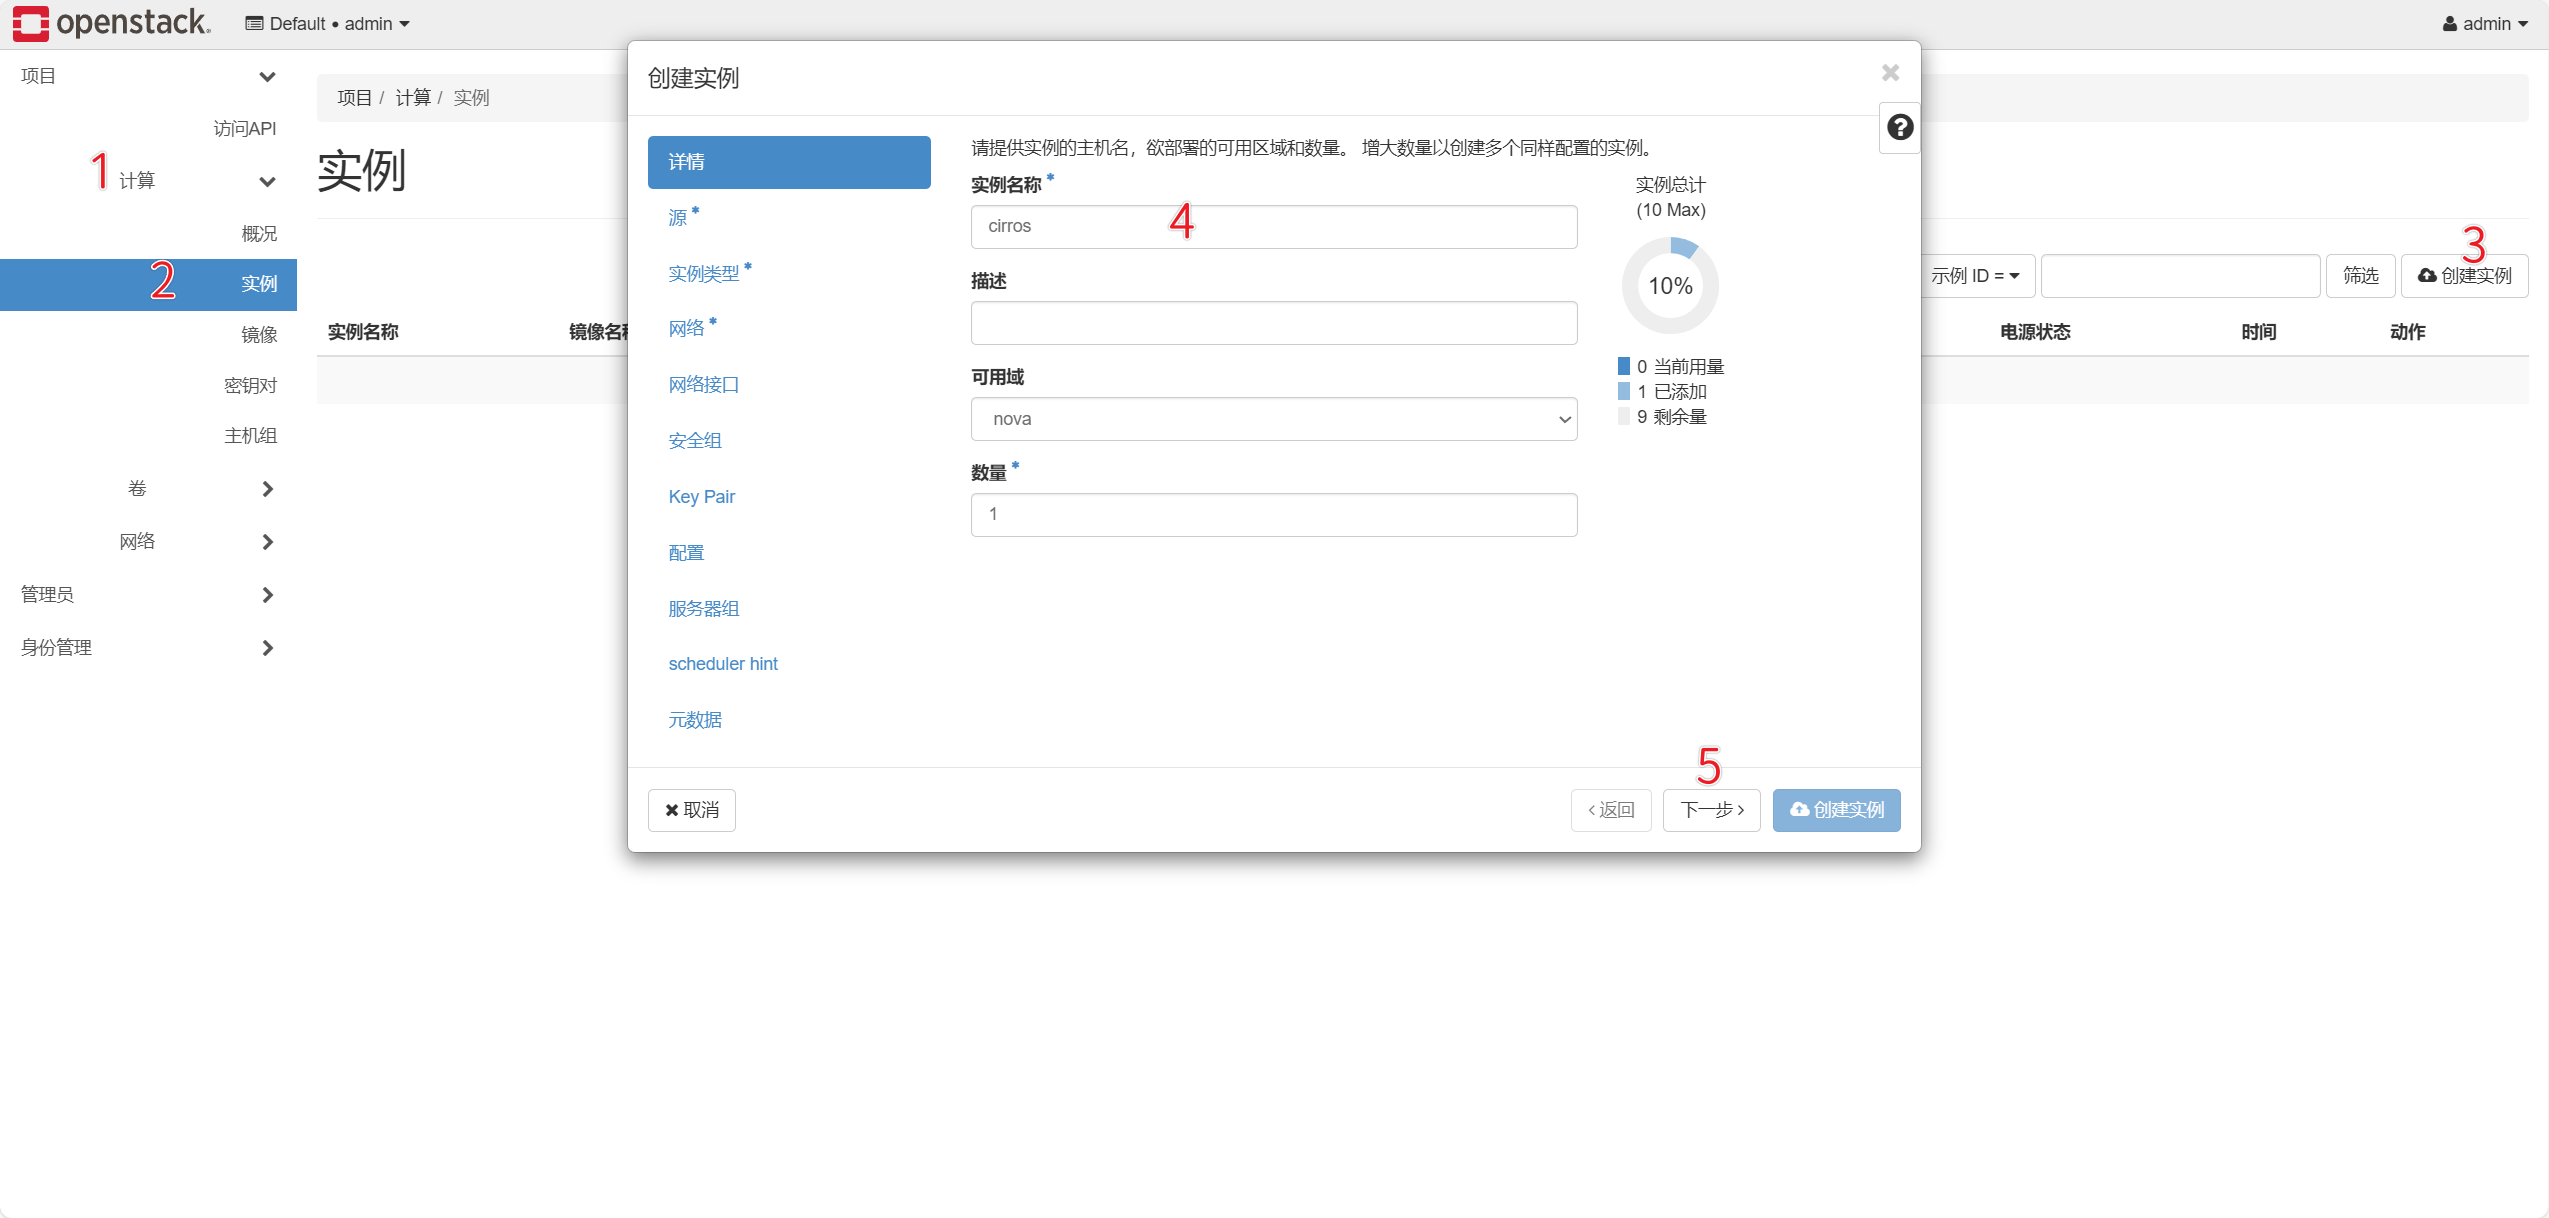
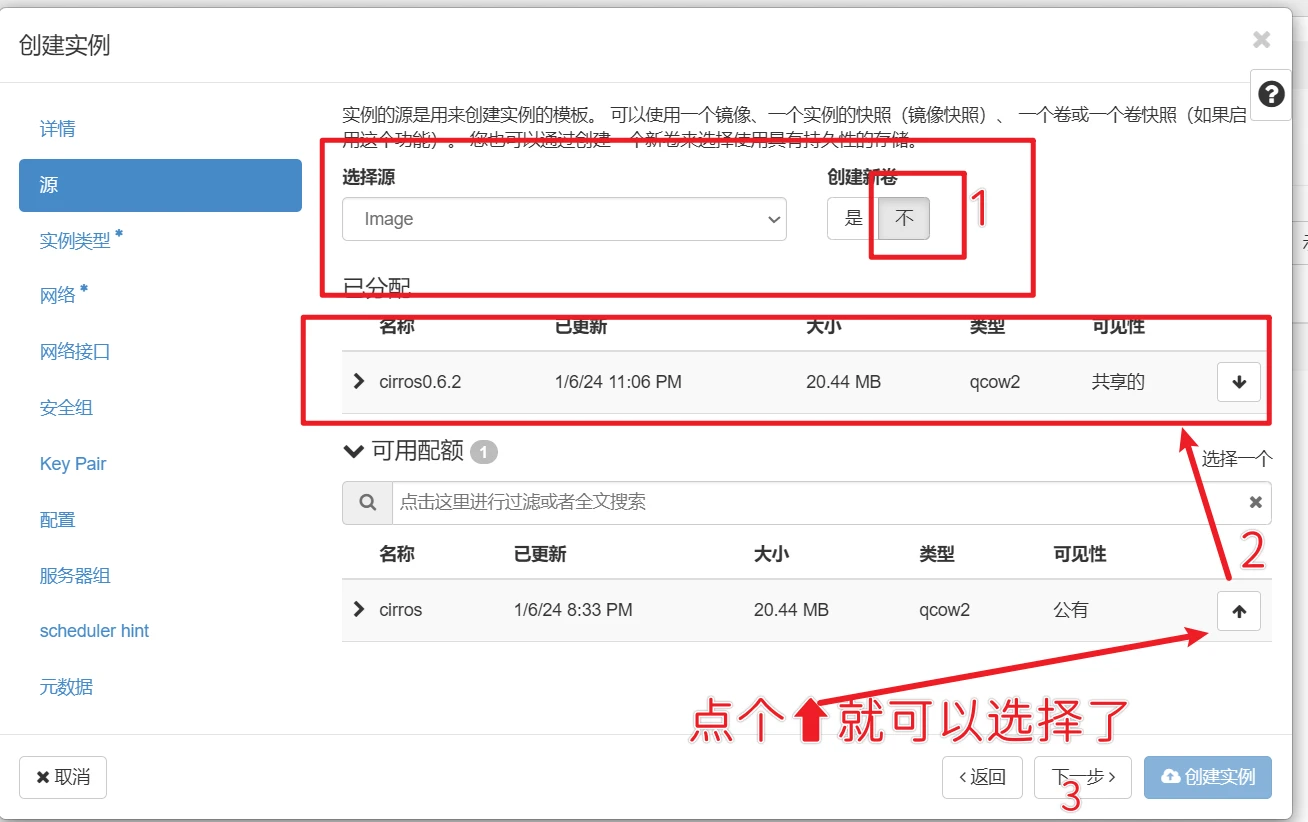
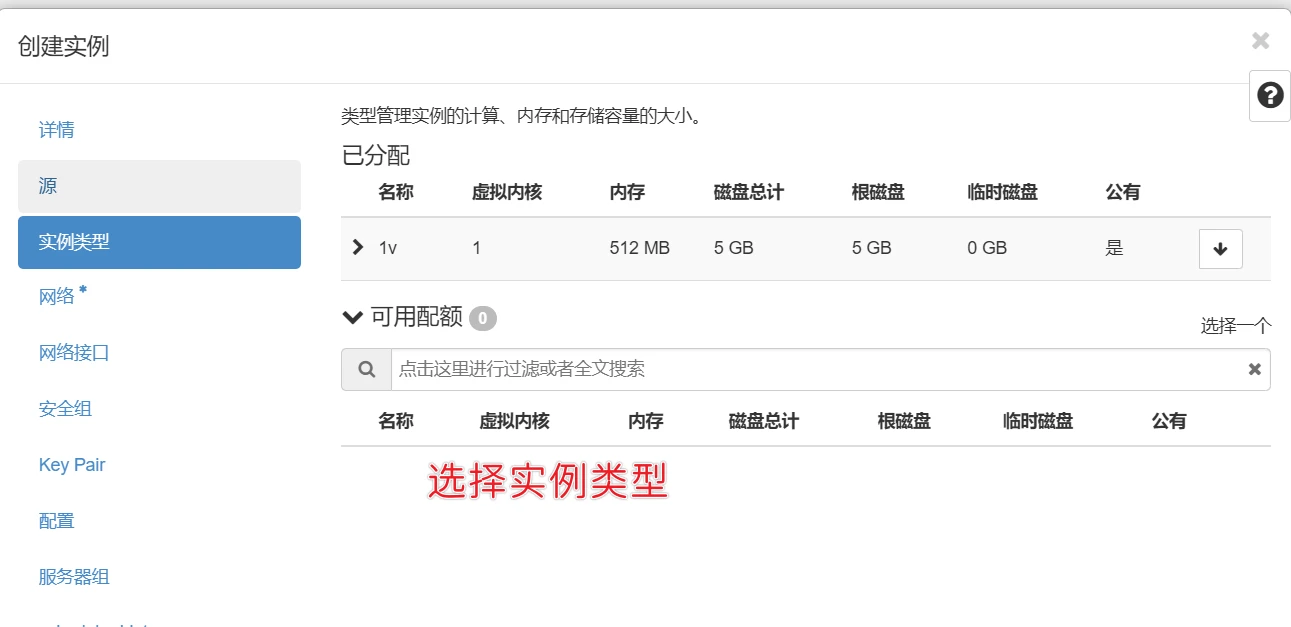
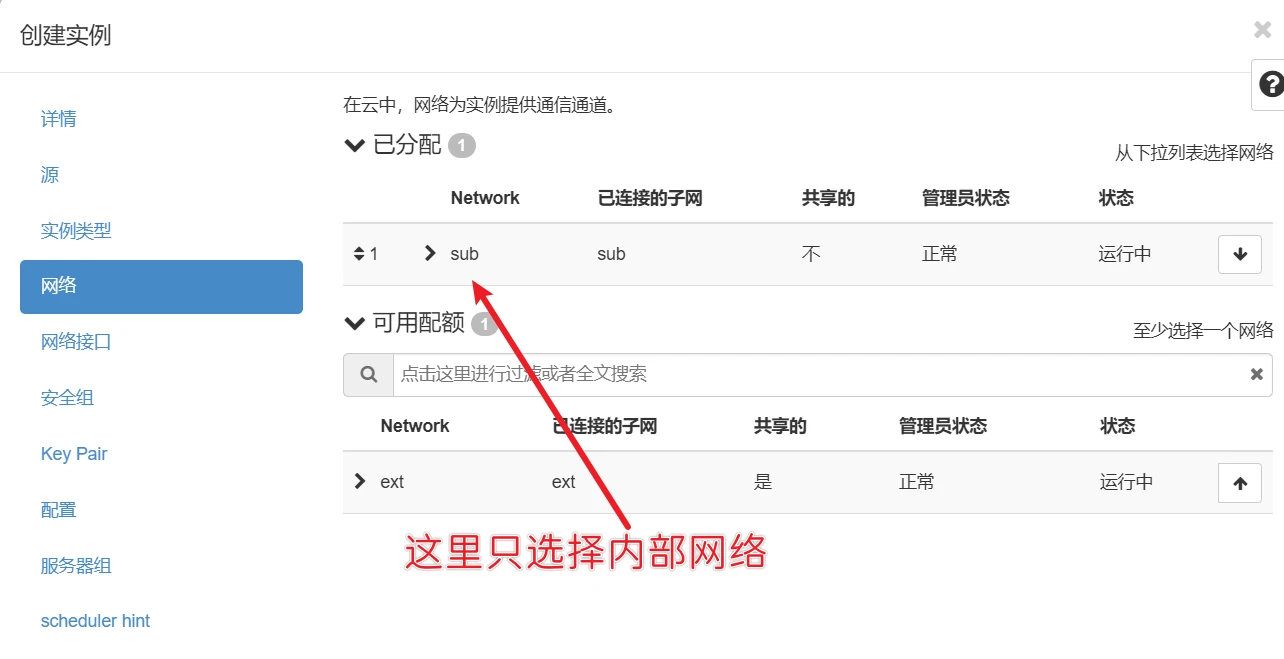
创建实例
然后点击创建实例
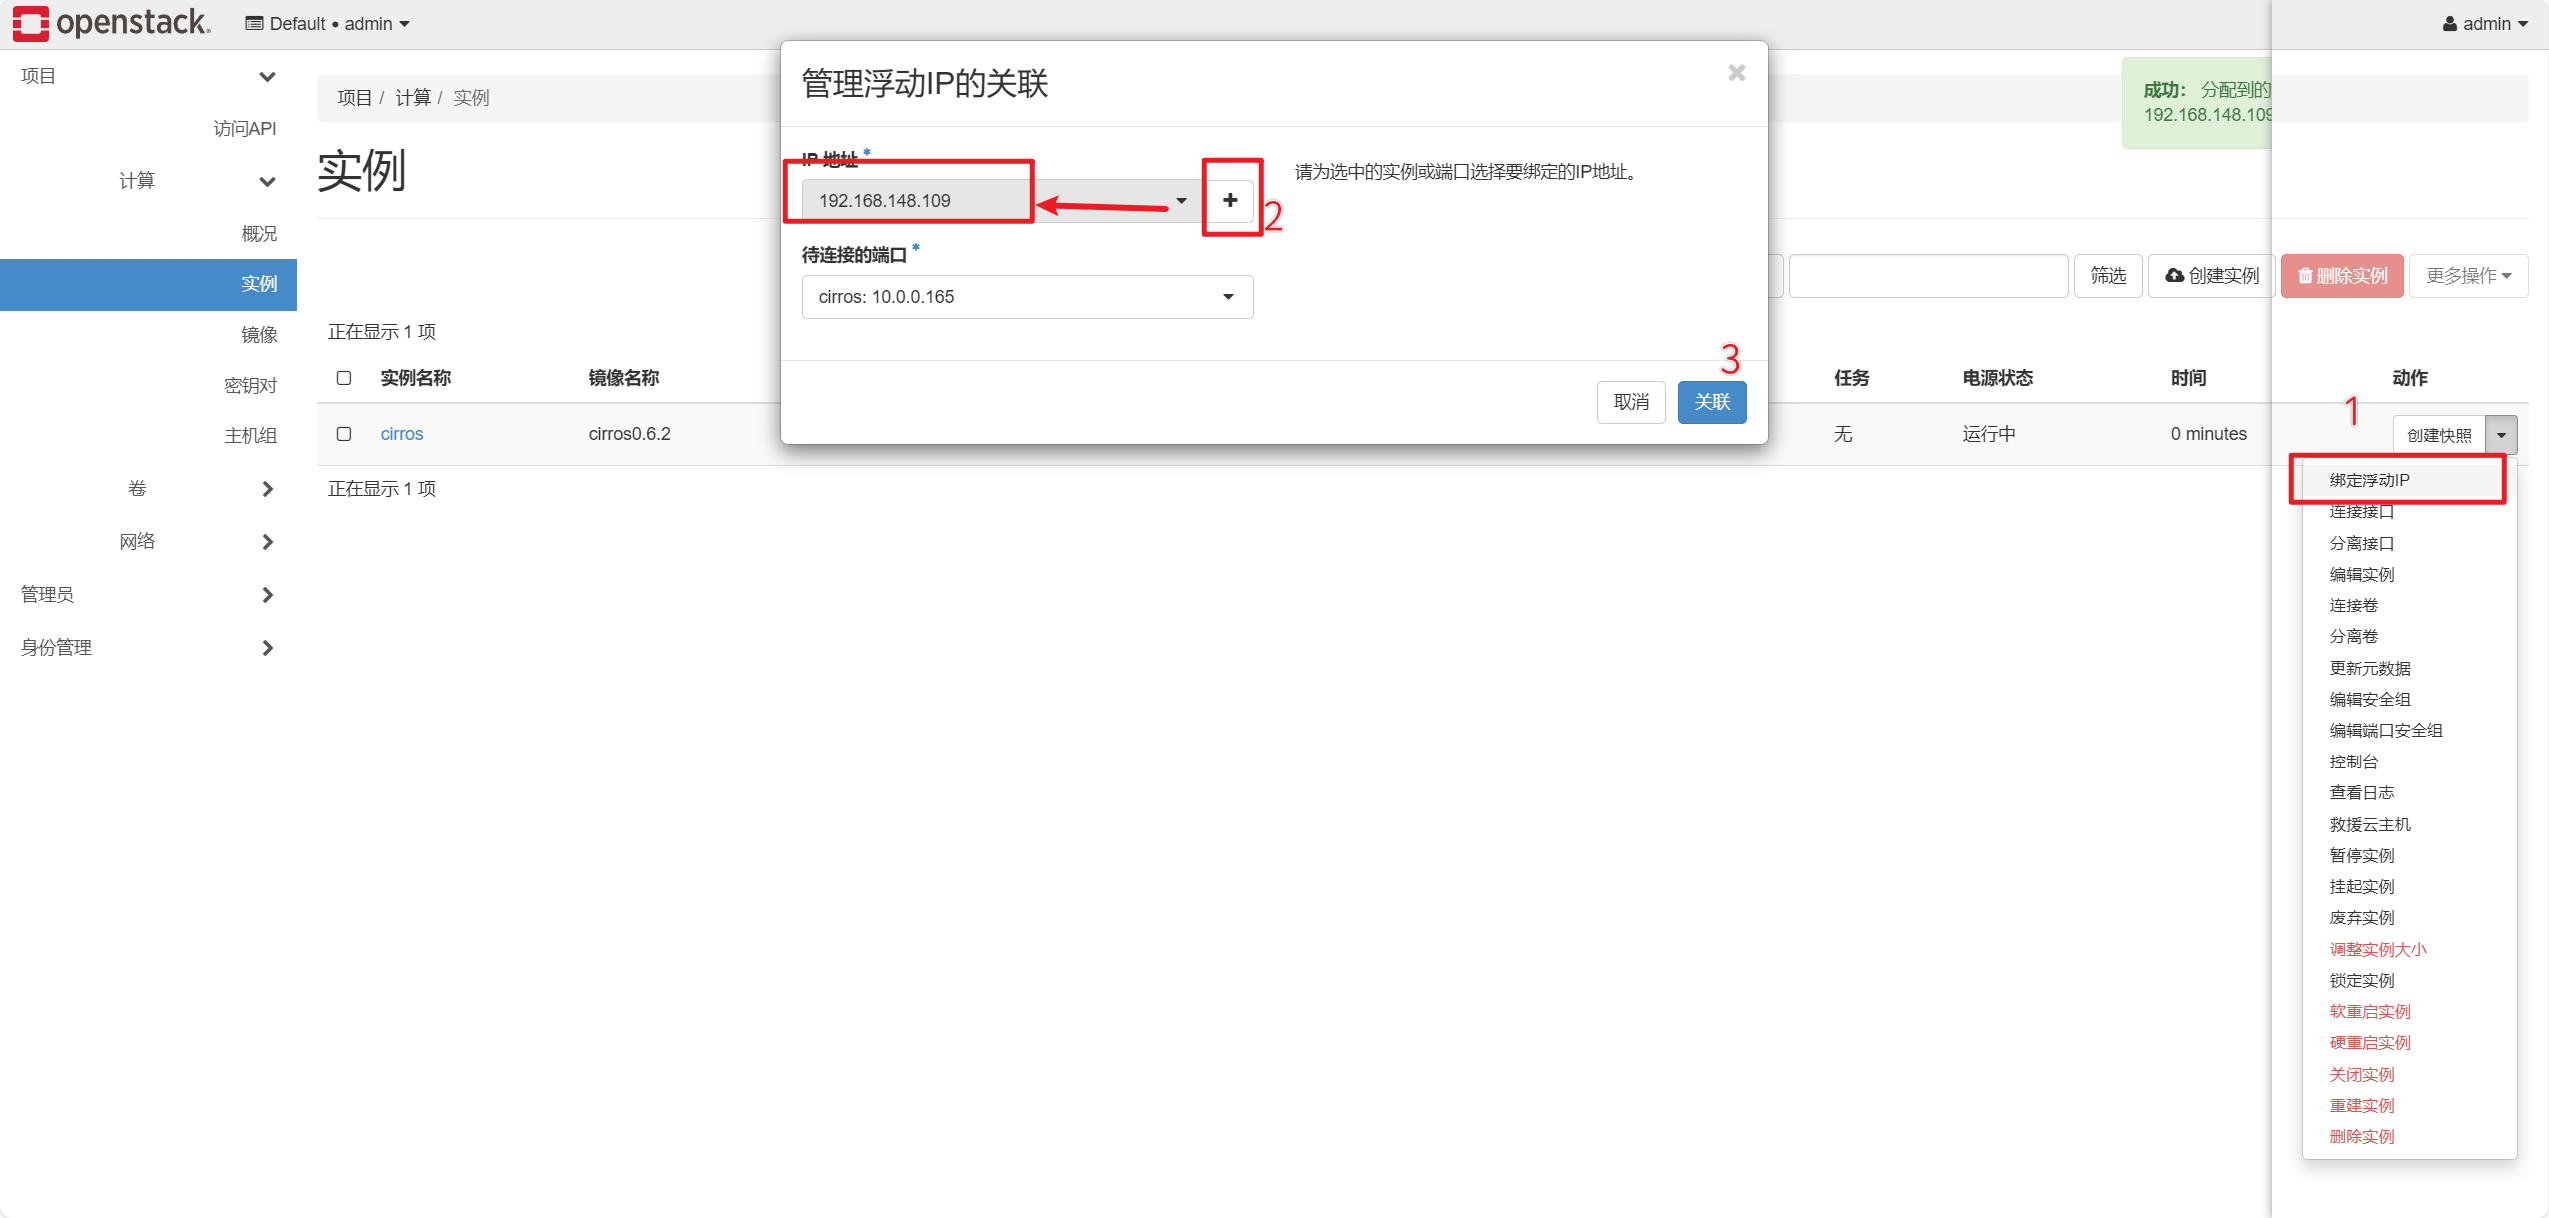
分配浮动ip
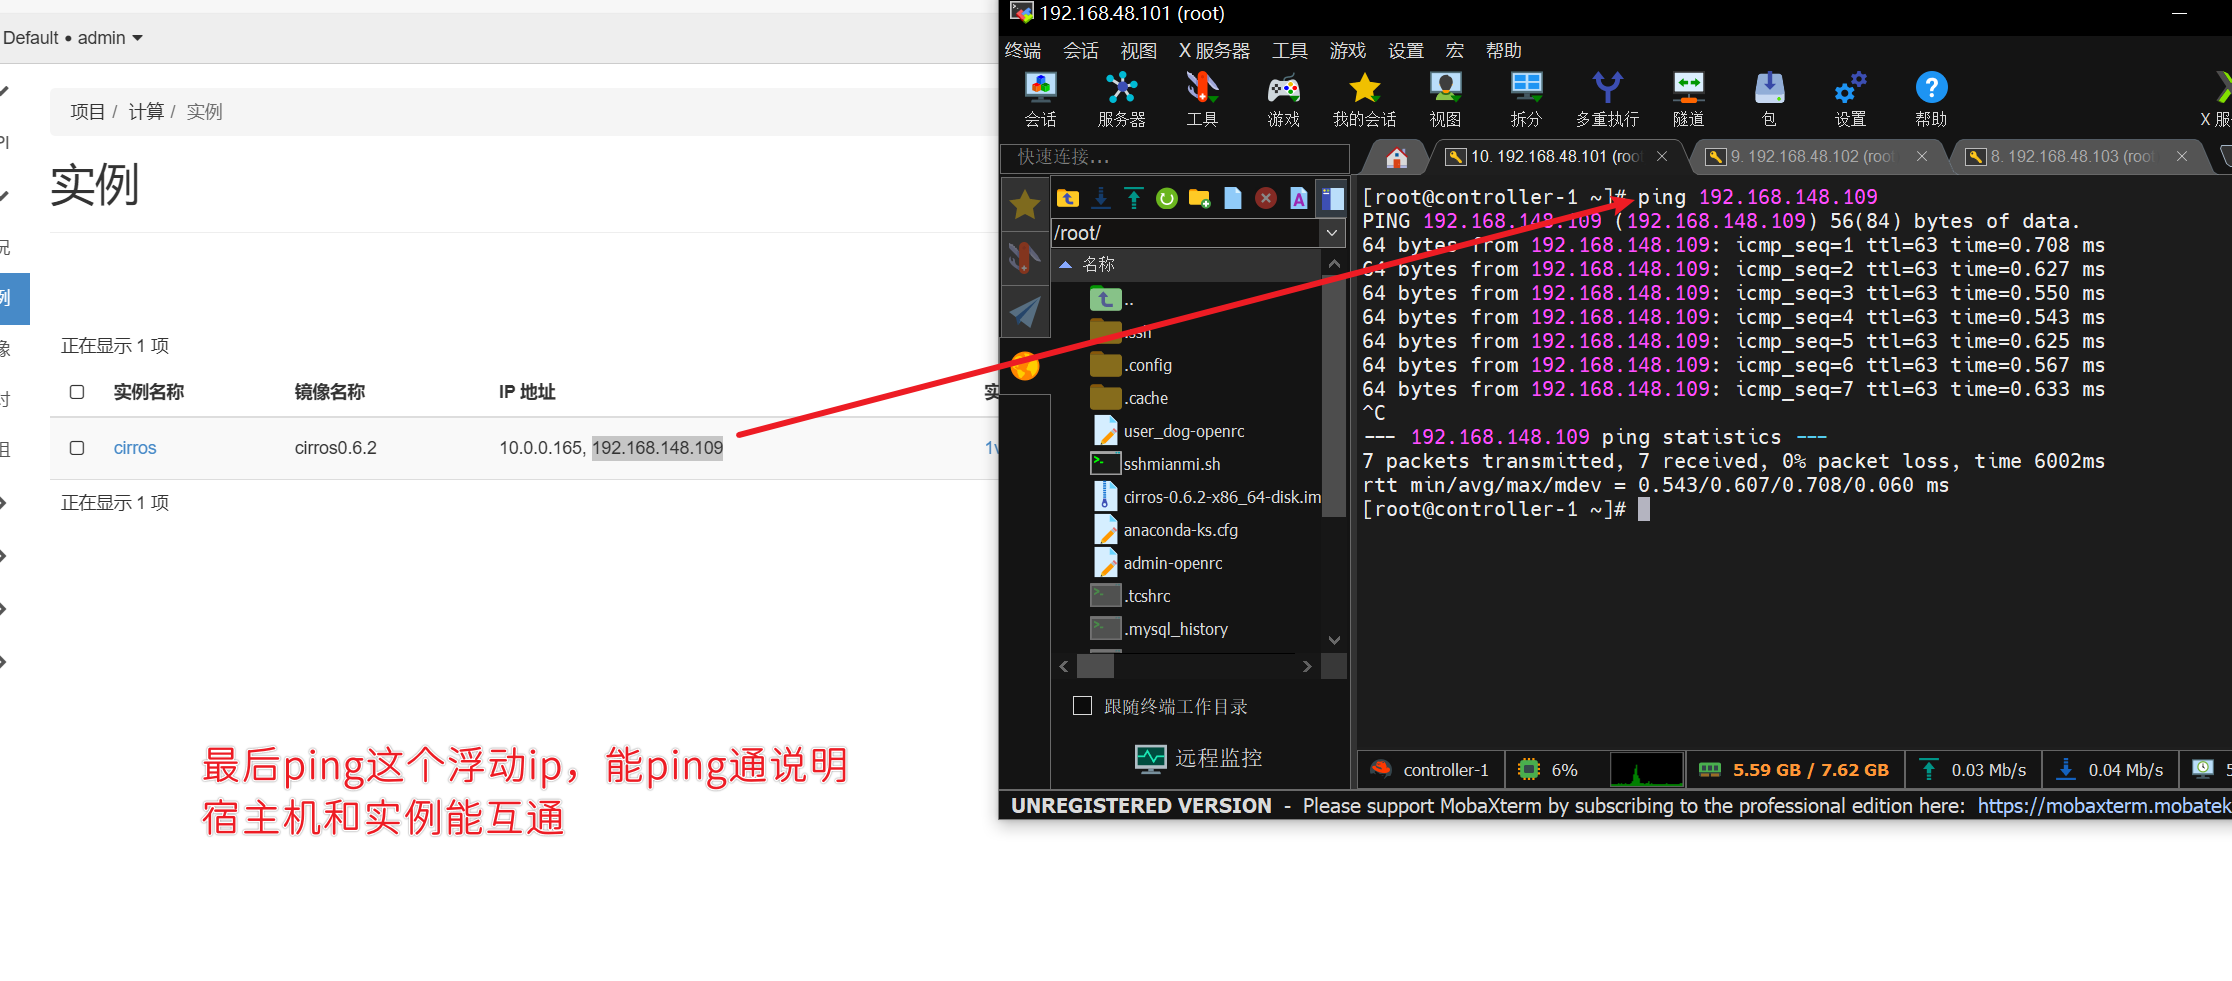
结论:创建实例成功
千屹博客旗下的所有文章,是通过本人课堂学习和课外自学所精心整理的知识巨著